
Contents
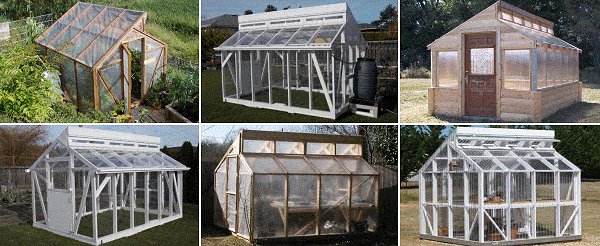
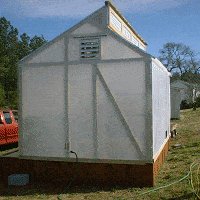
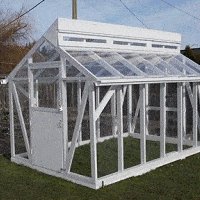
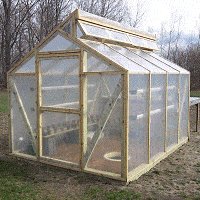
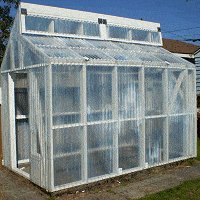
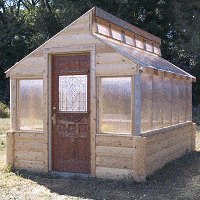
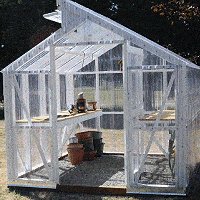
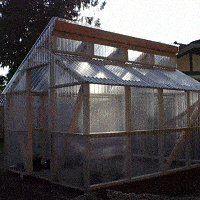
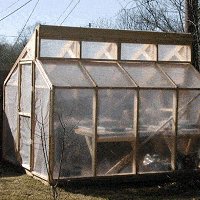
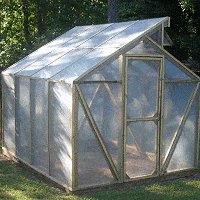
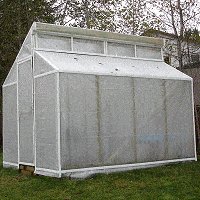
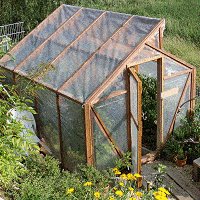
The above picture shows some of the greenhouses that have been built using these plans and instructions.
There are more pictures at the end of this article thanks to the users that have been kind enough to send in a photo or two of their handiwork.
Introduction
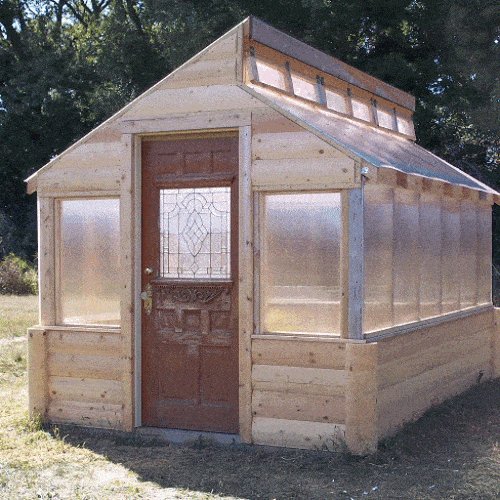
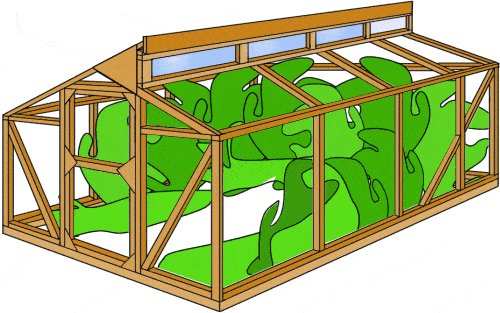
This greenhouse is 8ft (2400 mm) wide by 10ft (3000 mm) and stands 8′ 6″ (2550 mm) off the ground at the highest point.
In this version, the greenhouse frame is constructed mainly out of 2″ x 4″ (100 mm x 50 mm) which is a more common stock (in North America, anyway) than the 2″ x 3″ (75 mm x 50 mm) called for in the original version. We will talk more about wood stock sizes a bit further down the page.
Other modifications include a wider door to allow for a wheelbarrow if need be, and a bit more inside height. See, we do listen to feedback.
On page 12 You can view some greenhouse photos sent into us by people who have used these plans.
Photos of other peoples handiwork are always a good source of help and inspiration.
Greenhouse
$5.00
|
Description
This greenhouse consists of a wooden frame suitable for a cover such as a clear UV-resistant polythene film.
It is 8ft (2400 mm) wide by 10ft (3000 mm) and stands 8′ 6″ (2550 mm) off the ground at the highest point.
There are two opening windows that span along the very top of the greenhouse and a door at either end (optional).
The greenhouse basically sits on the ground and is held in place by a few stakes around the bottom that are hammered into the ground and nailed to sides of the base.
It could be fixed more permanently if required without too much ado, and would probably need to be, if positioned anywhere other than a sheltered area.
It is ideal for areas that have just enough winter frosts to be annoying.
Where to place the greenhouse
Choose a place likely to get the winter sun. The greenhouse should not be placed in a potential boggy area without drainage.
If the site is a low lying area, then it might be necessary to put in a drain (open, tile or metal) to re-direct any water flow away from the greenhouse site.
Wood sizes and measurements
This projects is in both imperial (inches) and metric (mm).
All measurements are given in inches first followed by millimeters (mm) in brackets ().
The size of the framing wood referred to in his project is the actual size, which is the size of the wood after it has been dressed (smooth, planed, finished).
When the wood is dressed, the actual size is then less than the nominal size.
For example: 2″ x 4″ (100 mm x 50 mm) when dressed may be 1 1/2″x 3 1/2″ (90 mm x 45 mm) actual size. The actual sizes can vary slightly from place to place.
Note: The imperial sizes are not an exact match to the equivalent metric sizes. A structure built using the imperial measurements (ft and in) will be approximately 1.6% larger than the same structure built using the metric (mm) measurements. The imperial measurements are more suited to North America. The metric measurements are more suited to Australasia.
About the angle cuts
There are two different angle cuts required for this project. One is 30 degrees off square, the other is 60 degrees off square.
To cut the 30 degree angle, simply set the blade on your miter saw to the required angle. The 60 degree angle will have to be cut with a circular saw, as miter saws will not do such a cut.
There is a 30 degree and a 60 degree angle pattern on page 11.
You will need
- Around 330ft (100 meters) of 1 1/2″x 3 1/2″ (90 mm x 45 mm) treated, or natural decay-resistant wood for the frame. Some will need to be ripped down for parts of the windows and doors.
- 36ft (11 meters) of 4″ x 4′ (100 mm x 100 mm) treated for the base (sawn wood will do).
- 10ft (3 meters) 3/4″x 7 1/2″ (190 mm x 19 mm) treated board for the fascia.
- I sheet of 4ft x 8ft x 3/8″ (1200 mm x 2400 mm x 10 mm) treated plywood for the gussets.
- 350sq ft (30sq m) ultra-violet-resistant polythene for the covering.
- You will also need miscellaneous such as nails, galvanized plates, strapping, hinges, handles, latches etc.
Step 1. The greenhouse base
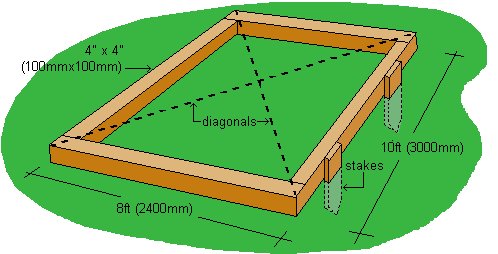
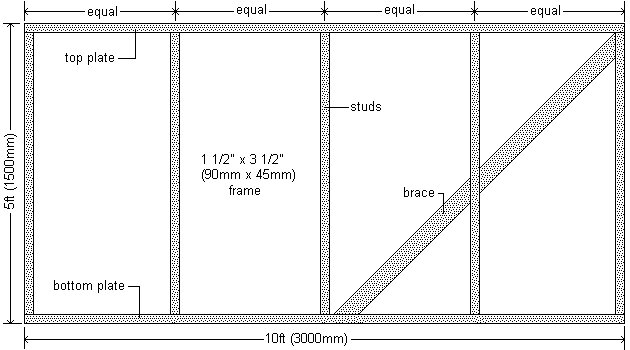
Use 4″ x 4″ (100 mm x 100 mm) treated, or natural decay-resistant, sawn wood to make the base.
Make a rectangle 8ft” x 10ft” (2400 mm x 3000 mm) as shown in the drawing above. Fix the wood together in the corners by using galvanized nails and nail plates.
Before you site (position) the base, make sure the ground where the base will rest is level and firm.
Use a level or a water level to check the grade, and dig accordingly to level the ground directly beneath where the wood will be sitting.
Go to here for an article on ‘how to make and use an inexpensive water level’.
Check that the two diagonal measurements are equal. If they are not, make any necessary adjustments. When the diagonals are equal, then the base is square.
Secure the base in place by driving stakes into the ground around the perimeter.
Nail the stakes to the base and cut flush any stakes protruding higher than the base wood.
Step 2. The side wall-frames
Construct all the framing out of 1 1/2″ x 3 1/2″ (90 mm x 45 mm) treated, or natural decay-resistant wood.
On a flat surface, make up the two side wall frames to the dimensions shown in the above drawing.
Make the diagonal measurements equal (in the same way as with the base in Step 1), and when the frame is square, cut and fix the bracing members in place. (See above drawing.)
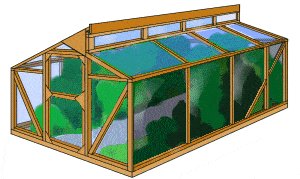
Step 3. The roof frame sections
Make up five roof sections that span from side-wall to side-wall. Refer to the plans and instructions below.

Cut all roof frame pieces to the dimensions given above.
Use 1 1/2″ x 3 1/2″ (90 mm x 45 mm) treated, or natural decay-resistant wood.
In all, cut 5 long rafters @ 73-3/8″ (1835 mm), 5 short rafters @ 53-5/8″ (1340 mm) and 5 rafter uprights @ 11 3/8″ (285 mm) all with end angle cuts as shown in the plan drawing.
Also cut five triangular gussets (equilateral triangles) from a sheet of 3/8″ (10mm) treated plywood, with all three sides being 20″ (500 mm) long.
On a flat piece of ground, make up the five roof sections to the pattern and dimensions as shown in above drawing.
Ensure the two furthest points are 8ft” (2400 mm) apart and then nail the triangular gussets in place with galvanized flathead nails spaced every 2″ (50 mm) apart, one gusset to each roof section.
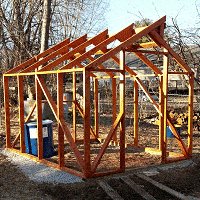
Step 4. Erect the side walls and roof sections
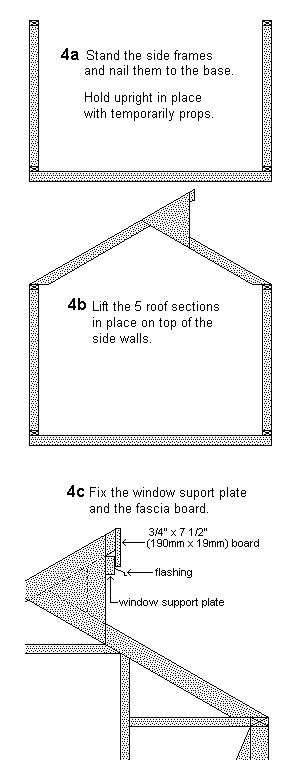
Stand the two side walls upright on the base boards and support them with temporarily props. Fix the bottom plate of the side walls to the base with galvanized nails.
Lift the 5 roof sections in place on top of the side walls.
First position a roof section at each end of the side walls, and then position the other three evenly spaced in between.
Fix the roof frames to the side wall top plate with galvanized nails.
Temporarily prop the two end roof sections plumb (vertical).
Fix the 1 1/2″ x 3 1/2″ (90 mm x 45 mm) window support plate against the top of the rafter uprights. (See drawing 4c.)
Nail the 3/4″ x 7 1/2″ (190 mm x 19 mm) fascia board to the top ends of the long rafters as shown in the drawing, making sure all the roof sections are vertical and parallel with each other.
Tuck some galvanized metal window flashing under and behind the fascia board prior to nailing the bottom of the board.
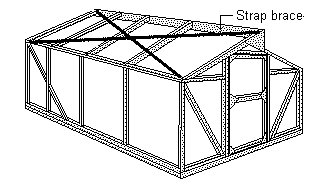
Brace the roof on the side that has no windows with two metal straps running diagonally across the top plane. Nail the straps at the ends and wherever they cross a rafter.
Step 5. The end wall frames
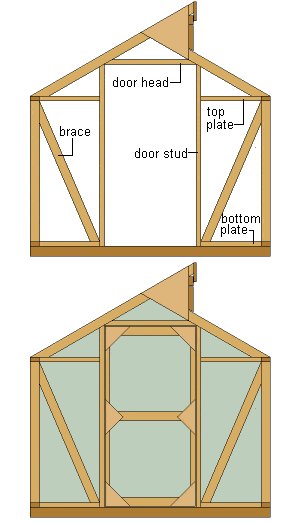
This is pretty much measure, cut, and fix as you go.
Before you start, ensure the side walls are plumb (vertical).
For all wall framing wood, use 1 1/2″ x 3 1/2″ (90 mm x 45 mm) treated, or natural decay-resistant wood.
Cut the door studs to size and fix in place. They should be 36 3/4″ (920 mm) apart to allow for the door.
Cut the door head to size and fix in place. It should be 72 3/4″ (1820 mm) above the base to allow for the door
Cut the top plates to size and fix them in place.
Cut the bottom plates to size and fix them in place.
Measure, cut and fix the bracing members.
Step 6. The doors
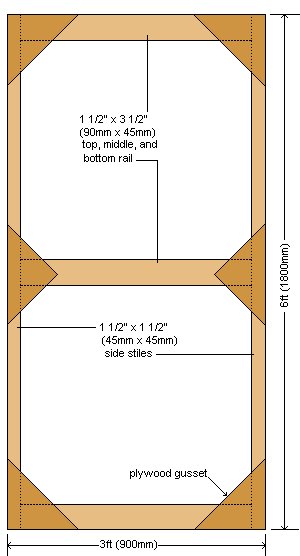
Make two doors as per the dimensions given in the drawing – the front door and the back door.
Make the doors 3/4″ (20 mm) smaller than the opening.
Use 1 1/2″ x 1 1/2″ (45 mm x 45 mm) stock for the stiles (upright side pieces), and use 1 1/2″ x 3 1/2″ (90 mm x 45 mm) stock for the three horizontal rails.
Make the door frames up on a flat surface. Ensure the frames are square and then nail the gussets in place on both sides of the doors.
Hinge the doors in place and fit handles or padbolts of your choice.
Step 7. The windows

For the windows use 1 1/2″ x 1 1/2″ (45 mm x 45 mm) treated or natural decay-resistant wood for the top and bottom horizontal rails and 1 1/2″ x 3 1/2″ (90 mm x 45 mm) for the side styles and middle mullions.
Angle cut the bottom of the window frame 30 degrees (the same pitch as the roof).
Make two windows as per dimensions above. Fix them in place with two butt hinges on each window screwed to the top rails of the windows and the window support plate.
Fit a window latch to each window.
Measure, cut and fix a row of blocking below the windows and in between the roof frames as shown on the above drawing.
Step 8. The greenhouse cover
Cover the greenhouse with a UV-resistant polythene (there are other options also).
Hold the covering in place by laying thin battens (strips of wood) over the polythene (ensuring the polythene is taut) and nailing the battens to the greenhouse studs, roof rafters or any other solid member.
Cover the doors and windows also.
Most hardware merchants or garden suppliers only stock the standard plastic polythene that is not UV resistant but they should be able to advise you where to get the polythene required for the greenhouse covering.
There are also other options such as acrylic sheet.
A 30° angle pattern and a 60° angle pattern


Your project photos


Summer of 09 we built my greenhouse from the plans on this site. We modified a bit for the height and made it fit the foundation that was in place. It was a lot of work but it came out so good, I have it filled with plants now and loving my time inside. Thanks for posting the plans
Janet
I Would like to give you credit for your greenhouse plans. I built one that is 10′ X 16′ . I enclosed it with Solex panels. My wife and grandmother just love it.
Again I would like to thank you for your free site.
Thank you for your site, Louis Jones Townville, SC USA
I just wanted to send along pictures of two recent Buildeazy projects that I completed.
My wife and I love to spent time outside in our ever expanding garden so we thought a greenhouse, using your plans, would be a great addition to our planting hobby.
The greenhouse plan was simple, well laid out and easy to understand. I am sure that we will enjoy it for many years to come.
The second project was a pair of adirondack chairs.
I searched the web and viewed many different styles of adirondack chairs, yours however was most like the chairs that I remember from years ago at a family lake house.
I used several pieces of 1x12x12 cedar that I had in storage to complete these chairs and side table.
After finishing with 3 coats of clear satin spar varnish they are not only good looking but will hold up to the elements for years to come.
We are currently searching your plans for our next project. Thank you for providing such a great website!
Kevin and Valerie Cowan Upstate South Carolina
Hi there
Here is a couple of pics of realized projects from your great site,(I’m sure it wont be the last)!!! The swing-seat is a great shady place to relax and enjoy a nice and cool Bavarian Beer on a hot summer day.
Also a picture of our Greenhouse. It works really good.
Costs were around 160,- Euro.
Thanx Alex & Stefan
Walchsing, Bavaria.
Hi
Just a few photos of the greenhouse I built according to your plans last fall. Only modification was to add 6 inches to the wall height. Did not have treated lumber for 2 by 3’s so stained it with a green preservative (copper napthenate). I covered it with a clear (translucent) woven poly.
cheers,
Andrew
I saw the picture of the garden bridge, so I thought I would send in two pictures of my greenhouse I built with your plans.
I am in America, so I had to convert to English measurements. Thanks for the inspiration. We love it!
Mark Hathaway Austin, TX, USA
I have just completed a greenhouse from you plan, and I am very happy with the results,
I used PVC panels rather than Poly. Photo attached,
Ken Taylor
Many thanks for the greenhouse plans, pictures, and suggestions on your website.
I modified the size of the greenhouse to 8′ by 8′, and installed only one door. We’ll see how that works out.
If necessary to increase air circulation, I may have to install a window or two on the opposite side from the door.
It was an enjoyable project, and once again, thanks for laying out the plans and procedures for the untrained!
Rod Partee Rochester, Washington, USA
Thank you for the wonderful greenhouse plan! Since I live in the northern states, I stepped it up and insulated the base and used twin wall polycarbonate for the windows.
This should extend my growing season for all but the two coldest months.
I also extended the length to twelve feet, but left the width at 8 feet.
I extended the rafter tails so I can add eaves to collect rain water.
There is a double window on the end opposite the door for ventilation.
I appreciate your site. Thank you so much.
Amber Christenson Strandburg, SD
Did you use the cross bracing or diagonal bracing in your build on the walls and the roof as specified in the plans or did you omit them and how is your structure holding up if so?
I did not use cross bracing. The walls are very solid. Not only is there log siding, but I also added half inch plywood on the inside half walls, and there is fiberglass insulation sandwiched between the plywood and log siding. This greenhouse is solid and strong. We have some strong winds around here and it doesn’t flinch. My polycarbonate is showing age, but the structure is sound.
Thank you. We live in the PNW and get some pretty strong winds along with a decent snow load in the winter, but I was thinking this build would probably hold up pretty well and extend our 75 day growing season a fair amount longer!
2011 was the year for this project. Thank you for this green house idea. This was really fun to build and we enjoy it very much. We are going to try to grow spinach and lettuce in the rain gutters I’ve attached to the side walls.
If any one else trys this, note that I stapled a piece of plastic to the 2X4’s where the plants may come in contact with the treated wood.
Thanks again,
Jim Morris Fremont, Michigan.
To buildeazy
I enjoyed building the greenhouse. I changed things up a little by making 12′ by 8′ and adding some gutters to catch the rain.
Jim – Victoria, B.C.
Greetings guys,
Here is a photo of my greenhouse project. I considered this mostly an easy build! Although, I’m moderately experienced with construction in general. I built this entirely by myself, with zero (0) assistance from any other person, so it truly can be done solo. The plans are very simple to follow. I spent just under $500 (USD) with all new material (USA Feb 2015).
The house is built to almost exact original dimension in all respect, with the exception of the door. I installed only one door. I used non-treated lumber, but did use Olympic porch and deck stain & preservative before covering. This wood treatment will last the length of the plastic covering, and we will reapply when we recover in 5 years. We used 1/2 gallon of product. The poly is UV rated greenhouse film (don’t skimp here).
A couple of builder’s notes: If you build this solo, make sure to the erect the sidewalls and roof on a calm day. Use 8″ C-clamps to holds things in place as you screw them down. Think it all through before you tackle each step. I used two ladders to stabilize the sidewalls as I screwed them down to the foundation boards. You will have no problems if you go slow and think it all through.
Once you cover the greenhouse, you need to secure the plastic permanently with wooden “battens.” You can do this really cheaply by purchasing a single 4 by 8 foot piece of pressure treated plywood .75 inch thick. You can cut approximately 32 each 1.4 inch wide strips that are 8 foot long. I say 1.4 inch because if you start at 1.5 you end up about 1.4 after the width of the saw-blade eats up part of that 1.5 inch. I recommend you use “lath” screws, as they have an extra wide head that holds the battens down well.
You will notice a steel barrel in my photo. This is actually a water-filled solar heat-sink. Here in Indiana USA, the sun’s angle to the earth in Feb, Mar, and April is such that the side of the barrel absorbs lots of light at day, and the heat is released back into the greenhouse at night to smooth out the temperature swings.
During the summer, the sun’s angle is much higher above the horizon, and most of the barrel is blocked off from the sun’s light by the shelf that is now built over it. The barrel does not absorb very much excess heat in the summer. The barrel weighs 400 pounds filled with water and so we bolted it to the frame of the greenhouse and it makes a wonderful house anchor as well!
This entire project only took me about 30 hours, which included the earth work. I had to haul in 3750 pounds of gravel, about 1000 pounds of dirt, and about 400 pounds of wood chips.
It was a fun project!
Cortland Carrington, Bloomington Indiana, USA
Here is the finished product!! I can honestly say this is the first wooden structure I’ve ever built !!!
I would say it turned out pretty good
Kevin H.
We built the greenhouse with some modifications. We doubled the length and made it 8′ x 20′. We also only put a door on the front and in place of the windows at the peak, took the palruf roofing halfway up, leaving the other half screened for ventilation. We made a rain barrel system inside to catch the water coming off the barn roof. Our plants are growing wonderfully!! Thanks.
Matt Burrier – Berlin, Maryland
This is one good looking greenhouse if I do say so myself! I modified the height of the walls to 6 foot, so I could use both halves of a 12 foot sheet of Polycarbonate, and increased the overall size to 10′ x 20′. I also primed and painted all of the treated lumber, which took quite some time. Thanks for the plans!
Bill Blackett – Charlotte, NC
Nice plans and thanks for sharing. On the blocking below the upper window frame, instead of notching into roof line joist, does it make sense to run the block along the TOP of the joist and allow the window frame dimension to be that thickness shorter (or extend the upper roof line based on block thickness and no material change in overall window dimension). Only issue is transition of block over roof panel. I think I would rather route the under side edge of block similar to a lap joint for roof panel to lay under. Thanks again.
Of course your miter saw will cut 60 degrees. When you cut off a 30 degree angle, the piece that’s left has a 60 degree angle. Just cut the long end from the opposite direction and turn it over and you have a 60 degree angle.
Hi!! I was wondering if anyone had a quote on how much it cost them to build their own version similar to this!!
I think I have about $400 in wood and hardware, including Simpson hurricane clips which I would recommend. I had paint and stain on hand.
I have yet to shop polycarb siding. I have a dozen 2x4s that should finish the door wall and the windows, that are not finished yet.
(Treated 2x4s are going for $9 EACH(!) just now, I am accustomed to $2 for regular and $2.50 – $3 for treated in the pre-Trump days.)
I live in a very windy area. Do you think this will hold up to 50mph winds? I plan on a 10 x 20 with 6ft walls and real exterior windows I found,
Thank you for posting these plans. I have shared this site with SO many people! Here is the greenhouse I built…
Thank you so much for these plans – I’ve shared them with so many people! Here’s the greenhouse I made in Kernersville, NC
Sirs,
I dont know what to use for window latches or swing bars. What do folks recommend? What brand, part or store?