
Introduction – Floor plan
This article explains how a temporary floor was made for a galvanized steel shed.
We emphasize ‘temporary’ because the floor was not anchored to the ground in any way.
Although the floor was made for a specific shed and to a specific size, the same principals could be applied to other variations.
Below are the plans with construction explanations on the following pages.
The floor plan
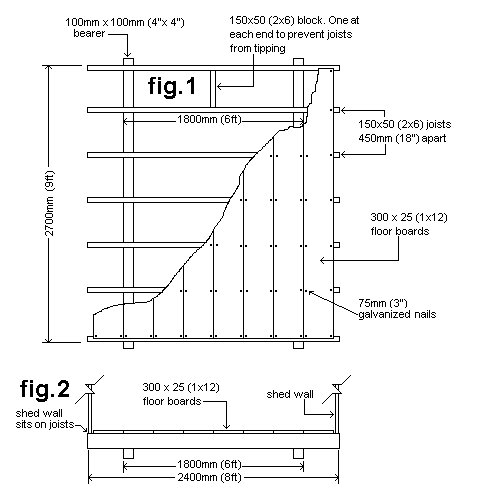
The shed outside measurements were 2400mm (8ft) wide by 2700mm (9ft) long.
The shed inside measurements were 2350mm (7ft 10″) wide by 2650mm (8ft 10″) long.
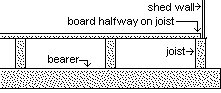
The plan was to have the shed walls sitting directly on the joists with floor boards also sitting on the joists, but fitting inside the shed walls. See fig.2 below.
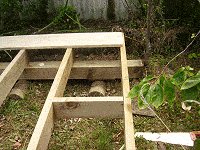
The bearers and joists
Laying out the bearers
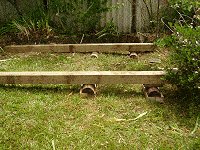
- The two bearers were placed in position and made parallel (see the plan for dimensions).
- Blocks of wood were packed under the bearers where necessary until the bearers were level.
- The bearers were not anchored or fastened in any way to the ground, since the shed was intended as a temporary arrangement only.
Placing and fixing the end joists
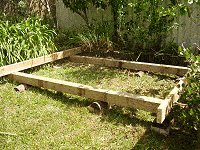
- The two end joists (one each end) were placed and fixed in position. (See the plan for dimensions).
- The joists were checked for parallel, the bearers were checked again for parallel, and the joists and bearers were checked for square.
Placing and fixing the intermediate joists
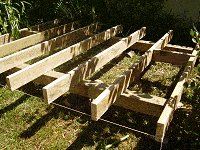
- The intermediate joists were positioned. (See the plan for dimensions).
- A string line was fixed to the ends of the two end joists.
- The intermediate joists were aligned to the string line and then fixed in place.
The floor boards
Blocking – Commencing the floor
- A block of wood was fixed between two joists at each end to prevent the joists from leaning or tipping. (See the plan for dimensions).
- The first floor board was positioned: beginning halfway on the first joist and ending halfway on the joist at the other end.
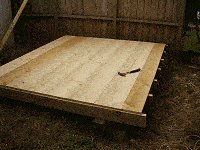
Finishing the floor boards
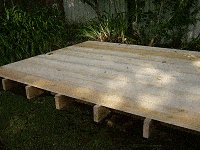
- One by one, the rest of the floor boards were fixed in place.
- The last floor board had to be ripped down to achieve the correct dimensions.
That was the floor finished – SO WE THOUGHT!
But just then…
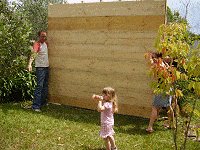
Out came the dear lady of the house, bless her, armed with her mother, her two sisters and her karate teacher, to say she’d changed her mind: she wanted the shed on the other side of the fence.
Who was to argue? Not us – wouldn’t dare!
Was it going to be a major? Not at all – luckily!
Preparing for the shift
- The floor was reasonably heavy and it had to be maneuvered through a narrow fence gate.
- It would have to be tipped on edge, then pushed and pulled through the gate.
- A board was nailed to the ends of the joists to act as a skid, so the floor (on edge) could slide along the ground.
Shed floor relocation
Standing the floor upright
- The shed floor was lifted on its edge and a rope was tied to the front.
- The floor was going to be pulled through the gate by the rope and also pushed from behind.
Moving the floor

- Everything went to plan: the shed floor slid easily on the skid and with heaps of people around to help, it was a case of many hands make light work.
- The floor went through the gate with ease.
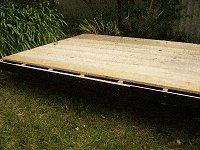
Positioning the floor
- The floor was then positioned in place and packed level with blocks of wood.
- There was no fastening to the ground as the structure was to be only temporary. Anyway, by the time the tools were stowed inside, along with bags of this and bags of that, there was so much weight in the shed that it was never going to blow away.
The finished shed
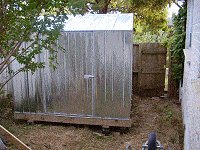
- Assembly instructions came with the shed. It was assembled on top of the joists around the floor boards, then fixed in place to the joists with screws going through the bottoms of the shed walls.


