Contents
Ft and inch version
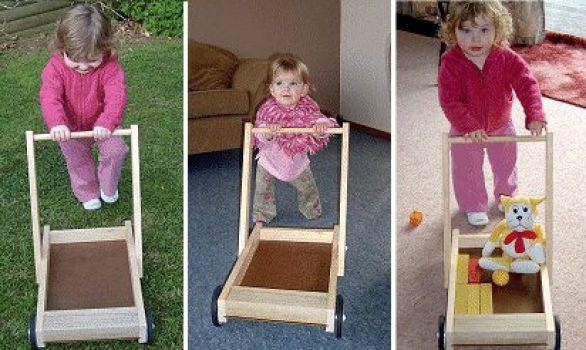
This project shows how to make a child’s pushcart.
This type of lumber cart is by no means new. In fact, the basic design has been around for many years, which is really a testament to the usefulness of such a toy; a toy that has helped many a child to take their first step to evolve from crawler to toddler. Apart from helping children to learn to walk, it also is a transporter for your child to move toys and blocks, etc. to and fro around the room. The pushcart is probably the most practical and entertaining toy a crawler or toddler can have!
A bit of load in the tray can of course help to steady or balance against the child’s weight, but we’ve designed this particular plan with balance in mind! We’ve given consideration to such things as the rear wheels being placed as far back as possible, the handle being placed as far forward as possible while still retaining easy workability and a block built into the front of the pushcart to act as a counterweight.
This pushcart is constructed using common stock and can be built in less than half a day.
Materials/cutting list
Note: All dimensions are in inches. The lengths referred to below are the exact lengths. When purchasing allow extra for wastage.
- [A] 2×3 (approximate finished actual size 1 1/2″x 2 1/2″) 2 pieces @ 19″ long
- [B] 2×3 (approximate finished actual size 1 1/2″x 2 1/2″) 1 piece @ 10″ long
- [C] 1×2 (approximate finished actual size 3/4″x 1 1/2″) 1 piece @ 10″ long
- [D] 1/4″ thick plywood (or other similar panel sheet) 1 piece @ 18″x 10 3/8″
- [E] 1×2 (approximate finished actual size 3/4″x 1 1/2″) 2 pieces @ 18 1/2″ long, cut back one end of each piece 25 degrees off square, (see The plans)
- [F] 3/4″ diameter dowel. 1 piece @ 13″ long
- Wood screws 8 @ 2″ long and 4 @ 1 1/4″ long
- Wheels, bolts, washers, and nuts, (see Step 6 for description)
- A dozen little panel pins (very small nails)
- PVA glue
- A piece of sandpaper
Instructions
Follow the steps below and refer to the plans as necessary
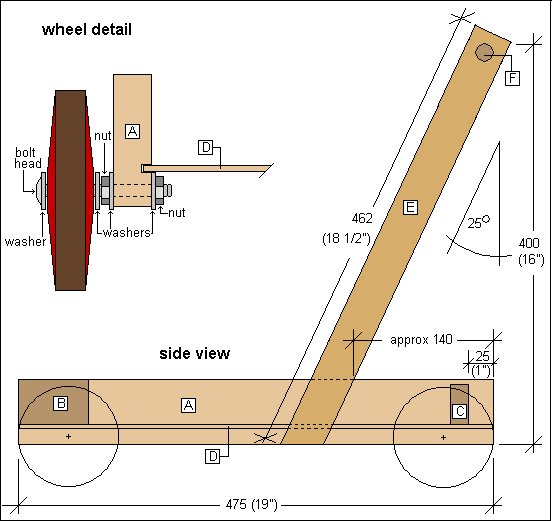
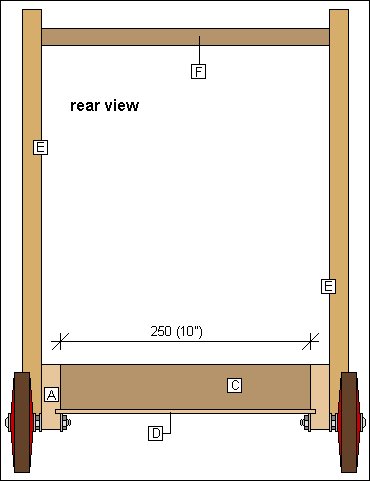
The plans
Step 1.
- Cut all the timber as per the cutting list above. Drill a 3/4″ diameter hole centered 1 1/8″ down from the top end of handle arms [E].
Step 2.
- Cut a groove 5/16″ wide and 5/16″ deep along members [A]. Measure so that the groove will be just below members [B] and [C]. The groove can be cut with a router or by repeated cuts with a circular power saw with the blade set to a depth of 5/16″.
- Or an easier option…
- If you think that making the grooves might be too difficult, then don’t do them. Instead, cut the bottom panel sheet [D] so that it will fit in between members [A]. The panel can be glued and nailed at the front and rear to the underside of members [B] and [C]. Then cut a couple of sticks of wood about 3/4″x 3/4″ @ 12″ long and glue them to the underside of the sheet panel and members [A] to stop any sag in the middle.
Step 3.
- Glue and screw members [A] to members [C] and [B]. Refer to the plans for placement. Use 2″ long wood screws, 2 at each meeting and pre-drill the holes through members [A] first.
Step 4.
- Glue the handle [F] into the holes in the handle arms [E] and then screw the bottom of the handle arms [E] to the side members [A]. Refer to the plans for placement. Use 1 1/4″ long wood screws, 2 at each meeting and pre-drill the holes through members [E] first.
Step 5.
- Slide the plywood panel [D] in the grooves until positioned as shown in the plans and then glue and nail (with small nails) to the undersides of members [B] and [C].
Step 6. The wheels.
- For this project, we used 4″ diameter wheels which were 3/4″ wide with a 1/4″ center hole. We used 1/4″ gutter bolts 2 1/2″ long for the axles. The bolt was first put through the center hole in the wheel, a washer was then put on, followed by a nut and another washer. The shank of the bolt was then put through a 1/4″ hole in the sideboard [A] and then another washer and nut was added. The two nuts were tightened against the sideboard [A] in such a way that held the bolt rigid yet allowed play for the wheel, thus allowing for it to spin freely. See The plans for configuration.
There is now a wide range of wheels available, and prices, types, and sizes vary from place to place so basically any wheel with a diameter between 2 1/2″ and 5″ will suffice.
The important things to note are:
- To use bolts that have the same shank thickness as the diameter across the center hole in the wheel.
- The bolt should be long enough to go through the wheel center and the sideboard [A], and also be able
- To take 3 washers and two nuts.
- The hole size in the sideboard [A] should be the same diameter as the wheel center hole.
- The hole in the sideboard [A] should be in from both ends the same distance as the radius of the wheel.
Step 7.
- The Finishing Touches: A bit of paint if you want (non-toxic of course) and that’s it!

Metric version
This project shows how to make a child’s pushcart.
This type of cart which is made from timber is by no means new. In fact, the basic design has been around for years and years which is really a testament to the usefulness of such a toy; a toy that has helped many a child to take their first step to evolve from crawler to toddler. Apart from helping children to learn to walk, it also is a transporter for your child to move toys and blocks, etc. to and fro around the room. The pushcart is probably one of the most practical and entertaining toys a crawler or toddler can have!
A bit of load in the tray can of course help to steady or balance against the child’s weight, but we’ve designed this particular plan with balance in mind! We’ve given consideration to such things as the rear wheels being placed as far back as possible, the handle being placed as far forward as possible while still retaining easy workability and a block built into the front of the pushcart to act as a counterweight.
This pushcart is constructed using common stock and can be built in less than half a day.
Materials/cutting list
Note: All dimensions are in millimeters (mm). The lengths referred to below are the exact lengths. When purchasing allow extra for wastage.
- [A] 75×25 (approximate finished actual size 70 x 19) 2 pieces @ 475 long
- [B] 75×50 (approximate finished actual size 70 x 45) 1 piece @ 250 long
- [C] 50×25 (approximate finished actual size 45 x 19) 1 piece @ 250 long
- [D] 4.75mm thick hardboard (or other panel sheet such as plywood, MDF board or similar) up to 6mm thick, 1 piece @ 450×260
- [E] 50×25 (approximate finished actual size 45 x 19) 2 pieces @ 462 long, cut back one end of each piece 25 degrees off square, (see The plans)
- [F] 18mm diameter dowel. 1 piece @ 326 long
- Wood screws 8 @ 50mm long and 4 @ 32mm long
- Wheels, bolts, washers, and nuts, (see Step 6 for description)
- A dozen little panel pins (very small nails)
- PVA glue
- A piece of sandpaper
Instructions
Follow the steps below and refer to the plans as necessary.
The plans


Step 1.
- Cut all the timber as per the cutting list above. Drill an 18mm diameter hole centered 28mm down from top end of handle arms [E].
Step 2.
- Cut a groove 6mm wide and 6 mm deep along members [A]. Measure so that the groove will be just below members [B] and [C]. The groove can be cut with a router or by repeated cuts with a circular power saw with the blade set to a depth of 6mm.
- Or an easier option…
- If you think that making the grooves might be too difficult, then don’t do them. Instead, cut the bottom panel sheet [D] so that it will fit in between members [A]. The panel can be glued and nailed at the front and rear to the underside of members [B] and [C]. Then cut a couple of sticks of wood about 20×20 @ 300mm long and glue them to the underside of the sheet panel and members [A] to stop any sag in the middle.
Step 3.
- Glue and screw members [A] to members [C] and [B]. Refer to the plans for placement. Use 50mm long wood screws, 2 at each meeting and pre-drill the holes through members [A] first.
Step 4.
- Glue the handle [F] into the holes in the handle arms [E] and then screw the bottom of the handle arms [E] to the side members [A]. Refer to the plans for placement. Use 32mm long wood screws, 2 at each meeting and pre-drill the holes through members [E] first.
Step 5.
- Slide the hardboard panel [D] in the grooves until positioned as shown in the plans and then glue and nail (with panel pins) to the undersides of members [B] and [C].
Step 6. The wheels.
- For this project, we used 100mm diameter wheels which were 20mm wide with a 6mm center hole. We used 6mm gutter bolts 60mm long for the axles. The bolt was first put through the center hole in the wheel, a washer was then put on, followed by a nut and another washer. The shank of the bolt was then put through a 6mm hole in the sideboard [A] and then another washer and nut was added. The two nuts were tightened against the sideboard [A] in such a way that held the bolt rigid yet allowed play for the wheel, thus allowing for it to spin freely. See The plans for configuration. Because there is now such a wide range of wheels available, and prices, types, and sizes vary from place to place, basically any wheel with a diameter between 60mm and 120mm will suffice.
The important things to note are:
- To use bolts that have the same shank thickness as the diameter across the center hole in the wheel.
- The bolt should be long enough to go through the wheel center and the sideboard [A], and also be able
- To take 3 washers and two nuts.
- The hole size in the sideboard [A] should be the same diameter as the wheel center hole.
- The hole in the sideboard [A] should be in from both ends the same distance as the radius of the wheel.
Step 7.
- The Finishing Touches: A bit of paint if you want (non-toxic of course) and that’s it!


Hi Les,
Thanks for putting this guide together! Excited to make this for my almost-one-year-old. I’m having trouble figuring out specifically what to purchase for the wheels. Do you have any suggestions or recommendations? Thank you!
I also need wheels for this project. Where did you find them, please?
Hi Les. Love your design for the toddler walker. I’ve Been looking for appropriate wheels without success. What brand do you use and where do you get them?
Thanks!