Contents
Introduction and materials list
This planter box (or pot plant holder) is completely held together with wire.
Construction is simply a matter of cutting the pieces, drilling the holes and threading the wire.
Note: There are lots of notes just like this one scattered throughout the instructions. They are well worth reading for their helpful hints.
The most important part of the whole project is to ensure that the pieces are cut to the right lengths, and that the holes are drilled accurately so that they all line up.
The measurements are given in both imperial (inches) and metric (mm). The imperial measurements are given first, followed by the metric measurements in brackets (). The imperial measurements are suited to North America, and the metric are suited to Australasia. The imperial measurements are not exactly equal to the equivalent metric measurements because of rounding. Use one or the other but not both.
The Components
Planter box
$5.00- Pay online by credit card, debit card, or Paypal using Secure Server Paypal. You do not need a Paypal account if paying by credit or …
|
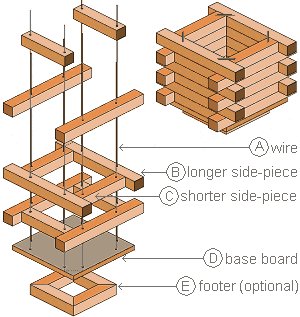
Material List
- Wire
- (A) 1/16″ (1.5mm) thick. 4 pieces at 3ft (900mm) long
- Wood (side-pieces and footer)
- 1 1/2″ x 1 1/2″ (45mm x 45mm)
- (B) 12 pieces at 15″ (390mm) long
- (C) 12 pieces at approx. 9″ (210mm)
- (E) 4 pieces at 9″ (210mm) optional
- Plywood (base)
- (D) 3/4″ (19mm) x 12″ (300mm) square
- You will also need eight 3/4″ (19mm) galvanized staples to fix the wire down.
Step 1
Cut the base board out of 3/4″ (19mm) thick plywood. Make a square 12″ x 12″ (300mm x 300mm).
Note: If you prefer a smaller or larger planter box, then cut the base board to your preference and cut the side-pieces to suit.
Step 2
Cut the 12 longer side-pieces out of 1 1/2″ x 1 1/2″ (45mm x 45mm) stock.
Make them 3″ (90mm) longer than the base board. This is so they overhang each end by 1 1/2″ (37mm).
Note: If you cannot source 1/2″ x 1 1/2″ (45mm x 45mm) stock, then it’s fine to use wood that is as near as you can get. It doesn’t really matter.
Steps 3 to 5
Step 3
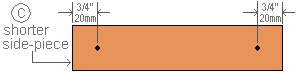
- Cut the 12 shorter side-pieces.
- Determine the length of the shorter side-pieces as follows:
- Place two longer side-pieces on the base board, one each side (see the drawing below), and measure between them.
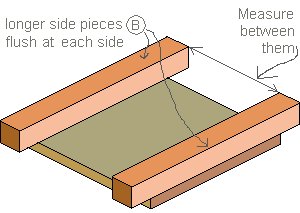
- The distance between the two longer side-pieces will be the length to cut the shorter side-pieces, i.e. approximately 9″ (210mm).
Note: Why only ‘approximately’ 9″ (210mm)? Because the exact measurement will depend on the width of the longer side-pieces.
Step 4
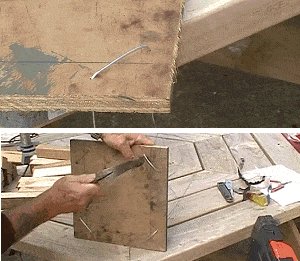
- Mark and drill the first piece.
- On a shorter side-piece, measure in 3/4″ (20mm) from each end and mark the drill holes. Then drill the holes. Make the hole diameters slightly larger than the wire.
Note: The holes must be straight, and at right angles to the face of the wood. If you use a hand drill rather than a drill press, then mark both sides of the wood and drill halfway through from each side.
Step 5
- Mark and drill the rest of the shorter side-pieces.
- Use the first shorter side-piece (the one prepared in ‘step 4’) as a template to mark the others.
- We will call it the ‘template piece‘.
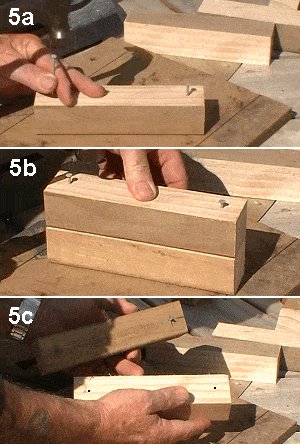
- Place a couple of nails into the pre-drilled holes in the template piece, and then position it flush on top of another shorter side-piece.
- Tap the nails to leave an indent on the lower piece. Remove the template and drill through the indent.
See step-by-step pictures below.
5a Place nails into the holes.
5b Align, tap, and mark.
5c And there are the marks for the holes.
- Mark the rest of the shorter side-pieces in the same manner, and then drill them.
Steps 6 to 9
Step 6
- Mark and drill the longer side pieces.
- Use the template piece (step 5) to mark the first longer side-piece.
- Position the template piece in the middle of the longer side-piece, and mark the latter in the same way you marked the shorter side-pieces.
- Once the first longer side-piece is marked, you can then drill it and use it as the new template to mark the rest of the longer side-pieces.
Step 7
- Mark and drill the base board.
- Mark the base board using the side-pieces as a template.
- Lay a row of side-pieces around the base board.
- Using a nail, mark through the holes in the side-pieces onto the base board.
- Take away the row of side-pieces and drill through the marks (nail indents) on the base board.
Step 8
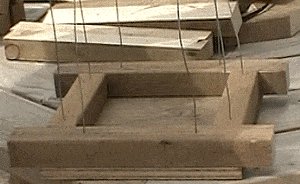
- Thread the wire through the base board.
- Get four lengths of wire 3ft (900mm) long, bend them in a ‘U’ shape, and thread them through the holes in the baseboard. One length of wire to each corner.
Note: Galvanized mild steel wire 1/16″ (1.5mm) was used in this project.
A thicker wire could also be used.
Step 9
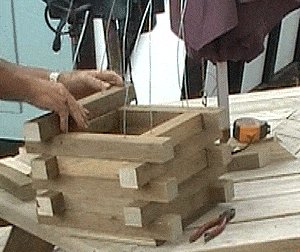
- Put together the side-pieces.
- Start threading the side pieces. Simply poke the wire through the holes in the side-pieces. The order will be fairly obvious.

- More threading pictures continued on the next page…
Steps 9 to 10
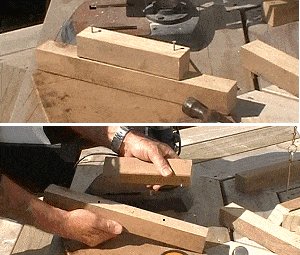
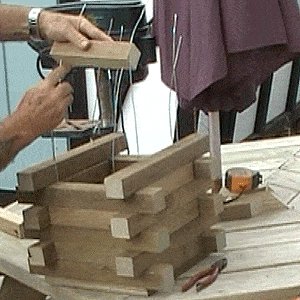
Step 9 continued…
- Threading the side-pieces, a step-by-step visual guide.
Step 10
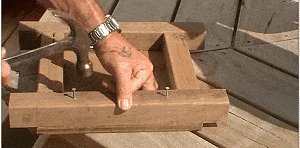
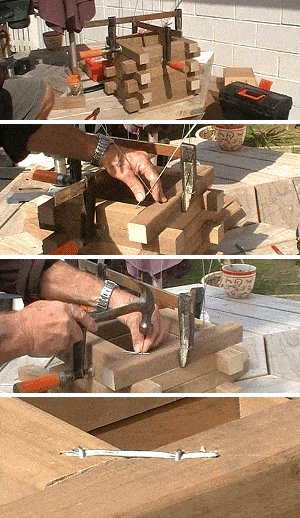
- Tie the wire down.
- Hold the top of the planter box secure with clamps while you tie the wire down.
- Pull the wire taut at each corner and then bend it over as shown in the pictures below. Cut off the excess, and hold the wire fast with galvanized wire staples.
- Follow the step-by-step visual guide below.
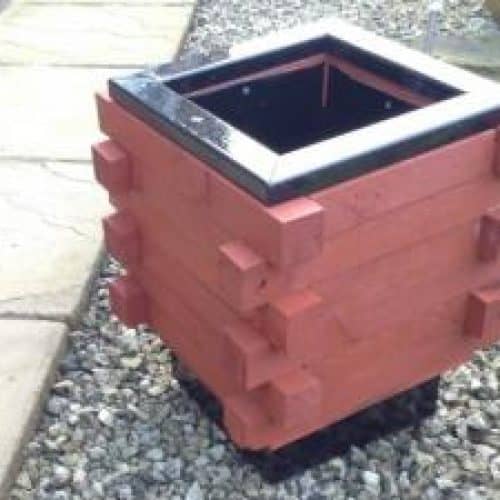
Note: You can stop here, and leave this as the finished planter box . An optional footer (as shown on the next page) is for looks rather than practicality – your choice.
Optional
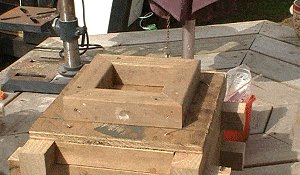
Step 11
- The footer (optional)
- Make a square approximately 9″ x 9″ (210mm x 210mm) out of the same stock that was used to make the side-pieces.
- Then just screw it on to the underside of the planter box.
And finally…
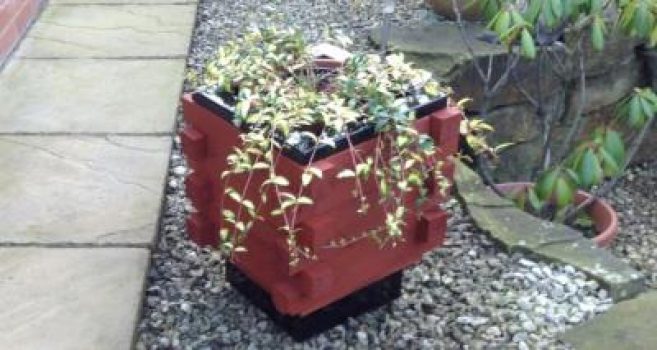
Drop a plant in it.


I had a stroke of luck in that our B@M store have just started stocking black plastic containers that I estimated would fit the planter. On inserting it into the planter I found it fitted perfectly with just 3 inches of it’s height to be removed. I pinned the top edges of it with small wood screws and cut and fitted a top covering strip. The planter was then painted with the fence pain we use and the top and bottom with black gloss paint for contrast. Of all the planters on the net this is the one that has most style.
Keith Baker
Thanks Buildeazy for your help with plans to build a planter it was easy and fun to do now my apple tree somewhere to grow many thanks.
Bryan.. From England