This project shows how to make a strong, basic, outside stool; a very useful implement to have in any garden. More often than not, a sturdy garden stool is used for many purposes other than for just sitting on because it can easily be moved around. For example, many a stool has been used as a step to help reach higher places in the garden, or even as a temporary support to hold such things as potting containers or washing baskets while hanging out the washing.
This stool is constructed using 150×50 (2×6) and 75×50 (2×3) stock and can be built in merely a couple of hours.
You will need….
- 3500mm (12ft) of 150×50 (2×6) lumber
- 1600mm (5 1/2ft) of 75×50 (2×3) lumber 4 galvanized coach/carriage bolts 110mm (4 1/2″) long
- A handful of 100mm (4″) galvanized nails
About the lumber
- Use lumber suitable for exterior use. If the lumber is dressed (planed or seasoned), the actual thickness and width will be less than the nominal size. For example: a piece of 150×50 (2×6) stock, which is called the nominal size, may actually finish at 140×45 (1 1/2″x 5 1/2″) when it has been dressed, which is the actual size. This will not make any difference to the construction of this stool.
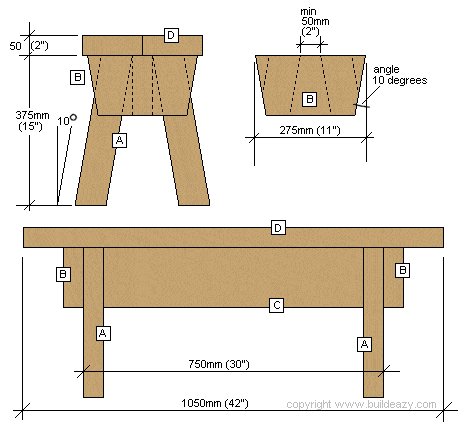
Step 1.
- Cut the seat boards [D]: 2 pieces of 150×50 (2×6) stock @ 1050mm (42″) long.
- Cut member [C]: I piece of 150×50 (2×6) stock @ 750mm (30″) long.
- Cut members [B]: 2 pieces of 150×50 (2×6) stock @ 275mm (11″) long. Cut back each end 10 degrees off square.
- Cut the legs [A]: 4 pieces of 75×50 (2×3) stock @ 375mm (15″) long. Cut back each end 10 degrees off square.
Step 2.
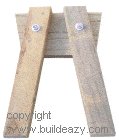
- Bolt the legs [A] to the leg braces [B] as shown in the drawing. Ensure that the top of the legs are separated by at least 50mm (2″). See plan above.
Step 3.
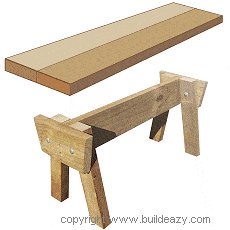
- Nail the two assembled leg [A] and leg brace [B] units to member [C] and then nail on the seat boards [D].
All finished!
Now wasn’t that easy?


Nice plan but check your model. Rendering of the leg assembly is deceiving. Should legs be flush with the top edge of the leg brace? They are shown extending past the top edge of the brace. The 2D drawing is clearer. Will follow that…plan to build one of these soon.
Cheers.
extending legs past the top edge prevents tip over from leaning forward while gardening.