
Contents
Introduction – Materials and Cutting List
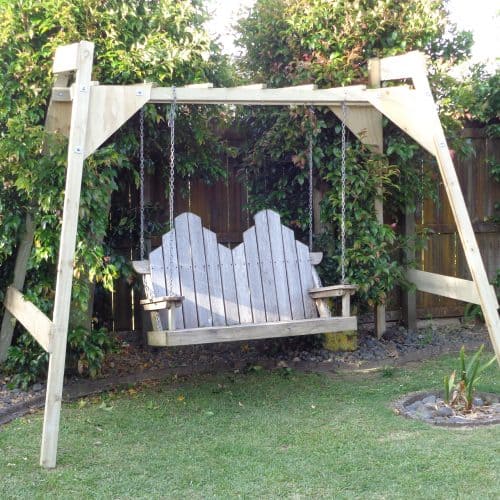
The Porch Swing
This seat has an adjustable seat-back which angles back to give varying degrees of comfort depending on whether or not you want to sit up straight or lie back a little.
As with other Buildeazy projects, it designed with the home handyman or DIYer in mind. All joins are secured with bolts and/or screws and nails. Because of this, the project only requires the most basic of tools to undertake a professional job.
A bit about the measurements
The measurements throughout this projects are given in both millimeters and inches.
The metric (mm) measurements are given first, followed by the imperial(inch) measurements in brackets.
For example: 50mm (2″)
Note: The metric (mm) sizes given in this project do not convert exactly to their corresponding ft and inch equivalents.
This project gives the dimensions in both metric (millimeters) and imperial (inches).
Swing Seat
$5.00The abbreviation for millimeters is mm and the abbreviation for inches is “.
The metric (mm) measurements are given first, followed by the imperial (inch) measurements in brackets.
Example: 100mm x 50mm (2″ x 4″).
However, the metric (mm) sizes do not convert exactly to the equivalent imperial (inch) sizes because the measurements are rounded to their respective commonly called sizes.
Example: A piece of 2″ x 4″ wood in North America is the equivalent of a piece of 100mm x 50mm wood in Australasia.
2″ x 4″ is not exactly the same size as 100mm x 50mm.
In fact, if 2″ x 4″ was converted into millimeters exactly it would be 101.6mm x 50.8 mm, and nobody really wants to be calling those sorts of sizes..
Also note that in North America the narrower side of the wood is called first (2 x 4), where as in Australasia the wider side is called first (100 x 50).
When the same piece of wood is made smooth (surfaced, dressed, planed), there is an even bigger discrepancy. 1 1/2″ x 3 1/2″ in North America compared to 90mm x 45mm in Australasia.
A project built using metric measurements will be approximately 1.6% smaller than the same project built using imperial (ft and in) measurements.
In this project the imperial measurements are suited to North America. The metric measurements are more suited to Australasia.
There are two different types of lumber used for this project. 90 x 35 (1-1/2″ x 3-1/2″) treated pine for the frame and 90 x 20 (3/4″ x 3-1/2″) hardwood for the seat slats and back slats. Also a small amount of 145 x 20 (3/4″ x 5-3/4″) treated pine for the arm rest.
If the sizes vary in your area, just make allowances accordingly.
The 45 x 35 (1-1/2″ x 1-3/4″) pieces required are from 90 x 35 (1-1/2″ x 3-3/4″) stock ripped (sawn down lengthwise) in half.
Any other smaller members that are required can also be cut from standard stock.
Hardware
As well as the lumber in the list below, you will also need…
- Two 3600mm (12ft) lengths of galvanized chain
- 10 galvanized coach (carriage) bolts 10mm (3/8″) x 120mm (5″) long.
- A handful of 100mm (4″) nails.
- A few 75mm (3″) nails to hold the two end frame members together while drilling and bolting.
- 92 wood screws approx 35mm (1-1/2″) long for the seat slats, back slats and arm rests.
The cutting list
All dimensions are in both millimeters and (inches)

Instructions – The Frame
1. Make up the two end frames.
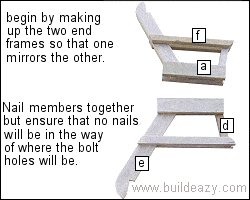
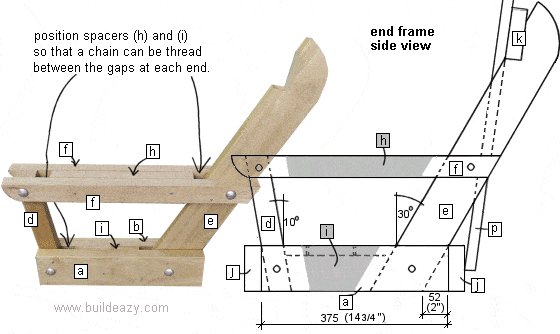
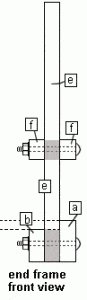
- Cut the members (a), (b), (d), (e), (f), (h), and (i) to the dimensions as shown in the lumber list in the previous page.
- Make up the two end frames using the drawings below as a guide. Note that the inner seat frame ends (b) are a different width than the outer seat frame ends (a) by 20mm (3/4″) which is the thickness of the seat slats.
- First nail and then bolt the horizontal members (a), (b), (f) to the vertical members (d) and (e) with 10mm (3/8″) coach (carriage) bolts. The spacers (h) and (i) can be fixed with screws.
2. Make up the seat frame.
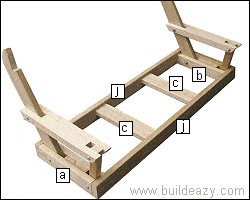
- Cut the members (c) and (j) to the dimensions as shown in the lumber list in the previous page.
- Nail the front and rear seat frame members(j) to the seat frame end members (a) and (b). Nail in place the two seat frame intermediate members (c) ensuring that they are 20mm (3/4″) below the top edge of the front and rear seat frame members (j).
3 The back slat support.
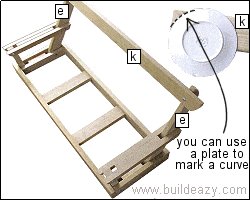
- Cut member (k) to the dimension as shown in the lumber list in the previous page.
- Round each end. You can use a dinner plate, paint tin or any other circular object as a template to draw a curve.
- Bolt the back slat support (k) to the two rear vertical arm supports (e).
4. Fix the seat slats in place.
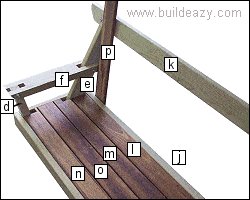
- Place the seat slats in place spread evenly within the seat frame. Members (n) and (m) will need to be checked (cut) out at each end to allow for the chain cavity and vertical arm supports (d) and (e). (See diagram).
- Screw the seat slats to the seat frame members (b) and (c). Pre-drill screw holes in the slats slightly bigger that the screw shank.
Instructions – Slats, Arm Rest and Chain
5. Fix the back slats in place and mark for cutting.
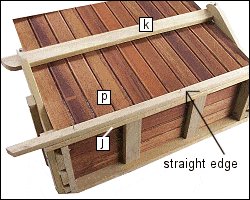

- Temporarily nail a straight edge to the bottom half of the rear seat frame (j) so the back slats will have something to sit on while they are being fixed in place.
- Spread the back slats (p) out evenly between the two end frames and fix to the back slat support (k) and the rear seat frame member (j) with screws.
- Pre-drill screw holes first through the back slats.
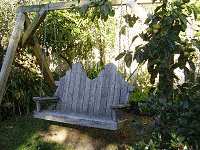
- When the back slats are fixed in place, you can draw a pattern of your choice at the top of the back slats.
- Cut with a jig-saw if the pattern has curved lines or a handsaw will do if the pattern only consists of straight lines.
6. Fit the arm rest.

- Cut the arm rest (g) to fit around the rear vertical arm support (e) and fix with screws to the horizontal arm supports (f).
- Make holes in the appropriate places for the chain cavities.
7. Thread the chain.
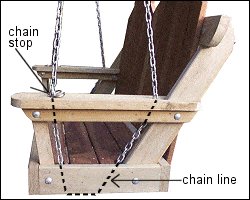
- Thread the chain through the holes in the arm rests down through the cavities at the bottom of the end frames and back up.
- The holes and cavities should be big enough so that the chain can be pulled through freely.
- When the seat is held off the ground by the chains (more about that next page), the seat angle can be easily adjusted and locked in place by inserting a “chain stop” through one of the chain link holes just above the front arm rest (g) hole. A “chain stop” can be a small bolt, piece of rod or anything that can fit through a chain link hole and stop the chain from slipping around the end frames.
- When you want to re-adjust the seat angle, simply take out the “chain stop”, adjust the angle and lock in place again by putting the “chain stop” back.
Instructions – Supporting the Swing
8. Supporting the Swing.
- Hang the swing so the seat is approx 400 (16″) off the ground. The builder is responsible for ensuring that swing is supported adequately to take the weight of the swing as well as the people that might occupy it.
- Have fun!

Appendage 1 – Safety concern addressed
This page addresses a safety issue that could be of concern if you have children that are likely to stand up on the seat and push against the back, and let’s face it – what kid isn’t likely to try that.
We discovered this mishap by chance thanks to our grandkids.
How?….
We had been using the swing seat for months without incident until one day two of the grandkids stood up on the seat together, facing the back. They then pushed against the top of the back trying to create a rocking motion.

Without warning the bench seat tipped over backwards sending the grandkids flying to the ground. Fortunately there was no damaged done to the kids (or the ground for that matter).
Anyway, The problem had to be addressed because kids being kids were bound to try it again and the next time they might not be so lucky. How did we fix it?
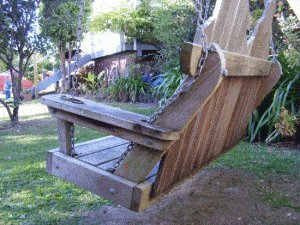
We just wrapped the chain around the back of the back slat support (k) and held it in place with a spike (nail, screw or whatever).

This seemed to do the trick. No matter how hard the kids tried to tip the seat over, they just couldn’t.
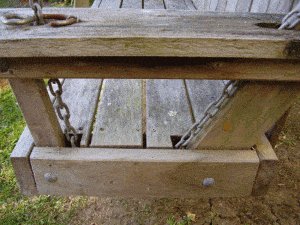
The photos show the chain tucked behind the back slat support.
Click on any of the photos to enlarge.
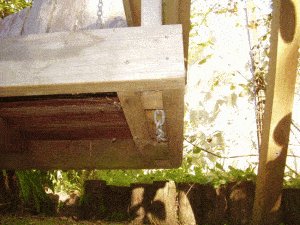
Appendage 2: Close-up sectional photos
Six years down the track and some helpful close-up sectional photos
This page takes a look at the swing seat some six years after it was first made (doesn’t time just fly), and shows a few close-up sectional photos.
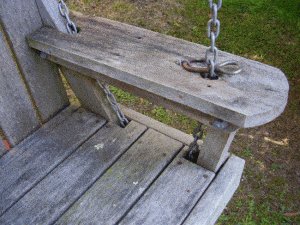
The photo to the right shows the same swing seat that is in the photo at the top of the page, only six years later.
The swing seat has stood the test of time and has not needed any maintenance whatsoever. The seat has been (and still is) used on a daily basis.
It is by far our most popular piece of garden furniture.


Hi Buildeazy,
Thank you for the free plans downloaded from your web site. This enabled me to construct the swing seat (photo attached) for my wife and 4 day old great grandson, to enjoy in the future. My wife at present is suffering from a serious illness and takes great enjoyment from the swing, that is when our Scottish weather allows. Thanks again.
Richard/ Isobel Saunders and great grandson Thomas More
Fantastic plans, thanks. We don’t have a porch to swing from so I made a pergola instead.
I decided to use rope instead of chains for aesthetic reasons and we are both pleased with the outcome. Rog’ and Alex (UK)
hi, I made this 1 from your plans and i think its brilliant. All made from tanalised wood. Had to be different sizes. 4×2, 2×2. 3×2. 4×1 and 6×1 but all worked out in the end. love this site.
Chyanne Barrasin Cornwall. United Kingdom
My husband and I built this swing in one afternoon.
The swing is built with treated lumber and we made it wider and deeper and arms are 3″ higher, we also used 6″ fence boards for the seat and back.
I used a dark walnut stain and then sealed it with a clear finish.
I love our swing, thank you so much for the great plan!
Here is a picture of our swing.
Later Janice Alberta, Canada.
Absolutely loved to build my own swing, the experience is great. I’ll definitely look for my next project here. I customized mine with a some brown dye and my routered signature. Looks great on the balcony.
Fabio Segura
Sacramento – Costa Rica
I built my swing out of Bois D Arc and Red Cedar. I modified some of the dimensions based on comments posted. Arm rests are higher and seat is wider and a little deeper…… Came out perfect……. watched the sunset tonight in it….
Edwin L.
I used the plans on your site for this porch swing but added length and depth to the seat. I should have added 3 inches height to the arm rest. Overall it turned out great and was fun to make.
Janet Scruggs
Hello Buildeazy,
This was actually the first time that I have actually made a work project. I had a rough start as I was getting used to what type of wood to pick out and how the final layout was going to turn out, but both my wife and I were very happy with the results.
The plans were easy to follow and I will continue to use your site for more new ideas. The new swing bench looks great in our front porch. Thanks.
Rafael Rivera
Hi there
Here is a couple of pics of realized projects from your great site,(I’m sure it wont be the last)!!! The swing-seat is a great shady place to relax and enjoy a nice and cool Bavarian Beer on a hot summer day.
Also a picture of our Greenhouse. It works really good.
Costs were around 160,- Euro.
Thanx Alex & Stefan
Walchsing, Bavaria.
Hi, I just finished the swing plan and are using it. I had already had a swing which I designed some twenty years ago and this one is very interesting in it’s look and design. Much nicer that mine was. My wife, who the swing was for has commented that she preferred my version of the swing for the following reasons. I had sides with higher supports which allowed her to turn on the swing with her back to the side. The other thing was that the chain connecting the swing back is in the way and interferes with the arm rest. So now she wants me to modify the design to remedy these items. The armrest could be 4 to 6 inches higher to make it more comfortable when sitting. The chain in the back is not a problem, I will simply attach it to the back support.
Other than these two minor items, I think it is a great design and easy to build.
Thanks
Spanishtrain
I just finished building this swing as a surprise birthday present for my fiance. I want to complement the Les Kenny for having made terrific plans to follow. This was my first wood shop project and it turned out great. I searched many sites for plans for a swing and this was by far the best.
Thanks again, CJ
Thank you for the plans, the project went very smooth. I chose to go on the cheap and I used what wood I had around, namely, spruce 2×10’s and 1 x 4’s. The kids painted it with Tremclad White. Looks great.
Gord B. Princeton BC Canada
From Fernando Oliveira
Made this porch swing using free plan from BUILDEAZY.
Turned out great. Sincere thanks for the plans you provide.
Brett N – Shawnee, OK, USA.
Really nice design frame on this swing. I varied somewhat but still managed to get a nice looking swing out of it.Thanks
Samuel Dodd
All,
I was so pleased with the design I wanted to share a few comments and picture.
I followed other’s suggestions for extending the arm’s 3 inches and that works out nicely.
Also, I used 5/4 womanized decking boards and ripped them for the 2 x 4 framing.
This gave it a less beefy look and feel. Plus, I used cheap ceiling stripping wood for the seat and back planks.
Usually you can pick thru those and find some decent ones.
All my materials were $51, including the chains.
I’m enjoying the new swing so much that I’m contemplating build another, wider one.
Curious to know if anyone has tried a 6 foot version. I assume this should work with a few extra cross supports in the seat frame. Do I need to find a way to reinforce the back as well?