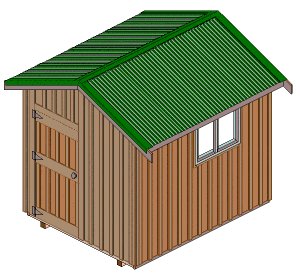
Introduction
This detailed shed plan-set is in both Standard and metric dimensions. There is more detail about the measurements on the next page.
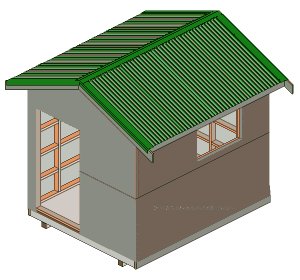
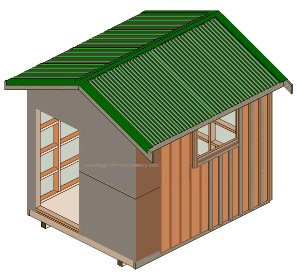
The shed is built on skids, meaning that there are no footings or foundations and that the finished shed is able to be moved.
The wall cladding (siding) is board and batten and the roof cover is corrugated roofing iron over plywood sheathing.
Door plans, materials list, instructions, nailing information and a glossary of terms is also included.
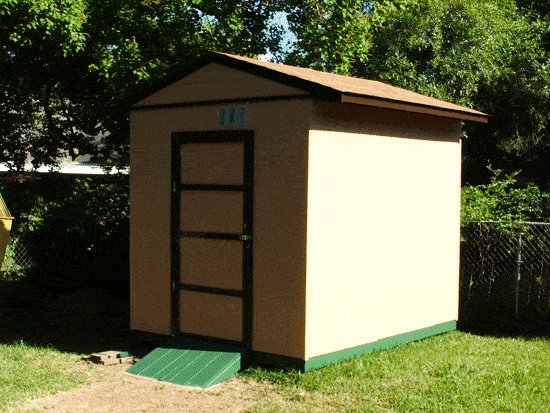
8 x 10 storage shed
$5.00- Pay online by credit card, debit card, or Paypal using Secure Server Paypal. You do not need a Paypal account if paying by credit or …
|
About the measurements
Dimensions given in this project are in both Metric (mm) and Imperial (inches).
The metric measurements are given first followed by the standard measurements in brackets. For example: 100mm x 50mm (2″ x 4″).
The size (width and thickness) of the wood (lumber) referred to throughout this project is the nominal size.
That is in reference to the size of the lumber before it has been dressed (surfaced planed and/or seasoned).
When the wood has been dressed (surfaced, planed, seasoned), it is then the ‘actual size’ or the true size. The actual size of lumber is less than the nominal size.
Chances are you will use dressed (surfaced, planed, or seasoned) framing lumber for this project, which means in effect that the ‘actual size’ will be smaller than the ‘nominal size’.
However, that’s not really going to make a great deal of difference in the overall scheme of things.
Below is a ‘nominal’ versus ‘actual’ chart, listing the wood sizes of the framing lumber used in this project.
| Standard (inches) | |
| NOMINAL SIZE | ACTUAL SIZE |
| 2″ x 4″ | 1 1/2″ x 3 1/2″ |
| 2″ x 6″ | 1 1/2″ x 5 1/2″ |
| 2″ x 8″ | 1 1/2″ x 7 1/2″ |
| 4″ x 4″ | 3 1/2″ x 3 1/2″ |
| Metric (millimetres) | |
| NOMINAL SIZE | ACTUAL SIZE |
| 100mm x 50mm | 90mm x 45mm |
| 150mm x 50mm | 140mm x 45mm |
| 200mm x 50mm | 190mm x 45mm |
| 100mm x 100mm | 90mm x 90mm |
Most Countries that use the Metric system generally call the bigger numeral first, example: 100mm x 50mm (100 millimetres by 50 millimetres). Most Countries that use the Imperial system generally call the smaller numeral first, example: 2″ x 4″ (2 inches by 4 inches).
For rounding-off purposes, the metric sizes in this project are not an exact match to the equivalent imperial sizes.
A structure built using the metric measurements will be approximately 1.6% smaller than the same structure using the imperial (ft and in) measurements. Not really worth worrying about.
The imperial measurements are more suited to North America. The metric measurements are more suited to Australasia and other countries.
Materials List
Note: This plan-set gives no allowance for a window, but does include a window opening in the wall frame that will accommodate a window 1200mm (4ft) wide x 600mm (2ft) high. The window opening in the framework can be changed without too much ado to suit a window of a different size.
| WOOD FOR SHED AND DOOR | ||
| AMOUNT | SIZE/STOCK/DESCRIPTION | FOR |
| 2 at 3000mm (10ft) | 100mm x 100mm (4″ x 4″) Treated lumber | Skids |
| 26 meters (86ft) | 150mm x 50mm (2″ x 6″) Treated lumber | Floor frame |
| 195 meters (640ft) | 100mm x 50mm (2″ x 4″) Framing lumber | Wall/roof frame and purlins |
| 1 at 3000mm (10ft) | 200mm x 50mm (2″ x 8″) lumber | Ridge beam |
| 145 meters (475ft) | 200mm x 25mm (1″ x 8″) board, exterior type | Vertical boards (siding) and door |
| 14 meters (46ft) | 150mm x 25mm (1″ x 6″) board, exterior type | Fascia and rake board |
| 15 meters (50ft) | 100mm x 25mm (1″ x 4″) stock, exterior type | Exterior corners and door casing |
| 145 meters (475 ft) | 75mm x 25mm (1″ x 3″) batten, exterior type | Vertical battens for walls and door |
| 5 meters (16ft) | 50m x 25mm (1″ x 2″) batten, exterior type | Door stop |
| 4 Sheets plywood | 12mm x 1200mm x 2400mm ( 1/2″ x 4 ft x 8 ft) | Roof sheathing |
| 3 Sheets exterior plywood | 18mm x 1200mm x 2400mm ( 3/4″ x 4 ft x 8 ft) | Floor |
| ROOFING IRON | ||
| 10 sq meters (108sq ft) | Corrugated roofing iron | Roof |
| 3.1 meters (10′- 4″) | Ridge capping | To cap the apex of the roof |
| 6.8 meters (22.5ft) | Rake flashing | To cap the end gables of the roof |
| BUILDING WRAP | ||
| 38 sq meters (410 sq ft) | Building wrap / felt | Envelop exterior frame |
| NAILS / SCREWS / FASTENERS / MISCELLANEOUS | ||
| AMOUNT | LENGTH/TYPE | FOR |
| 6 kg (13 lb) | 90mm (3 1/2″) Galvanized nails | Framing |
| 3 kg (7 lb) | 75mm (3″) Galvanized nails | Battens and trim |
| 4.5 kg (3 1/2 lbs) | 60mm (2 1/2″) Galvanized nails | Floor, sheathing, vertical boards |
| 96 | 38mm (1 1/2″) Galvanized flathead nails | Hurricane ties |
| 100 | 60mm (2 1/2″) Roofing nails | Corrugated roofing iron |
| 150 | 45mm (1 3/4″) wood screws (exterior) | Door and hinges |
| 12 | RT1 Hurricane ties | Securing rafters to top plate |
| 3 | 150mm (6″) T-Hinges | Door |
| 1 | 100mm (4″) Slide bolt | Door hardware |
| 1 | Latch set | Door hardware |
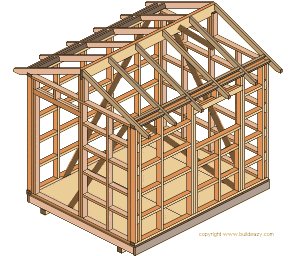
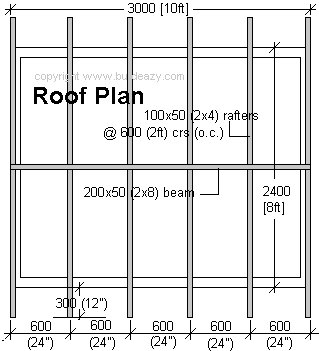
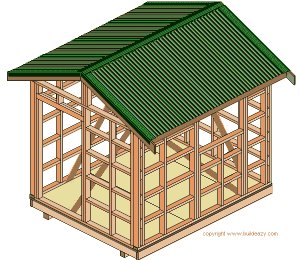
Floor, Roof and Stud layout


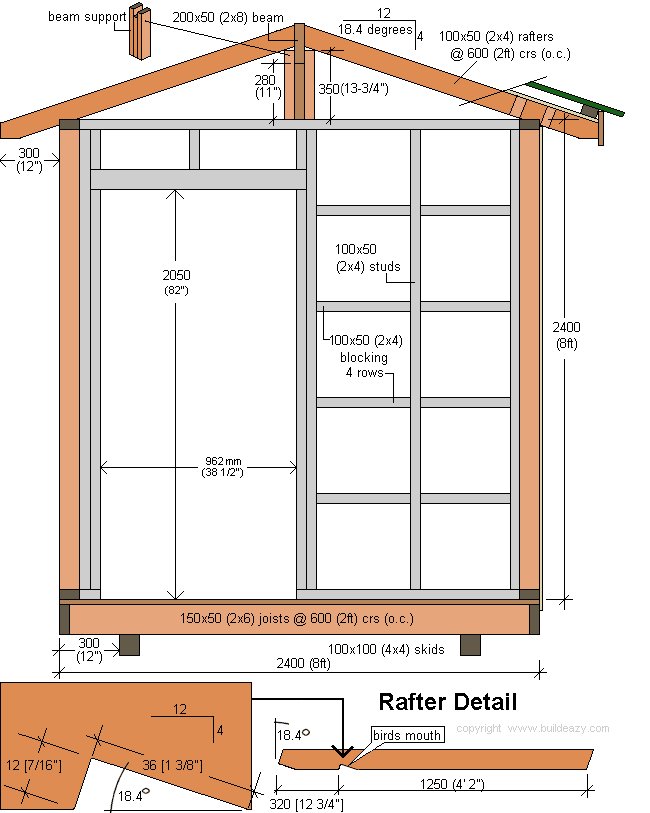
Plans – front elevation and roof section
Cross-Section and Rafter Detail
The floor and wall frames
Instructions
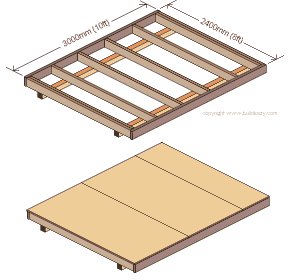
1. The Floor
- Position the two skids level and parallel on firm ground free of any vegetation.
- Space the skids apart so that the inside measurement from skid to skid is 1600mm (64″).
- Make up the floor frame consisting of 8 joists and 2 boundary joists to the dimensions as shown in the ‘Skid and Joist Layout’ plan.
- Use a hard level surface such as a concrete drive or garage floor as a work area.
- Use the ‘Skid and Joist Layout’ plan and the ‘Materials List’ for layout reference and individual member sizes and lengths.
The finished floor frame should be a rectangle 2400mm x 3000mm (8ft x 10ft). - When the floor frame is made, position it in place on top of the skids. Ensure the floor frame is a true rectangle (all corners are 90° / right angles) and then fix it to the skids. Toenail (angle nail) thru the joists into the skids.
- Fix the 18mm (3/4″) plywood sheets to the floor frame. Use 60mm (2 1/2″) galvanized nails to fix the plywood floor to the floor frame nailing 150mm (6″) apart along the seams (where the sheets join) and a maximum of 200mm (8″) apart around the perimeter and along all intermediate joists.
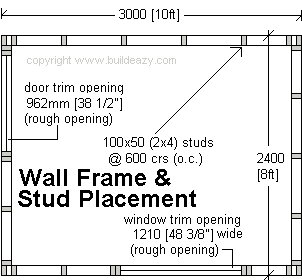
2. The Wall Frames
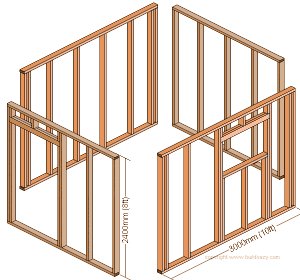
- Cut the 100mm x 50mm (2″ x 4″) wall frame members to length as shown in the ‘Wall Frame and Stud Placement’ plan. Cut the longest pieces first to minimize wastage.
- Make the wall frames up on even ground, referring to the ‘Wall Frame and Stud Placement’ plan which shows the placement of the studs from a bird’s eye-view.
- In this particular plan, the studs are spaced at 600 [2ft] crs or o.c.(which means “at centers” or “on center”).
This means the studs are spaced apart 600 (2ft) from the center of one stud, to the center of the next stud (where possible).
Studs spaced at 600 [2ft] crs/o.c. are also placed appropriately to accommodate standard width 1200 [4ft] cladding panels, either exterior or interior.
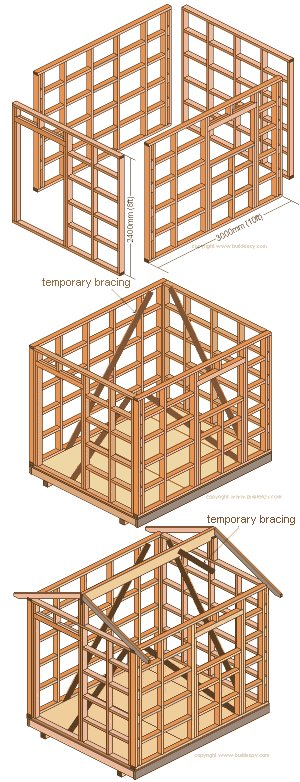
Standing the frames and the and the roof beam
3. Wall-Frame Blocking
- Fix four evenly spaced rows of blocking between all the studs. This is best done while the wall frames are still lying on the ground.
- The blocking gives the exterior vertical boards something substantial to be nailed to.
- Use 90mm (3 1/2″) galvanized nails for all framing.
4. Standing the Frames
- Lift the four shed frames upright onto the floor and nail them together at the corners ensuring that the corners of the frames are flush.
- Position the wall frames on the floor so that the outside edges of the bottom plates are flush with the outer edge of the floor.
- Commence nailing the bottom plates to the floor beginning as close as possible to the corner studs at all four corners and then continuing the rest of the way along the plates but DO NOT NAIL the bottom plate in the door opening as that part is to be discarded.
- Cut out the bottom plate in the door opening with a hand saw.
- Make the walls plumb (vertical) and fix a 75mm x 25mm (1″ x 3″) brace to the inside of each wall running diagonally from top plate to bottom plate. The bracing is only temporary and can be discarded once the exterior cladding is on.
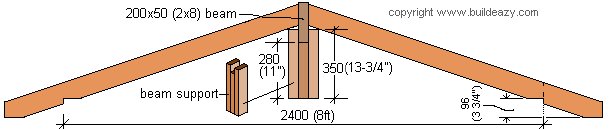
5. The Roof Beam
- Cut and fix the two beam supports on top of (and in the middle of) the front and rear wall frame top plates. The roof beam can then be cut to length and fixed in place on top of the two beam supports.
- Cut four end rafters as per the ‘Rafter Detail’ drawing and fix in place.
- Make plumb and temporarily brace. See drawing.
The roof frame and the sheathing
6. The Roof Rafters
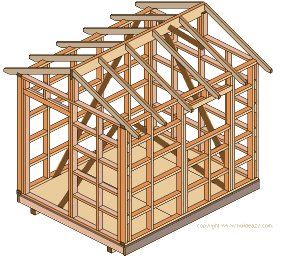
- Cut the remaining eight intermediate rafters (see ‘Rafter Detail’ drawing) and fix in place, four each side. Spacings are shown in ‘The Roof Plan’.
- See the ‘Nailing and Fastening Information’ page for fixing instructions.
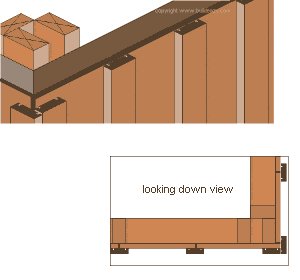
7. Roof Blocking
- Measure and cut four rows of blocking to fit between the rafters. Place the rows each side of the side wall’s top plates (see Picture). This is so the exterior Boards and Battens will have a straight edge at the top to butt up to.
8. Roof Sheathing

- Cover the roof with 12mm (1/2) inch plywood. Run the sheets from the apex to the ends of the rafters. The sheets will need cutting.
- All joins must be over a rafter or under a purlin.
9. The Purlins
- Nail three rows of purlins to each side of the roof, overhanging each end by 25mm (1″).
- Fix the top row about 75mm (3″) down from the apex (this measurement will depend upon the width of the ridge capping, as the ridge capping is nailed to the top purlin), the bottom row flush to the ends of the rafters and another row in the middle.
- Nail the lower end of the roof sheathing (from the underside) up into the bottom of the purlin.
The roof trim and roof cover
10. Fascia, Rake Board and Builders Felt
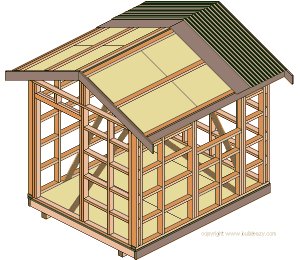
- Nail the rake boards to the ends of the purlins along each gable rake and make flush with the top of the purlins.
Join the rake boards at the apex (vertical cut) and cut the other end vertically, 175mm (6″) past the ends of the rafters. - Cut and fix the fascia board to the ends of the rafters, between the rake boards.
Make the top edge of the fascia board flush with the top of the purlin. - Cover the roof with builders felt prior to the corrugated roofing iron going on.
11. The Roof
- Fix the roofing iron to the purlins with appropriate roofing nails/screws.
- Fix to the top and bottom purlins at every second corrugation and fix to the intermediate purlins at every 3rd or 4th corrugation.
- Fix through the high side of the corrugation.
Overhang the roofing approx 65mm (2 1/2″) past the Fascia Board.
12. The Ridge Capping and Rake Flashing

- Standard ridge capping is about 130 (5″) each side of the apex, but can vary and any size can be made to order.
Have the ridge flashing in mind when positioning the top Purlin. - Fix the ridge capping to the Purlin at every second corrugation.
The rake flashing goes under the ridge capping at the top. - Fix to each purlin (through two corrugations) and also to the side of the rake board.
The vertical boards and battens
13. Building wrap / Builders felt
- A building wrap / builders felt should envelop the exterior walls prior to the cladding being fixed.
14. Exterior Vertical Boards
- Commence fixing the boards vertically to the wall frames, beginning from one corner. Cut the boards long enough so that they will touch the underside of the Rafter at the top and run at least 50mm (2″) below the floor.
- Nail all vertical boards to the horizontal blocking with nails spaced approximately 75mm (3″) apart including the nail that will be going through the batten.
- Leave a gap about the width of a nail shank between each board. The vertical boards on the front and rear walls will tuck under the rake board.
15. The Battens
- Fix the Battens 75mm x 25mm (1″ x 3″) over each join. Preferably, the battens should have a groove each side of the join to stop water being drawn in by capillary action.
- Nail on the center line of the batten, through the gap between the boards and into the blocking.
- Overlap battens at corners using 75m x 25mm (1″ x 3″) batten on one side of each corner and 100mm x 25mm (1″ x 4″) batten on the other side.
- Using one length of 100mm x 25mm (1″ x 4″) batten and one length of 75mm x 25mm (1″ x 3″) batten at each corner will give a balanced look.
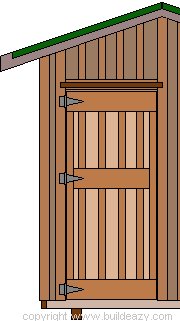
The Door
16. Making the door
Note: Use these dimensions as a guide only. The exact door measurements should be taken when the jambs are fixed in place.
To obtain the door width, measure between the two side jambs and deduct 12mm (1/2″). This allows for a 6mm (1/4″) gap each side.
You will need:
- Five 200mm x 25mm (1″ x 8″) boards 2075mm (83″) long for the vertical door slats
- Three 200mm x 25mm (1″ x 8″) boards 900mm (36″) long for the horizontal door rails
- 10 meters (33ft) of 75mm x 25mm (1″ x 3″) batten
- 130 galvanized wood screws 45mm (1 3/4″) long
- Some exterior type wood glue.
Instructions:
- Lay the five 200mm x 25mm x2075mm (1″ x 8″ x 83″) vertical door slats next to each other on a flat surface forming a rectangular panel. See fig.1. Cut down the two side slats (lengthwise) as necessary to achieve a door width of 900mm (36″).
- Glue and screw two 200mm x 25mm (1″ x 8″) horizontal boards (rails) to the vertical door slats, one at the top and one at the bottom. See fig.2.
- The length of the screws should be slightly less than the thickness of the door. Refer to fig.2 for screw placement.

- Cut to length and glue and screw two 75mm x 25mm (1″ x 3″) battens to the slats at each side of the door. Screw in a zig-zag pattern as shown in fig.3.
- Cut to length and glue and screw the middle horizontal rail in place between the two side vertical battens.
- The height placement is just personal preference, although middle rails are usually placed within the top half of the door. See fig.4.
- It is now just a matter of cutting to length, gluing and screwing the intermediate 75mm x 25mm (1″ x 3″) battens to the door slats covering all of the joins. See fig.5.
Installing the door
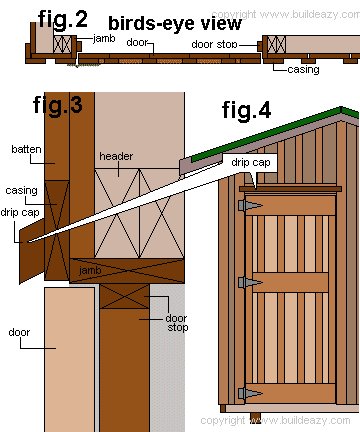
Door Installation
- Add the hinges to the horizontal rails on the door and then ‘hang’ the door in place by fastening the loose ends of the hinges to the casing (trim) surrounding the door opening.
- Fixing the hinges to the casing allows the door to open 180°
Adding the door stop
- Fix 50mm x 25mm (1″ x 2″) wood (door stop) to the jamb around the inside perimeter (sides and top) of the door to cover the gap between the door edge and the jamb.
- Do not fix the door stop tight against the door on the hinged side. A little bit of play is needed to ensure the edge of the door does not bind against the door stop when the door is being opened or closed. See fig.2 and fig.3.
Adding a drip cap
- A drip cap is a horizontal piece of molding that is fixed above the door to deflect any water from running inside.
- This can be shaped from 75mm x 25mm (1″ x 3″) stock and fixed to the casing directly above the door. See fig.3 and fig.4.
Done! Install a Window and you’re done!
Final note
Wind: It is presumed that this shed will be tucked away in a sheltered part of the back yard without any real concern about the wind, and because it is a heavy and solid structure, it is highly unlikely that it is going to blow away under normal conditions. However….. If the shed is situated in a windy area and there are concerns, then additional securing measures should be taken. The shed will need to be fastened against uplift.
1.) Concrete a pile or post into the ground under each corner of the shed and fasten to the bottom plate with a metal strap or similar type of fastener.
2.) At each corner fasten the bottom plate to the stud with a metal strap or similar type of fastener.
3.) At each corner fasten the stud to the top plate with a metal strap or similar type of fastener.
Nailing and Fastening Information
For the most part of this project galvanized common nails can be used. A common nail has a flattish round head about twice the diameter of the nails shank that is clearly visible after the nail has been driven home. However, If you prefer a finished external wall covering (siding) that does not display any nail heads then a nail such as a ‘brad’ that can be set (punched) in to the wood and covered with putty or filler will need to be used.

The Floor
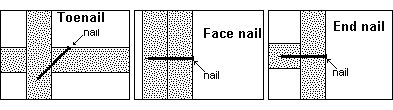
- Use 90mm (3 1/2″) galvanized nails to construct the floor frame and ‘toenail’ the joists to the skids.
- Use 60mm (2 1/2″) galvanized nails to fix the plywood floor to the floor frame nailing 150mm (6″) apart along the seams (where the sheets join) and a maximum of 200mm (8″) apart around the perimeter and along all intermediate joists.
The Frames
- Use 90mm (3 1/2″) galvanized nails for all wall and roof framework, 2 nails at each meeting. Most nailing options are obvious. Where possible face nail and end nail. For example, end nail all plates to studs. When it is not possible to ‘end nail’ such as with a row of blocking between studs, then the only option is to toenail.
The Rafters
- When the rafters are fixed in position on the sidewall top plates, secure against uplift by nailing a hurricane tie to the bottom of each rafter and the top plate as shown in the drawing.
- Use eight 38mm (1 1/2) galvanized flathead nails per hurricane tie or special product nails that may come with the purchase of the hurricane ties.
Roof Sheathing
- Use 60mm (2 1/2″) galvanized nails. Nail a maximum of 200 (8″) apart along all rafters, purlins and ridge beam.
Roofing iron
- Use nails suitable for roofing iron. Obtainable from the roofing iron stockist.
Vertical Boards
- Nail the boards to the horizontal blocking with 60mm (2 1/2″) galvanized nails spaced approximately 75mm (3″) apart (including the nail that will be going through the batten).
Vertical Battens
- Use 75mm (3″) galvanized nails. Nail on the center line of the batten, through the gap between the boards and into the blocking.
Trim, Fascia, Rake board
- Use 75mm (3″) galvanized nails.


I really needed a shed and decided to build it myself and thanks to your plans I was able to accomplish this project. I made some modifications and did make some mistakes but over all I am really please at the outcome. By the way this was my first attempt at building anything. I think I will try some of your other projects.
Frank