Contents
Introduction
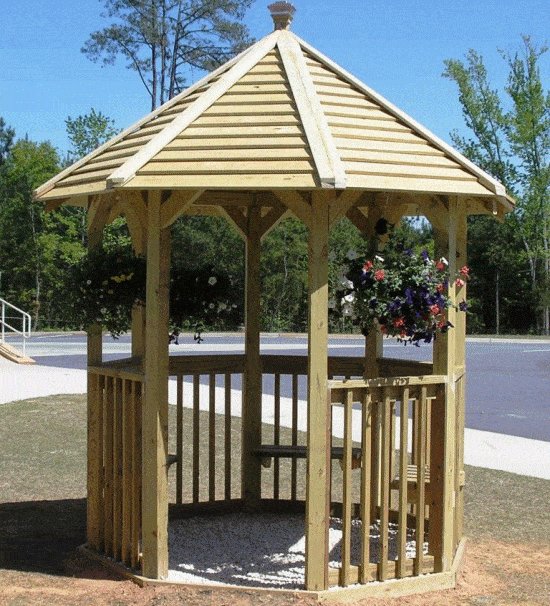
This 8ft (2400mm) diameter octagonal Gazebo is one of the more simple and cost effective octagonal gazebos to build.
The entire gazebo is constructed out of rough sawn (not dressed) lumber, which in most parts is readily available and cheaper than dressed or surfaced lumber. Rough sawn lumber also looks attractively rustic.
The floor: There is no allowance for a structural floor in this plan-set as the gazebo is designed to use the existing (grassed) ground as a ‘floor’. If a structural floor of some description is preferred, then concrete, tiles, slate or lumber can easily be added later.
Note: These plans are not intended for the purpose of building permit or consent. If you have any doubts whether a building permit or consent is required for the structure of this gazebo, please inquire at your local authority.
Footing and Post Layout
This gazebo has been designed with eight posts concreted into the ground rather than bolted to a concrete slab or lumber floor. This means that a floor is not necessary – grass will do quite nicely! However if a floor of some description is preferred, then concrete, tiles, slate or lumber can easily be added later without affecting the structure of the gazebo.
As the posts are to be concreted into the ground, no other bracing is required for the gazebo. Any arches or corbels (the fancy bits between the posts and the head beams) are solely decorative rather than structural.
The setting out of the eight posts is the most crucial requirement of this project. It is important to spend time on this and to do it properly. This is how:
Making a footing and post template
Ft and inch version: (metric version below)
- Find or create an area of even ground where you intend to construct the gazebo. The area should have at least a 10ft diameter to give you room to work.
- Make a template for the footing holes and posts out of four straight pieces of 1×4 lumber 85″ long.
- The width and thickness of the lumber are not important, however the length (85″) must be measured correctly. The type of lumber is not important either, as this template will be discarded once the posts have been concreted into the ground.
- Measure carefully and mark the centers of each piece of lumber (fig 1) and drill a 1/8″ diameter hole all the way through the center mark.
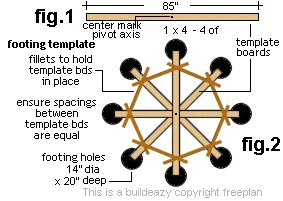
- Stack the four pieces of lumber on top of one another. Hammer a 4″ nail into the center hole and through the four pieces of lumber we will call the template boards.
- Fan the template boards out using the nail in the middle as the axis pivot (fig 2). Rotate the lumber template boards around until all ends are an equal distance apart. Each piece of lumber should be at 45 degrees to one another.
- Get eight lumber fillets approximately 1×2 and about 44″ long. (These measurements are not crucial, as the lumber fillets will only be used to brace and hold the template boards in place.)
- Lay the fillets on top of the template boards about 12″ in from the end (fig 2) and clamp the fillets to the template boards. Double check that ends of the template boards are all equal distances apart. If not, loosen the clamps and make any necessary adjustments. You have now built your template.
- Place the template flat on the ground where you are to build the gazebo.
- Once the template is in place you can then mark out the footing hole positions.
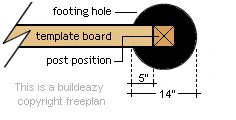
- Mark out each of the eight footings with a spray can using the dimensions as in drawing: 14″ diameter and set back 5″ from the end of each template board. (See drawing.)
- When all eight footings are marked the template can then be removed to allow for digging the holes. Dig all holes 20″ deep.
- Before any concrete work commences, make sure all your posts are in a handy position. The posts will be sawn treated lumber, 4×4 and approx 10ft long – slightly longer than needed, but the tops can be trimmed when the concrete is hard. Once holes are dug, place the template back into its original position and check once again that the ends of the template boards are equal distance apart.
Metric version:
- Find or create an area of even ground where you intend to construct the gazebo. The area should have at least a 3000mm diameter to give you room to work.
- Make a template for the footing holes and posts out of four straight pieces of timber 100mm wide, 25mm thick and 2156mm long. The width and thickness of the timber are not important, however the length (2156mm) must be measured correctly. The type of timber is not particularly important either, as this template will be discarded once the posts have been concreted into the ground.
- Measure carefully and mark the centers of each piece of timber (fig 1) and drill a 3.5mm diameter hole all the way through the center mark.

- Stack the four pieces of timber on top of one another. Hammer a nail (100mm x 3.5mm) into the center hole and through the four pieces of timber we will call the template boards.
- Fan the template boards out using the nail in the middle as the axis pivot (fig 2). Rotate the timber template boards around until all ends are all an equal distance apart. Each piece of timber should be at 45 degrees to one another.
- Get eight timber fillets (approximately 1100mmx50mmx25mm). These measurements are not crucial, as the timber fillets will only be used to brace and hold the template boards in place.
- Lay the fillets on top of the template boards about 300mm in from the end (fig 2) and clamp the fillets to the template boards. Double check that ends of the template boards are all equal distances apart. If not, loosen the clamps and make any necessary adjustments. You have now built your template.
- Place the template flat on the ground where you are to build the gazebo.
- Once the template is in place you can then mark out the footing hole positions.
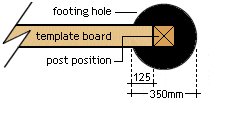
- Mark out each of the eight footings with a spray can, using the dimensions as in drawing, i.e. 350mm diameter and set back 125mm from the end of each template board.(See drawing.)
- When all eight footings are marked the template can then be removed to allow for hole digging. Dig all holes 500mm deep.
- Before any concrete work commences, make sure all your posts are in a handy position. The posts will be sawn treated pine, 100mmx100mm and 2800mm long, i.e. slightly longer than needed, but the tops can be trimmed when the concrete is hard. Once holes are dug, place the template back into its original position and check once again that the ends of the template boards are equal distance apart.
Mixing Concrete & Standing Posts
Mixing the concrete
In a wheelbarrow or concrete mixer, make a mix consisting of 5 parts gravel and sand mix, to one part cement.
Pour in clean water and mix to a uniform consistency with a spade or shovel. The mix should be stiff enough to hold up the posts without bracing props yet wet enough to work around the posts.
Standing up the posts

- This will take two people. One to hold the post and one to shovel the concrete into the hole.
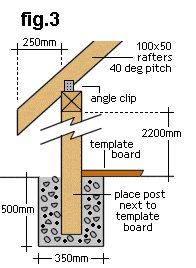
First shovel some concrete into the hole so there is at least a 3″ (75mm) concrete base under the bottom end of the post. Place a post into the hole so it sits against the end of the template board (fig 3) and ensure post is plumb or vertical by way of holding a spirit level against two adjacent sides of the post. - Fill the hole with concrete and check again that the posts are plumb. Because of the depth of the hole and the stiffness of the concrete, the post will stay up by itself. Of course you will need a calm day! Repeat this procedure until all posts are in concrete, in place and standing plumb/vertical. Check again an hour later.
Well, that’s all you can do today so you may as well go inside and watch your favorite sport on TV.
The next day / Head beams
The next day
All of the eight posts are now firmly set in place but the tops need to be trimmed off. (Remember, all the posts were longer than needed).
Ft and inch version: (metric version below)
- Measure from the ground 87″ up one of the posts (we are assuming the ground is reasonably level) and mark with a pencil.
- With your set square, draw a pencil line around all four sides of the post (87″) from the ground).
- You will probably need a ladder or saw stool to do this.
- Now, hammer a 4″ nail partly into the outside edge of the post you have just marked on the underside of the pencil line.
- Sit one end of a level on that nail and hold the other end level against the next post.
- Mark the underside of the level with a pencil on the second post, checking of course, that the level is level, too.
- If your level is not long enough to span from one post to the next, get a straight piece of lumber 40″ long, and use that with the level sitting on top.
- With your set square mark a pencil line around all four sides of the second post, and again hammer a 4″ nail partly in, the same as on the first post.
- Repeat this action until all eight posts are marked.
- Check that the pencil line on the last post is level with the line on the first post, if not, go around again with the level and find the discrepancies.
Trimming the posts
- Cut off the top of the posts where you have marked, with a circular saw.
- If the circular saw does not cut all the way through the post, finish the cut off with a handsaw. Make sure you have firm footing.
- If necessary erect a scaffold about 2ft off the ground to help you reach.
Head Beams
- For the head beams you will need eight pieces of 4×4 lumber 40″ long.
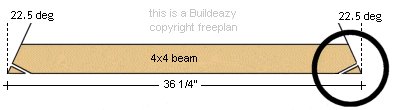
- Pencil a square line at one end of the beam with your set square as shown in the diagram below and then pencil another line 22.5 degrees from the first.

- Cut on this line with your circular saw.
- If your circular saw does not cut all the way through the beam, finish the cut off with a handsaw.
- Measure from the long point and along the beam 36 1/4″ and do the same cut that end as you have done the other end.
- Another cut is required: 2″ long and square (right angles) to the edges just cut.
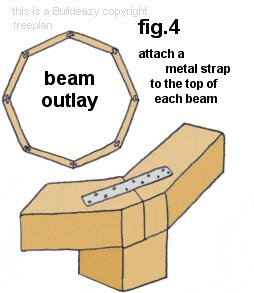
- To achieve this, hold your set square against the newly cut edge and slide it along until you’re able to pencil a line 2″ long, square to the cut edge and finishing at the beams longest (face) edge. Sounds complicated I know, but just follow the drawing in the circle. Also see fig 4.
- Repeat this for all eight beams.
- You now have all eight beams ready to sit in place.
- Sit the eight head beams on top of the eight posts as per fig 4 and skew nail (toe nail) the beams to the posts with 4″ galvanized nails.
- Nail a 12″ long metal strap plate to the top side of each head beam join. Also see fig 4.
- This will stop any likely outward movement of the gazebo.
- Nail the metal strap plates with 2″ (flathead) galvanized nails.
Metric version:
- Measure from the ground 2200mm up one of the posts (we are assuming the ground is reasonably level) and mark with a pencil. With your set square, draw a pencil line around all four sides of the post (2200mm from the ground). You will probably need a ladder or saw stool to do this.
- Now, hammer a 90mm nail partly into the outside edge of the post you have just marked on the underside of the pencil line. Sit one end of a level on that nail and hold the other end level against the next post. Mark the underside of the level with a pencil on the second post, checking of course, that your level is level, too! If your level is not long enough to span from one post to the next, get a straight piece of timber 1000mm long, and use that with the level sitting on top.
- With your set square mark a pencil line around all four sides of the second post, and again hammer a 90mm nail partly in, the same as on the first post. Repeat this action until all eight posts are marked. Check that the pencil line on the last post is level with the line on the first post. If not, go around again with the level and find the discrepancies.
Trimming the posts
- Cut off the top of the posts where you have marked, with a circular saw.
- If the circular saw does not cut all the way through the post, finish the cut off with a handsaw.
- Make sure you have firm footing and if necessary, erect a scaffold about 600mm off the ground.
Head Beams
- For the head beams you will need eight pieces of timber 100×100 and 1000mm long. (Rough sawn treated pine, suitable for outside use.)
- Pencil a square line at one end of the beam with your set square as on the diagram below and then pencil another line 22.5 degrees from the first.
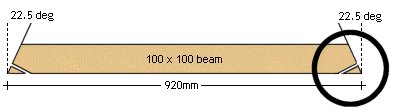

- Cut on this line with your circular saw.
- If your circular saw does not cut all the way through the beam, finish the cut off with a handsaw.
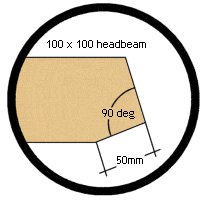
- Measure from the long point and along the beam 920mm and do the same cut that end as you have done the other end.
- Another cut is required, this one 50mm square to the edges just cut.
- To achieve this, hold your set square against the newly cut edge and slide it along until you are able to pencil a line 50mm long, square to the cut edge and finishing at the beams longest (face) edge.
- Sounds complicated I know, but just follow the drawing in the circle.
- Also see fig 4. Repeat this for all eight beams.
- You now have all eight beams ready to sit in place. Sit the eight head beams on top of the eight posts, see fig 4 and skew nail beams to posts with 90mm galvanized jolt head nails.
- Nail a 300mm long metal strap plate to the top side of each head beam join. (Also see fig 4.)
- This will stop any outward movement of the gazebo.
- Nail the metal strap plates with 50mm clout head (flat head) galvanized nails.
Beam an post braces and making the hub
Ft and inch version: (metric version below)
Beam / post braces
- The beam/post braces are fixed to the top of the posts and to the underside of the head beam.
- Two per post, so a total of sixteen is required.
- The beam/post braces are decorative rather than structural, as the posts concreted into the ground are support enough for any sideways movement. For these beam/post braces you will need 16 lengths of 4×4 sawn treated pieces of lumber at approximately 16″ long. (It’s up to you whether you replace these beam and post braces with something more fancy.)
- At the end of one of the pieces of lumber cut a 45 degree angle (fig 5). Measure back 14″ from the long point of the cut and pencil mark another 45 degree angle inward. Set your circular saw blade at 22.5 deg. and cut along that pencil mark.
- Repeat this on all 16 pieces of lumber.
- Fix all 16 pieces in place as per fig 5 with 4″ galvanized nails.
- It is sometimes wise to drill the nail holes first with a slightly smaller drill bit to ensure no splitting of the lumber occurs.
Making the hub
- The hub is the piece of lumber that goes to the very top of the gazebo roof (apex).
- The eight roof rafters are fixed to the hub.
- Get a length of 4×4 sawn treated lumber 2ft long.
- Make a pencil line down the length of the lumber 1 1/4″ in from the edge as per fig 6. Do the same along all four edges.
- Set the angle on the circular saw to 45 degrees and rip-cut down the four pencil lines.
- You now have made the hub.
Metric version:
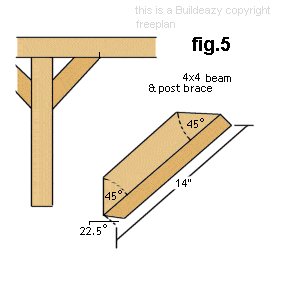
Beam/post braces

- The beam/post braces are fixed to the top of the posts and to the underside of the head beam.
- Two per post, so a total of sixteen is required.
- The beam/post braces are decorative rather than structural, as the posts concreted into the ground are support enough for any sideways movement. If you prefer, you can replace these beam and post braces with something more decorative.
- However, for these beam/post braces you will need 16 lengths of 100×100 sawn treated timber at approximately 400mm long.
- At the end of one of the pieces of timber cut a 45 degree angle (fig 5). Measure back 350mm from the long point of the cut and pencil mark another 45 degree angle inward. Set your circular saw blade at 22.5 deg. and cut along that pencil mark. Repeat this on all 16 pieces of timber. Fix all 16 pieces in place (fig 5.) with 90mm galvanized jolt head nails.
- It is sometimes wise to drill the nail holes first with a slightly smaller drill bit to minimize the chance of the timber splitting.
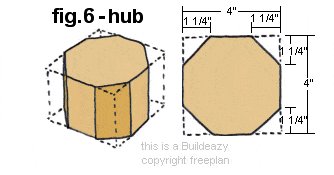
Making the hub
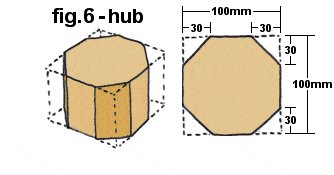
- The hub is the piece of timber that goes to the very top of the gazebo roof (apex).
The eight roof rafters are fixed to the hub. - Get a length of 100×100 sawn treated pine timber 600mm long.
Scribe a pencil line down the length of the timber 30mm in from the edge fig 6. Do the same along all four edges.
Set the angle on the circular saw to 45 degrees and rip-cut down the four pencil scribe lines. - You now have made the hub.
The Roof Rafters and Hub
Ft and inch version: (metric version below)
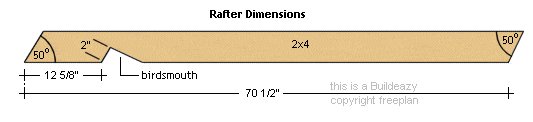

- Take 8 lengths of 2×4 sawn treated pine lumber approx 74″ long, from which the rafters will be cut.
Cut one piece to the dimensions of the diagram above and then use that piece as a template to mark and cut the other seven. - Once all rafters are cut, you will need someone to give you a hand to assemble them.
- Start by nailing two opposing rafters to the hub whilst laying them flat on the ground.
- Nail with 4″ galvanized nails and drill first if necessary.
- Place a scaffold plank (approx 9ft or longer) on top of the gazebo beams and spanning the gazebo close to the center.
- One person will need to be up on the scaffold plank and the other to pass up the two opposing rafters nailed to the hub.
- While the person on the scaffold plank balances the first two opposing rafters, the other can fix the birds-mouth (see drawing above) end of the rafters to the beam, central over the post.
- Once the rafter is nailed in place, attach an angle clip for added strength on top of the beam and against the rafter (one each side) and fix with 2″ galvanized (flathead) nails.
- The next rafter can then be put into place followed by an opposing rafter, and so on until all eight are in place and firmly fixed.
Metric version:
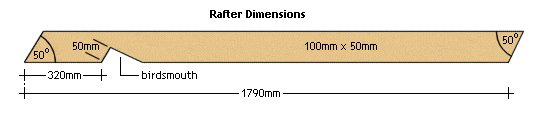

- Take 8 lengths of 100×50 sawn treated lumber approximately 2000mm long from which the rafters will be cut.
- Cut one piece to the dimensions of the diagram above and then use that piece as a template to mark and cut the other seven. Once all rafters are cut, you will need someone to give a hand to assemble them.
- Start by nailing two opposing rafters to the hub whilst laying them flat on the ground.
- Nail with 90mm galvanized jolt head nails and drill first if necessary.
- Place a scaffold plank (approx 2600mm or longer) on top of the gazebo beams and spanning the gazebo close to the center.
- One person will need to be up on the scaffold plank with another to pass up the two opposing rafters nailed to the hub.
- While the person on the scaffold plank balances the first two opposing rafters, the other can fix the birds-mouth (see drawing above) end of the rafters to the beam, central over the post.
- Once the rafter is nailed in place, attach an angle clip (see fig.3 on page 3) for added strength on top of the beam and against the rafter, one each side and fix with 50mm galvanized clouts (flathead) nails.
- The next rafter can then be put into place followed by an opposing rafter, and so on until all eight are in place and firmly fixed.
The Roof laying the roofing boards
Laying the Roof Boards
Ft and inch version: (metric version below)
- The roof is constructed of 1×6 sawn (undressed, unsurfaced) treated lumber.
- You will need 220ft in random lengths for this.
- Always cut the longest boards first, so the off-cuts can be utilized for the smaller boards.
- Firstly, put two pencil marks (square off the board) 42″ apart along the edge of one of the random lengths of 1×6 lumber. (See fig 8.)
- On those two pencil marks, pencil another line inward at 20 degrees.
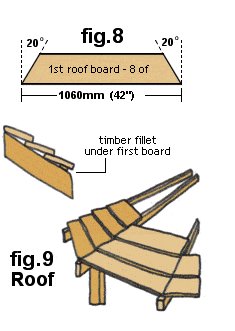
- Set the blade on your circular saw to 11 degrees and cut along the pencil lines.
You now have your first roof board, and you will need eight at this length. - Cut the rest of the roof boards to the following lengths (the measurement being the longest point):
- 8@ 42″ (already cut); 8@ 38 3/4″; 8@ 35 1/2″; 8@ 32 1/4″; 8@ 29″; 8@ 25 3/4″; 8@ 22 1/2″; 8@ 19 1/2″;8@ 16 1/2″; 8@ 13 1/4″; 8@ 10″; 8@ 7″; 8@ 4″;
- When all the roof boards are cut, 104 in total, take the first board (one of the 42″ longest boards) and place it on top of the rafters in a position so that the two ends are sitting on the center of the rafters and both ends of the roof boards are equal distance from the bottom of the rafters.
- Temporarily tack this board in place and then proceed with the next 42″ board, butting up tight to the first board and tacking to the next rafter.
- Continue this action around the perimeter of the gazebo roof.
- On the first boards only, a 1″ thick fillet or packer will need to be inserted under the bottom edge of the board and on the rafter, in order to raise it to the same pitch as the rest of the following roof boards. (See fig 9.)
The rafter pitch is 40 degrees, but because all the roof boards lower edges are raised to sit on the roof boards beneath them, the roof board pitch will be more like 30 degrees. - When the first row of boards (the eight 42″ boards) are in place with the fillets or packers inserted, (fig 9) and are all equal distance up from the ends of the rafters, and all joining in the center of the rafters, then nail them in place onto the rafters.
- From here on it gets easier.
- Get one of the next longest roof boards (38 3/4″) and lay it on one of the first fixed boards so that the ends line up flush with the lower board ends
- Check both boards are parallel. Nail in place.
- Continue this around the perimeter and so on, until all the roof boards are fixed in place.
The last row of boards (at the very top) might need a trim to ensure they fit snuggly against the hub at the apex of the gazebo. - Drill and screw roof boards together where the span exceeds 20″.
Metric version:
- The roof is constructed of 150mm x 25mm sawn (undressed) treated pine timber, a timber commonly used for fencing, and readily available at any merchants.
- You will need 65 meters in random lengths of this.
- Always cut the longest boards first, so the off cuts can be utilized for the smaller boards.
- Firstly, put two pencil marks (square off the board) 1060mm apart along the edge of one of the random lengths of 150×25 timber (fig 8).
- On those two pencil marks, pencil another line inward at 20 degrees.

- Set the blade on your circular saw to 11 degrees and cut along the pencil lines.
- You now have your first roof board, and you will need eight at this length.
- Cut the rest of the roof boards to the following lengths, the measurement being the longest point.
- 8@ 1060mm (already cut); 8@ 980mm; 8@ 900mm; 8@ 820mm; 8@ 740mm; 8@ 660mm; 8@ 580mm; 8@ 500mm; 8@ 420mm; 8@ 340mm; 8@ 260mm; 8@ 180mm; 8@ 100mm;
- When all the roof boards are cut (104 in total), take the first board (one of the 1060mm longest boards) and place it on top of the rafters in a position so that the two ends are sitting on the center of the rafters and both ends of the roof boards are equal distance from the bottom of the rafters.
- Temporarily tack this board in place and then proceed with the next 1060mm board, butting up tight to the first board and tacking to the next rafter.
- Continue this action around the perimeter of the gazebo roof.
- On the first boards only, a 25mm thick fillet or packer will need to be inserted under the bottom edge of the board and on the rafter in order to raise it to the same pitch as the rest of the following roof boards. (See fig 9.)
- The rafter pitch is 40 degrees, but because all the roof boards lower edges are raised to sit on the roof boards beneath them, the roof board pitch will be more like 30 degrees.
- When the first row of boards (the eight 1060mm bds) are in place with the fillets or packers inserted, (fig 9) and are all equal distance up from the ends of the rafters, and all joining in the center of the rafters, then nail them in place onto the rafters.
- From here on it gets easier.
- Get one of the next longest roof boards (980mm) and lay it on one of the first fixed boards so that the ends line up flush with the lower board ends.
- Check both boards are parallel. Nail in place.
- Continue this around the perimeter and so on, until all the roof boards are fixed in place.
- The last row of boards (at the very top) might need a trim to ensure they fit snuggly against the hub at the apex of the gazebo.
- Drill and screw roof boards together where the span exceeds 500mm.
The Handrail
Ft and inch version: (metric version below)
Handrail, top and bottom rails
You will need 14 pieces of 2×4 treated lumber approx 36″. These are the top and bottom rails.
Cut one end off at an angle of 22.5 degrees and then measure back 32″ and do the same the other end. (See fig 10.)
On one side only, pencil two lines 1″ apart along the length in the center of the rails as per fig 10.
Set the blade on your circular saw to a depth of 3/4″ and do repeated cuts along and between the two pencil lines.
Clean out with a chisel.
This will give you a rebated groove 1″ wide x 3/4″ deep along the center on one side of each rail.
Handrail boards
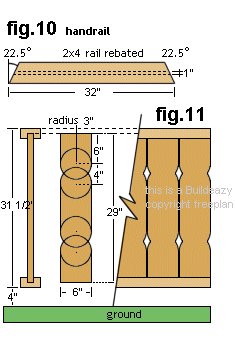
- You will need 40 lengths of 1×6 lumber boards (the same as used for the roof) Any pattern of your choice can be implemented.
- The pattern in (fig 11) is just one idea.
- Make the pattern on one piece of board and use that as a template to do the rest.
Fitting the handrail
- Fit the boards into the rebated grooves in the top and bottom rails.
- This is best done by laying the top and bottom rails on the ground and then inserting the boards into the grooves.
- The number of boards will not work out exactly, so one of the boards will need to be marked and ripped (cut) down.
- When one section is finished, tie a rope around each end so the boards will not fall out while that section is being installed.
- Nail each section in, 4″ off the ground and fix the rails to the posts with 4″ galvanized nails.
- Do this to all seven sections.
- One section (section eight) is not made, as this is the point of entry into the gazebo.
Have fun!
Metric version:
Handrail, top and bottom rails
You will need 14 pieces of timber 100×50 sawn treated pine approximately 900mm long. These are the top and bottom rails.
Cut one end off at an angle of 22.5 degrees and then measure back 810mm and do the same the other end. (See fig 10.)
On one side only, pencil two lines 25mm apart along the length in the center of the rails as per fig 10.
Set the blade on your circular saw to a depth of 20mm and do repeated cuts along and between the two pencil lines.
Clean out with a chisel.
This will give you a rebated groove 25mm wide x 20mm deep along the center on one side of each rail.
Handrail boards
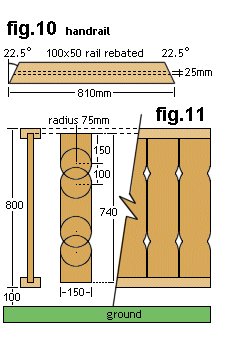
- You will need 40 lengths of 150×25 timber (the same timber as used on the roof) Any pattern of your choice can be implemented.
- The pattern in (fig 11) is just one idea.
- Make the pattern on one piece of paling and use that as a template to do the rest.
Fitting the handrail
- Fit the palings into the rebated grooves in the top and bottom rails.
- This is best done by laying the top and bottom rails on the ground and then inserting the palings into the grooves.
- The number of palings will not work out exactly, so one of the palings will need to be marked and ripped (cut) down.
- When one section is finished, tie a rope around each end so the palings will not fall out while that section is being installed.
- Nail each section in, 100mm off the ground and fix the rails to the posts with 90mm galvanized jolt head nails.
- Do this to all seven sections.
- One section (section eight) is not made, as this is the point of entry into the gazebo.
Have fun!
Material & Tool list
Ft and inch version: (metric version below)
Materials needed to construct a rustic 8ft diameter octagonal gazebo
| Description | Material / size | Length | Quantity |
| Footings | |||
| cement | 1 bag | ||
| gravel and sand mix | 1/3 cubic yard | ||
| Template | 1×4 sawn | 85″ | 4 of |
| Fillets | 1×2 sawn | 44″ | 8 of |
| Posts | 4×4 sawn treated lumber | 10ft | 8 of |
| Framing | |||
| Hub | 4×4 sawn treated lumber | 24″ | 1 of |
| Head beam | 4×4 sawn treated lumber | 40″ | 8 of |
| Rafters | 2×4 sawn treated lumber | 74″ | 8 of |
| Beam and post brace | 4×4 sawn treated lumber | 20″ | 16 of |
| Handrail | |||
| Rails | 2×4 sawn treated lumber | 36″ | 14 of |
| vertical boards | 1×6 sawn treated lumber | random | 130ft |
| Roofing | 1×6 sawn treated lumber | random | 220ft |
| Hardware | |||
| Metal straps | 12″ strap plate | 8 of | |
| Angle clips | 2″ | 16 of | |
| Screws | 2″ exterior | 1 lb | |
| Nails | 4″ galvanized | 10 lb | |
| 2″ galvanized flat head | 5 lb |
Tool list
Tools needed to construct a rustic 8ft diameter octagonal gazebo:
- set square
- pencil
- hammer
- chisel (3/4″)
- clamps (8 of)
- measuring tape
- level
- ladder
- circular saw
- handsaw
- wheelbarrow
- spade or shovel
- electric drill
- scaffold plank (9ft long)
- saw stool
Metric version:
Materials needed to construct a rustic 2400mm octagonal gazebo
| Description | Material / size | Length | Quantity |
| Footings | cement | 1 40 kg bag | |
| builders mix | .25 cubic meters | ||
| Template | 100×25 sawn | 2200mm | 4 of |
| Fillets | 50×25 sawn | 1200mm | 8 of |
| Posts | 100×100 sawn treated pine | 3000mm | 8 of |
| Framing | |||
| Hub | 100×100 sawn treated pine | 600mm | 1 of |
| Head beam | 100×100 sawn treated pine | 1000mm | 8 of |
| Rafters | 100×50 sawn treated pine | 2000mm | 8 of |
| Beam and post brace | 100×100 sawn treated pine | 500mm | 16 of |
| Handrail | |||
| Railings | 100×50 sawn treated pine | 1000mm | 14 of |
| Palings | 150×25 sawn treated pine | random | 40 meters |
| Roofing | 150×25 sawn treated pine | random | 65 meters |
| Hardware | |||
| Metal straps | 300mm plate strap | 8 of | |
| Angle clips | 50mm | 16 of | |
| Screws | 50mm exterior | 0.5 kg | |
| Nails | 90mm galv jolt hd | 5 kg | |
| 50mm galv flat hd | 2 kg |
Tool list
Tools needed to construct a rustic 2400mm octagonal gazebo
- set square
- pencil
- hammer
- chisel (20mm)
- clamps (8 of)
- measuring tape
- level
- ladder
- circular saw
- handsaw
- wheelbarrow
- spade or shovel
- electric drill
- scaffold plank (2700mm long)
- saw stool


Dear BuildEazy,
I used your simple but excellent Gazebo plans in metric (also in imperial) this Spring 2010 and was able to complete the project with not too much hassle, the greatest weapon by far was the electric planer and I have bought another one as a result to finish a door project – well done to all with your BuildEazy site.
Here is my Gazebo – done by me and the missus in Livno, Western Bosnia…
best regards Brian Eager
Hi, Thanks for the plans! Here is a photo of the Gazebo. My son, father-in-law, and I built this Gazebo for his Eagle Scout Service Project! We really enjoyed it and the plans were easy to follow. The roof was the most challenging part!
-Brian McKenna
Hi. Just a photo of the garden gazebo that I made from your plans , really easy to make.
Simon Rowley