
Contents
Introduction
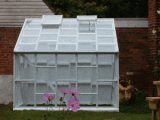
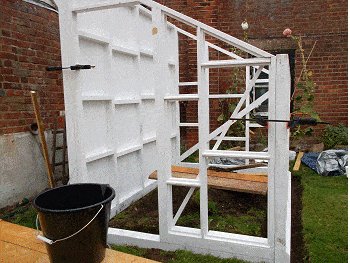
This glasshouse was constructed with minimal tools. The complete frame was cut out using just a circular power saw, as were all the rebates, trenches, and chamfers.
I designed and built this glasshouse while on a visit to London in June, 2013.
My mind was set on building a lean-to type.
Most lean-to glasshouses are attached to another building by some means or another.
However, in this case, an attached or fixed glasshouse would have required permits and permissions all of which would have taken time.
Glasshouse
$5.00My limited time in England made it almost impossible to get the necessary permits and permissions required to build such a structure.
I was therefore confined to designing and constructing a stand-alone, relocatable, lean-to glasshouse which would also have to be under a certain size to avoid contravening any local building law.
Of course different places have different rules and regulations so it is a good idea to find out from your local authority exactly what you are and are not allowed to do.
Something special about a wooden glasshouse
It is as if it’s meant to be.
Wooden glasshouses have a certain ambience or aura about them that their aluminium or metal counterparts seem to lack.
Maybe its because wood is natural (from plant), and therefore fits well with the plant life inside it.

The relocatable factor
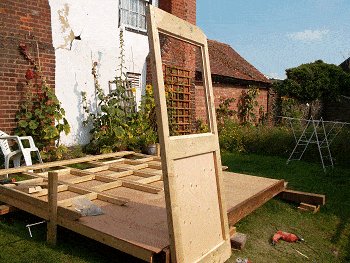
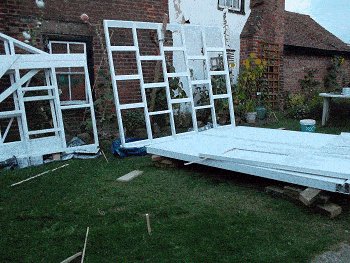
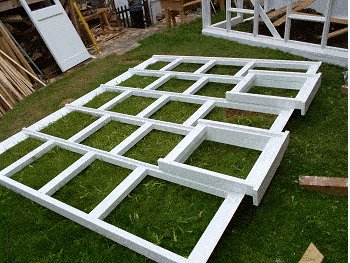
This glasshouse is relocatable in so much as it is in sections that can be easily assembled , easily dismantled, moved and reassembled again (as many times as you like).
Each wall is a section, as is the roof.
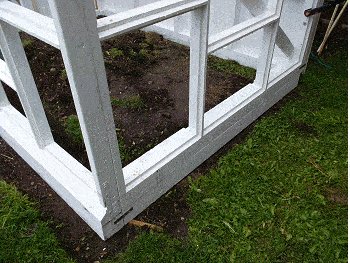
Each wall has a beam as its bottom plate to keep the wall rigid and help eliminate sag. The walls are designed to sit directly on even ground.
There are no footings – the unit just sits on the ground.
I, myself have not come across another stand alone, relocatable, lean-to glasshouse, but I dare say many do exist.
The structure of the thing
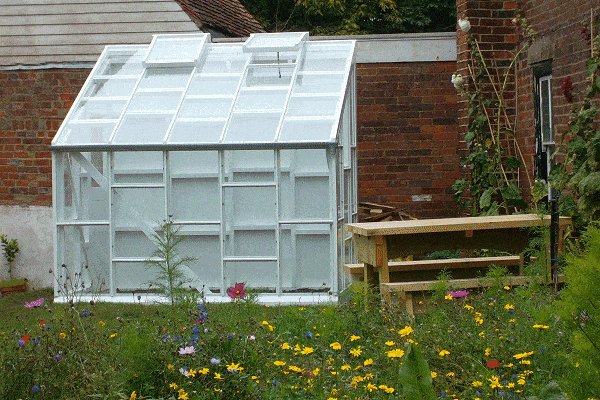
The size
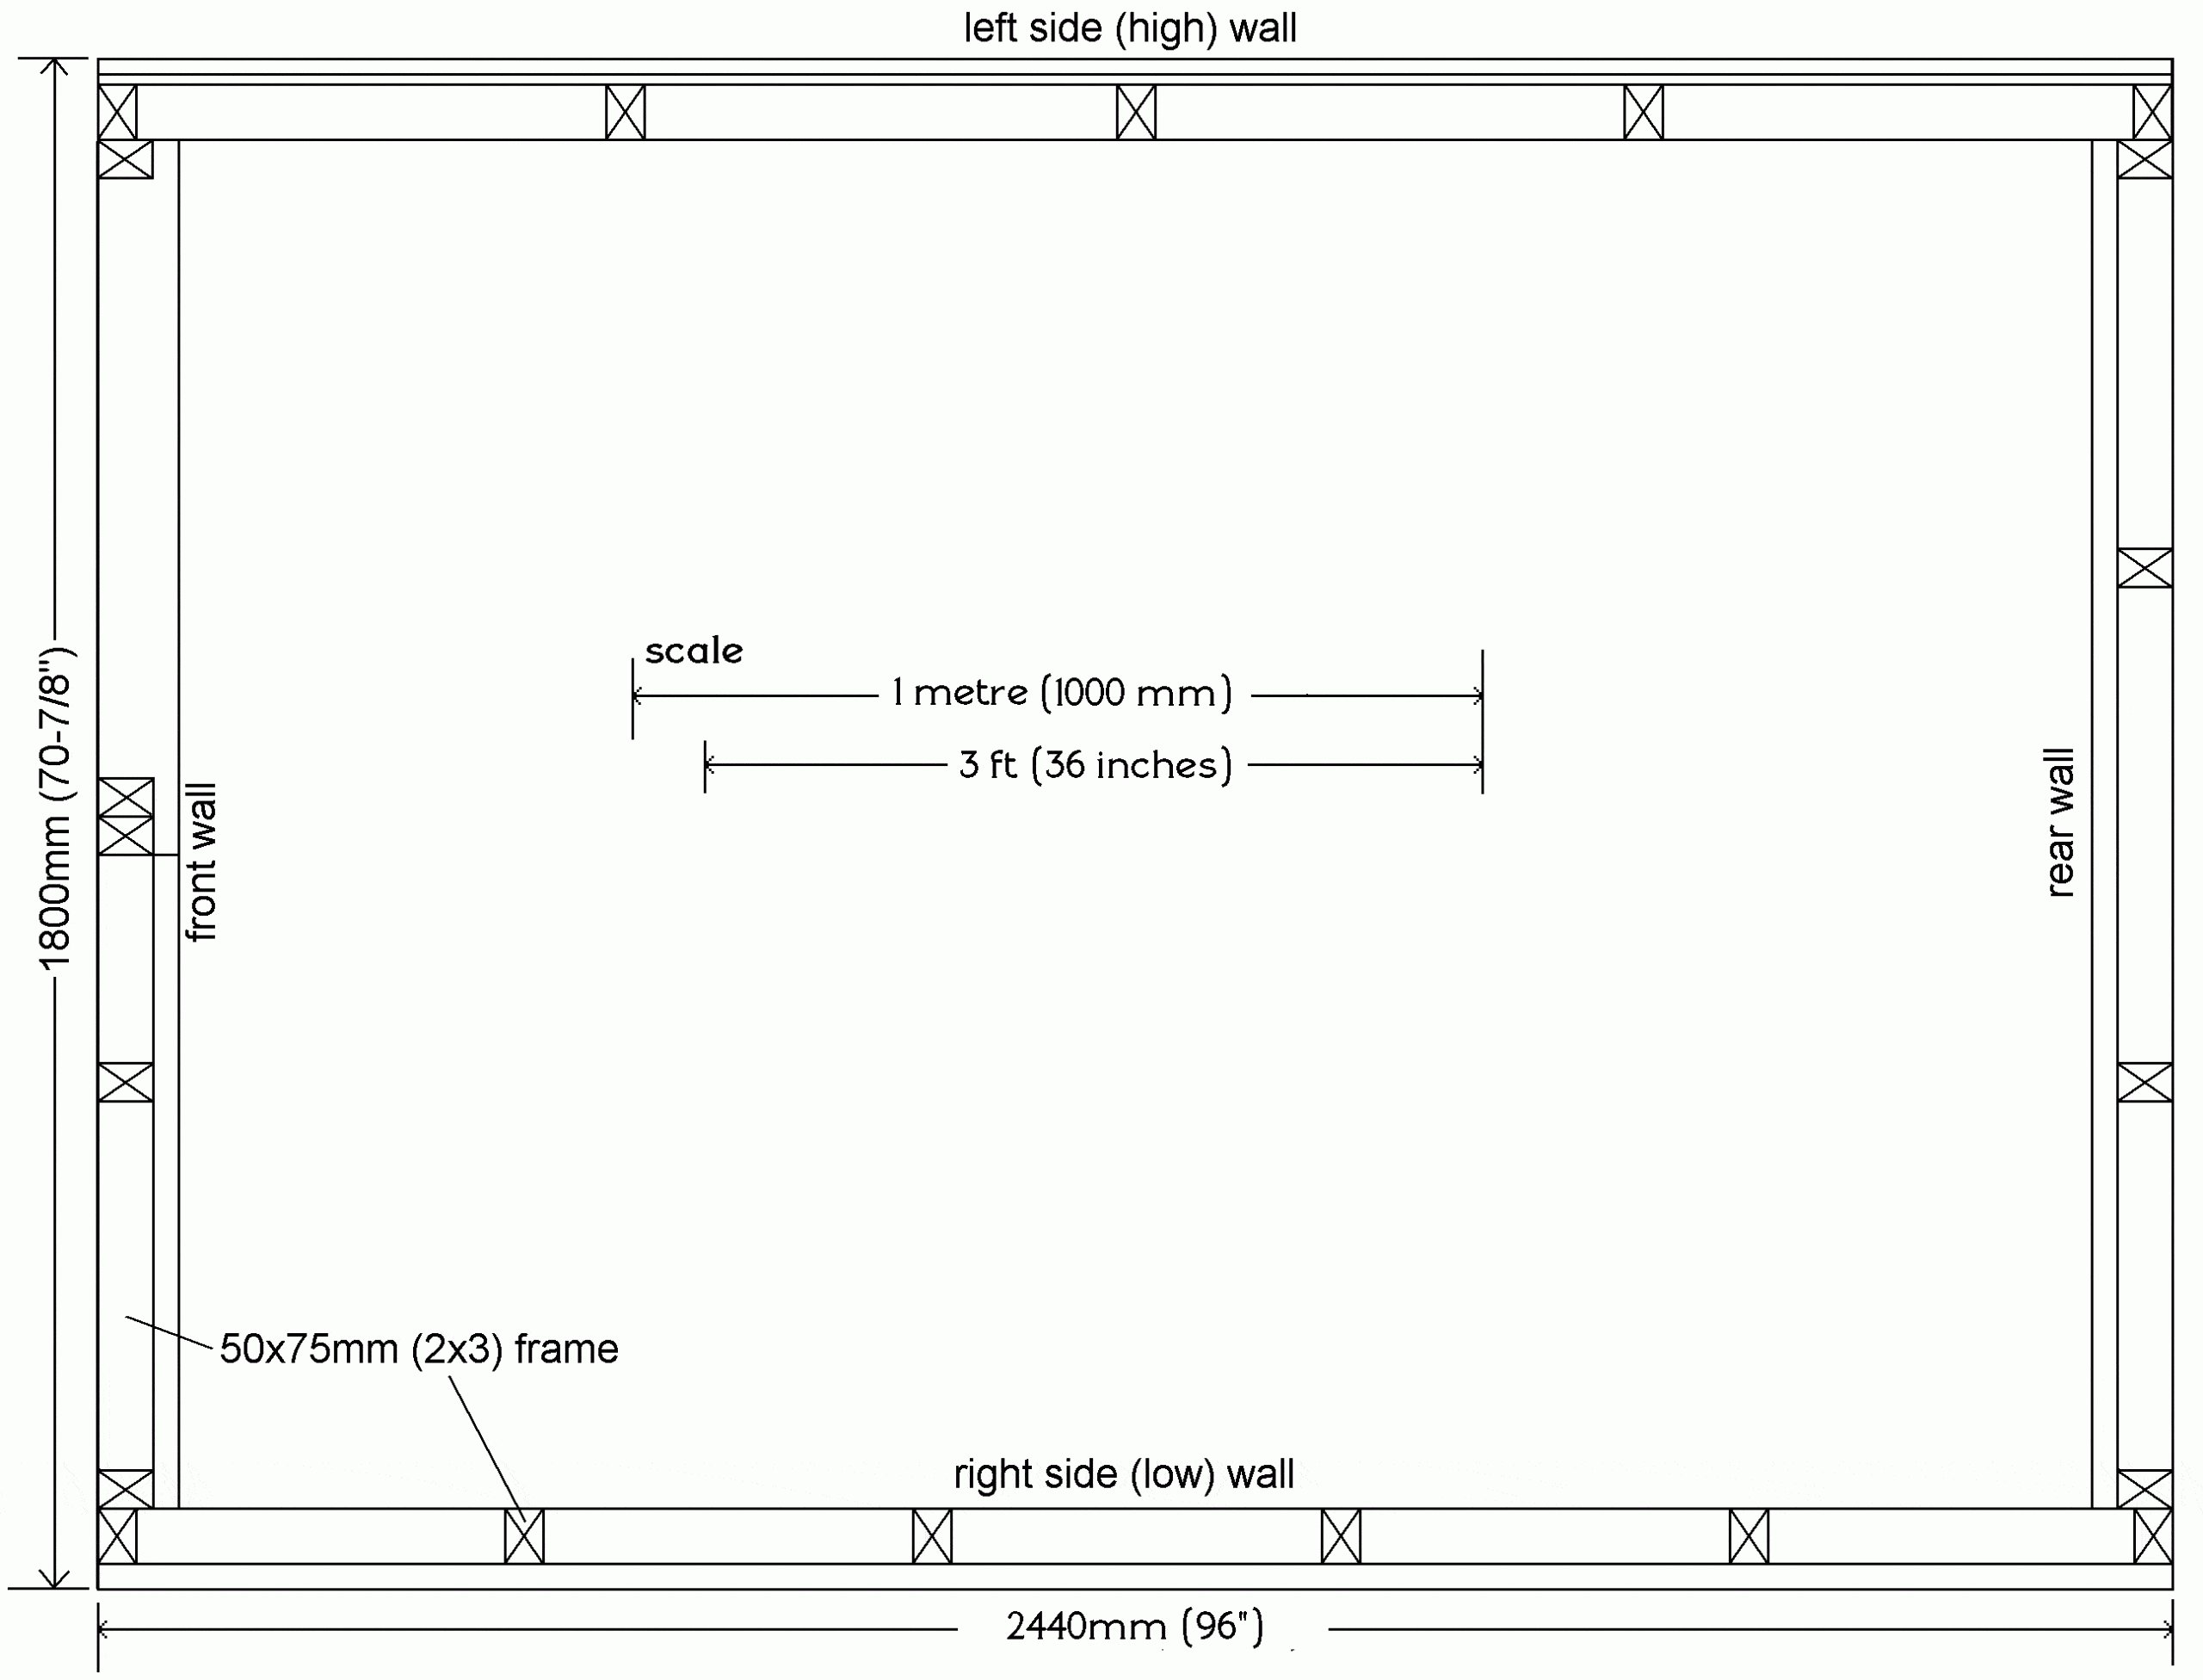
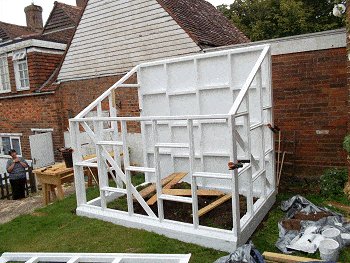
The footprint (ground area) is slightly bigger than 2400 mm x 1800 mm (8ft x 6ft).
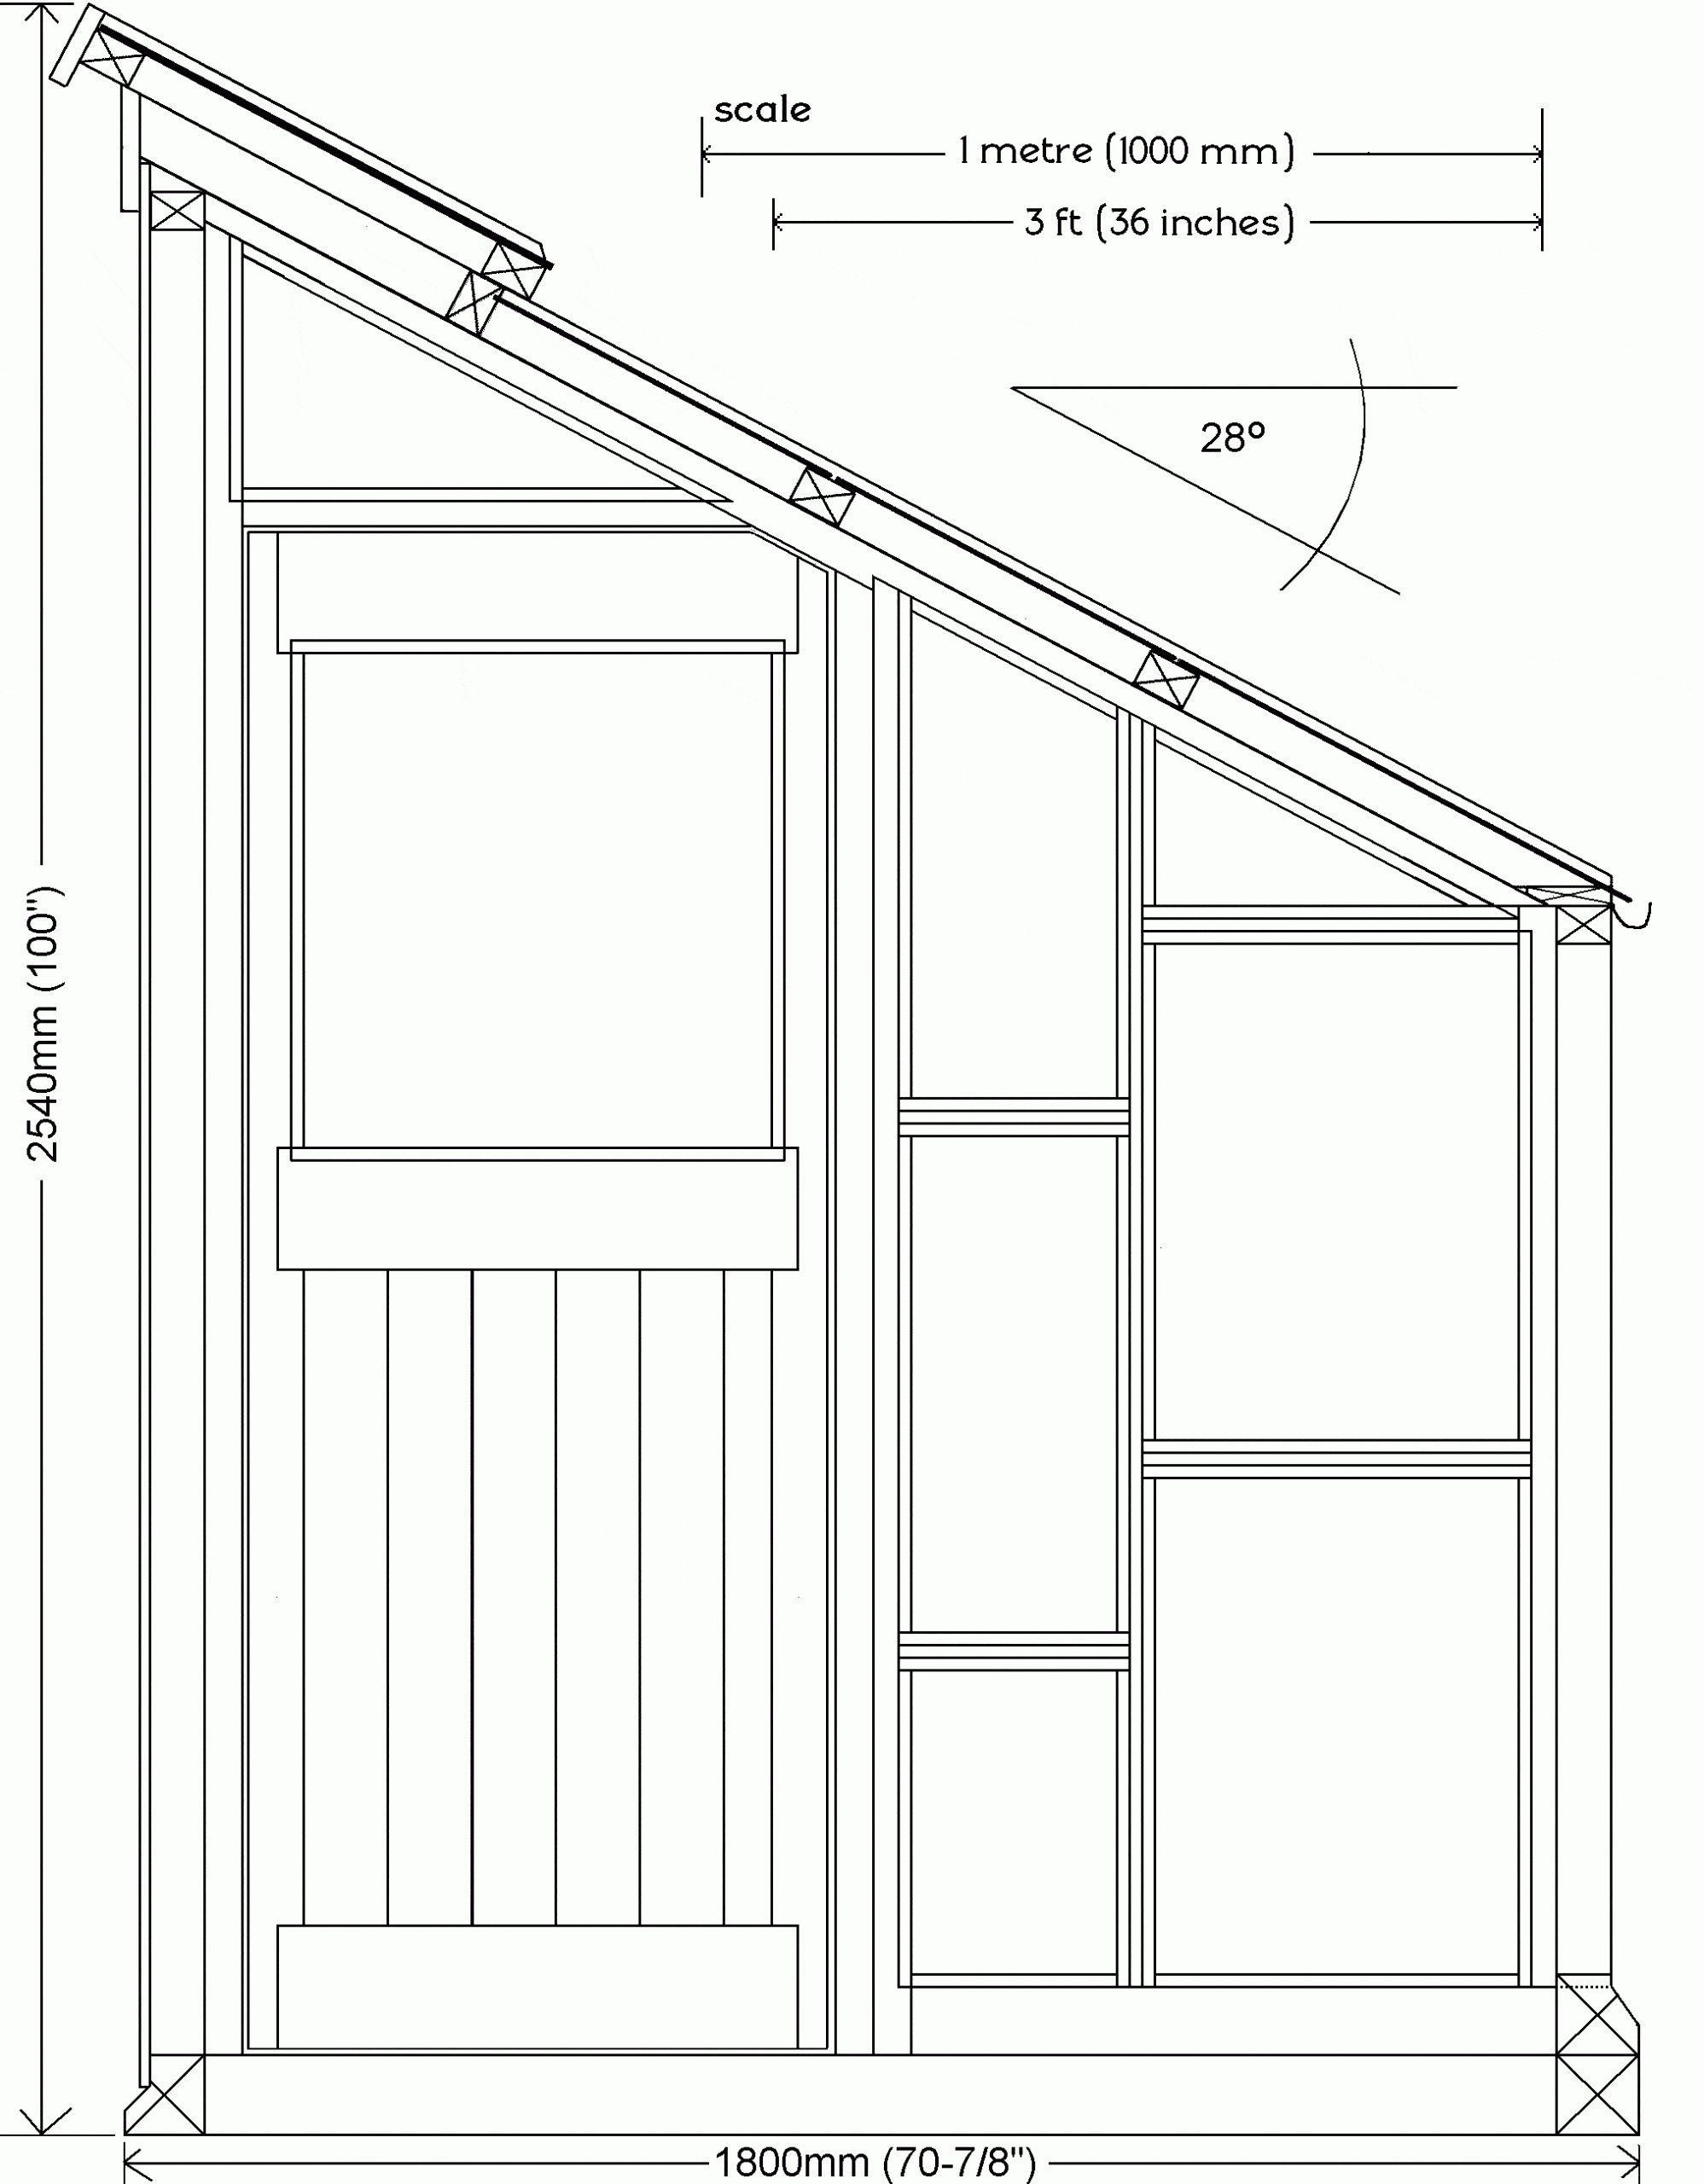
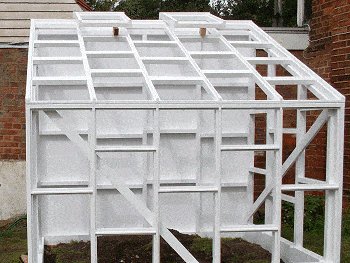
It is around 2400 mm (8ft) high along the high side and rakes down to 1500 mm (5ft) high along the low side. You can get around inside it quite comfortably.
The structure of the thing
This glass house is a stand-alone, lean-to, relocatable structure.
Each of the walls and the roof are separate sections. They can be screwed together to make up the complete unit.
They can also be dismantled (unscrewed) should you wish to move.
At the bottom of each wall is a decay/rot resistant beam (the bottom plate) that sits directly on the ground and gives the wall ‘anti-sagging’ strength.
There are no footings or any permanent ground fixtures.
The back wall is a solid frame and plywood wall. You can fix things to it, hang things on it, or do what you want to it.
Each of the other three walls and the roof consist of a framework made up primarily of 50mm x 75mm (2×3) framing wood – the exception being the bottom horizontal wall plates which are 100mm x 100mm (4×4) stock, some of it doubled up to make 100mm x 200mm (4×8) plates.
Glass is fitted between the framing members. The glass panes sit in rebated sections in the frame, and is held there with an adhesive sealant.
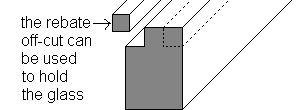
Alternatively, the glass can be held in place with a beading. The off-cuts from making the rebates can be used for the beading.
Rebates and trenches
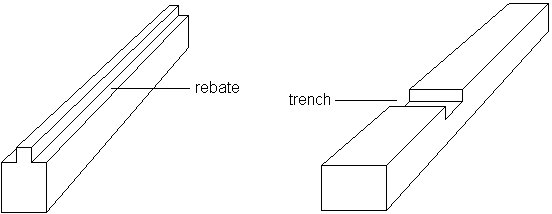
For the purpose of this article a ‘rebate‘ is a recess cut into the edge of a framing member. A rebate runs lengthwise (with the grain).
Its primary purpose is to house the glass panes.
A ‘trench‘ is a groove cut across a framing member (across the grain).
Its primary purpose is to house the end/s of a framing member (stud, nogging).
The wood and wood sizes
Note: This project is written using both Metric (mm) and Imperial (inch) measurements.
The metric measurements are given first followed by the standard measurements in brackets ( ). For example: 50mm x 75mm (2×3).
The size (width and thickness) of the framing wood given throughout this project is the nominal size, that is the size of the wood before it has been dressed (surfaced, planed, seasoned).
When the wood has been dressed (surfaced, planed, seasoned), it becomes the ‘actual size’ or the true size.
The actual size of wood is less than the nominal size.
The wood I used for this frame was a treated softwood.
For the studs, top plates, rafters, and noggings I used dressed (surfaced, planed, seasoned) 50mm x 75mm (2×3). That is the ‘called’ (nominal) size. The actual size is less.
50mm x 75mm (2×3) is not a very common stock size in North America although it can be sourced from the odd place. Failing that, it can be obtained by ripping 2×6 stock in half.
For the bottom plate I used rough (actual size, fence post) 100mm x 100mm (4×4).
The stock sizes given for the framing wood in this documentation are the ‘nominal’ sizes as opposed to the true ‘actual’ sizes. why?…
Nominal size Vs. Actual size
When wood (nominal size) is dressed (surfaced, planed, seasoned), the width and thickness of it becomes less. It becomes the true ‘actual’ size. The actual size is less than the nominal size.
The actual (true) size can vary in different countries.
For example: Consider a piece of common 50mm x 100mm (2×4).
When dressed (surfaced, planed, seasoned) there is a discrepancy in the wood thicknesses between the British/Australasian standard stock size (being 45mm thick) and the US standard stock size (being 1 1/2″ thick). There is a difference of around 7mm (1/4″).
Hence why I will be referring to the framing wood by the nominal size rather than the actual size. The nominal size is more standardized.
If the wood that you source is a slightly different size (width and thickness) to the wood used in this project, it doesn’t matter, Just make adjustments to suit.
The glasshouse glass – Terminologies
3 mm thick standard glass is commonly used for glasshouses in England.
There are specific sizes that are called in inches (even though England uses the metric system) for width and length, and millimetres for thickness.
For example: A standard piece of glass is 18″ x 24″ x 3mm – Called by a mixture of metric and imperial.
Note: If your glasshouse is subject to a lot of kids playing around it, maybe a thicker tempered glass might be in order (albeit a lot more expensive) or even polycarbonate might be worth considering.
Note: Some countries including USA seem to be trending more toward polycarbonate than glass.
Polycarbonate is a lot stronger than glass, I guess it boils down to availability, price, and whether you’re a traditionalist or not.
Different terminologies
Because this was my second project in London I had acquired a few basic tools and a bit of knowledge regarding local wood. I also got to grips with a slightly different terminology to what I was used of.
For this article I am going to refer to all wooden members as ‘wood’.
In North America framing wood is referred to as lumber (example: a piece of 2×3 lumber), In Australasia it is referred to as timber (example: a piece of 50mm x 75mm timber).
I am going to refer to it as ‘wood’ (example: a piece of 50mm x 75mm (2×4) wood). I’m sure everyone can understand that.
All in all, wood is wood, nails are nails, screws are screws, and other stuff is other stuff – so it’s just really a matter of finding the best suit for your needs and getting on with the job.
The order of making
This is the order of making, and the order this documentation is scripted. It is basically a summary and overview of the instructions.
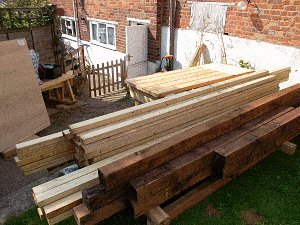
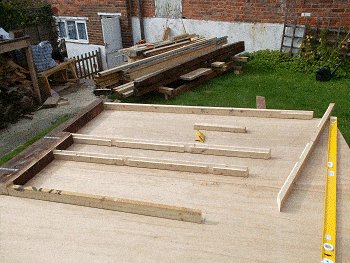
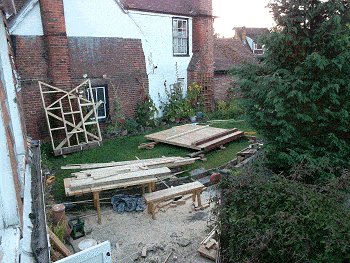
1. Get the materials. stack the wood off the ground, straight, and in a way that the various lengths and stock sizes can be easily accessed.
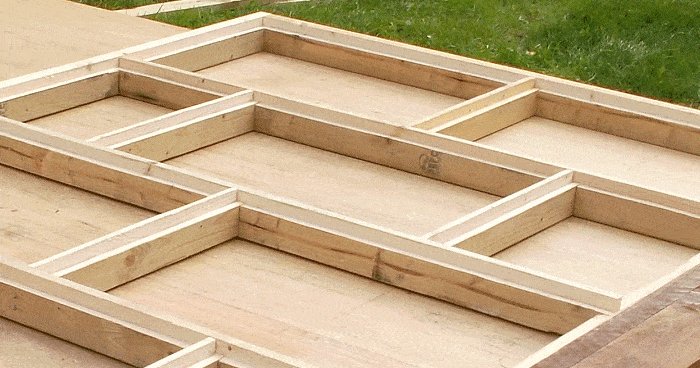
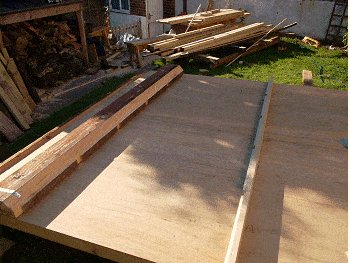
2. Make up the high wall first (frame and plywood) and pack it up level off the ground with the plywood facing up. This wall can be used as a working platform to make up the rest of the frames.
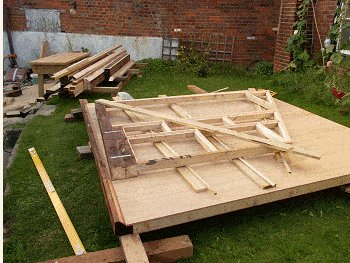
3. Prepare the pieces for the front wall frame. Make up the front wall frame on a flat surface (see 2.), brace it and place it out of the way.
4. Prepare the pieces for the rear wall frame. Make up the rear wall frame on a flat surface (see 2.), brace it and place it out of the way.
5. Prepare the pieces for the right-side wall frame. Make up the right-side wall frame on a flat surface (see 2.), brace it and place it out of the way.
6. Prepare the pieces for the roof frame. Make up the roof frame on a flat surface (see 2.).
7. Prepare the pieces for the 2 roof windows. Make up the roof windows.
8. Prepare the pieces for the door. Make up the door on a flat surface (see 2.), and place it out of the way.
9. Paint everything.
10. Level the site area where the glasshouse is to sit.
11. Stand the four walls and clamp them together. Plumb them and fix them.
12. Fit the roof windows to the roof frame and then place and fix it on the top of the wall frames.
13. Hang the door, add the door hardware.
14. Glazing time.
15. Fix the gutter and place drainage stones around the base (if applicable).
16. Get the windows working.
Wood you will need
If the wood that you source is a slightly different size (width and thickness) to the wood used in this project, it doesn’t matter. Just make adjustments to suit.
Type of wood to use: treated softwood (or similar)
Note: The stock sizes given for the frame are the ‘nominal’ sizes. The ‘actual’ (true) sizes will be less once the wood is dressed (surfaced, planed, seasoned).
The metric measurements (mm) are given first followed by the standard measurements (inches) in brackets.
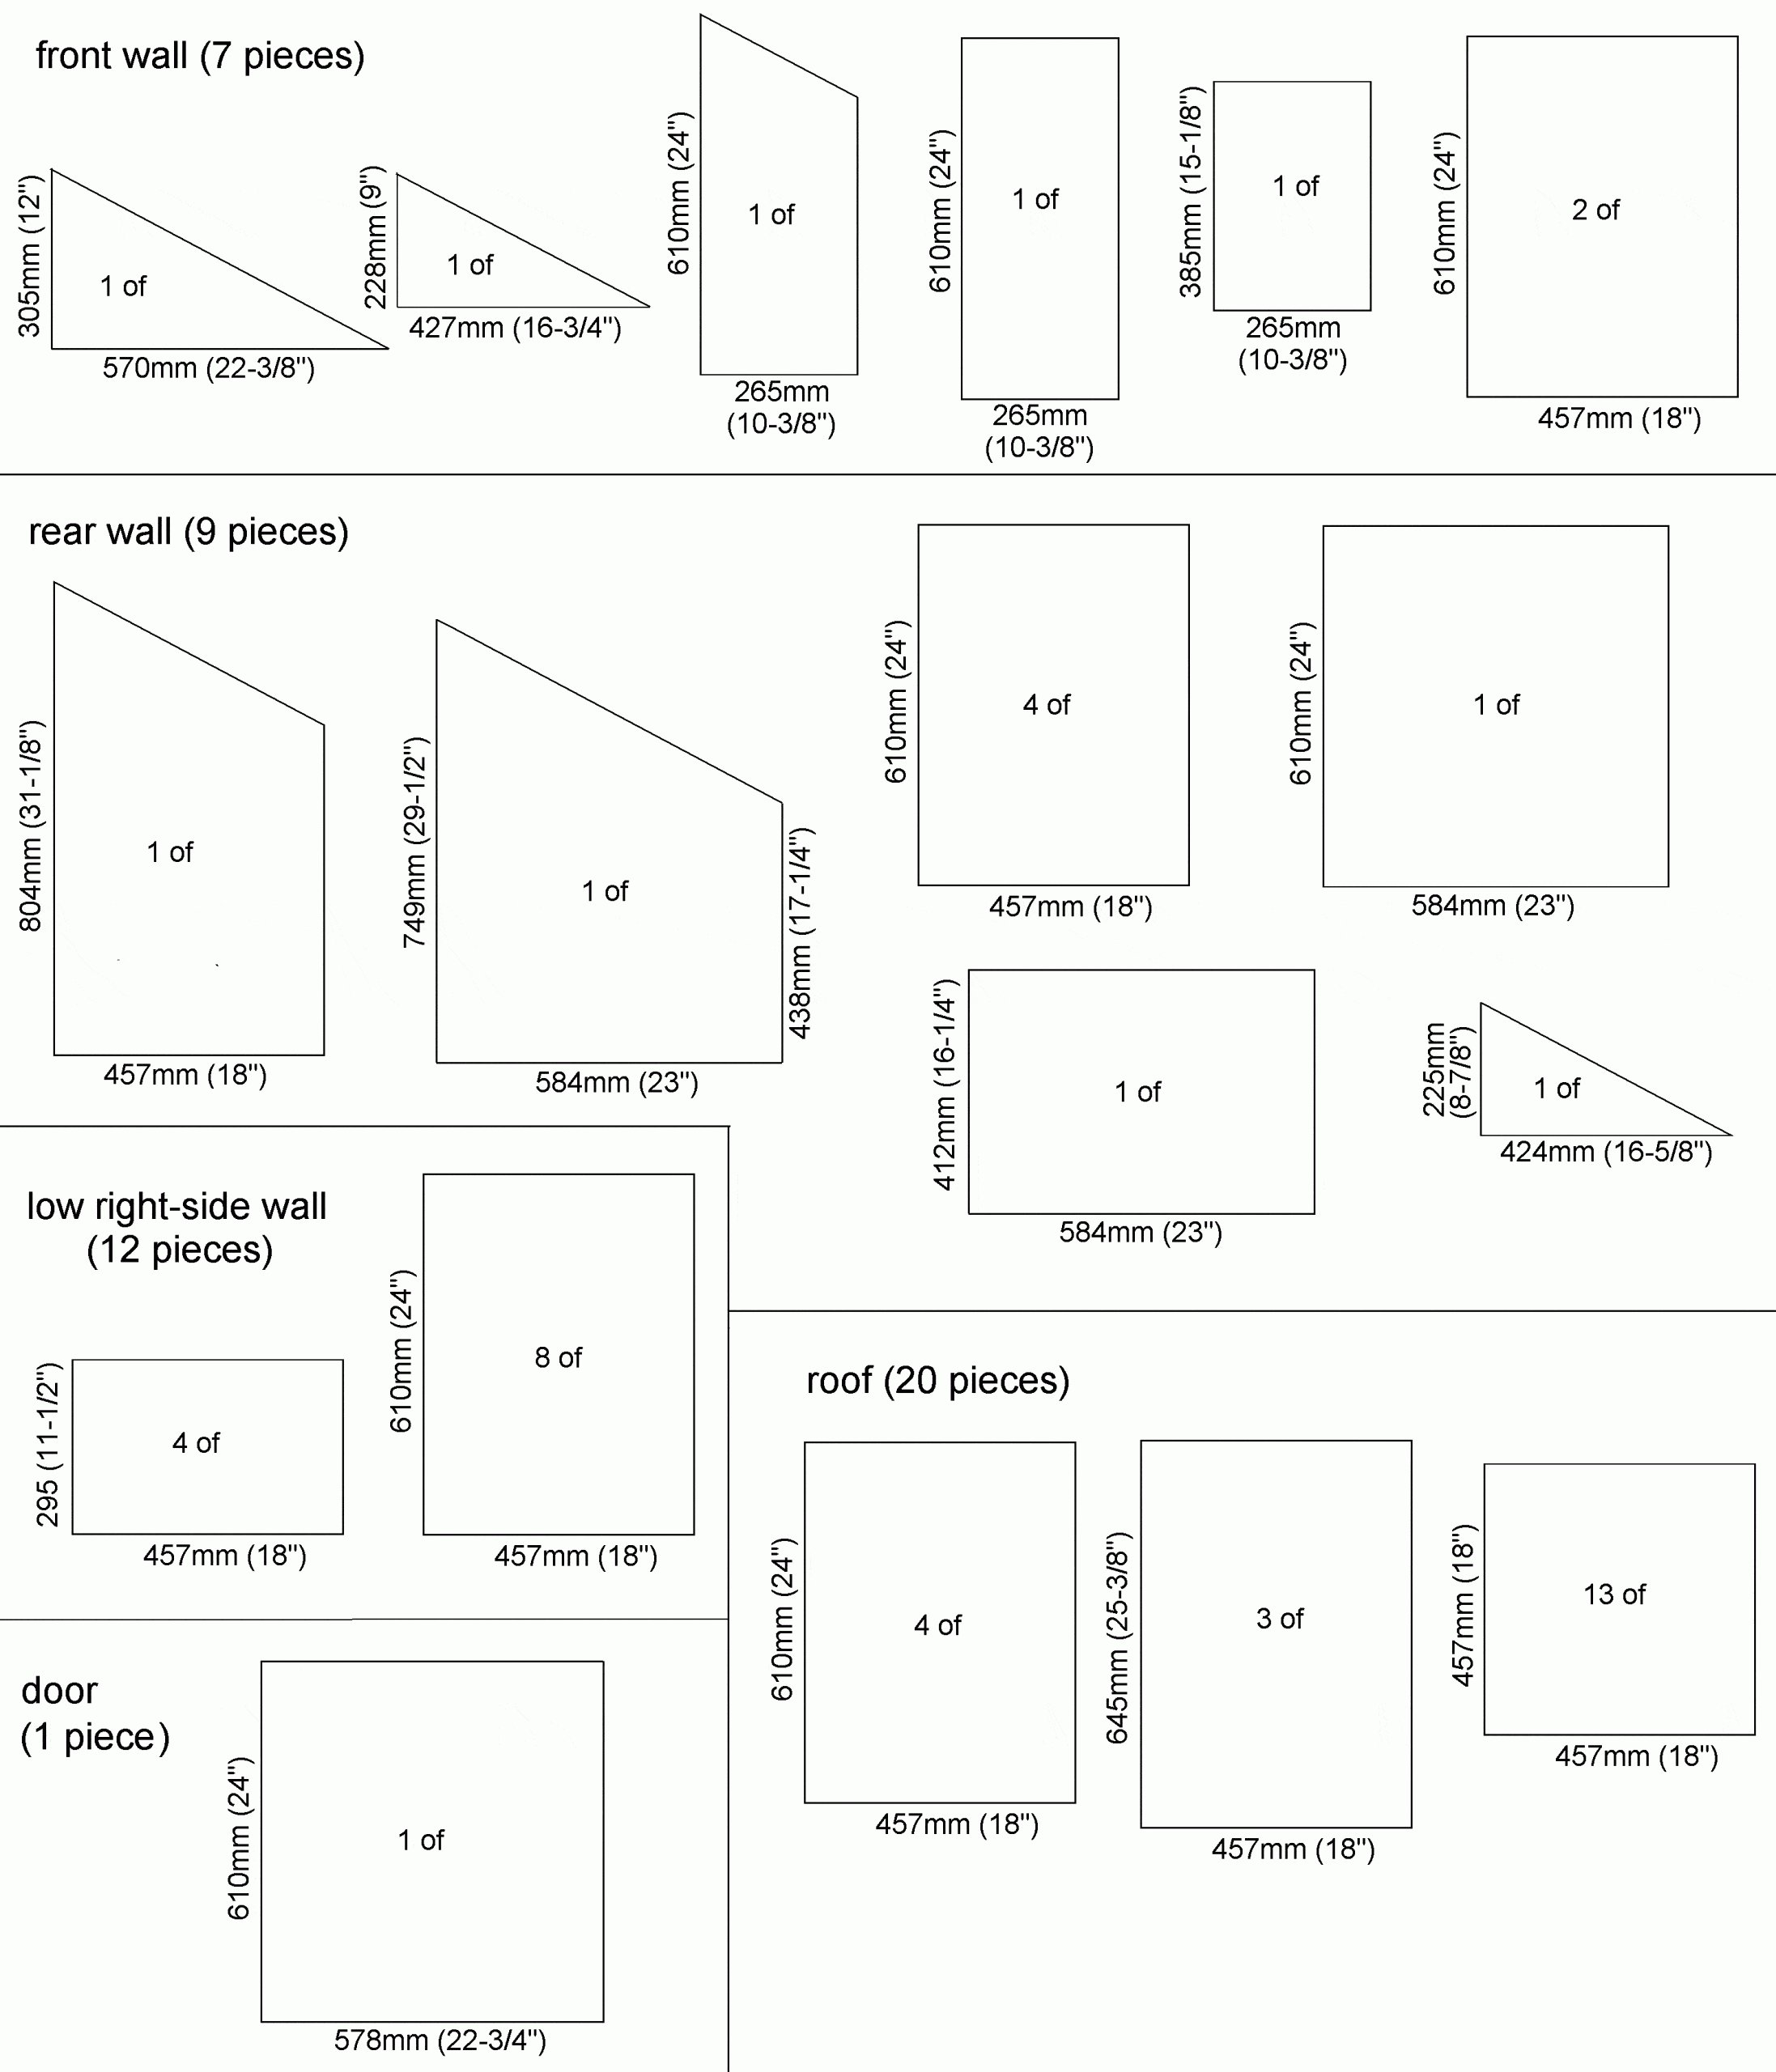
Stock sizes and lengths – overall amounts
Individual section quantities are given on the next page.
Note 1: Measurements are given first in millimeters (mm) followed by inches in brackets ().
Note 2: All lengths given are slightly oversize. Measure and cut exact length as you go.
Note 3: ‘random’ (mentioned below) is the wood allowance for the nogging (blocking). Measure and cut as needed.
TOTALS
- 50mm x 75mm (2×3): 2 @ 2500 (100″), 1 @ 2300 (92″), 6 @ 2200 (88″), 6 @ 2100 (84″), 5 @ 1900 (76″), 2 @ 1800 (72″), 4 @ 1600 (64″), 8 @ 1300 (52″), 4 @ 700 (28″), 4 @ 500 (20″), random 28m (94ft)
- 100mm x 100mm (4×4): 3 @ 2500 (100″), 3 @ 1700 (68″), 1 @ 800 (32″)
- 50mm x 150mm (2×6): 3 @ 700 (28″)
- 25mm x 100mm (1×4): 1 @ 2500 (100″), 2 @ 2300 (92″), 1 @ 1800 (72″), 2 @ 600 (24″)
- 25mm x 100mm (1×4) T&G: 5.1m (17ft)
- 25mm x 150mm (1×6): 1 @ 2500 (100″)
- 18mm (3/4) Plywood: 2 sheets @ 1220mm x 2440mm (4ft x 8ft)
Note: The breakdown of wood quantities and lengths for the individual frame sections (walls, roof, door) are on the next page
Wood list per section
Wood list per wall, roof, and door
The overall list is on the previous page.
Note 1: Measurements are given first in millimeters (mm) followed by inches in brackets ().
Note 2: All lengths given are slightly oversize. Measure and cut exact length as you go.
Note 3: ‘random’ (mentioned below) is the wood allowance for the nogging (blocking). Measure and cut as needed.
FRONT WALL (sloping wall, entry)
- 50mm x 75mm (2×3): 1 @ 2300 (92″), 1 @ 1900 (76″), 2 @ 1800 (72″), 1 @ 1600 (64″), 1 @ 1300 (52″), random 3m (10ft)
- 100mm x 100mm (4×4): 1 @ 1700 (68″), 1 @ 800 (32″)
- 25mm x 100mm (1×4): 1 @ 1800 (72″)
REAR WALL (sloping wall)
- 50mm x 75mm (2×3):: 1 @ 2200 (88″), 2 @ 1900 (76″), 3 @ 1600 (64″), 1 @ 1300 (52″), random 5m (17ft)
- 100mm x 100mm (4×4): 2 @ 1700 (68″)
- 25mm x 100mm (1×4): 1 @ 2300 (92″)
RIGHT SIDE WALL (low wall)
- 50mm x 75mm (2×3):: 1 @ 2500 (100″), 6 @ 1300 (52″) random 4m (14ft)
- 100mm x 100mm (4×4): 2 @ 2500 (100″)
- 25mm x 100mm (1×4): 1 @ 2300 (92″)
LEFT SIDE WALL (high wall)
- 50mm x 75mm (2×3): 1 @ 2500 (100″), 5 @ 2200 (88″), random 7.5m (25ft)
- 100mm x 100mm (4×4): 1 @ 2500 (100″)
- 18mm (3/4) Plywood: 2 sheets @ 1220mm x 2440mm (4ft x 8ft)
ROOF & ROOF WINDOWS
- 50mm x 75mm (2×3): 6 @ 2100 (84″), 4 @ 700 (28″), 4 @ 500 (20″); random 8.5m (28ft)
- 25mm x 100mm (1×4): 1 @ 2500 (100″) 2 @ 600 (24″)
- 25mm x 150mm (1×6): 1 @ 2500 (100″)
DOOR
- 50mm x 75mm (2×3): 2 @ 1900 (76″)
- 50mm x 150mm (2×6): 3 @ 700 (28″)
- 25mm x 100mm (1×4) T&G 5.1m (17ft)
Floor (footprint) and front elevation plans
Step 1. Get and stack the wood
- Stack the wood off the ground, straight, and in a way that the various lengths and stock sizes can be easily accessed.
- Sort the wood into stock sizes, as you will probably be making only one wall-frame (or the roof frame) at a time, and will need to access more that one stock size for each section, unless of course you have a large flat workspace and can lay out all the frames at one time.
Plans – High wall (step 2)
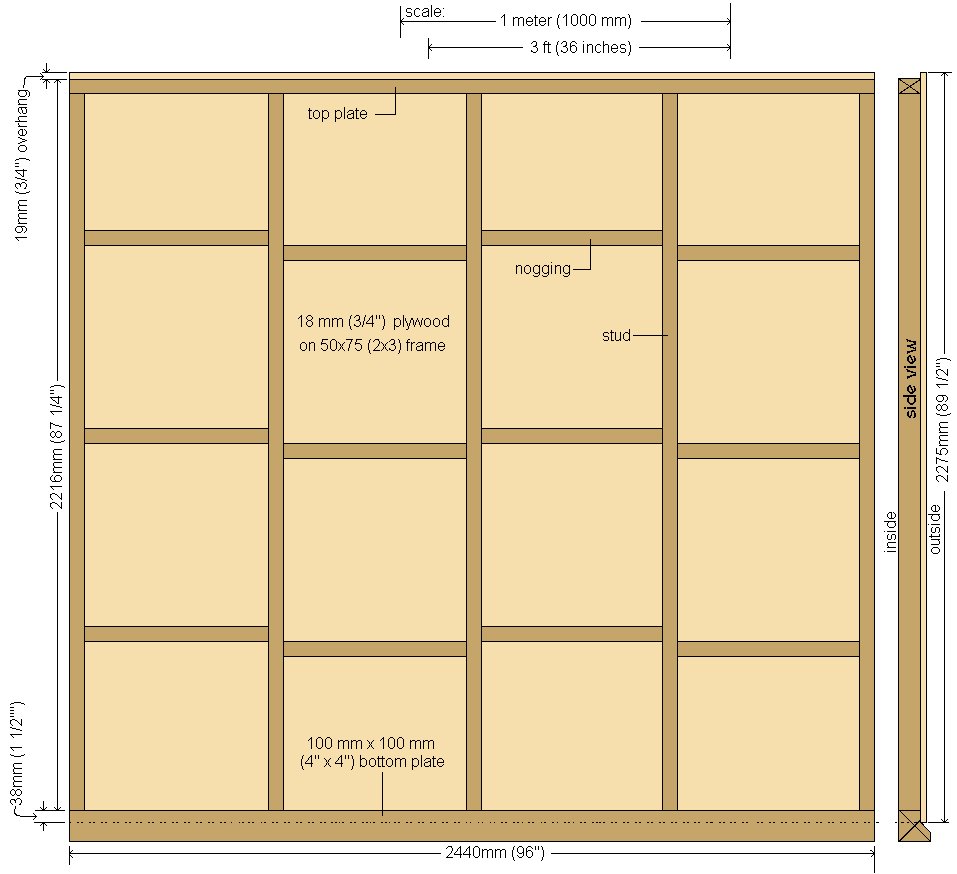
Step 2. Make up the high (left side) wall
- Make up the high (left side) wall according to the plan on the previous page.
- The frame is 50mm x 75mm (2×3) stock except for the bottom plate which is 100mm x 100mm (4×4).
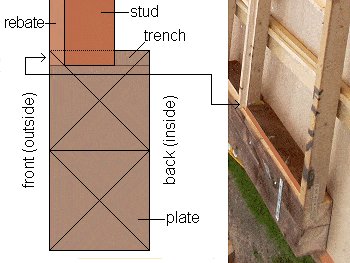
- The bottom plate will need to be rebated. Refer to the drawing below for the dimensions.
- Space the studs evenly along the frame ensuring there is one in the middle to take the plywood join.
- Fix three rows of nogging. Measure and cut them as you go. Note that the rows are not in a straight line. They are staggered for ease of nailing.
The bottom plate rebate dimensions

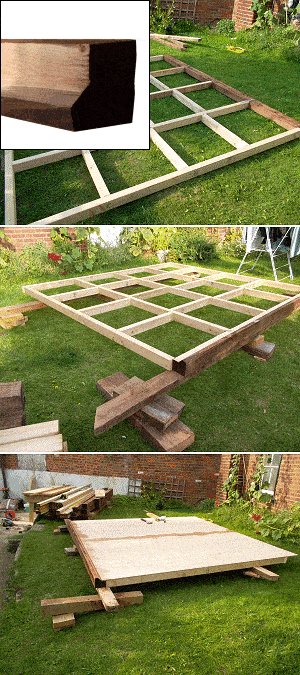
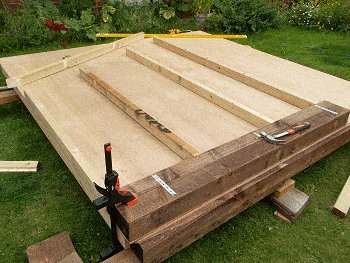
- Make up the frame on the ground and then pack it up (off the ground), level.
Fix the plywood sheets to the frame according to the plan on the previous page.
Trim off the top of the plywood 19mm (3/4″) above the top of the top plate. - This wall can now be used as a level working platform for making up the rest of the wall frames, the roof frame, the door, and the roof-windows.
Plans – Front wall (step 3)
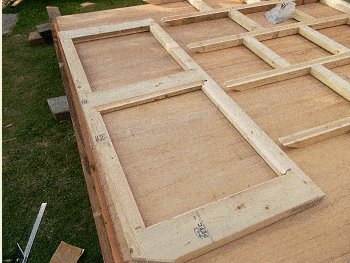
Step 3 (after). Make up the front wall
- Make up the front wall frame according to the plan on the previous page.
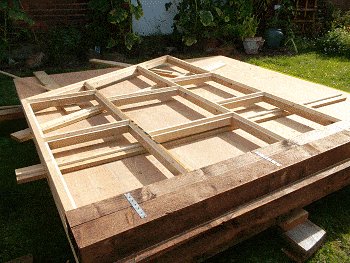
- Draw a pattern of the front frame on the working platform. Refer to the front wall frame plan on the previous page and draw the shape of the wall in its entirety (perimeter, plates, studs, noggings) onto the working platform using a chalkline or a pencil and straight edge. You will then have a full size pattern.
- Cut the individual pieces to the pattern and rebate and trench accordingly. Refer to the following page for ‘HOW TO – Cut rebates and trenches’.
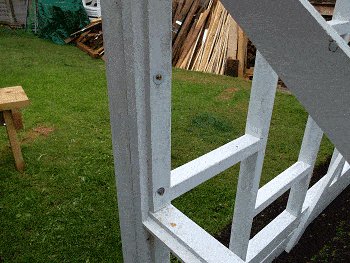
- Don’t spare the metal strapping when tying the plates together or the studs to the plates.
- Take notice of where the studs sit in relation to the bottom plate as shown in the pictures below.
How to – Cut rebates and trenches
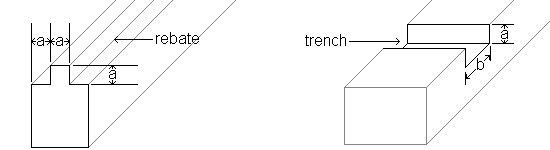
a = 1/3 of the thickness of the wood.
For example: If the wood is 45mm thick, then the rebate will be 15mm in and 15 mm deep. Likewise, if the wood is 1-1/2″ thick, then the rebate will be 1/2″ in and 1/2″ deep.
b = the thickness of the wood.
For example: If the wood is 45mm thick, then the trench will be 45mm wide and 15 mm deep. Likewise, if the wood is 1-1/2″ thick, then the trench will be 1-1/2″ wide and 1/2″ deep.
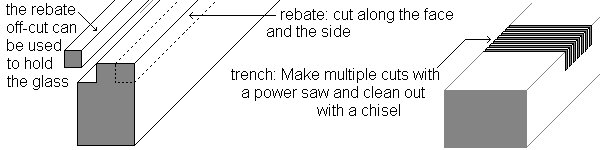
- You can cut out a trench by using a circular saw. Set the blade in the circular saw to the required depth and make multiple cuts across the cut-out area, and then clean out with a chisel.
- You can cut a rebate with a bench saw or a circular saw. First mark the rebate i.e., along the face and the edge. Set the blade in the circular saw to the required depth and run a cut along the marks, both face and edge.
Note: The off-cut from the rebate can be used as a beading to hold the glass in place.
Plans – Rear wall (step 4)
Step 4 (after). Make up the rear wall
- Make up the rear wall frame according to the plan on the previous page.
- Draw a pattern of the rear frame on the working platform. Refer to the rear wall frame plan on the previous page and draw the shape of the wall in its entirety (perimeter, plates, studs, noggings) onto the working platform using a chalkline or a pencil and straight edge. You will then have a full size pattern.
- Cut the individual pieces to the pattern and rebate and trench accordingly. Refer to ‘HOW TO – Cut rebates and trenches’ on page 16.

- Don’t spare the metal strapping when tying the plates together or the studs to the plates.
- Take notice of where the studs sit in relation to the bottom plate as shown in the pictures below.

Plans – Low wall (step 5)

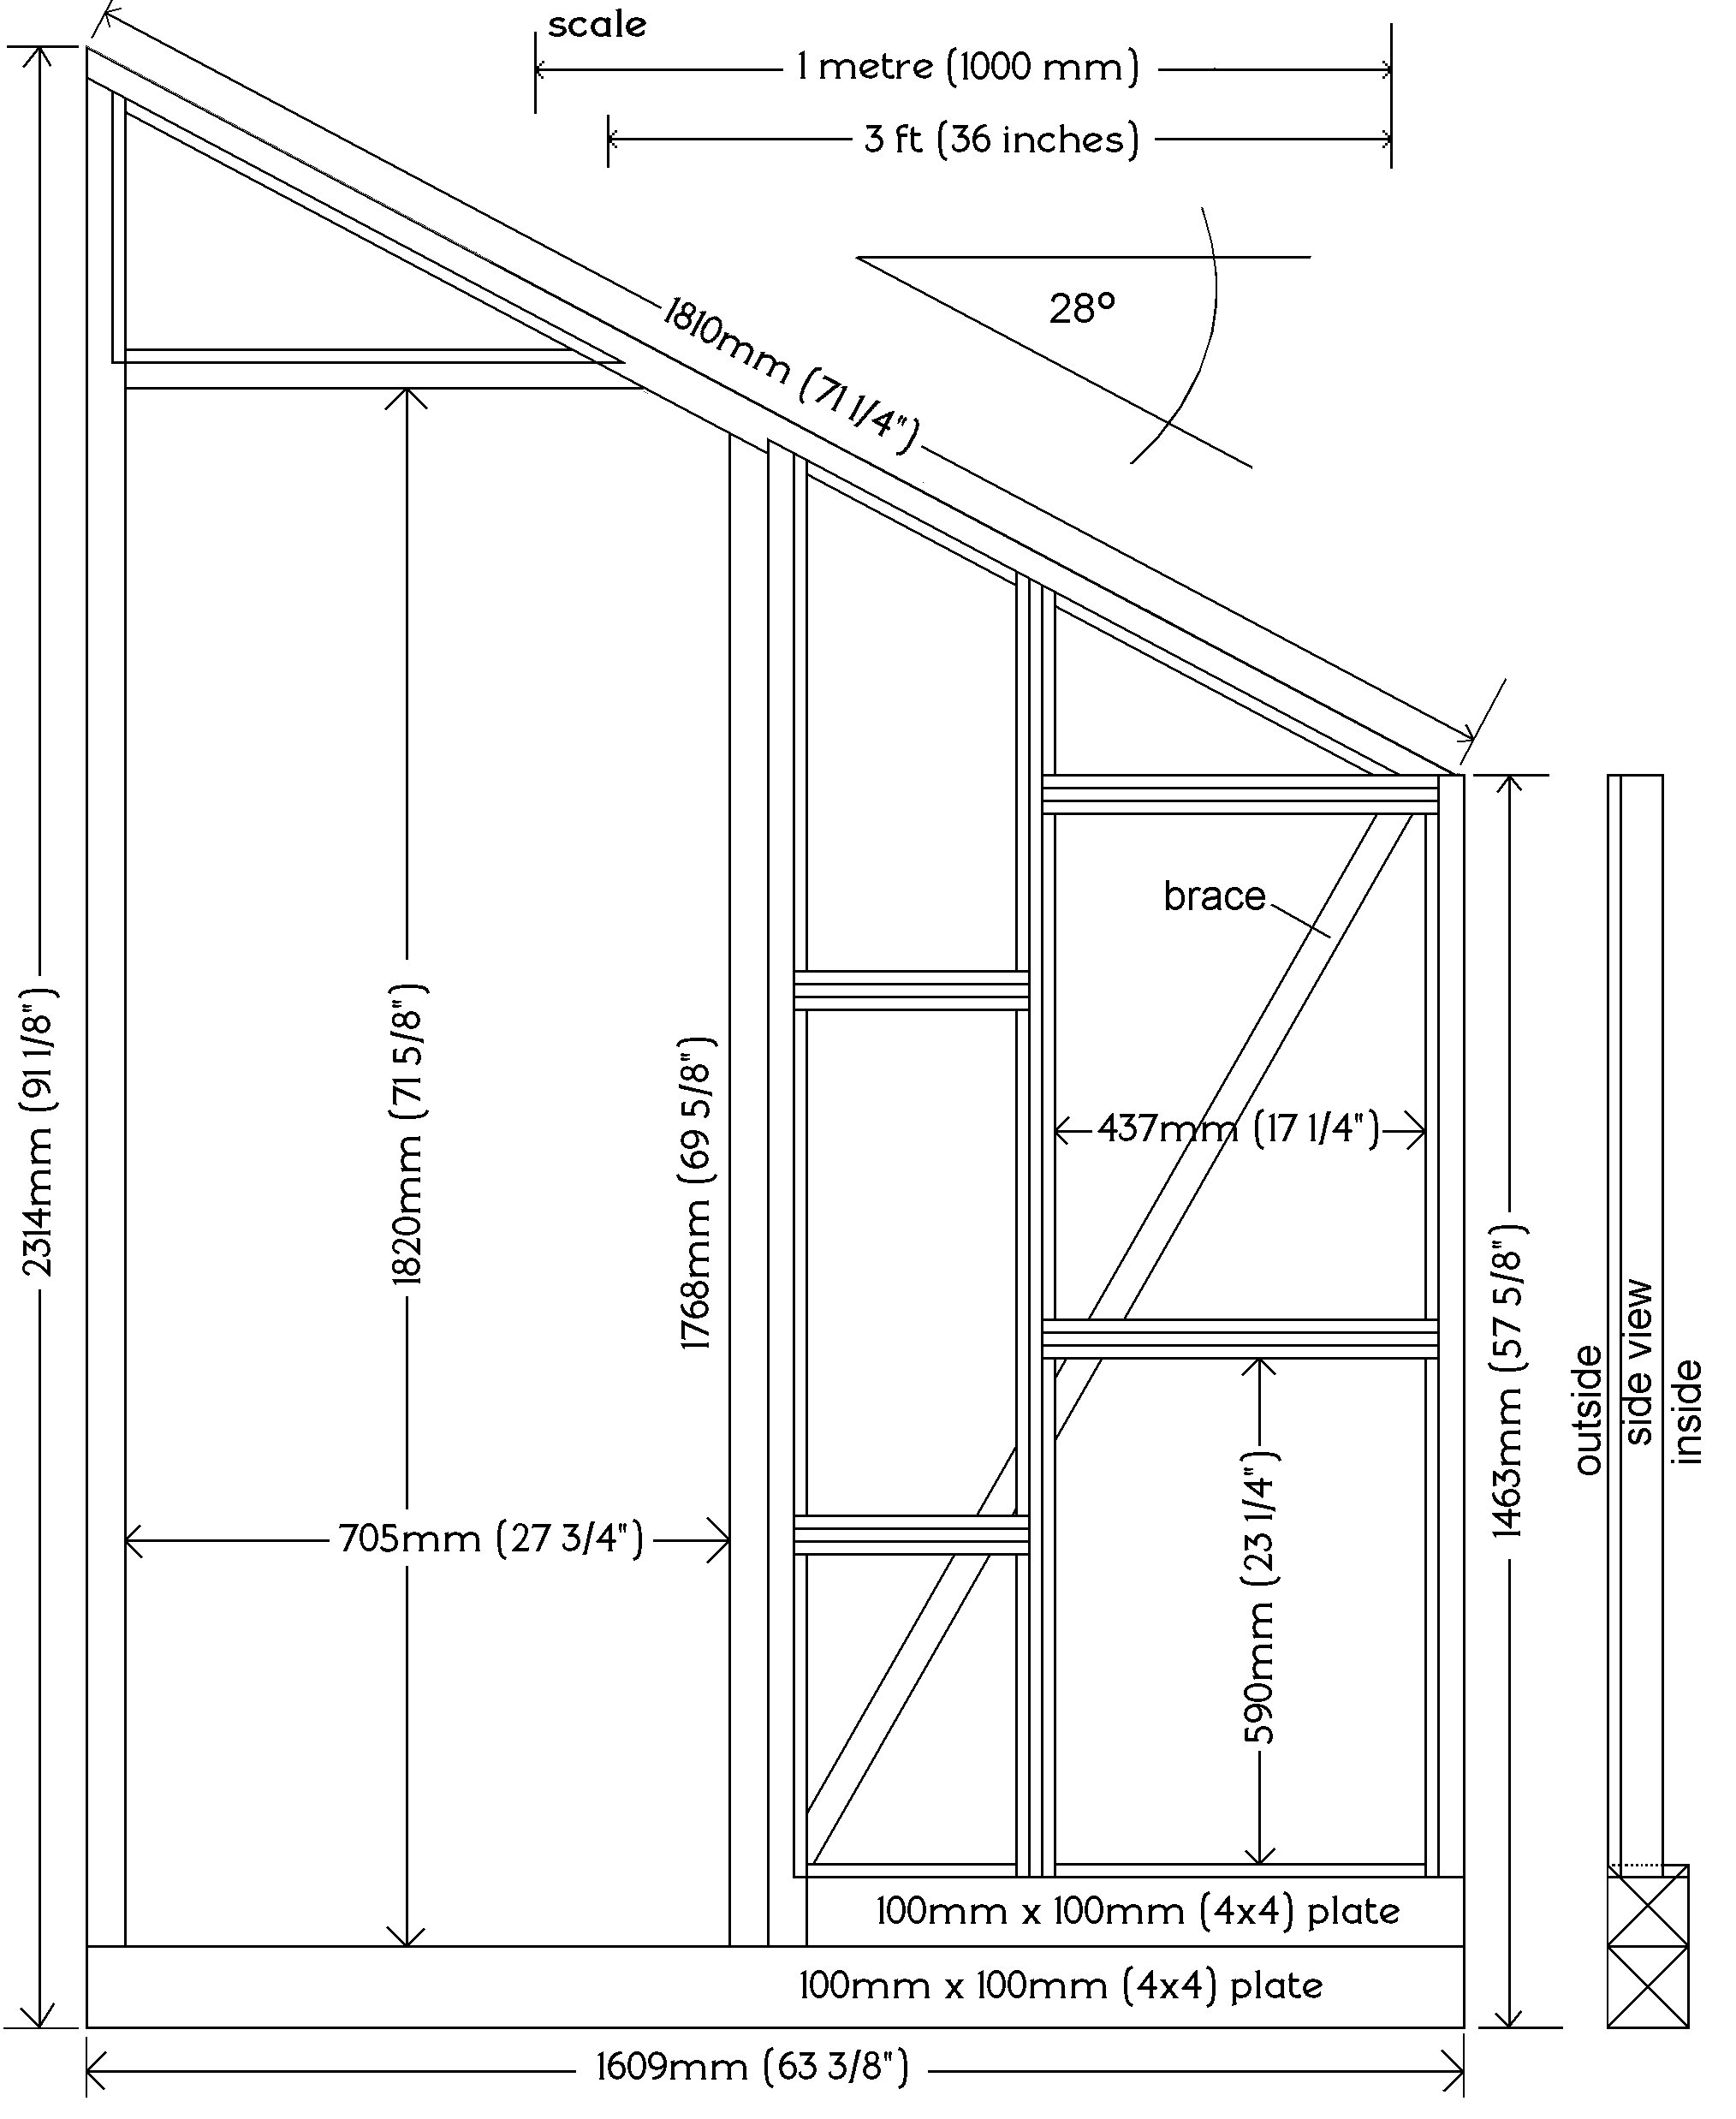
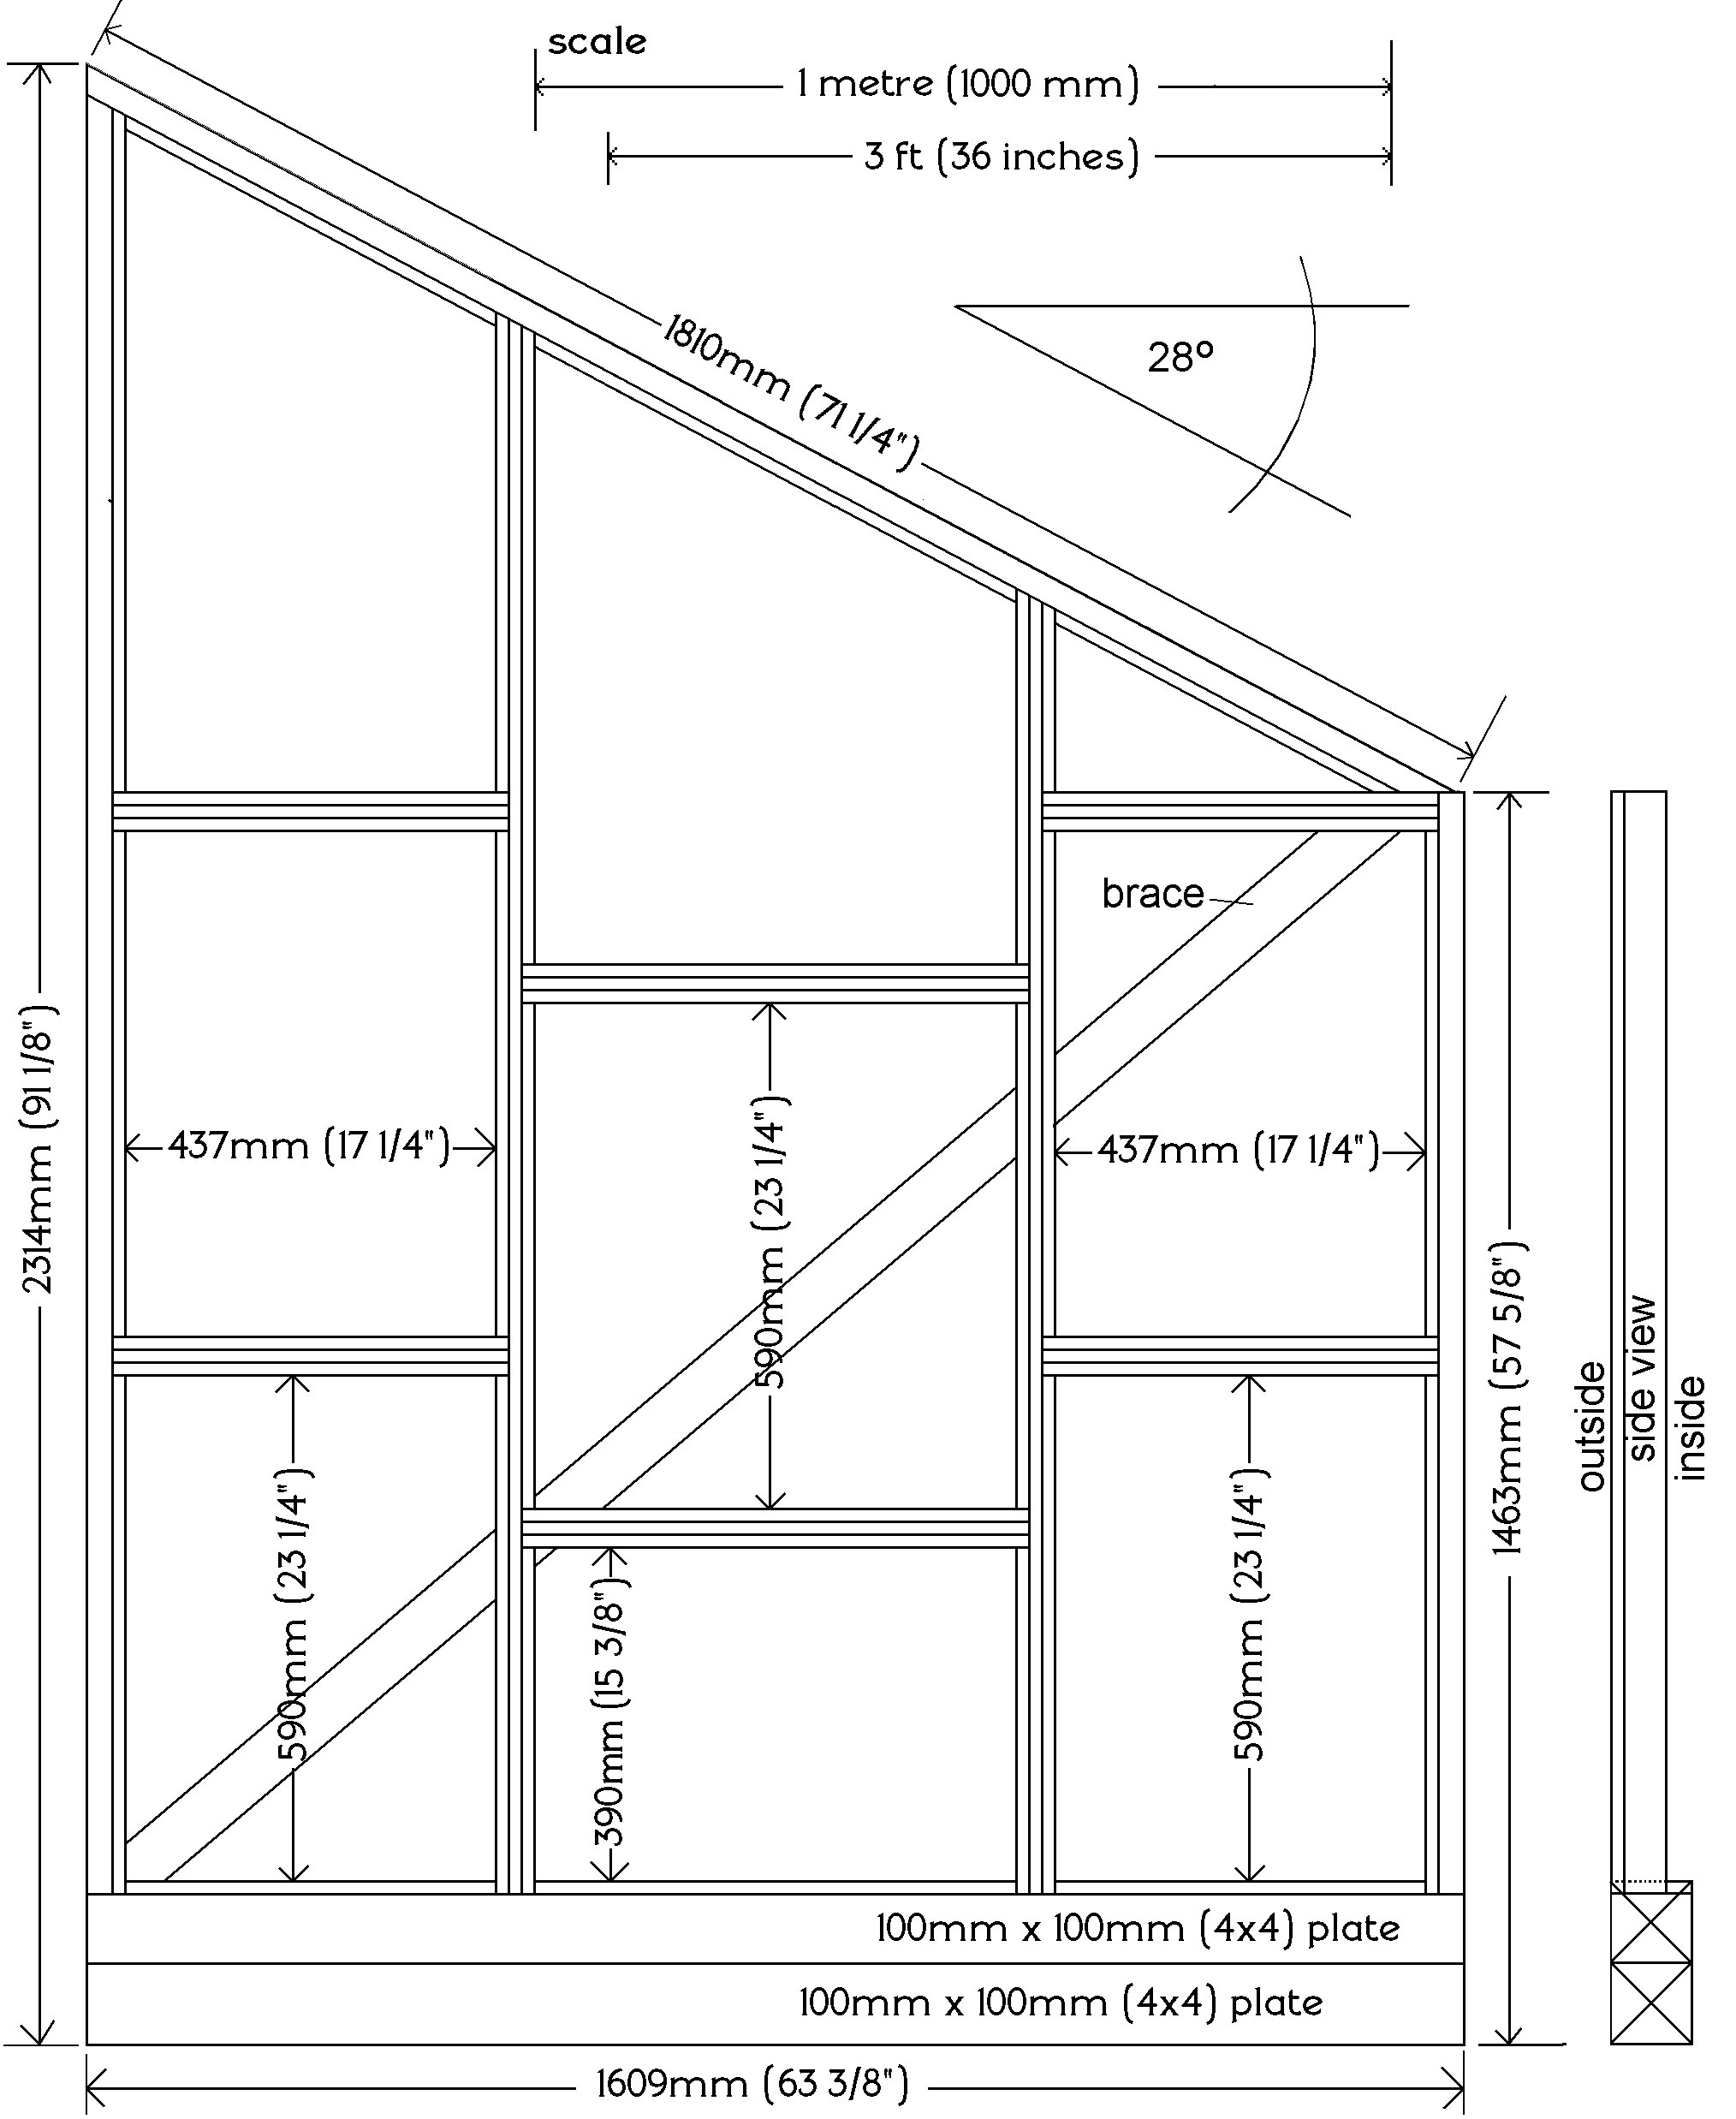
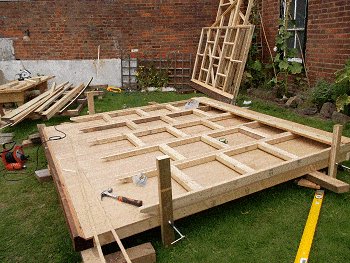
Step 5 (after). Make up the low wall
- Make up the low wall frame according to the plan on the previous page.
- Cut to length the top and bottom plates and rebate, trench, and chamfer where necessary (refer to the plans on the previous page).
- Lay the plates apart in readiness for the studs. Cut the studs to length and rebate (for the glass) and trench (for the noggings) where required.
- Refer to ‘HOW TO – Cut rebates and trenches’ on page 16.
- Fix the studs in place and then measure, cut, rebate, and fix the noggings in place.
- Don’t spare the metal strapping when tying the plates together or the studs to the plates.
- Flip the frame over and brace it.

Plans – Roof frame (step 6)

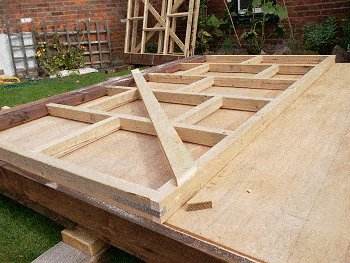
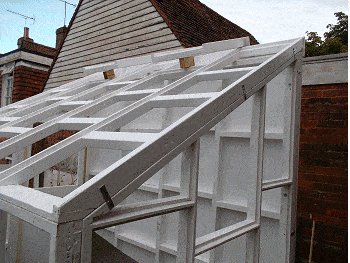
Step 6 (after). Make up the roof frame
- Make up the roof frame according to the plan on the previous page.
- The length of the roof frame is the same as that of the high wall (the working platform), so if you fix a couple of blocks each end of the working platform, it will contain the length of the roof frame.
- Refer to ‘HOW TO – Cut rebates and trenches’ on page 16.
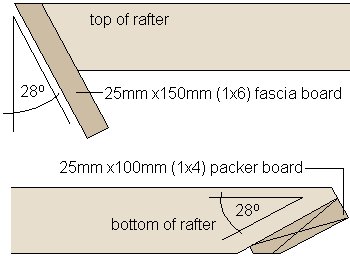
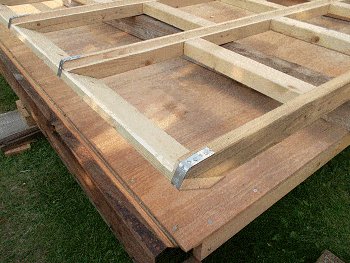
- Cut the rafters to length, angle cut the ends, rebate where required (refer to previous page plans), space them out, fix the noggings, the top fascia board, and the bottom packer board. Take notice that one corner of the packer board needs to be chamfered. Refer to the plans for all other details. Space the noggings to suit the glass sizes.
Step 7. Make up the windows | Plans and instructions
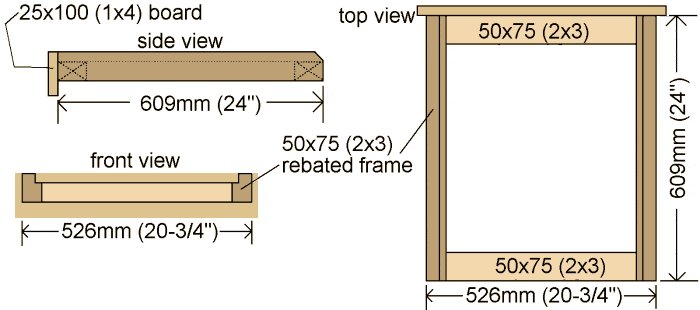
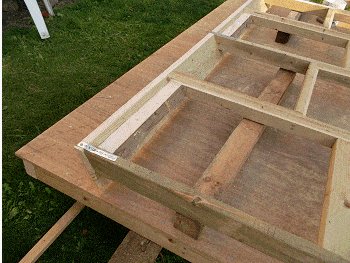
- Make up the two roof windows according to the plan drawings and pictures on this page.
Plans – Door (step 8)
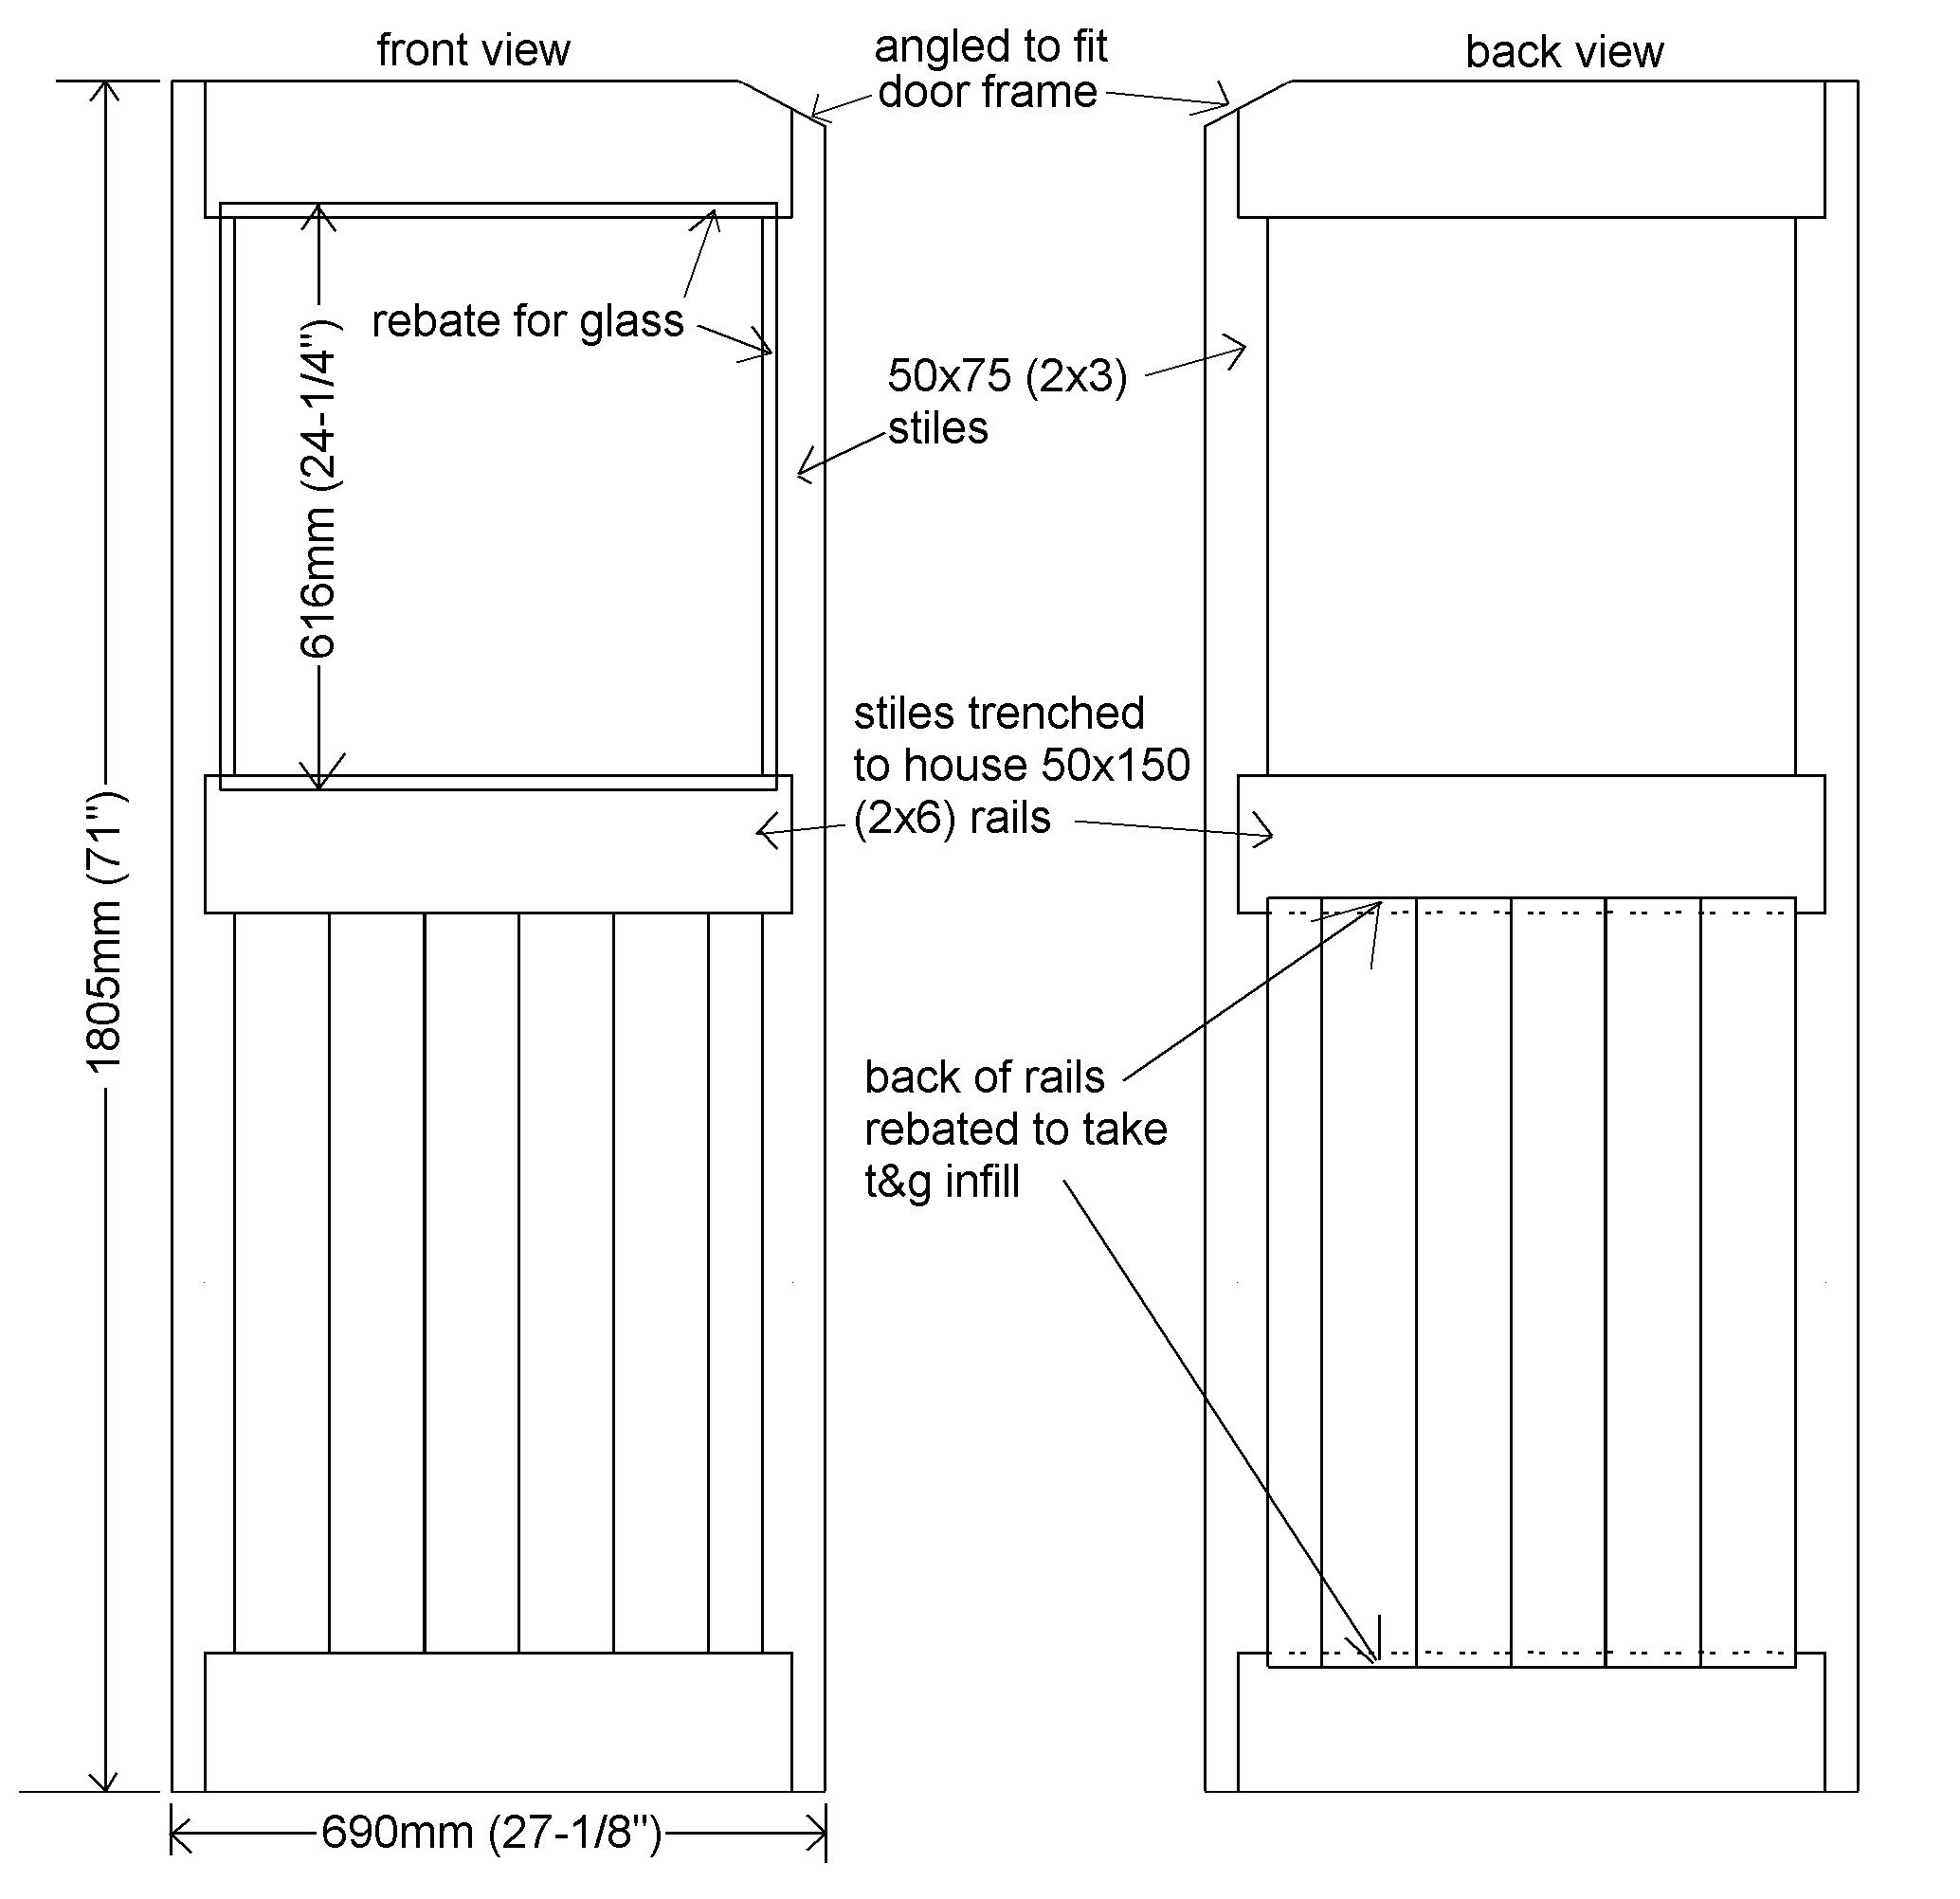
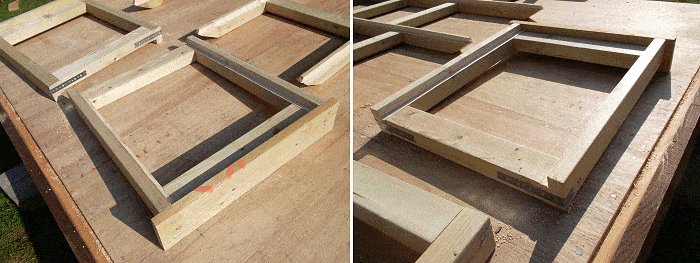
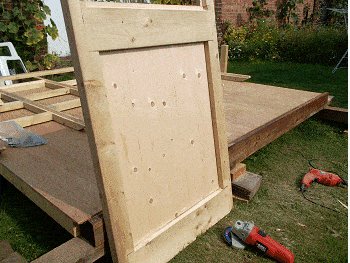
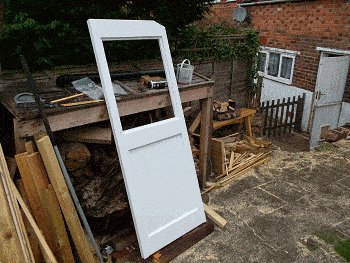
Step 8. Make up the door
- Make up the door according to the plan on the previous page and the pictures on this page.

- Take note that the rebate for the glass is in the front of the door, and the rebate for the infill is in the back of the door (horizontal rails only). Use 19mm (3/4″) thick T&G (tongue and groove) boards of any width for the door infill, or even a solid sheet.
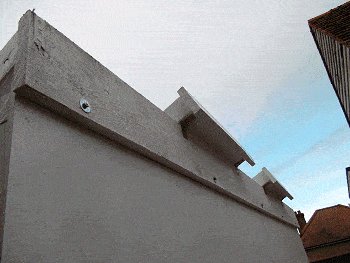
Step 9. Paint it
Paint it all
- Now with all the sections made, slop on a coat or two of paint prior to the frames being assembled.
- A good sealing of paint helps protect the glasshouse from the elements, and by putting on a coat or two prior to assembly means all the sections can be coated in their entirety. Once assembled, and prior to the glass being fitted, another coat can be applied.
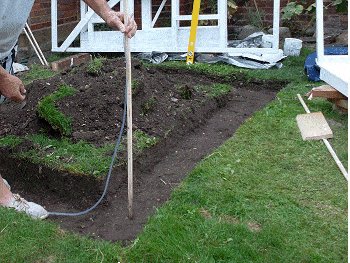
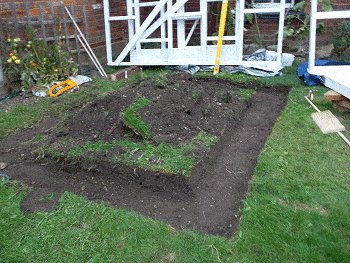
Step 10. Level the site area
- Level the site area. Ensure the glasshouse frames are sitting on level ground.
- Use a level or a water level to check the grade, and dig accordingly to level the ground directly beneath where the frames will be sitting.
- Go to here for an article on ‘how to make and use an inexpensive water level’.
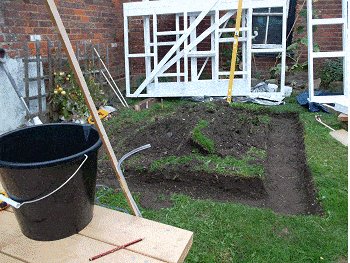

Note: Any trenches or low lying areas must be well drained.
The glasshouse should not be placed in a potential boggy area without drainage
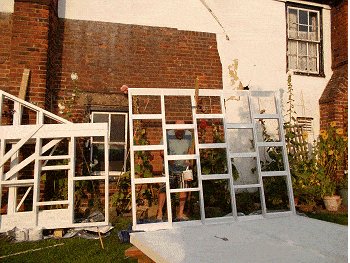
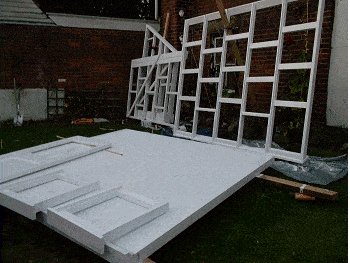
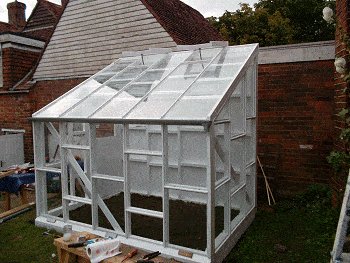
Step 11. Stand the walls
- Place the four walls on level ground and clamp them together.
- Fasten the frames together using screw and washers, and metal plates. Put all the screws and plates in places where they can be easily removed should you ever need to dismantle the glasshouse i.e., don’t put any screws or fixings into rebates that will be covered by the glass.
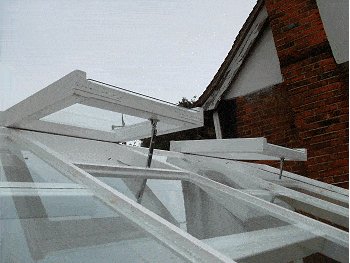
Step 12. Complete and position the roof frame
- Fix the two roof windows to the roof frame with hinges, as shown in the drawing below.
- Then sit the roof frame on top of the wall frames. It should sit neatly in place held there by the fascia board.
Secure it with metal plates or galvanized strap intermittently placed along the sides and front. Also screw the fascia board to the left-side high wall. Screw in places that can easily be accessed later, should you ever want to dismantle the glasshouse.
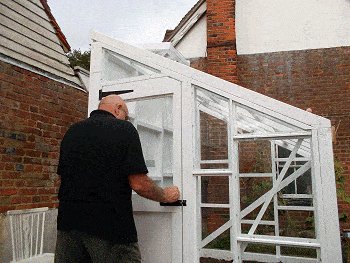
Step 13. Hang the door

- Wedge and pack the door in place. Add the hinges and pad bolt or other handle and latch, and then remove the wedges and packers.
Glass sizes and quantity
- In all there are 49 panes of glass. Use these measurements as a guide. measure for their exact size when the frames have been completed.
Step 14. Glazing time
- When all the framework has been assembled and painted, measure up for the glass. Refer to the previous page for a size guide.
- Apply a bead of adhesive silicon around the rebate and sit the glass on that. Hold it in place with little blocks of wood tacked into the side of the rebate until the silicon has cured. Then remove the blocks.
- Alternatively you can hold the glass in place with a wooden bead – the off-cut from cutting the rebate would be ideal for that.
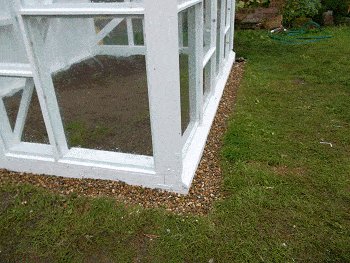
Step 15. Gutter and drainage
- Add a gutter of your choice. You may want to run the water to a container and use it to water plants.
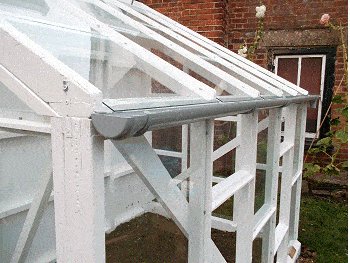
- If applicable (prone to ponding or excessive dampness) ensure there is drainage around the bottom of the glasshouse, either open drain (ditch and stones as shown here), or other that is capable of running the water away.

Step 16. Get the windows working
- The window is already hinged, so it is just a matter of getting something that will be able to hold it open and also lock it shut.

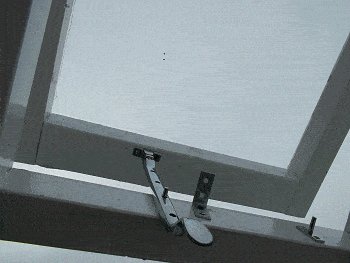

- I used a standard window casement stay and added an angle bracket to make it lockable when shut.
- Just a means to suit a need.
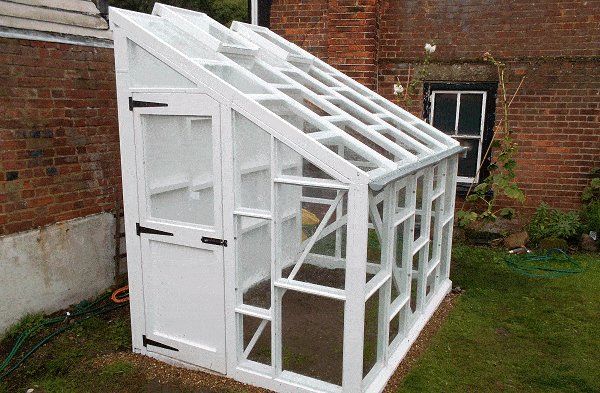
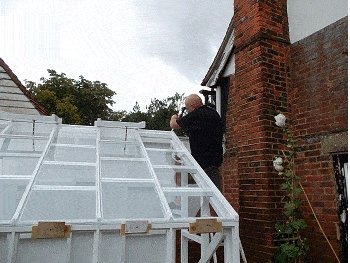
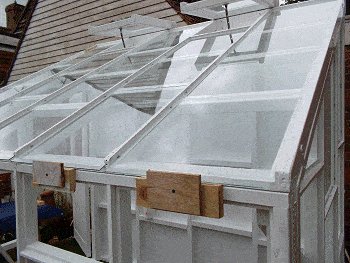
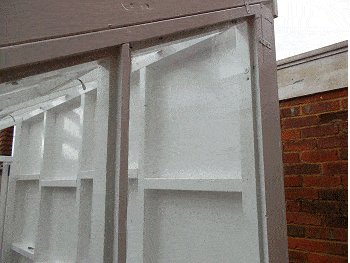
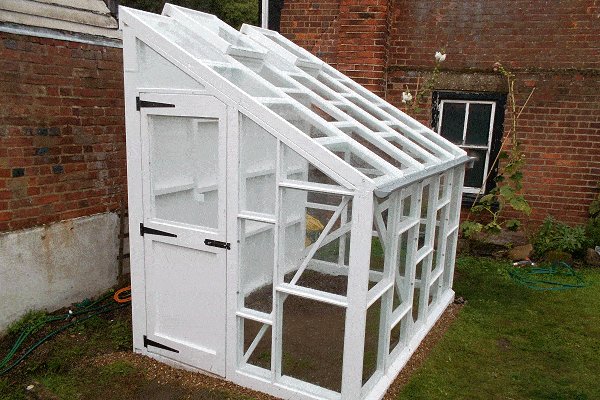
A couple of photos


Where is the list of materials needed and instructions? I am here because I clicked on “free plans” but there’s another link to download pdf plans for $5. Where do you have the free plans?
Can youmprovide guidance, please?
Good job! I’m dreaming of building this in my backyard.