Contents
Introduction and the parts list
An easy project to make. It can be built without the use of any power tools.
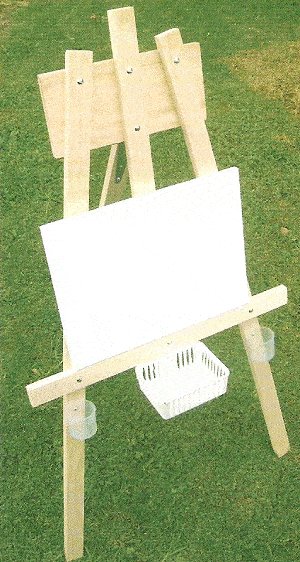
This is a good, simple, easy-to-make kid’s easel that can be used for a blackboard, a whiteboard, a clipboard, and an artist’s canvas.
To make this easel is simply a matter of cutting the wood to length, marking and drilling the holes according to the cutting list and individual piece drawing in step 1., and then just bolting all the pieces together.
The measurements throughout this projects are given in both millimeters and inches.
The metric measurements are given first, followed by the imperial measurements in brackets.
Note: For rounding-off purposes, the metric (mm) measurements given are not an exact match to their equivalent imperial (inch) counterparts, so use one or the other.
For this project you will need
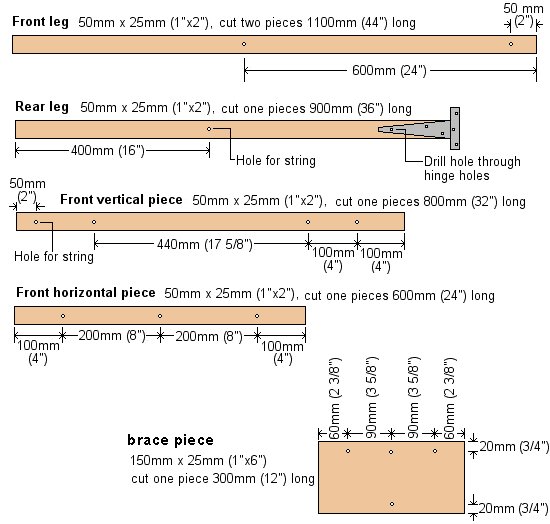
- Two pieces of 50mm x 25mm (1″x 2″) wood, 1100mm (44″) long.
- One piece of 50mm x 25mm (1″x 2″) wood, 900mm (36″) long.
- One piece of 50mm x 25mm (1″x 2″) wood, 800mm (32″) long.
- One piece of 50mm x 25mm (1″x 2″) wood, 600mm (24″) long.
- One piece of 150mm x 25mm (1″x 6″) wood, 300mm (12″) long.
- One 150mm (6″) T hinge
- Thirteen 6mm (1/4″) carriage bolts with nuts and washers: seven at 50mm (2″) long and six at 30mm (1 1/4″) long.
- Three 25mm (1″) long wood screws
- A piece of strong thin rope, and three plastic containers to hold pencils, chalk, crayons, etc.
Tools you will need

Two Easel plans
$5.00- Pay online by credit card, debit card, or Paypal using Secure Server Paypal. You do not need a Paypal account if paying by credit or …
A bit about the wood size
- The wood sizes referred to in this project are the nominal sizes. The nominal size of a piece of wood is the size (width and thickness) of the wood before it is dressed (surfaced, smooth, seasoned) and is the size generally referred to when purchasing from the lumber store. The actual size, or dressed size of the wood will be less than the nominal size. For example, a piece of 1″x 2″ wood when dressed may be 3/4″x 1 1/2″ actual size.
- Sizes (widths and thicknesses) do vary from place to place but that will not have any impact on this project.
Identifying the parts
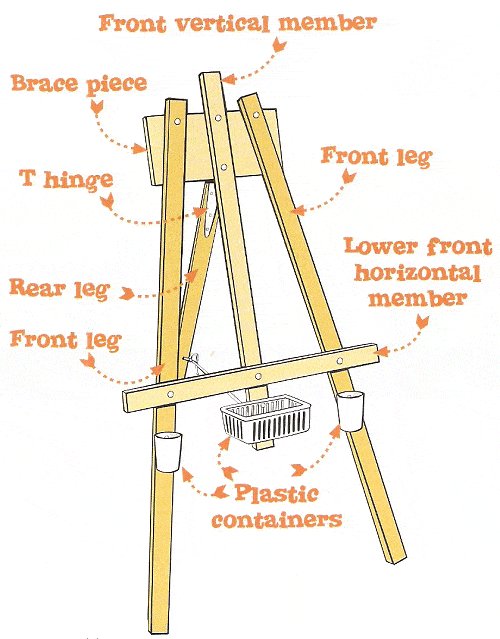
The individual pieces
Instructions
Step 1. Cut and drill the holes
- Measure and cut all the pieces of wood to the lengths given in the cutting list below.
- Drill 6mm (1/4′) holes in the pieces of wood. The positions of the holes are given in the drawings above.
The cutting list
- Two pieces of 50mm x 25mm (1″x 2″) wood, 1100mm (44″) long.
- One piece of 50mm x 25mm (1″x 2″) wood, 900mm (36″) long.
- One piece of 50mm x 25mm (1″x 2″) wood, 800mm (32″) long.
- One piece of 50mm x 25mm (1″x 2″) wood, 600mm (24″) long.
- One piece of 150mm x 25mm (1″x 6″) wood, 300mm (12″) long.
Step 2. Assemble the front frame
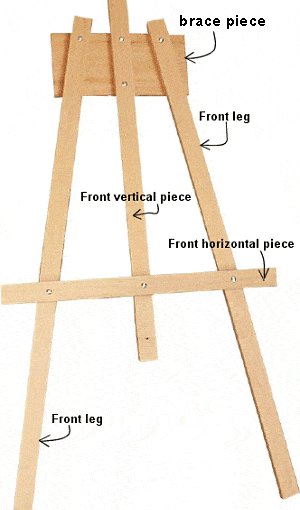
- Lay the brace piece on the ground. Place the two front legs and the front vertical piece on the top piece and align the holes.
- Insert the appropriate bolts into the holes. Lift the unit slightly off the ground so that washers and nuts can be applied to the bolts and then tighten the nuts finger-tight.
- Place the front horizontal piece on the front legs and front vertical piece as shown in the picture.
- Insert the appropriate bolts into the holes. Lift the unit slightly off the ground so that washers and nuts can be applied to the bolts and then tighten the nuts finger-tight.
- Turn the unit over and tighten the nuts with a spanner.
Step 3. Add the rear leg
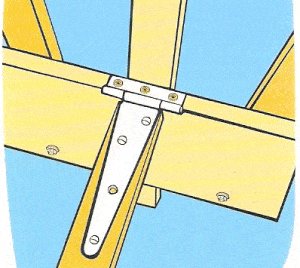
- Bolt the long part of the hinge to one end of the rear leg as shown in the drawing.
- Turn the easel frame unit upside down and screw the shorter end of the hinge to the underside of the brace piece with wood screws.
See picture.
The final touches
Step 4. Tie the rope and fix the containers
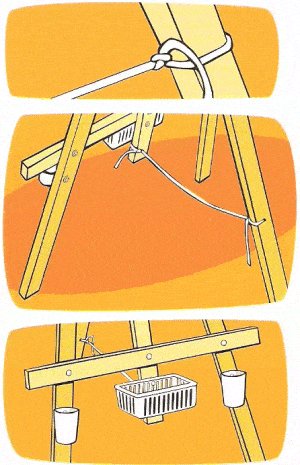
- Stand the easel upright and spread the rear leg to suit.
- Thread a piece of thin rope through the hole at the bottom of the front vertical piece and also through the hole in the rear leg.
- Tie the rope to the front vertical piece and the rear leg so that the legs cannot spread further.
See picture. - Add two or three containers to the easel frame as shown in the picture.
Drill a hole through the top of the container and through the wood and fix in place with a bolt. - The containers can be practically anything that will hold pencils, chalk, wiping rag, or anything else you think might be required when using the easel.
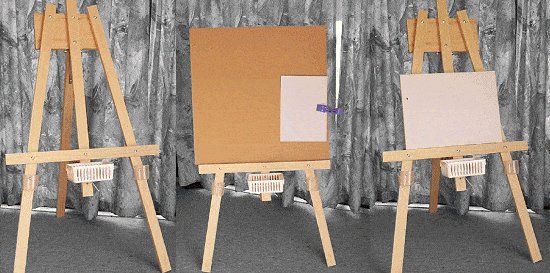
- Below are a couple of ideas of how to use the multipurpose easel. Have fun!


Here’s an easel we made off your plans while on holiday in Spain.
Things were a little different for me here, so had to change a few things!
I don’t know if they even have lumber yards here in the city (Barcelona) or close to it, but found a carpentry store just around the corner from where we are staying and asked what they had to offer.
They had a few spare pieces of lumber and offered us four 2m (80″) lengths of 50mm x 15mm ( 5/8″ x 2″) for 5 Euros (8 U.S. Dollars).
After measuring off the plan we realized it would be a little small for me (Yes I know it said kids easel!) so we followed your plan, just added some length.
Found the screws and bolts at a local hardware store. easy as! Total of everything including timber was 9 Euros (14 U.S. Dollars) spent.
We also added a piece of timber on top of the horizontal piece, so we could have a ledge for my canvas and pencil / paint brushes to rest on. We dug out a trench thingy for my pencils/paint brushes. You would cringe – we had no tools so just kinda dug it out with a screw driver and hammer. Good enough though – the pencil doesn’t roll away!
Everything bought, made and painted all in one day:)
Rose