Contents
Introduction – Materials
Introduction
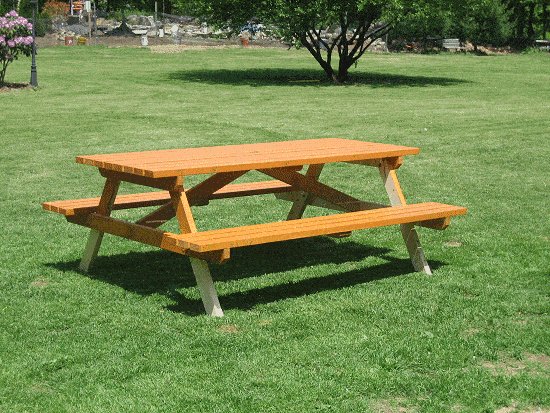
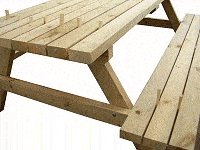
This is a larger than normal traditional picnic table, which at a push can seat eight adults.
The table is 2000mm (80″) long and the top is 800mm (32″) wide, so there’s plenty of room for a bit of food, too!
The complete unit is made out of 100mm x 50mm (2″x 4″) wood,
and…
We have also added a plan for an end frame template to make the project just that much easier.
Materials
Wood: 45 meters (150ft) of 100mm x 50mm (2″x 4″) wood.
This amount includes the template and also allows for a bit of wastage.
Bolts: 16 galvanized coach/carriage bolts 10mm (3/8″) thick by 110mm (4 3/8″) long, or long enough to go through two thicknesses of wood plus enough to accommodate the nuts.
Also 16 nuts and washers to suit.
Nails: About a hundred 90mm (3 1/2″) long galvanized flat-head nails.
You will also need 1800mm (6ft) of metal strap and a handful of 30mm (1 1/4″) flat-head nails for the template.
NOTE ABOUT THE WOOD:
Use a dressed wood (smooth, planed, surfaced) that is suitable for outside use.
The actual thickness and width of the wood will be less than the nominal size or the size that you call the wood.
For example: A piece of 100mm x 50mm (2″x 4″) wood, when dressed (made smooth) will actually be more like 90mm x 45mm (1 1/2″x 3 1/2′).
However, that is not going to effect the overall dimensions of the project.
Traditional picnic table
$5.00- Pay online by credit card, debit card, or Paypal using Secure Server Paypal. You do not need a Paypal account if paying by credit or …
|
About the measurements
A bit about the measurements
The measurements throughout this projects are given in both millimeters and inches.
The abbreviation for millimeters is mm and the abbreviation for inches is “.
The metric (mm) measurements are given first, followed by the imperial (inch) measurements in brackets.
Example: 100mm x 50mm (2″ x 4″).
However, the metric (mm) sizes do not convert exactly to the equivalent imperial (inch) sizes because the measurements are rounded to their respective commonly called sizes.
Example: A piece of 2″ x 4″ wood in North America is the equivalent of a piece of 100mm x 50mm wood in Australasia.
2″ x 4″ is not exactly the same size as 100mm x 50mm.
In fact, if 2″ x 4″ was converted into millimeters exactly it would be 101.6mm x 50.8 mm, and nobody really wants to be calling those sorts of sizes..
Also note that in North America the narrower side of the wood is called first (2 x 4), where as in Australasia the wider side is called first (100 x 50).
When the same piece of wood is made smooth (surfaced, dressed, planed), there is an even bigger discrepancy. 1 1/2″ x 3 1/2″ in North America compared to 90mm x 45mm in Australasia.
A project built using metric measurements will be approximately 1.6% smaller than the same project built using imperial (ft and in) measurements.
In this project the imperial measurements are suited to North America. The metric measurements are more suited to Australasia.
The Plans
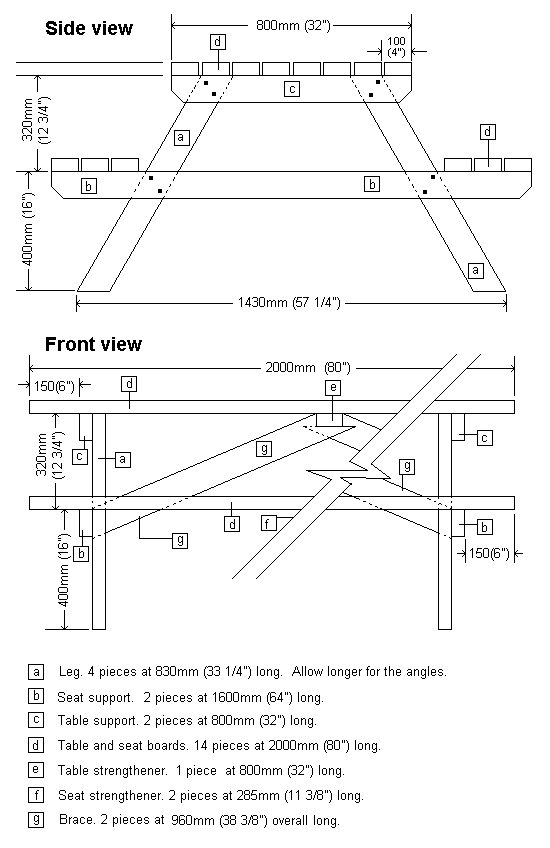
The plans followed by a list of the parts
Cutting the pieces
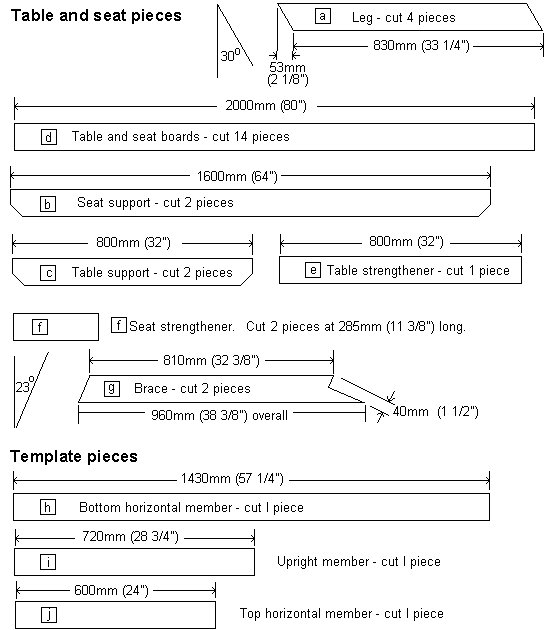
Step 1: Cut the pieces
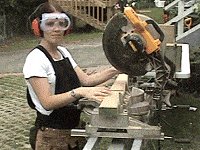
- Cut all the pieces for the picnic table and the template according to the drawings below.
- Cut the longest pieces first to minimize wastage.
Making the template
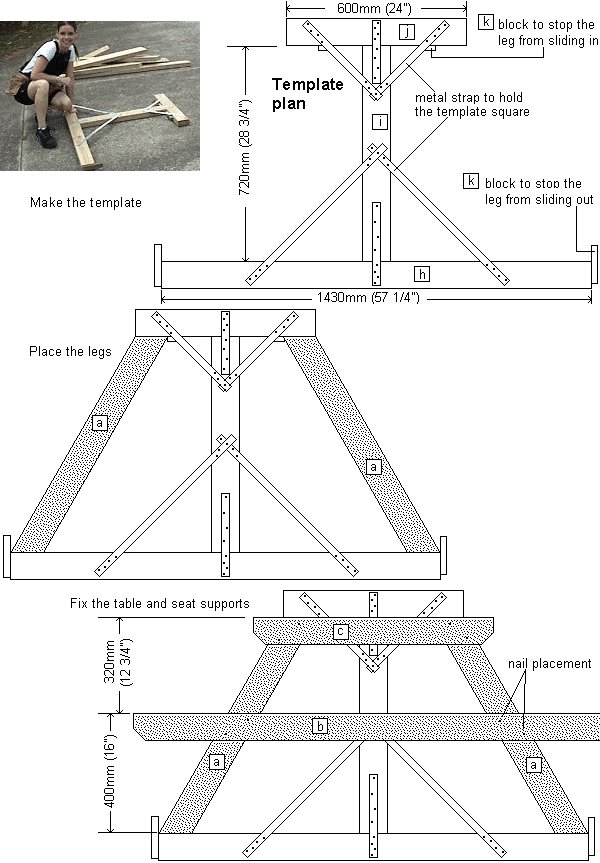
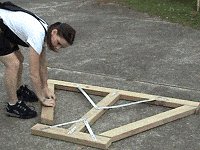
Step 2: Make the template
Making the end frames
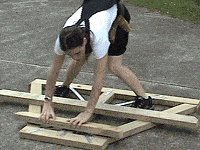
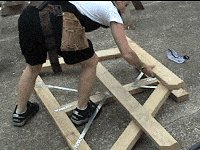
Step 3: Place the legs
- Place the picnic table legs in the template as shown in the picture and also in the template plan.
- The legs should fit neatly into place provided they were cut according to the cutting list plan.
Step 4: Place the support pieces
- Lay the seat and table support pieces in place on top of the legs.
- Refer to the template plan for placement measurements.
Step 5: Nail the end frame

- Nail the table and seat support pieces to the legs.
- The nails are to hold the frame together to enable drilling and bolting once the frame is removed from the template.
- Pre-drill the nail holes in the support pieces to avoid splitting.
- Use two 90mm (3 1/2″) flat-head galvanized nails at each meeting.
- Refer to the template plan for nail placement.
Step 6: Remove the end frame
- Lift the end frame out of the template and place on a couple of work stools in preparation for drilling and bolting.
Step 7: Drill and bolt
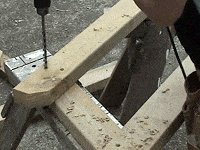
- Drill and bolt the seat and table support pieces to the legs.
- Use two bolts at each meeting.
Fixing the table and seats
Step 8: Stand the two end frames
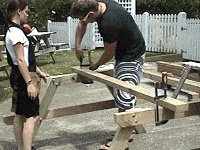
- This step requires three people (to make life easy): one to hold each end frame and one to clamp a temporary holding piece to the top of the end frames.
- Refer to the plans to see how far to space the two end frames.
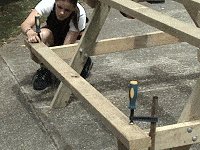
Step 9: Place the outside boards

- Lay the very outside table boards and outside seat boards in place.
- That is four boards altogether; the two very outside table boards and the outside board on each seat.
- Using the plans as reference, ensure that the boards are placed correctly and with the right amount of overhang each end.
Step 10: Fix the outside boards
- When positioned correctly, clamp and fix the four outside boards by drilling and nailing with ONE NAIL ONLY at each meeting.
This enables the whole unit to be slightly twisted if need be. - Using a big set-square, check that the unit is square (that the seat and table boards are at right angles to the end frames), make any necessary adjustments and then drill and add a second nail at each meeting.
Step 11: Fix the intermediate boards
- Lay the intermediate boards in place evenly spaced. They can be temporary held in place with wedges (see photograph).
- When positioned correctly, fix by drilling and nailing with two 90mm (3 1/2″) flat-head galvanized nails at each meeting.
TIP: Do not nail in a straight line. Zigzag the nails a little, this will help prevent possible splitting along the support members, especially with straight grain wood.

The bracing
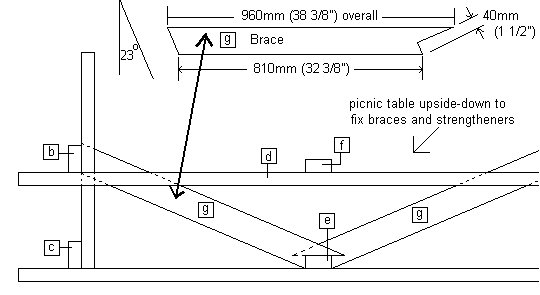
Step 12: The bracing

- Turn the table upside-down.
- Add the strengtheners [f] and [e] to the under side of the table and the seats.
- Position them midway between the end frames.
- Next ensure that the end frames (legs and supports) are at right angles (square) to the table. Then add the two braces [g].
- Off-set the bracing from the center in case you want to drill a hole for an umbrella.
Flip the table over and enjoy!


Hello
I would like to thank you for your Picnic Table plans. They were very easy to follow. My brother and I made this over a weekend with no power tools apart from a drill. Came out great and was good fun doing it…
Best regards,
Paul, From Penang, Malaysia.
Hi Paul! Did you make it longer? how long is your table? Thanks!
Dolores.
Hi i would like to submit my picnic table photos that i ‘ve recently built, with the plans from the web that was very simple and ease . I built in 4 hours and had lot of fun with my son, the only thing that i would like to know is the stain ,would have been better to stain the wood before the assembly ? I’ve had a hard time staining between the boards of seat and table top , if have any suggestion let me know …..
thanks
Philipe do Carmo,Connecticut
Good evening,
Your plans, were a great help to construct the pick-nick table. Took me only almost two working days, but the results may be seen, therefore a photo included.
Thanks and regards.
Leen Groeneweg
Here are some picnic tables that I made that look similar to the one on your site. They range from 4ft – 8ft. They are very simple to make.
k
Photo of the (big) Picnic table I made from your plans! Coated with weather sealant.
Also just a few other photos I thought I’d share. The last one is of my 95-year-old grandmother enjoying the Garden Chair I made from your awesome plans. (My first woodworking project.) Thanks again for the website. I love it!
Derick
Providence, Rhode Island, U.S.A.
Dear Buildeazy,
I would like to say thank you for the free plans for the picnic table. Please see the attached files about my seat and picnic table.
Thank you for your kind guidance.
Best regards,
Tokar Gabor
Just wanted to say thank you for the great plans and easy to follow instructions. I completed the picnic table and finished it off with a nice gingerbread stain all in one evening.. Here are some pictures.. Wayne Mahoney Newfoundland, Canada
Hi Guys,
Built the traditional picnic table (2m long seats and top) yesterday, very easy to follow plans and everything fitted without hassel. Took me about 4 hours to complete and is an excellent size and height.
I have attached a pic.
Stephen Wood
I’ve just finished making this picnic table and I’m very pleased with the result. I made it out of oak 2 1/4″ finished planed thickness. So it should last for years and years. I live in Italy and am fortunate that I got all the wood virtually free from a manufacturer of oak wine barrels ( the really big ones!) all the oak that he rejects because they have a slight problem eg knots or small fissures I buy for the price of firewood i.e.approx $10 for 220 pound (100kg).
One problem that I did find fortunately very early in the construction was that your excellent plans and instructions had a fundamental error. The conversion of imperial versus metric measurement was wrong. In Italy I work in metres but on this design I had to work in inches which worked out perfectly OK.
Now looking forward to the next project and keep up this excellent web site I know that it gives lots of people like me a lot of pleasure.
Best regards.
Thank you for the free picnic table plans. Attached are pictures of the table I built based on your instructions. I searched the internet for several free picnic table plans available and decided on yours. Im glad I did because it was easy to build and turned out great.
I made modifications to your base plan:
– I made my table 96″ long to fit 8 adults even more comfortably
– I did not use bolts, but rather screws from the inside of the table to keep fasteners out of sight
– I added more seat and table supports on the underside
– I used pocket-hole screws everywhere possible to screw from underneath the table to avoid having screw-heads visible
Thanks again
Jordan Self
These plans look great!!! So tempting to give it a try! Do you think I could go 1 ft longer? Or would the wood bend?
Thanks!!!
Hi Camilia,
1 ft longer should not be a problem.
No built pictures are shown, what are the angles for the legs on table, thank you.