Contents
Introduction – Plans – Materials list
Introduction.
A good solid sawhorse. The sawhorse in this project is very similar to a couple that I’ve had around for so long, I can’t really remember when I first made them. One thing is for sure, they’ve had to put up with a lot of punishment and they’ve really stood the test of time.
Even though making of this sawhorse requires the odd compound angle cut (a bevel cut across the width as well as the thickness of a piece of wood), it can be built without the use of any power tools whatsoever
The measurements.
The measurements throughout this project are given in both Standard (inches) and Metric (mm). The standard measurements are best suited to North America and the Metric measurements are best suited to Australasia and other countries.
The inch sizes given in this project do not convert exactly to their corresponding metric (mm) equivalents, so use one or the other.
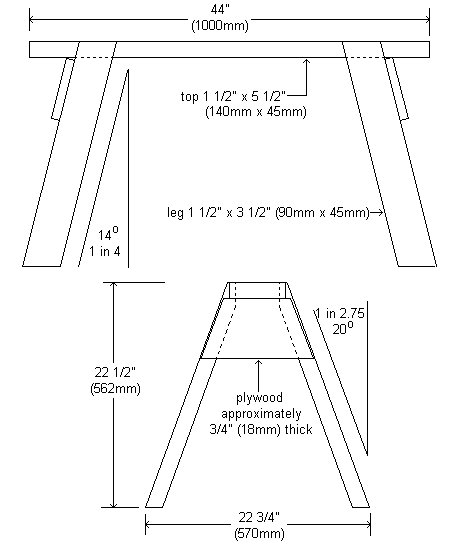
Directly below are the plan drawings.
Under the drawings is the materials list.
The instructions, with pictures included, are on successive pages.
You will need…
- For the top – I piece of 1 1/2″ x 5 1/2″ (140mm x 45mm) wood 44″ (1000mm) long.
- For the legs- 4 pieces of 1 1/2″ x 3 1/2″ (90mm x 45mm) wood 27″ (675mm) long.
- For the braces – 2 piece of 3/4″ (18mm) thick plywood at least 6″ (150mm) wide x 24″ (600mm) long.
- And – 24 galvanized flat-head nails 2 1/2″ (60mm) long.
Video instructions:
The angles and the legs
Step 1. Cut all the pieces to rough length
Acquire or cut all the pieces to the lengths given in the materials list on page one.
The pieces will require further cutting and you will need to work with two angles: 14° and 20°.
Below explains how to find both a 14° and a 20° angle.
Step 2. Finding the angles
Make an angle template by marking the required angles on a work tabletop or square panel.
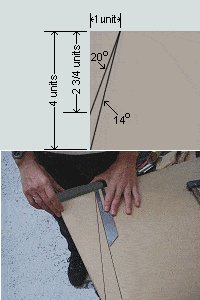
• To find a 20° angle, measure 1 unit across and 2 3/4 units down (as per diagram).
Note: A unit can be any measurement. For example: if you make each unit 4 inches, then measure four inches (1 unit) across and 11 inches (2 3/4 units) down to make a 20° angle.
• To find a 14° angle, measure 1 unit across and 4 units down (as per diagram).
Note: Once again a unit can be anything. If your unit is four inches, it would be 4 inches (1 unit) across and 16 inches (4 units) down to make a 14° angle.
You have now made a template for a 14° angle and a 20° angle.
Set the bevel gauge to the required angle when needed.
Step 3. Mark and cut the tops of the legs
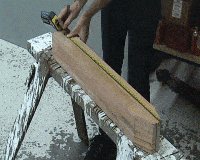
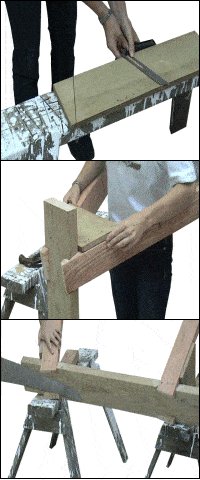
Clamp one of the legs on its edge to a sawhorse and commence to mark the angle cut at the top of the leg.
Measure 1″ (25mm) across and 2 3/4″ (68mm) down. (See diagram.)
Square down off each end of the line to complete the cutting line. (See picture.)
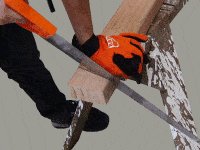
Cut along the cutting line with a handsaw.
Do the same to the other three legs.
Step 4. Mark and cut the bottoms of the legs
Lay a pair of legs back to back on a sawhorse, i.e. in mirror fashion. (See picture.)
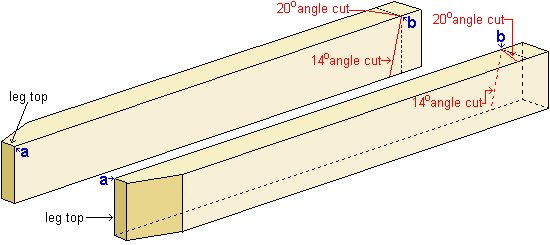
Measure 25 1/2″ (637mm) along the top of the legs from point a and make a mark which will be point b. See the drawing below.
From point b, use a bevel gauge to mark a 20° cut line inwards across the edge of both pieces and to mark a 14° cut line inwards across the face of both pieces.
Then clamp one of the pieces to a sawhorse and cut along the lines with a handsaw. See picture.
The cut is a ‘compound bevel cut’ which means that you are cutting a bevel cut across the width as well as the thickness of the wood.
Do all four legs the same.
The sawhorse top
Step 5. Mark the sawhorse top for rebating
You will need to make four rebates (check-outs, notches) in the sawhorse top to house the tops of the legs.
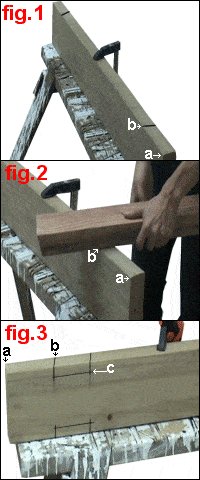
Refer the pictures on the right to help clarify the instructions.
Measure 5″(125mm) in from each end a to point b and then mark a 14° bevel line across the edge. See fig.1.
Do the same to both ends of both sides (four in all).
Next mark the width of the ‘cut-out’ area which will be the same width as a leg.
Use a leg as a template. Hold a leg against one of the bevel lines at point b and with a pencil, mark along the opposite edge of the leg. See fig.2.
Mark the ‘cut-out’ depth which will be 3/4″ (20mm). See fig.3.
Step 6. Rebate the top to house the legs
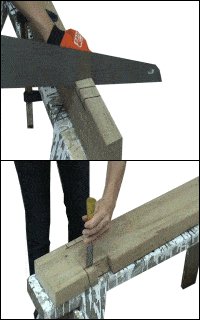
Make multiple saw cuts across the ‘cut-out’ area down to the marked cutting depth which is 3/4″ (20mm).
Three or four cuts across each cutting area should be enough for straight grain wood, but if the wood is a bit knotty then make more cuts.
The more cuts you do, the easier it will be to chisel out the rebate.
Next lay the sawhorse top on its flat end and commence chiseling along the depth line.
Do not go too deep initially.
Chisel in a little bit one side, then turn the sawhorse top over and chisel in a little bit on the other side. Turn the top over again and chisel a bit deeper and so on and so on, until the chips of wood fall out and the ‘cut-out’ area is clean.
Final assembly and braces
Step 7. Fix the legs to the sawhorse top
Place the top of a leg into the rebate in the sawhorse top.(See far left picture above.)
Align the top of the leg so that its innermost point is flush with the sawhorse top.
Then nail it in place with three galvanized flat-head nails 2 1/2″ (60mm) long.
Do the same for the other three legs.
Step 8. Brace the legs and trim the jut-outs.
Cut two braces from (18mm) thick plywood.
Make the tops of the two braces 7 3/8″ (190mm) long.
Mark the sides running out 20° off square, then cut. See top-right picture.
Fit each brace at the top of the legs hard up to the underside of the sawhorse top.
Fix the braces to the legs with three galvanized flat-head nails 2 1/2″ (60mm) long each side.
Finally, lay the sawhorse on its side and cut off the tops of the legs protruding past the sawhorse top.

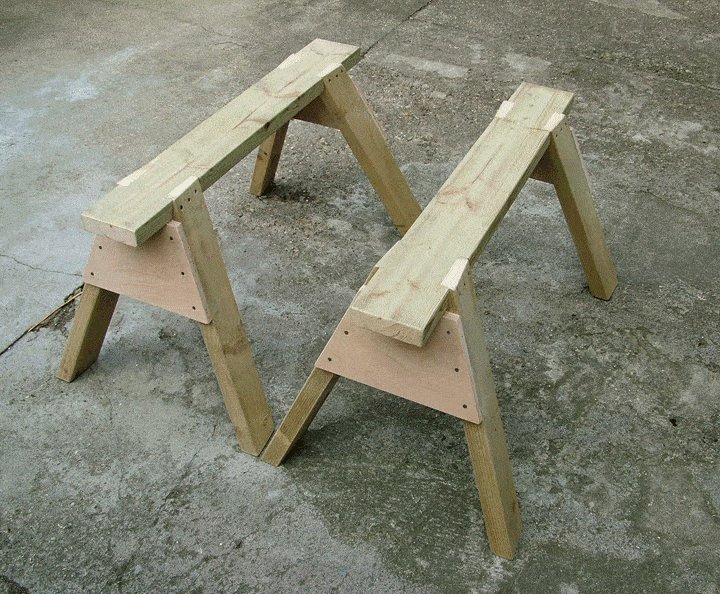




Hello. I made a pair of these saw horses last summer , using your plans.
I used tanalised timber – 95 x 45 for the legs, 145 x 45 for the tops and 18mm ply for the ends. 75mm ring nails to attach the legs , 50mm ring nails for the ends and lots of P/U glue.
They are very sturdy , you can stand right on the ends and they will not tip.
I made a pair of saw horses years ago but did’nt splay the legs in both directions (probably put off by the compound mitres) – Don’t go down this route, these are a lot sturdier and more stable.( Traditional designs always work the best) .
Very easy to make if you own a compound mitre saw. (for the leg cuts and the cutouts) .
I glued and nailed the legs on a flat bit of concrete, then put a concrete block on top while the glue set overnight, (in case the legs were a bit out) ,trimmed and cleaned them up the next day. Turned out alright.
Edmund
Attached is a photo of sawhorses made according to your plans. I used screws for extra care.
cheers.
Andrew Legun
Hi, after looking around for a simple, easy to follow plan for a saw horse, I was really happy to finally find your plans online. This was a fun and easy weekend project. The saw horses will be used while painting my sailing dinghy this summer.
I used off-cuts from scrap timber so the only cost was the hard ware. So thanks! Ps they came out 100% level with no last minute adjustments! Legend! Cheers.
Alistair Walling, Auck. NZ
Hello I followed your plans but for the top laminated to 90×45 and stood them upright and made it 1200mm long they were level when finished no tweaking needed very heavy duty and will last a lifetime thank you so much from Australia
Thank you for putting this out there. Simple, clear instructions. Everything worked perfectly. I made two in an afternoon and used up some offcuts from our house extension.
Hello from N.Z.
I use tanalized timber as per the list of “ you will need “ required to build these saw horses.
My mitre saw was set up ( using clamps to position the leg) to cut the 20 deg cuts at the top of the legs and Also for the compound cuts at the bottom of the legs.
I followed the instructions throughout the build …. with two additions:
1. I attached the legs with 70 mm Square drive wood screws .
2. Attached 3 legs and ensured all was level before Screwing / attaching the 4 th leg.
The end result is A strong solid set of saw horses. Now making a second set.
Thank you for making the instructions available to all.
Cheers Ken
Nice design. People need to know, though, that this is not a project for novices. It takes a pretty high level of manual skill in the use of hand tools. If you don’t have a chop saw or a compound mitre saw, you are in for a lot of sawing. Especially so given that you generally need two sawhorses. So you’re going to be cutting eight legs multiple times.
Another thing: I think the legs need to be longer. 27” makes for a very low sawhorse unless you are not tall. I’m only 5’11” and I will have backache if I work on these for any length of time. I will probably make another longer set of legs, which is why I haven’t glued the first set.
Tips: I used a cordless Sawzall with a fine-tooth blade (hacksaw blade works fine) to cut the angles on the tops of the legs (a radial arm saw won’t make angles that fine) and to make the first angled edge cuts for the rebating.
Also, I didn’t use the multiple cut and chisel method for cleaning out the rebates. I just used a router to clear a portion wide enough for the Sawzall to get in, then used it to make a horizontal cut to left and right to clean out the entire rebate. It made a clean job and saved a lot of time.
Hi, I like the design of your sawhorse, my only concern is that it is too low. If I make the height 30 in, will the bevel and compound cuts remains the same? Thanks
It’d be great if someone could answer this, and give updated measurements and angles for a taller unit.
Come on guys… who can do this??
thanks! looks like easy to follow plans, except for one thing – I don’t have a sawhorse to work on!
Looks like a chicken or the egg thing, but I do have a bench so it shouldn’t be a problem.
great plans – thanks for posting
1. For those with thoughts of gluing and screwing: Don’t. A sawhorse is meant to be used in various locations, including uneven surfaces. This implies movement, which must be allowed for. A sawhorse is not a table. By simply nailing it together there will be enough ‘give’ to allow the sawhorse to ‘settle’ on uneven ground.
2. Start with a length of timber sufficient to cut all four legs. Then each top cut will become the bottom cut for the next leg. This reduces the number of cuts by 50%.
3. With regard the dimensions of the legs and top: I find 4 x 2 good for tops and 2 x 2 good for legs. Those sizes are easier to get and cheaper. Legs can be longer if desired but not above 30″ (75cms)