Contents
Simply Measure, Cut, Drill & Assemble!
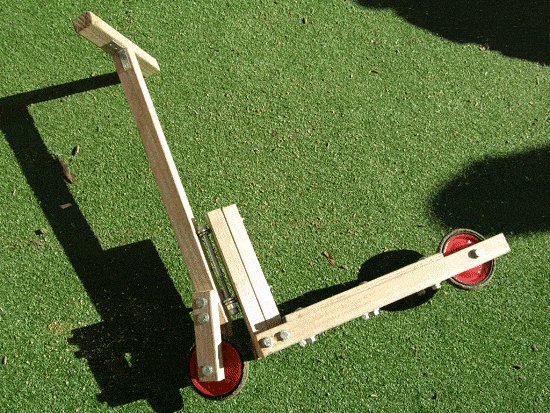
This scooter is an example of how something mechanical can be made just by using standard materials that can be purchased from most building supply stores. This project should be undertaken in conjunction with a capable adult. This basic project involves cutting the pieces of wood to length, marking where the holes are to be drilled, drilling the holes and simply bolting the pieces together.
Helpful tips


- Using good quality tools (such as those made for adults) makes the task easier.
- Use a sharp 8 point (i.e. 8 teeth per inch) handsaw for general cutting. If you are not experienced in using handsaws, use blocks of wood and clamps to act as a saw-guide. Do not use your hand for a guide.
- All electric tools should be used by a capable adult, unless under strict supervision. Even if only using a non-electrical hand drill, goggles should still be worn as a drill bit might snap and fly through the air.
- Screwdriver handle should be big enough to ensure a good grip. Square head screw drivers (with appropriate screws) tend to slip less.
Materials and Plans (ft / inch / metric versions)
Tools you will need
| Work stool or saw horse | Set square | Electric drill |
| Adjustable spanners (2) | Measuring tape | 6mm drill bit |
| Square point screwdriver | Pencil | 12mm drill bit |
| Sharp handsaw | Hammer |
Ft and inch version:
The wood
Wood used in this project is: 1 1/2″ x 2″ for runner boards, handlebar and handlebar uprights; 2×3 for the neck and a piece of 3/4″ plywood for the platform deck. 1 1/2″ x 2″ wood usually machines (dresses, planes or gauges) down to approx 1 1/4″ x 1 1/2″.
Pine is a typical wood that can be used for this project. Untreated wood can be used if the scooter is to be stored mainly indoors. If the scooter is to be left outside, choose a wood that has a natural resistance to decay (i.e. doesn’t rot easily). Your local lumber supplier can advise you on the best available options. If you cannot purchase wood in the sizes stated above, then near enough will do but remember if the thickness of the wood changes, so must the length of the relevant bolts!
Take notice of the drawings below and then follow the step-by-step instructions that come after. You can also go to helpful stuff for more helpful tips.
Identifying The Parts
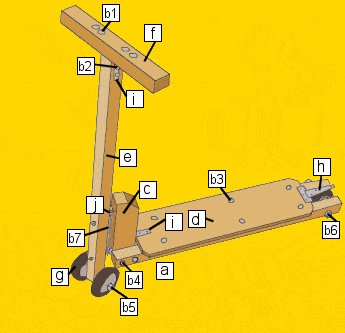
Individual pieces
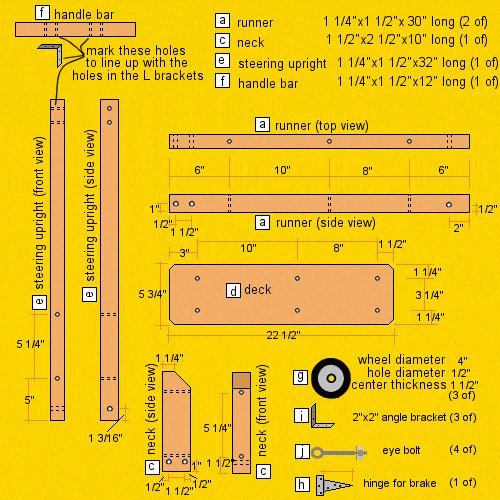
You will also need….
- [j] 2 only 1/4″ eye bolts 2″ long with 5/8″ hole and 2 only 1/4″ eye bolts 3″ long with 5/8″ hole. You will need four eye bolts altogether.
- [b1] 4 only 1/4″ carriage/coach bolts 1 3/4″ long with one washer and one nut for each bolt.
- [b2] 2 only 1/4″ hexagonal head bolts 1 3/4″ long with one nut for each bolt.
- [b3] 6 only 1/4″ carriage/coach bolts 2 3/4″ long with one washer and one nut for each bolt.
- [b4] 2 only 1/2″ carriage/coach bolts 5″ long with one washer and one nut for each bolt.
- [b5] 1 only 1/2″ hexagonal head bolt 6″ long with 2 nuts (to lock against each other) and 4 washers. This bolt is for the front axle.
- [b6] 1 only 1/2″ hexagonal head bolt 6″ long with 2 nuts (to lock against each other) and 4 washers. This bolt is for the rear axle.
- [b7] 1 only 1/2″ carriage/coach bolt 8″ long with 2 nuts (to lock against each other). This bolt goes thru the eyes of the eye bolts and acts as a steering pin.
Metric version:
The timber
Timber used in this project is: 50×40 for runner boards, handlebar and handlebar uprights; 75×50 for the neck and a piece of 18mm plywood for the platform deck. 50×40 wood usually machines (dresses, planes or gauges) down to approx 43×35.
Pine is a typical timber that can be used for this project. Untreated timber can be used if the scooter is to be stored mainly indoors. If the scooter is to be left outside, choose a timber that has a natural resistance to decay (i.e. doesn’t rot easily). Your local timber supplier can advise you on the best available options. If you cannot purchase wood in the sizes stated above, then near enough will do but remember if the thickness of the wood changes, so must the length of the relevant bolts!
Take notice of the drawings below and then follow the step-by-step instructions that come after. You can also go to helpful stuff for more helpful tips.
Identifying The Parts

Individual pieces
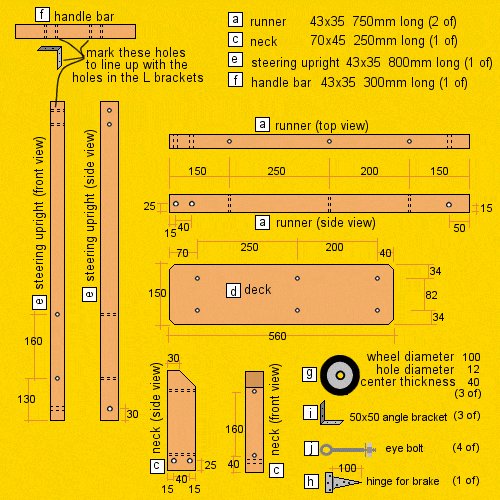
You will also need….
- [j] 2 only 6mm eye bolts 50mm long with 16mm eye hole and 2 only 6mm eye bolts 75mm long with 16mm eye hole. You will need four eye bolts altogether.
- [b1] 4 only 6mm carriage/coach bolts 45mm long with one washer and one nut for each bolt.
- [b2] 2 only 6mm hexagonal head bolts 45mm long with one nut for each bolt.
- [b3] 6 only 6mm carriage/coach bolts 70mm long with one washer and one nut for each bolt.
- [b4] 2 only 12mm carriage/coach bolts 130mm long with one washer and one nut for each bolt.
- [b5] 1 only 12mm hexagonal head bolt 150mm long with 2 nuts (to lock against each other) and 4 washers. This bolt is for the front axle.
- [b6] 1 only 12mm hexagonal head bolt 150mm long with 2 nuts (to lock against each other) and 4 washers. This bolt is for the rear axle.
- [b7] 1 only 12mm carriage/coach bolt 200mm long with 2 nuts (to lock against each other). This bolt goes thru the eyes of the eye bolts and acts as a steering pin.
The instructions
If all the holes are drilled in the right place, the scooter should be a piece of cake to assemble.
Please note: If any of the parts or members you have obtained to use in this project vary in size from the parts listed, then adjustments may possibly be required to bolt lengths and other measurements.
1. Measure, cut, drill and lay out
- Cut all the pieces of wood to the lengths as shown in the previous page. Carefully measure and mark the center of where all the holes are to be drilled. Next, drill the holes.
- Note that there are two different hole sizes.
The holes for the axle bolts and for the bolts that fasten the runners [a] to the neck [c] are 1/2″ (12mm) holes. All the other holes are 1/4″(6mm) diameter. - Lay all the pieces out on the floor.
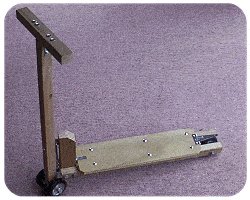
2. Assemble the handlebar
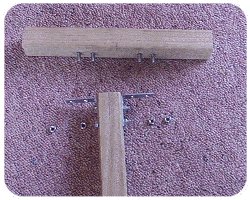
- Bolt the two angle brackets [i] to the top of the steering upright [e]. Then bolt the handlebar [f] in place.
- Use the picture for reference.
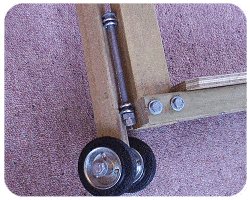
3. Assemble the front wheels

- Assemble the front wheels using a 1/2″ (12mm) bolt as the axle. Place a washer on each side of each wheel and making sure that the axle assembly is loose enough to allow the wheels to turn freely, use two nuts tightened against each other to form ‘lock nuts’.
This will ensure that the axle assembly does not vibrate loose with constant movement. - Also place two eye bolts in the appropriate holes in the steering upright [e].
4. Assemble the platform frame
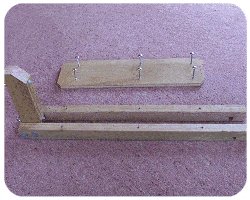
- Bolt the two runners [a] to the neck [c].
- Place the remaining two eye bolts in the appropriate holes in the neck [c].
5. Add the deck
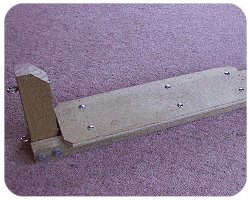
- Fasten the deck [d] to the two runners [a] with 6 carriage/coach bolts.
- Use the picture for reference.
The instructions continued
6. Attach the steering assembly
- Line up the eye of the eye bolts in the neck [c] with the eye of the eye bolts in the steering upright [e].
- Thread a 1/2″ carriage/coach bolt through the eyes of the eye bolts to act as a steering pin.
Make sure that the steering assembly can turn freely and then tighten two nuts together at the end of the carriage/coach bolt to form ‘lock nuts’. This will ensure that the steering pin does not fall out or vibrate loose with constant movement.
7. Secure the neck
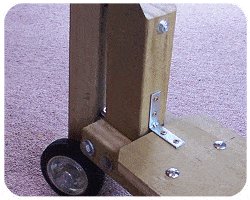
- Fasten an angle bracket to the neck [c] and the deck [d] with screws.
- This is purely to increase strength.
8. Assemble the rear wheel
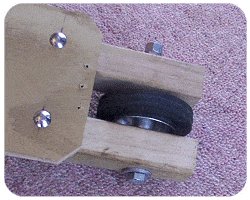
- Assemble the rear wheel in the same way as for the front wheels in step 3.
- Make sure that there is a washer each side of the wheel and also that the wheel can rotate freely, before applying ‘lock nuts’ at the end of the bolt.
9. Add the brakes
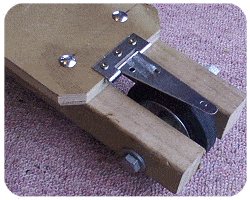
- Screw a T-hinge to the rear of the deck [d].
- This is the brake.
Finished!
NOW!
Read below for some scooter safety stuff.
Some scooter safety stuff
ALWAYS use a helmet, knee pads, and elbow pads.
This is a small investment and can instantly eliminate almost two-thirds of possible scooter accidents.
Children under eight should always be supervised when using scooters.
Almost a third of all scooter-related injuries and accidents involve children under the age of eight. As everyone knows, scooters are capable of traveling very quickly, and children that age do not always have the judgment or coordination to handle these high speeds.
Use scooters in a safe places.
Cars and scooters don’t mix, especially for younger riders. Smooth, paved surfaces are best – avoid bumpy, uneven, wet or rocky surfaces. School yards, parks, paved trails are examples of safe places to “scoot”!
Do not ride a scooter at night.


Thanks a lot for the wooden scooter plan. I modified my design to be a 2 wheel version for the kids at my day care centre.
The neck is made from 2 lengths of the same wood as the runners and steering column etc joined together.
The forks for front wheel needed to be tilted forward to allow a greater turning range.
The wheels I’ve centred with a number of washers on either side.
The 4 year olds are learning how to balance on the 2 wheels, it’s neat.
Sean Newlands
Would love to try and build this scooter but, too many adverts and pop up’s makes it impossible to read through