Contents
Replacing an old shower with new
How to – Time involved
So… You want to replace your old shower with a new one but don’t know what tradesman to get, how long it will take. This article will give you some idea.
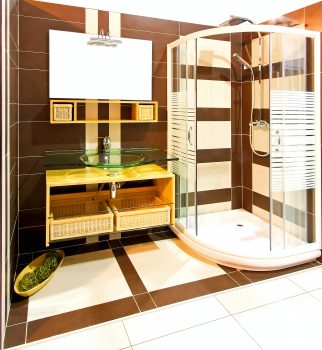
In most cases an old shower consists of a stainless steel tray, Lamiwall or seratone (hardboard backed) shower linings and a shower curtain or a 3 panel sliding door of glass or plastic encased in aluminum framing. The most popular replacement showers are either 1: a complete acrylic unit with a glass door or 2: an acrylic tray, tiled or glass wall with a glass door.
The following was an actual case study, the replacement of an old shower with a complete acrylic shower unit. Both a builder and a plumber were required for this job, and both needed to work in with each other.
What needed to be done
The existing shower had to be replaced with a new acrylic shower unit.
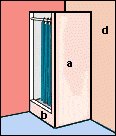
The wall, marked (a) in the above picture, had to come out along with the existing shower tray, shower tray support frame (b) and all existing linings.
The taps and rose in the existing shower were fixed to wall (a), but wall (a) needed to be removed so the plumber had to re-direct all plumbing to wall (d).
Enter the builder
- The water mains were turned off.
- The builder came and removed wall (a) and left the plumbing pipes, taps etc hanging in mid air.
- He then disconnected the waste (drain pipe under the shower tray), and removed the wall linings, shower tray, show tray support and any other remnants of the old shower.
Unusual circumstances. A built up shower tray support.
- Usually, the shower tray would sit hard on the floor with the waste connected to the shower tray through a hole in the floor, but in this case, because of the exceptional structure of the floor, the waste had to be above the floor, hence the need for a raised tray support. See picture below.
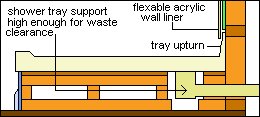
- The builder constructed the shower tray support, 30mm (1 1/4″) smaller than the tray size using 75×50 (2×3) lumber for the frame and 20mm (3/4″) plywood for the tray to sit upon.
- He took the plasterboard off the wall (d) so the plumber could redirect the pipes.
- He fixed the shower tray support in place
Enter the plumber
- The plumber redirected the pipes to wall (d) and installed a Felton mixer (that is what the shower water comes out of, it is a unit that mixes hot and cold water to the required temperature by moving a lever either left or right) at the appropriate height. At that stage the shower mixer cover plate and rose was left off to allow the builder to put up the sheet lining.
- The plumber put the easy clean waste in place.
- The plumber went home.
- The builder again The builder re-lined wall (d) with gib agualine (plaster board) by nailing the sheet to the studs and nogs. (first he marked on the plaster board where all the pipes were, to ensure he didn’t accidentally puncture one).
- He put the shower tray in place. The shower tray was glued to the shower tray support and checked in to the two walls to allow the flexible acrylic shower wall liner to go over the shower tray upturn. See above drawing. (the installation method and tray placement can vary slightly from tray to tray, but all acrylic shower trays come with instructions).
- Next he glued the flexible acrylic wall liner to the plasterboard. With every acrylic shower pack comes the appropriate glue and mastic and instructions on how to glue the wall liner to the wall and how to cut the necessary holes for any plumbing taps or roses. In this case, the builder cut the hole in the wall liner for the Felton mixer by drilling a lot of consecutive little holes.
- The builder went home.
The next day
- The next morning the plumber came in and connected the easy clean waste to the shower tray and connected the Felton mixer cover plate and rose. He turned on the water mains, tested the shower and the waste, and that was the plumber finished.
- The builder came in and fitted the shower screen and door unit. Some screen and door units installation methods vary slightly but they all come with installation instructions and the appropriate mastics or sealants.
- He then put lining and skirting around the raised shower tray support and that was the builder finished. However, the shower could not be used for 24 hrs so the mastic / sealant could cure.
Other jobs that needed doing
- Plastering and painting (outside the shower unit area). In this case, it was done by the owner.
Materials and time
- The owner purchased the shower unit, mixer and waste.
- The plumber supplied the pipes
- The builder supplied the timber, plasterboard and nails.
| Item | Description |
| Shower unit | Newline complete shower unit. From The Building Depot on special |
| Waste | Easy clean |
| Mixer | Felton mixer |
| Plumbing materials | Pipes and miscellaneous |
| Plumber | LABOR 5 hrs |
| Building materials | Framing, nogging, plasterboard, finishing lines, nails, miscellaneous |
| Builder | LABOR 12 hrs |
Note 1: This job went relatively smooth for a shower replacement. Some times there is rot to deal with. This cannot always be seen prior to the builder giving a quote. Usually rot or damp areas in old showers do not become obvious until the shower wall linings have been removed and tray has been lifted. Any rot problems must be addressed and is usually an additional cost.
Note 2: Acrylic shower packs come with appropriate glues and sealants and instructions. Read them.
TIP 1: Most shower screen and door units require a sealant around the outside of the unit only. Run masking tape each side of the area to be sealed, usually around the outside edge of the screen and door unit, but the accompanying instructions will explain exactly. Once the sealant has been applied, remove the masking tape immediately.


