Contents
Materials list
Before building this pergola……..
Check with your local authority to see if any Building permits, permissions, or conditions are required.
Check with the utility companies to make sure the area is clear of underground gas, water, electrical lines, etc.
Find out the depth of the frost line in your area and if applicable check to see if the footings require any special consideration. Usually, the bottom of the footings should be below the frost line to prevent movement.
| Tools required | ||
| • carpenter’s hammer • carpenter’s square • carpenter’s pencil • measuring tape • handsaw | • adjustable spanner • builder’s string line • power saw • electric drill | • 12mm (1/2″) drill bit • bucket or hose • spade • wheelbarrow |
A bit about the lumber
The lumber used in this project needs to be suitable for exterior use and the posts need to be suitable for the inground application. The local lumber yard will be able to advise you on the most suitable lumber for the job.
The lumber sizes referred to in this project are nominal sizes. The nominal size is the size of the lumber before it is dressed or seasoned. This is the size generally referred to when purchasing from the lumber yard. The actual (or dressed) size of the lumber will be less than the nominal size. For example, a piece of 100×50 (2×4) lumber when dressed may be 90×45 (1 1/2″x 3 1/2″) actual size. Please make necessary allowances.
Materials list
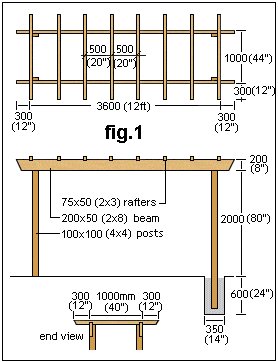
- Posts: 100×100 (4×4) – 4 pieces at 3000mm (10ft)
- Beams: 200×50 (2×8) – 2 pieces at 4200mm (14ft)
- Rafters: 75×50 (2×3) – 8 pieces at 1800mm (6ft). Up size to 100×50 (2×4) or even 150×50 (2×6) if a bulkier look is preferred
- Bolts: 12mm (1/2″) galvanized carriage bolts 120mm (5″) long – 8 of
- Nails: 90mm (3 1/2″) galvanized – 1kg (2.5 lb) of
- Concrete: As needed
- Batter boards and stakes: 5 meters (16ft) of 50×50 (2×2) – 8 meters (26ft) of 100×25 (1×4) throw-away low grade wood.
Instructions: Steps 1 to 3:
Step 1: Familiarize yourself
- Familiarize yourself with the plans and instructions and read the “Before building this pergola” notes in the previous page.
Step 2: Location
- Determine the location of the pergola. Mark out the position by placing a peg in the ground at each corner forming a rectangle 3600mm (12ft) long x 1000mm (44″) wide. The pegs also mark the outside corners of the posts.
Step 3: Set out
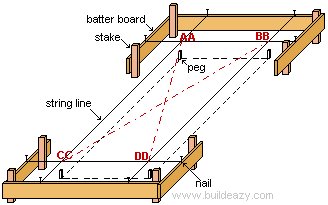
- Make a temporary framework structure at each corner consisting of horizontal boards (batter boards) attached level to stakes. The batter boards are used to establish the levels and the building line (boundary / perimeter) of the pergola.
- 3a) Cut 8 stakes 600 (2ft) long, out of 50×50 (2×2) stock. Cut a point at one end of each stake so they can be easily hammered into the ground.
- 3b) Position the stakes as shown in the diagram and hammer them firmly into the ground. The stakes should be at least 600 (2ft) away from the building line to allow room to dig the corner footing holes.
- 3c) Make a level mark on all eight stakes beginning approx 150 (6″) above ground level, at the corner where the ground is the highest (if the ground is sloping). Use a long straight edge and a carpenters level to transfer the level mark from stake to stake.
- 3d) Once a level line has been established and marked on all eight stakes, proceed nailing 100×25 (1×4) batter boards to the stakes, so that the top of the batter boards are flush with the level lines marked on the stakes.
- 3e) Run a taut string line from batter board to batter board, passing directly over the pegs and tie the ends to nails hammered half way in to the tops of the batter boards. This will now show the approximate building line and perimeter of the pergola, but more exact measurements are needed.
- 3d) Check that the distance between the string line at point AA and BB and the distance between DD and CC are equal. If not, make any necessary adjustments by moving the string line along the batter board and adjust the nails accordingly. The distance between AA and CC and the distance between BB and DD, also need to be equal. Make any necessary adjustments.
- Once the perimeters are parallel, the diagonals need to be measured to ensure that the building line is square.
- Do this by measuring the distance between AA and DD and the distance between BB and CC (the diagonals). Make any necessary adjustments to ensure the diagonals are equal and if adjustments are required, re-check the parallels again, since altering the diagonals will also change the parallels.
- When the building lines are parallel and the diagonals are equal, the building line is then square. You now have a level, square building line to work from.
Instructions continued: Steps 4 to 7:
Step 4: Dig the holes
- Mark the centers for the four holes which will be (50mm (2″) in from the building line (string line) at the corners.
- Take down the string line and dig the four post holes, 350mm (14″) square and 600mm (24″) deep. They will need to be deeper if in a frost prone area. See notes in page one.
- When the holes are dug, replace the string line. (The string outlines the outside faces of the posts.)
Step 5: Mix and pour the concrete
- Make a mix of concrete in a wheelbarrow at a ratio of 3 gravel, 2 sand and 1 cement. Add clean water and mix to a uniform consistency until wet enough to fill around the posts, yet stiff enough to hold the posts upright without the need of supports or braces. Of course you will need a wind free day.
- Carefully shovel some concrete into the bottom of each hole before placing the posts. (Minimum 75mm (3″))
Step 6: Stand the posts
- This step will require two people.
- Have one person position a post vertical into one of the holes and next to (but not quite touching) the building lines (string lines) where they meet at the corners.
- Check the post is vertical by holding a plumb level against two adjacent sides of the post. The other person can then proceed to shovel concrete around the post to within 50mm (2″) from the top of the hole. Repeat this action until all four posts are concreted in place.
- Confirm again that all posts are vertical and leave to set.
A couple of days later
Step 7: Trim the tops of the posts
- Trim the top off one of the posts 2200mm (88″) from the ground. (Remember from the materials list that all posts are slightly over length.)

Note: Keeping the top of the pergola as low as possible gives the appearance of a wider opening and less elongated look. However, if you prefer a higher pergola – Then do it.
- Measure down from the top of the trimmed post to the building line (string line) and transfer that measurement to the other three posts. This gives a level mark at the top of the posts.
- Trim the other three posts.
- On the outer side of each post mark a horizontal line 200mm (8″) down from the top.
- Cut along the mark with a power saw to a depth of 50mm (2″) i.e. the thickness of the beam. Do this to all four posts.
- Next – Scribe a vertical mark 50mm (2″) in from the outer site of each post from the top, down 200mm (8″). Cut down that mark with a sharp handsaw. See fig.2
Safety first
- When using a power saw make sure you have firm footing.
- Erect a scaffold if necessary.
- Wear safety goggles and earmuffs.
Instructions continued: Steps 8 to 11:
Step 8: The beams
- Cut two 200×50 (2×8) beams at 4200mm (14ft) long, tapering the cuts in 30 degrees off square at the ends. (See fig. 3.)
- On the top edge of each beam measure in 300mm (12″) and then another 50mm (2″) from the ends and mark square.
- Make notches in between the two marks (50mm (2″)apart) by running a series of saw cuts 25mm (1″) deep and then by cleaning out with a chisel.(See fig.3.)
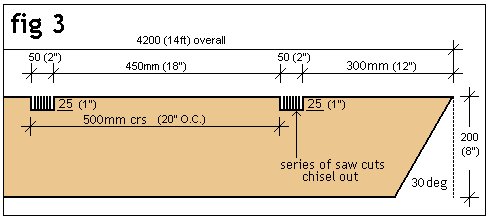
- Make similar notches along the tops of the beams at 500mm (20″) centers/O.C. In all a total of 8 notches spread evenly along each beam.
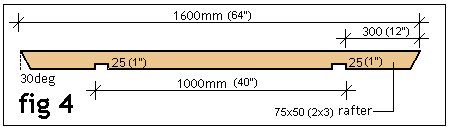
Step 9: The rafters
- Cut eight 75×50 (2×3) rafters 1600mm (64″) long, tapering the cut in 30 degrees off square at each end.
Note: If you prefer a more bulkier look, then up size the rafters to 100×50 (2×4) or even 150×50 (2×6).
- Make two notches 50mm (2″) wide and 25mm (1″) deep on the bottom side of each rafter in the same manner as described in Step 8 and to the dimensions as shown in fig.4.
Step 10: Place the beams
- Sit the two beams in the rebates at the tops of the posts. Align the beams so that each end overhangs the posts 350mm (14″) and that the notches line up flush with the outsides of the posts. See fig.5.
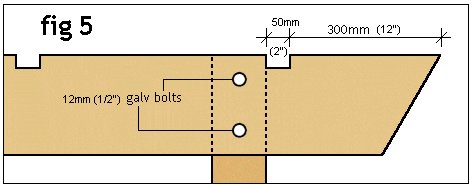
- Drill and bolt beams to posts using 12mm (1/2″) galvanized carriage bolts and washers.
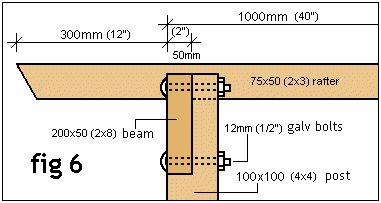
Step 11: Place the rafters
- LAST AND LEAST. Place the rafters on top of the beams so the notches on the underside of the rafters line up with the notches on the top side of the beams. Tap the rafters into place and nail down through the top of the rafter into the beam with 90mm (3 1/2″) galvanized nails. See fig.6.
That’s the lot. Have fun 🙂


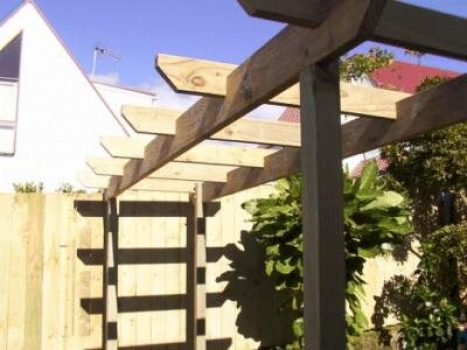
I built this Garden Pergola from the Buildeazy plans “How to Build a Walk-through Garden Pergola.”
I used 100×100 (4×4) dressed treated posts, 200×50(2×8) beams, and 150×50 (2×6) rafters for a more bulk look.
I put the posts in basically to the same dimensions as in the plan. I let the posts set in concrete overnight and then trimmed and checked out the top of the posts according to the instructions.
I then measured and notched out the top of the beams to accommodate the rafters.
I cut all the rafters to length and also cut my preferred profile on the ends and clamped them altogether and placed them on convenient height supports to enable marking and notching. I then marked lines where the rafters were to be checked out, set my power saw blade to the required depth, which was 60mm (2 1/2) inches in this case, and made multiple saw cuts within the lines.
I used 150×50 (2×6) rafters for a more bulkier look.
It was a simple task with a hammer and chisel to clean out the notches. I had previously done the same to the top of the beams where the rafters are to be fixed.
The tops of posts are trimmed and shaped, the beams and rafters are cut and notched, now the whole structure can be assembled.
I then sat the two beams in the top of the posts and clamped them in place.
It was then just a matter of drilling and bolting the beams to the posts.
I pretty much went by the plan instructions
The next step was probably the easiest part of the whole job and also the most rewarding as the finished project took shape.
The rafters fitted easily into the notches in the beams.
A nail or two to make sure that the rafters aren’t going anywhere and that’s about it!
I haven’t yet put much thought into what else I might do to the pergola but I might run some lattice work up each end.
I completed the project in a weekend and it’s strong enough to support any amount of plants and vines and maybe even put up a swing for the kids.