
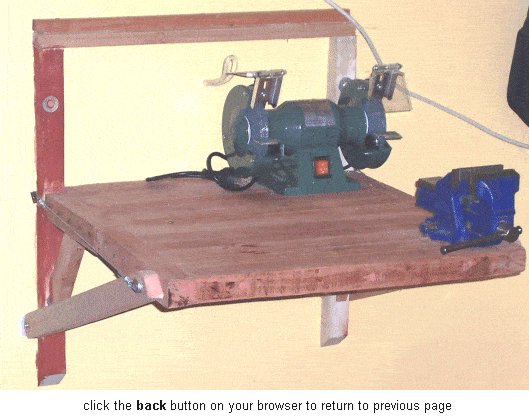
Marcelo was kind enough to send us a couple of photos of a wall mounted folding work bench that he made and designed. This work bench is ideal for tight spaces and we thought that the bench was well worth posting online so that others might benefit from his handy work.
Unfortunately no measurements or instructions accompanied the photos so we took a guess of the size and come up with some figures of our own. Scroll down for our version of the plans and a few direction notes.
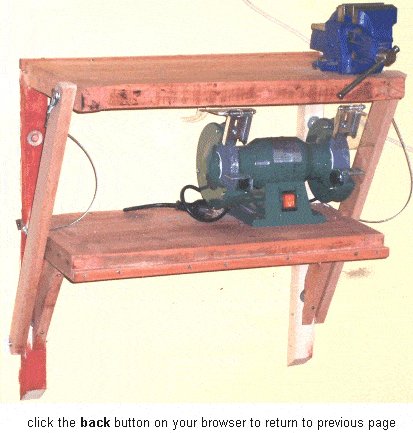
The plans for a wall mounted work bench

[a] 50×50 (2×2) upright members that are fixed to the wall.
[b] Top shelf. Constructed of two pieces of 150×50 (2×6) wood, two pieces of 50×50 (2×2) wood one each end of the shelf and one piece of 25×25 wood along one edge of the shelf.
[c] Lower shelf. Constructed of two pieces of 150×50 (2×6) wood, two pieces of 50×50 (2×2) wood one each end of the shelf and one piece of 25×25 (1×1) wood along one edge of the shelf.
[d] 25×25 (1×1) wood that runs along one edge of each shelf and also on top of member [e].
[e] 50×25 (1×2) wood. Runs horizontal and sits on top of the two uprights [a].
[f] 50×50 (2×2) wood. Fixed brace that supports the lower shelf.
[g] 50×25 (1×2) wood. Moving brace that supports the top shelf.
[h] Wire cable or chain.
[i] 150×50 (2×6) wood. Part of the shelves, both top and lower.
[j] 50×50 (2×2) wood. Part of the shelves, both top and lower.
A few directional notes
Materials
You will need 3600mm (12ft) of 50×50 (2×2) wood, 2100mm (7ft) of 50×25 (1×2) wood and 2100mm (7ft) of 25×25 (1×1) wood.
Note: If the wood that you use is dressed or surfaced, then the size (width and thickness) will be less than the sizes nominated above. Make any necessary adjustments.
You will also need a hook catch to hold the top shelf in place when it is in the raised position, Wire cable or chain to hold the top shelf in place when it is in the lowered position, necessary wall fixings (see below) and assorted nails and/or screws.
Wall fixing
The upright members [a] will need to be fixed securely to the wall with appropriate screws or anchors.
In a standard lumber frame wall the upright members should be fixed directly to a vertical stud or horizontal block within the frame. Use 100mm (4″) screws positioned as shown in the plan above.
Click here for more info about how to find studs in a standard lumber frame wall.
In a masonry wall the upright members can be fixed directly to the wall using appropriate anchor bolts or similar types of masonry screws or bolts.
Wire cable or chain
Use wire cable (similar to that used on a bicycle brake) or chain to hold the top shelf in place when it is in the lowered position.
Most important measurements
The two most important measurements are……
The distance between the holes (pivoting points) in the moving braces (members [g]) and also the fixing points on the top shelf [b] and upright [a].
A little bit of trial and error might be needed when determining these measurements to ensure that the top shelf is level when it is in either the raised position or the lowered position.
And……
The length of the wire cable should be just long enough to ensure that the top shelf is held firmly in position when it is in the lowered position.


Dear Sirs:
I’m from Argentina, very far away at the south, I built an Adirondack chair using the plans (https://www.buildeazy.com/cape-cod-chair/) from your web site. Thanks a lot.
I’m sending to you a pair of photos, of a working table that I designed, so you can put them in your free-plans section.
Kind Regards
Marcelo.
How do you keep the top shelf stable while changing postions? With only one pivot point you have a heavy vise just flopping around when between top and bottom settings. I know the answers I will get. “Oh you just hold on as you lower it”. Unless that is a little toy of a vise there is no way I could let any of my kids near it. I am talking about teens that are trained and allowed to use all the tools. Anyone who has not had a shop accident doesn’t think it can happen to them. Someone WILL get hurt from this design.
We have some great engeneering types on this group. How about someone give us this same concept with a proper 2nd pivot point that will not allow the top shelf out of level.