Contents
Introduction
This wooden bucket is decorative in the sense that it can’t be used for some of the tasks expected of a standard bucket, such as carrying water.
It does, however, have other practical uses and makes a very attractive planter.
The bucket is also ideal for the wishing well project.
This project is in both metric (mm) and imperial (ft and inch) dimensions.
The measurements are given first in millimeters followed by inches in brackets ().
Materials you will need
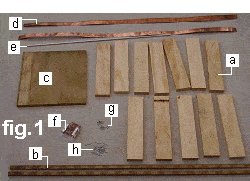
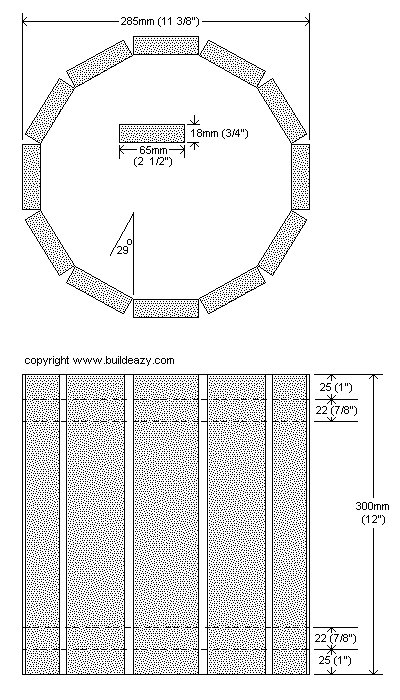
[a] Twelve 65mm x 18mm (3/4″x 2 1/2″) wood slats that are 300mm (12″) long.
[b] Two thin strips of wood approximately 1000mm (40″) long.
[c] One piece of 15mm (5/8″) plywood approximately 300mm x 300mm (12″ x 12″) square.
[d] Two lengths of copper strap approximately 22mm (7/8″) wide by 1000mm (40″) long.
[e] One length of metal rod approximately 6mm (1/4″) thick by 700mm (28″) long. Can be steel, aluminum etc.
[f] Fifty 18mm (3/4″) long nails with flat heads. Copper or galvanized.
[g] Six 18mm (3/4″) long staples.
[h] Twenty-four 25mm (1″) long nails to temporarily tack the strips of wood (marking sticks) to the slats.
About the wood
The slats are from 65mm x 18mm (3/4″x 2 1/2″) stock which is dressed 75×50 (2×3). If the wood that you use is slightly different in width and thickness, it does not matter. The concept will still work, however, make sure that the wood you choose is suitable for exterior use.
About the copper strap
Most sheet metal stockists and some plumbing firms have off-cuts of copper sheet lying around that you can usually obtain inexpensively. Some will even cut straps for you to the required width, whereas others will only sell bigger off-cut pieces that you will have to cut yourself, using a pair of tin snips.
If you are unable to get copper then any metal strap will suffice, as long as it is suitable for exterior use.
Instructions
Step one: Cut the pieces
- Cut all the pieces required for the project to the sizes as shown in the plan and the materials list above.
Step two: Mark square lines on the slats
- Measure in 25mm (1″) from each end of each wood slat and make a pencil line parallel with the ends, as shown in fig.2.
- The lines mark where the copper strap will go.
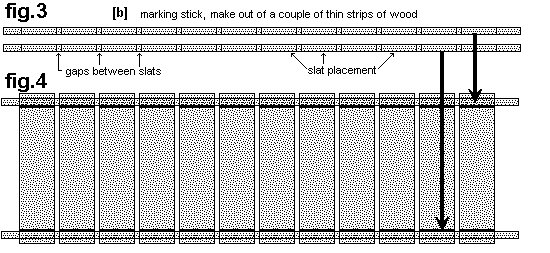
Step three: Make the marking sticks
- On two thin strips of wood [b] 1000mm (40″) long, measure and mark for slat placement, as shown in fig.3 below. These strips of wood are the ‘marking sticks’ or ‘templates’.
- The gap between the slats should be half of the slat’s thickness. See The Gap Equation below.
- The marking sticks can be made out of any thin strips of wood as they will later be discarded.
Example size: approximately 10mm (3/8″) thick x approximately 25mm (1″) wide x approximately 1000mm (40″) long.
Step four: Lay out the slats
- Lay out the slats in line with the marks on the marking sticks [b] and temporarily hold in place with small nails (fig.4).
- The marking sticks are tacked (temporarily nailed) to the slats (fig.4 below) to ensure the spacings (gaps between the slats) are held correctly until such time as the copper strap is fixed in place.
The Gap Equation
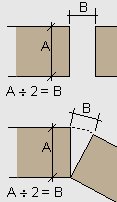
The distance of the gap between the slats is crucial to forming a good circle. The gap, or spacing between the slats, should be half of the thickness of the slat.
For example: The thickness of the slats in this project are 18mm (3/4″).
Therefore: 18mm (3/4″) divided by 2 = 9mm (3/8″), which is half of the thickness. Hence the gap or spacings between the slats in this project will be 9mm (3/8″).
Note: The width of the slat has no bearing on the size of the gap, only the thickness and the total number of slats matter. In this case, 12 slats are used to form the bucket sides.

Also important:
Ensure that the slats have square corners. Wood with rounded corners would require a different equation.
Instructions continued
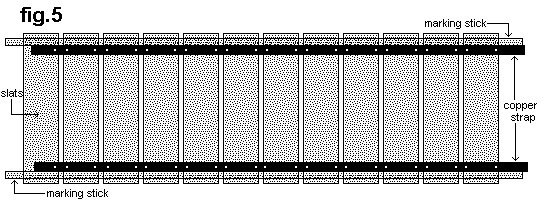
Step five: Fix the copper strap
- Nail the copper strap to the slats. See fig.5 below for positioning. Nail as closely as possible to the edges of the slats and pre-drill nail holes through the copper.
- Once the copper strap has been fixed in place, take off the two marking sticks and discard them.
Step six: Form a circle
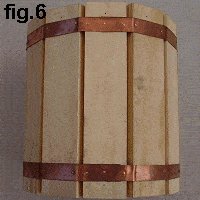
- Roll the slats in a circle and nail through the copper straps where they overlap (fig.6).
Note: If the gaps are the correct size the circle will be self forming. See the gap equation on previous page
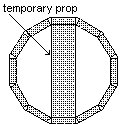
Place a temporary prop under the slat where the copper straps overlap prior to nailing to give support.
<<< see drawing
Step seven: Mark and cut the base
- Stand the bucket on a piece of plywood and mark the base. See fig.7.
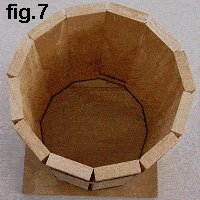
- Remove the bucket and cut out the base with a jig-saw.
Step eight: Fit the base
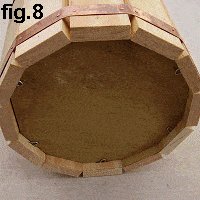
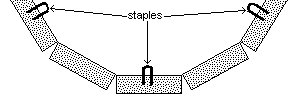
- On the inside of the bucket, hammer 18mm (3/4″) staples halfway into every second slat 25mm (1″) up from the bottom. Then sit the plywood base on top of the staples.
Step nine: Add the handle
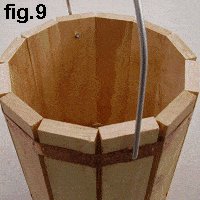
- Drill handle holes (the thickness of the handle) through the copper strap and slat at the top of the bucket.
- Drill slightly upwards from outside to inside.
- Bend the handle to shape and then insert it through the holes.

All done!


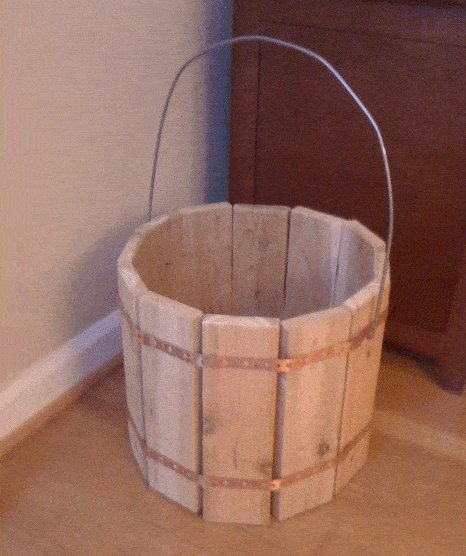
Here is the bucket I made following your instructions. Great plans. Easy to follow.
Took about an hour and a half using only hand tools.
Thanks, David
I made this smaller version of your bucket using 8″ slats.
I used birch iron on pre glued wood to hold slats in place, then used copper strap for final holding.
Added rope for extra attraction. Handle is made from copper tubing plumbing type. Great and easy pattern.
Regards,
Parker K Paine