Contents
Introduction
For a larger version of this picnic table with detailed plans and instructions click on the bow below.
To see an assortment of picnic tables click here.

Traditional picnic table
$5.00- Pay online by credit card, debit card, or Paypal using Secure Server Paypal. You do not need a Paypal account if paying by credit or …
|
Ft and inch version:
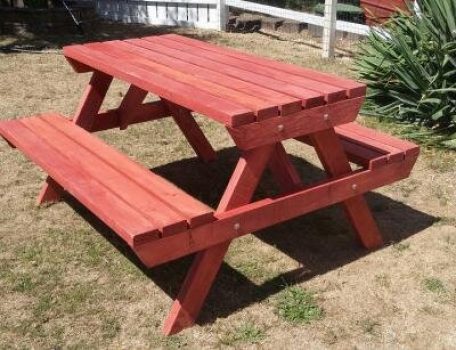
This four seater picnic table with attached seating is made solely our of 2×4 dressed treated lumber. It is one of the most basic of picnic tables but is very sturdy and will last for years.
Total materials required for this project are 75 ft of 2×4 dressed treated lumber (or other lumber suitable for outside use), eight 3/8″x 4″ galvanized carriage bolts and about fifty 3 1/2″ galvanized flat head nails.
Note that dressed (surfaced, planed) 2×4 lumber finishes at approximately 1 1/2″ x 3 1/2″, so the ‘actual size’ is smaller than the ‘nominal size’. The sizes used in this project are the ‘actual sizes’.
Below are the picnic table plans followed by some brief instructions.
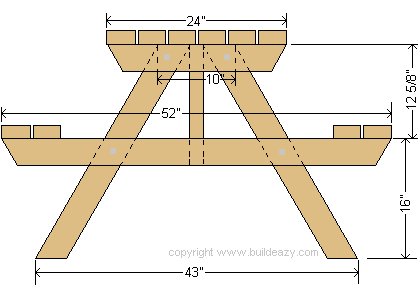
Picnic table plans: End profile
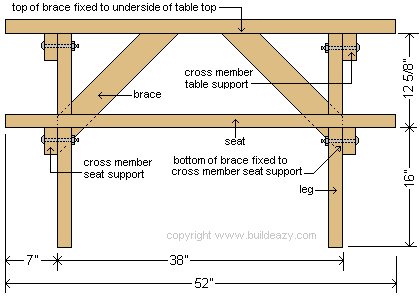
Picnic table plans: Front profile
Picnic table plans: individual pieces

Instructions
- Cut all the members for the picnic table out of 1 1/2″ x 3 1/2″ stock. Refer to the plan above for lengths and angle cuts. Cut the longest pieces first to minimize wastage.
- On flat surface make up the two end frames comprising of the cross members and the legs. Use above plans for reference.
- Stand the two end frames upright and fix the seat members and the table members to the appropriate cross members.
- Turn the picnic table upside down and fix the braces in place insuring that the end frames are square (at right angles) to the table and seat members.
- Done! Pop it into the garden and enjoy.
Metric version:
Plans – Material list
Below are the detailed plans and material list for every piece of timber needed to construct a bbq picnic table. There are no instructions for this one, as everything is pretty much self explanatory. Have fun.
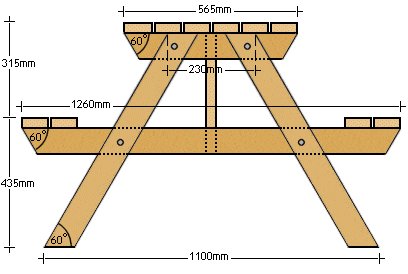
Picnic table plans: End profile
Picnic table plans: Front profile

Picnic table plans: individual pieces
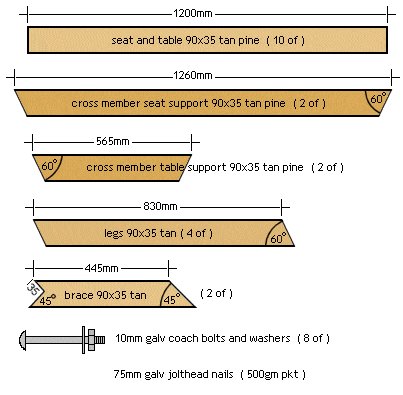
Materials required
- 90×35 treated pine. 22 meters required allowing for 10% waist. Cut the longer lengths first and the shorter lengths from the off cuts
- 8 only 10mm galvanized coach bolts 90mm long with nuts and washers
- 500gm (1/2 a kilo) bag of 75mm galvanized nails


Thanks to BE for clear and simple guides to make this picnic table. I made it with one of my assistance last Sunday, start from 900 hrs finish at 1600 hrs. Made from used Rasamala wood ex door/window frames; very cheap but it’s one of the strongest wood. I put it at my backyard Organic Home Gardening. See the picture attached.
Soeparwan, Bandung – Indonesia
Hi. I just wanted to let you or who ever supplied the BBQ table plans know that I have built a table and everything worked out to the “T”, and your prices were quite accurate. Was a bit of fun. Keep it up. Tony. Remuera
Thanks for the ideas from your page…I was able to build a wheelbarrow and BBQ table for mum just in time for mothers day…. Wonderful site to visit and lots of handy hints… Looking forward to more each month.. Debbie. Balclutha
Hi. A couple of months ago I wrote to say I was going to make your bbq table. I have made three and am going to make more (for all my relations). Thank you. H.B. Howick
Great project! Wish I had found this before I made a fool of myself measuring the tables at rest areas! Within an hour of the first cut we were the proud owners of a great little BBQ table with no hassles or swearing. Thanks for putting the plans up – It’s so nice to see information available where no fees are involved. Good luck with the site, you’ve earned it. P.M. Northland
Thanks to your web site I have built this picnic table.
Rick
Thank you for these great plans. I am not a carpenter/woodworker by any means! But these plans were simple to follow and it came together nicely. Only two modifications; 1) I used 3 inch deck screws instead of nails. 2) I added a 3rd board to each side of the seat.
My cost to build it was just under $60, minus stain. I used standard 2x4s. 7 — 12 footers total.
Piece of cake!!! Thank you again!
Thanks to Build Eazy and the free plans, I have now my own picnic table!
It took me a little less than two workdays and today here it is 😀
Abdelaziz Bengaid
Great design easy to follow Will use again Cheers
Vag Monoyos
Just a note to tell you what a great time two ten year old kids had building the picnic table for four. Total cost was about $40 including Grandpa’s mistakes. The kids did the project with only hand tools except to drill the holes for the lag bolts. When they tired of using the crosscut hand saw Grandpa took over but only a little. The kids did the cutting, drilling, measuring (including the compass to get the angles correct), nailing and adding a few screws to add strength. It took us two mornings because of staining and Grandpa got tired. We did add #8 2.5 inch wood screws to the seats and the braces just for solidity. In the end it was one heavy and sturdy table. We christened it today with a big watermelon. Biggest mistake was we built it in the garage and then discovered that it would not fit through the gate to the back yard. Ingenuity by 10 year olds solved the problem and it sits nicely under a shade tree. Many thanks for the plans.
The pictures show the almost finished project before staining. Notice the acting and we used protective eyeglasses.
Robert Jacobi