
Contents
Metric version
Materials required:
The lumber sizes referred to in this project are the nominal sizes. The nominal size of a piece of lumber is the size of the lumber before it is dressed or seasoned and is the size generally referred to when purchasing from the lumber yard. The actual size, or dressed size of the lumber will be less than the nominal size. For example, a piece of 100×50 lumber when dressed may be 90x45actual size. Please make necessary allowances.
All the timber used in this project is 100×50 stock suitable for exterior use.
You will need……
- 100×50 lumber suitable for exterior use : 18 metres (allowing for wastage)
- 8 only m12 galvanized coach bolts 110mm long
- 2 only m12 galvanized coach bolts 150mm long
- 1 kg 90mm galvanized flathead nails.
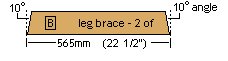
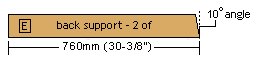
Below are the precise sizes and angle cuts of every piece of lumber required to construct the garden seat. Always cut the longer pieces first and then cut the shorter lengths from the off cuts.
All timber illustrated below is 100×50 stock


Garden seat plans
Garden seat assembly instructions

Step 1:
- Cut all pieces of timber to lengths and angles as shown in previous page. All angle cuts are 10 degrees off square.
Step 2:
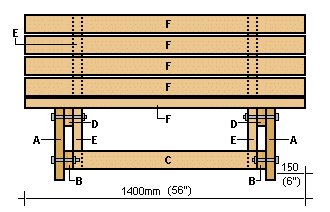
- Lay out one of the end frames flat on the ground with the two legs (A) first, followed by the leg brace (B) and the seat support (D) on top of the two legs, and then the back support (E) on top of that.
- Position as shown in the plan ensuring all ends are flush. (refer fig.1 in the plan)
Step 3:
- Hold the frame in place with clamps and drill and bolt all adjoining pieces. (4 only 12mm bolts at 110mm long and 1 only 12mm bolt at 150mm long.) That’s the first end frame complete.
Step 4:
- Make up the second end frame in the same way as described in step 1 and 2 but as a mirror image of the first.
Step 5:
- Stand up both frames and nail the spreader (C) in place. See fig.1 & 2 in the plan.
Step 6:
- Commence nailing the seat slats (F) to the seat frames beginning with the first slat flush with the front edges of the legs and overhanging the sides of the legs by 150mm. see fig.2 in the plan.
- Continue nailing the rest of the slats to the seat frames, spreading them out evenly (approx 10mm gap between slats.)
- Constantly check that all slats are overhanging the seat frames by the same amount and that the seat frames are square and parallel.
- Nail with 90mm galvanized flathead nails.
Finish! eazy with a ‘Z’ 🙂
Ft and inch version
Materials required:
The lumber sizes referred to in this project are the nominal sizes. The nominal size of a piece of lumber is the size of the lumber before it is dressed or seasoned and is the size generally referred to when purchasing from the lumber yard. The actual size, or dressed size of the lumber will be less than the nominal size. For example, a piece of 2×4 lumber when dressed may be 1 1/2″x 3 1/2″ actual size. Please make necessary allowances.
All the lumber used in this project is 2×4 stock suitable for exterior use.
You will need……
- 2×4 lumber suitable for exterior use : 60 ft (allowing for wastage).
- 8 only 1/2″ galvanized carriage bolts 4 1/2″ long.
- 2 only 1/2″ galvanized carriage bolts 6″ long.
- 2.5 lb 3 1/2″ galvanized flathead nails.
Below are the precise sizes and angle cuts of every piece of lumber required to construct the garden seat. Always cut the longer pieces first and then cut the shorter lengths from the off cuts.
All the lumber illustrated below is 2×4 stock
Garden seat plans
Garden seat assembly instructions
Step 1:
- Cut all pieces of timber to lengths and angles as shown in previous page. All angle cuts are 10 degrees off square.
Step 2:
- Lay out one of the end frames flat on the ground with the two legs (A) first, followed by the leg brace (B) and the seat support (D) on top of the two legs, and then the back support (E) on top of that.
- Position as shown in the plan ensuring all ends are flush. (refer fig.1 in the plan)
Step 3:
- Hold the frame in place with clamps and drill and bolt all adjoining pieces. (4 only 1/2″ bolts at 4 1/2″ long and 1 only 1/2″ bolt at 6″ long.) That’s the first end frame complete.
Step 4:
- Make up the second end frame in the same way as described in step 1 and 2 but as a mirror image of the first.
Step 5:
- Stand up both frames and nail the spreader (C) in place. See fig.1 & 2 in the plan.
Step 6:
- Commence nailing the seat slats (F) to the seat frames beginning with the first slat flush with the front edges of the legs and overhanging the sides of the legs by 6″. see fig.2 in the plan.
- Continue nailing the rest of the slats to the seat frames, spreading them out evenly (approx 3/8″ gap between slats.)
- Constantly check that all slats are overhanging the seat frames by the same amount and that the seat frames are square and parallel.
- Nail with 3 1/2″ galvanized flathead nails.
Finish! eazy with a ‘Z’ 🙂


Thanks for the vast information you have available.
My twins and I took advantage of some of your pics and made big sturdy bench for our deck.
Its seating area is 60inches wide and the backrest is a plus.
Treated lumber is readily available here in Puerto Rico and cost almost the same as plain lumber.
Here is a pic of it before the sealer applied.
Thanks again. Marcos, Marcos and Andres.
Thanks for your awesome Free Garden Bench Plans!!!
I’m definitely a novice when it comes to wood working and your plans were a breeze to follow.
I made this bench as a gift for my wife for our 5th Anniversary (which traditionally calls for a wooden gift).
I engraved our wedding date and the phrase “Grow old with me” to make it a little more romantic. Thanks again!!!
-Bill N. Miller Place, NY
Hi
I built a bbq table off the plans from your site a while ago, and decided our outdoor area needed some sort of casual seating, so I had another look for seating and came across this bench seat.
The plans were really easy to understand, and I even modified the seat by also changing the back to a 15 degree angle and I made the legs longer to allow for some armrests by repositioned the legs at the end of the seat slats to allow for them.
I am thinking of making single seaters the same to have as a set and having them all stained the same colour.
Attached are some photos for you to look at.
Thanks
Regan Wellington, New Zealand
Thanks for the plans of the garden bench. The photos and ideas from others were also helpful.
I too went with the 15 degree back rest angle.
I also added a top 2×4 which makes a good arm rest and a level spot for a cup of coffee.
Note that you have to cut the top at the same angle so it will be horizontal.
I didn’t do a great job with the stain/varnish but since both are going in the woods it adds to the “rustic” look! As illustrated, if you make two benches, you could put them back-to-back if there was a need for such an arrangement.
Thanks again. S Norwood
Hi
I was searching for a Bench Plan for our local cricket club for a quick and easy bench to make in quantity.
Yours was great. just modified slightly by making halfing joints on end frames to make it a little neater and instead of nailing, screwed and dowel plugs. Hope these benches give years of service.
Regards Dave Dawson,Rossendale,Lancs..
Thanks for the bench great plans like the others I went with 15 degrees for the back.
The Build was very easy using only basic tools.
Also as the climate can be very wet here in Ireland I used a lot of wood preserver and I also painted it white with an outdoor wood paint.
I’m now building another one for my parents. attached are some pics.
Eoin Fanning
Your Garden Seat
I built this for my wife from your plans, and it went together like a piece of cake (with several layers). I didn’t need 5 lbs. of nails because I could buy a 2-lb. box. I also added some “skids” of treated lumber so the legs wouldn’t sink into our soft ground. She loves it!
Greg Brownell
South Bend, Indiana
Hi Buildeasy.
I built two of the garden seats and donated them to a school (in South Africa). The benches will outside in the playground.
First I marked out the sizes of the pieces and cut them, taking extra care with the angled parts. Then I painted everything with wood primer and left it for a week, after which they were painted again with a good quality paint and left for another few days. Then the benches were assembled and painted a second time. Treated timber was used throughout and considering that the benches have had three coats of paint, they should last for many years.
I consider myself to be a “battler”, not good with my hands, and yet I managed to put together quite a stunning pair of benches. It was fun !
My next project is going to be the BBQ picnic table.
Hugh Ashworth (South Africa)
Dear Buildeazy,
I would like to say thank you for the free plans for the seat.
Please see the attached files about my seat. Thank you for your kind guidance.
Best regards,
Tokar Gabor
I built three of these benches last year to go around our fire pit and they were a big hit with everyone. I’ve since built quite a few more for admirers of the seats.
I highly recommend, as others have as well, to make the seat back 15 degrees to give a slightly more comfortable position.
Thanks!
Bob
Hi. I build the garden seat. Instead of the seat slats, i used two Snowboards. Instead of 100×50 timber, i used 70×30 and i changed the back support angle to 15. For more stability with the elastic snowboards, i add two more spreaders. Greets from Switzerland.
Michael Forter
Hi guys! Thanks a lot for the ‘free plans’. Bench was easy to build and it looks nice too.
Here are two pictures of when I just finished it, and after I stained it. Thanks again!!
Heriberto Cervantes
Here’s another twist on the garden seat..
I used a skateboard as the backing and 2X3’s instead of the 2X4’s. We love your website and thanks again for the plans.
Mike Paget
Hi, Your plans are excellent. I built one bench last year for my fire pit and am planning on building another soon. I also modified the for the bench back to 15 degrees. It’s quite comfortable.
Since I’m an almost 50 year old female – I’d like to give the female prospective on building this bench. It was easy, and rewarding to build and quite a conversational piece – everyone is so impressed. My son’s friend suggested I build a smore’s table to match. I used the same basic principles as your bench plans and I now also have a great table.
Thanks you for sharing. “Sitting” pretty in Oceanport, NJ.
Hi. I used your site plans to make a garden seat for my 9-year old daughter, who helped.
The plans worked great, and I am attaching a picture.
I would agree with other builders comments — to slant the backrest to 15 degrees, not 10, and to use 4 inch carriage bolts, not 4 1/2. I seem to have an overhang on both sides of over 6 inches, but it still looks swell.
The whole thing took about 4 hours, if you include looking for tools and yelling at my kids. We plan to stain and weatherize it, and to cover the ends of the carriage bolts with rubber covers so no one scratches themselves.
Thanks for a great site and a fun project for the novice!
Bradford Parks
After searching the internet for the “BEST” design, this treasured FREE!, Yes, FREE! park bench design is the greatest thing. It’s plain, simple and easy to understand. My son did his Boy Scout Eagle Project and built 3 park benches for the church around the parking lot. With the help and guidance of an adult, these benches came out looking good, comfortable and are super sturdy. No nails used. They used heavy duty bolts. Then, they cemented these benches to the ground. The greatest satisfaction for him is seeing these benches are constantly used and enjoyed by many. I tell ya… this Eagle Scout is mighty proud of his project. He can go back 20 years from now and will still see these benches holding on pretty good. You can expect more Eagle projects as the boy scouts share this design. Thank you so much.
Smile! Have a blessed day!
Mimi
Hi, The Garden Seat plans are excellent, thanks for putting them up online.
As a novice I found the instructions and diagrams very clear and easy to follow.
I would agree with the previous comment about 15 degree angle for the seat.
I changed the dimensions to 6 feet long, a bit taller and deeper.
I could not get 2×4 inch boards so I used 6×1.5 inch mahogany instead and it turned out plenty strong enough.
To give extra strength to the seat and back boards, I used 120mm screws instead of nails, sunk and plugged for a smooth finish.
Photo attached. Thanks again, great plans.
Tim
Hello, Last year I built your “Garden Seat”.
I had not taken on anything this large previously, the plans were concise making the bench a quick build.
I made only one change to the plans, increasing the angle of the backrest from 10 degrees to 15 degrees.
I used scrap lumber,so the only costs were hardware, primer and exterior paint. The bench is rugged and will last a very long time, it also has an anti-theft mechanism built in, as it weights so much. Thank you for the plans.
M. Holtan
I have now made two of these seats. They were quick to make, instructions were easy to understand and the finished product looks great.
Many thanks
Melinda Davies
Just built a second bench. I would suggest 4″ bolts and not 4 1/2 ” bolts. The 4 1/2 in bolts stick out further than they need to.
Rick
This is the first project I’ve undertaken working with plans,i must say im very happy with the result,but credit goes to those plans so easy to understand & exact.
I.A Williams
Thanks for the great plans, made three of them and modified a little to suit my needs. Made two 6 footers and one 8. added armrests. Recommend changing the plans to a 15 degree cut on (E) to let the backrest lean back a little further. Heres a picture!
Thanks.
Brian
I just wanted to thank you for your great Garden Seat plans. This was my first project I have every done like this and your plans were very easy to follow.
I took another builders advice and changed the back angle to 15% but also added my own twist on the seat and back, old snowboards!
Thanks for your designs, I will hopefully be building more things soon.
Adam
You have been sent 2 pictures
I built several of the garden benches for one of our buildings at work and the employees love them.
I put three slats on the back and four on the seat, it seems more comfortable that way to me. I will attach a photo to show the finished project.
Thanks for the free plans and the inexpensive materials list. I couldn’t believe that the parts didn’t even cost $25 per bench, that was a nice surprise!
Thank you, Doug Dunn
Hi,
Thanks for your detailed instructions. I completed my project too. The original idea was taken from this page:
https://www.buildeazy.com/garden-seat/
I made my bench from a reclaimed wood. Friends were going to use it for BBQ but i managed to claim the wood before. I had to use an electric planer and sander to clean a surface of panels. There were tons of nails left in panels, took me a white to extract all of them.
The bench is 3 cm higher than it was suggested on your page. I found it more comfortable. I also used 90mm screws to fix the construction.
Thanks again.
Regards,
Denis Alyshev, Scotland (UK).
This bench was a joy to build. My buddies and myself out in the shop laughing and joking around, took about 2 hours to cut the pieces and slap it together. I did some extra detail with a routered edge and stain, with screws and plugs. Turned out great! Good times with friends, and nice simple project for anyone to try.
Drew Else
St. Thomas, Ontario, Canada
Hi, I built three garden benches and one planter at a total cost of under $190 using all brand new material. I live in Hawaii and as you can imagine everything is way more expensive. I’m sure someone in the continental U.S. can make them cheaper. They all came out strong and perfect. I only modified one bench by making it 8 feet long and the planter by making the supports 22 inches long instead of 14 inches to add height and be able to use it as an arm rest. Build time was a little over 2 hours for the first bench, under 2 hours for the second bench and 1 hour 20 minutes for the third bench (8 foot bench). It get’s way easier the more you do it. The planter took me about 2 hours as well. All this was before sanding and finishing. About me, I’m just an average guy with no prior skills in making furniture or carpentry skills. All I did was follow the steps. The angle of the backrest and the width of the seats are perfect. The benches are very comfortable.
Now, I do have some tips that I stumbled upon. When I bought the material I bought 14 2x4x8s and enough bolts to make two benches. I noticed that if you follow the instructions by cutting the longer pieces first you will use exactly 7 planks of 2x4x8 no more, no less with very little leftover material. So when you go buy your material just buy 7 2x4x8s and the necessary bolts. That’s it! Total cost for the 7 boards and 10 bolts was $44.95.
Beat that! Thanks Buildeazy!
Hector
Oahu, Hawaii
Here’s a photo of the first of two benches I’m making, following your plans! I did as other commenters have suggested and moved the seat-back angle to 15 degrees.
Also decided to make the seat more roomy by using 4 of the seat slats on bottom, and spacing out 3 on the top.
It seems more balanced to me, this way.
Thanks very much for the wonderful design! It was super easy, and I’ve not made anything since a small spice rack in middle school woodshop, ages ago.
H Scotland
Hi, because of you we did perfect with little budget but look rich 🙂 thank you
P.S. we changed the angle from 10 to 13 🙂
We did not stop to build some items from your website that you shared with us.
Today we made a garden set for our lovely friend Gurkan.
Thank you again
greetings
Emre and Nesrin from Turkey/Bodrum
Here is the Garden Seat I just made from your plans. It is very sturdy. I raised the height to 50cm as its for pensioners at a day centre and they need a higher seat.
I am donating it to them.
I finished it with Barratine Cedar Red wood preserver (its the nicest red cedar) and with Ronseal Fern garden paint, 3 coats of each. I too used a 15 degree slant for the back, or even a bit more. I used my angle grinder to cut flush the coach bolts that protruded. I had spare wood in the roofspace which was almost 2×4 inches. I’m pretty pleased with the results.
Another version I done of this last year was without the back support, as a quick easy bench for a neighbour. I may also shorten it and do a single chair type version.
John M., Co.Down UK.
This is one of the most ‘must have’ and ‘must do’ list that every person should try,
Its easy, fun, reliable and strong structured bench type, I’ve tried once, and it can hold up to 8 person at one time, marvelous, then I’ve tried it for 2nd time, this time everybody wants to have one at their home and eventually I’ve promote a new hobby for my friends!!
now working on my 3rd version!
Hi,
I built the bench from your plans more than a year ago and it was quite useful in our front porch. However, after a while my wife suggested that we need a companion table for the bench. so a modified the plans and came up with the table as seen in the picture. I will soon be doing another bench to complete the set, but without the back rest this time. Guest have been saying that they complement the porch quite well.
Thanks a lot.
Had great fun making the garden bench which goes really well with the table I made earlier.
I used a water based Bright Oak stain which was very easy to apply using a brush to get into the nooks and crannies.
Like others I pitched the back rest at 15deg which is very comfortable and I rounded the corners at the front just to soften the look slightly.
If anybody needs to de stress build something out of wood, I was lost in my workshop for days.
Thanks for the bench plans
Martin Perry
Hi
Thank you so much for your so friendly sight.
The plans are very clear to jump into the project.
I just decided to make the seat with 4 slats.
I needed only 1200 mm to fit it to the place.
I gave the back 15 degrees.
And added a top flat slat for glasses…
thank you all.
Best Regards,
Kobi Keren,
ISRAEL
I made this transition to a bed, +table , if a bit taller,using pullout hitch bolts… make sure you get dead center at the pivotpoint though! Oops.
I trusted the dimensions in the plan and cut the pieces accordingly, not giving much thought to customizing. Dumb move on my part. I began assembling it and quickly discovered this bench, as the seat is only 16″ (410mm) high, is designed to accommodate a child, not an adult. (I’m 6’1″ tall.) Again, in caps so as to grab the attention of anyone scanning these comments ,THIS BENCH IS DESIGNED FOR A CHILD, NOT AN ADULT. I will have to toss the 4 A parts (the legs), and make 4 replacement legs, adding 4″ to each one.
This is how high (or, rather, low) the seat of this bench will be (+1.5″ for the slats) if made to the specs provided. You’d have to be very short if you’d hope to make yourself comfortable on it.