Contents
Bench or picnic table for the kids
Introduction
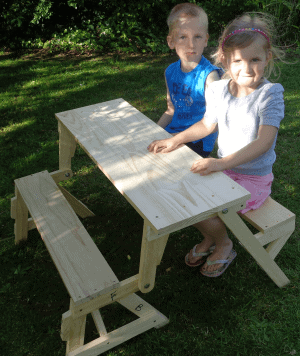
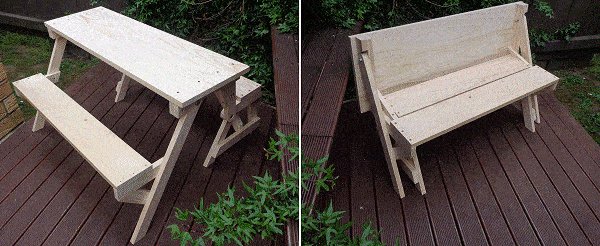
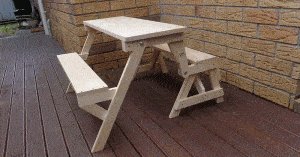
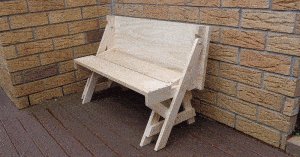
A mighty little bench come picnic table ideal for kids around the three to six year age group (give or take a year or so depending on the size of the kids).
As a bench seat it does not take up a lot of room and will seat a couple of kids quite comfortably.
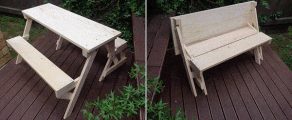
When activity time comes around (drawing, eating, etc) it can be opened up very easily into a picnic table with two seats (one along each side) able to seat four kids.
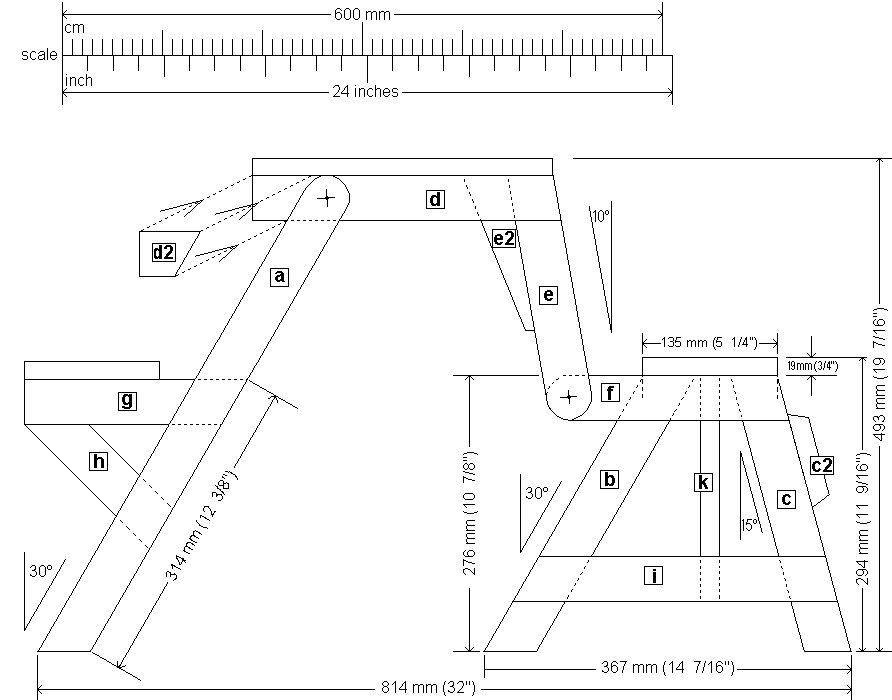
The unit is 900 mm (35½”) long. When in picnic table mode it is 814 mm (32″) wide and 493 mm (19 7⁄16″) high to the top of the table and 294 mm (11 9⁄16″) to the top of the rear seat.
When in bench mode, the complete unit is only 367 mm (14 7⁄16 “) wide.
|
The wood sizes
This project is written in both Metric (mm) and Imperial (inches).
The metric measurements are given first followed by the standard measurements in brackets ( ).
For example: 45 mm x 19 mm (¾” x 1¾”).
For the framework of this project I used 45 mm x 19 mm (¾” x 1¾”) stock.
That width is not an overly common size and if you are unable to source it or obtain it by other means such as ripping it out of wider stock, you can use 38 mm x 19 mm (¾” x 1½”) stock in place of.
The latter is a more common size. However, if you use it changes will need to be made to the length of a couple of frame members. More about that below.
Using wood with a different width
The stock size and associated measurements (lengths, hole placements) are important to the workings of this folding unit.
If you use 38 mm x 19 mm (¾” x 1½”) stock in place of the 45 mm x 19 mm (¾” x 1¾”) stock used here, make the following changes:
1.) Make the diameter of the template (referred to in Step 1) 38 mm (1½”).
2.) Cut pieces [b] & [c] (the rear legs) 9 mm (⅜”) shorter than stated in the plan drawings.
3.) Pieces [d2] (the leg stops) will need to be a little bit longer but it’s easy enough to check the measurements when you are up to that step.
Using wood with a different thickness
Changing the stock thickness (of that used in this project) will impact on the length of the bolts and also the difference between the lengths of the seat boards and the length of the tabletop in relation to one another.
The bolts (there are only four) will need to be long enough to go through two (frame piece) thicknesses.
The difference in length between the shorter (rear) and longer (front) seat boards is the sum of the thickness of four framing pieces.
For example, if the framing pieces are 19 mm (¾”) thick, four times that is 76 mm (3″). Therefore 76 mm (3″) will be the difference between the length of the front (longer) and rear (shorter) seats boards.
Likewise, the difference in length between the tabletop and the longer (front) seat board is the sum of the thickness of four framing pieces.
For example, if the framing pieces are 19 mm (¾”) thick, four times that is 76 mm (3″). Therefore 76 mm (3″) will be the difference between the length of the front (longer) seat board and the length of the tabletop.
Making the table longer or shorter
Apply the same rule as above regarding the length of the seat boards and the length of the tabletop in relation to one another. By applying that rule you can make the unit as long or as short as you want – within practical reason of course.
The task ahead simply involves…
The task ahead simply involves cutting the pieces to length, cutting the angles and rounds on the pieces that need it (strictly adhering to the dimensions given in the plans), drilling through the pieces that need it, assembling the frames, and then last but not least – adding the seats, tabletop, and a bit of bracing.
Material requirements
What you will need
Is the bench / picnic table going to be used inside or outside?
If outside, ensure the wood, bolts, screws, and glue are suitable.
Framing wood
Altogether you will need 7.5 metres (25 ft) of 45 mm x 19 mm (¾” x 1¾”) stock.
That allows for a bit of waste.
Note: For an alternative stock size refer to the previous two pages.
Tip: When purchasing, choose the longest lengths possible. When cutting the pieces, always cut the longest lengths first to minimize waste. The shorter pieces can be cut from the off-cuts.
Seat boards
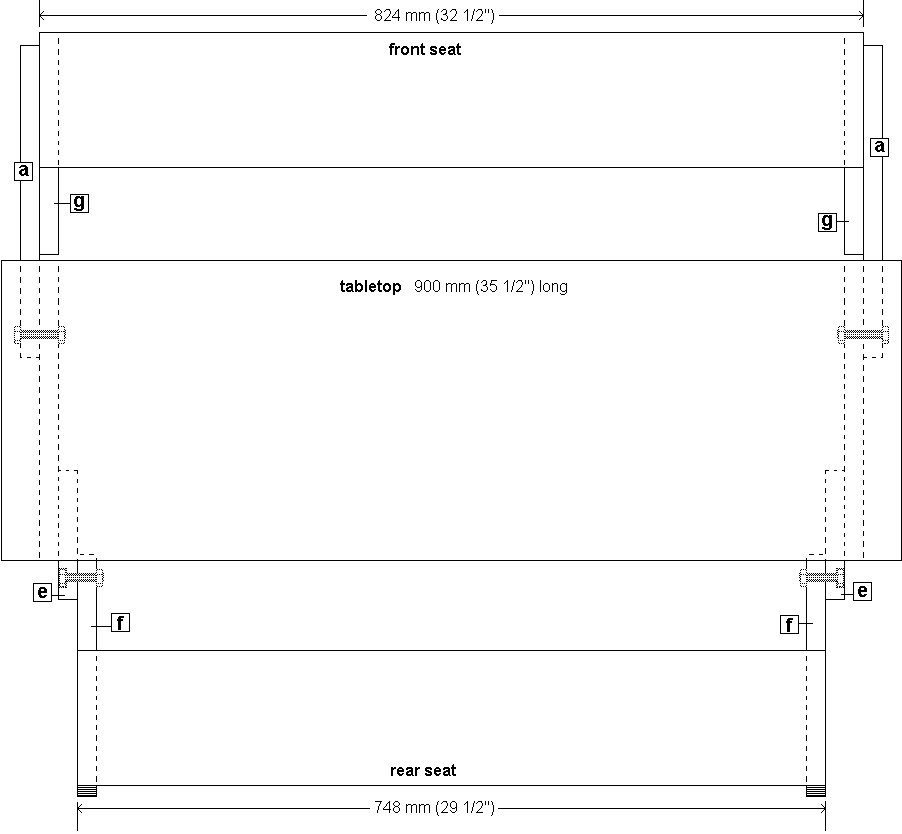
- 1 piece of 135 mm x 19 mm (¾” x 5¼”) board @ 824 mm (32 ½) long.
- 1 piece of 135 mm x 19 mm (¾” x 5¼”) board @ 748 mm (29 ½) long.
Note: If you can’t source the exact stock size you can rip it out of wider stock.
Tabletop board
- 1 piece of board 300 mm x 19 mm x 900 mm (¾” x 11⅞” x 35 ½”)
Note: The tabletop board can be any type of board suitable for the conditions (inside use or outside use?) such as plywood, MDF panel, shelving board etc.
You will also need
- Four 8 mm (5⁄16″) bolts 50 mm (2″) long. Also eight washers and four nylon locking nuts (or similar).
- A handful (seventy or so) of 38 mm (1 ½”) wood screws.
- Some good wood glue.
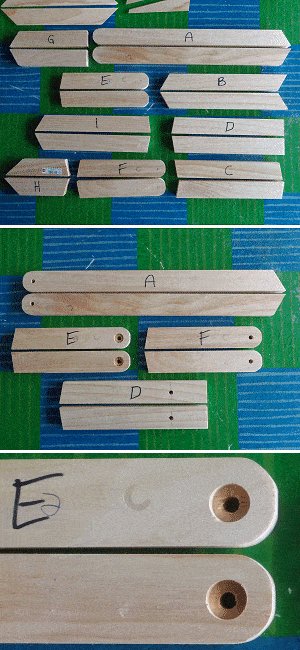
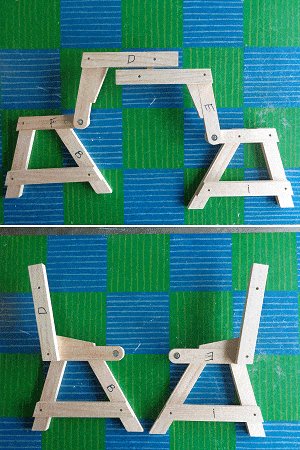
Identifying the pieces
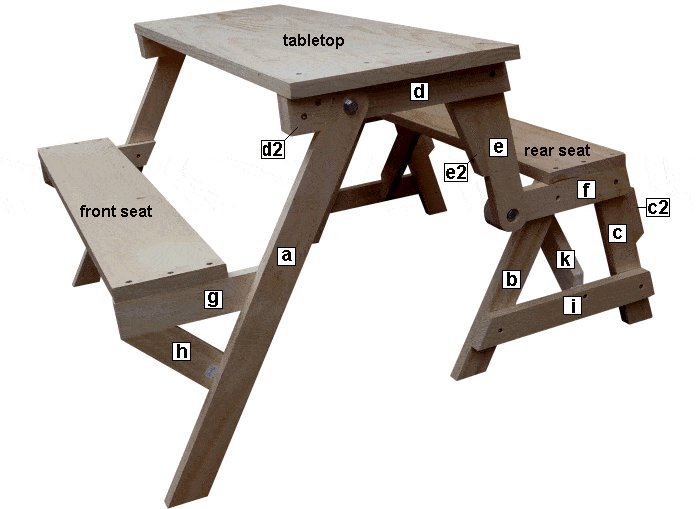
| [a] front leg [b] rear leg inner [c] rear leg outer [c2] back-stop [d] tabletop rail [d2] front leg stop [e] leg extension (rear) | [e2] leg extension brace [f] rear seat rail [g] front seat rail [h] front seat rail brace [i] rear seat lower rail [k] rear seat brace |
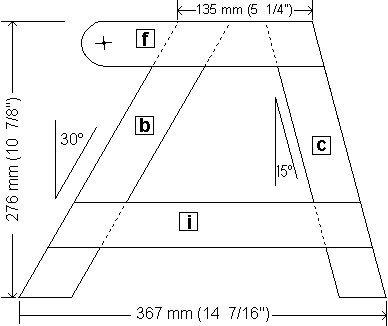
The plans – Side (sectional)
The plans – Looking down view
The plans – Individual frame pieces
| [a] front leg [b] rear leg inner [c] rear leg outer [c2] back-stop [d] tabletop rail [d2] front leg stop [e] leg extension (rear) | [e2] leg extension brace [f] rear seat rail [g] front seat rail [h] front seat rail brace [i] rear seat lower rail [k] rear seat brace |
All the above is out of 45 mm x 19 mm (¾” x 1¾”) stock.
Also…
For the seat (front): 1 piece of 135 mm x 19 mm (¾” x 5¼”) board @ 824 mm (32 ½) long.
For the seat (rear): 1 piece of 135 mm x 19 mm (¾” x 5¼”) board @ 748 mm (29 ½) long.
For the tabletop: 1 piece of board 300 mm x 19 mm x 900 mm (¾” x 11⅞” x 35 ½”)
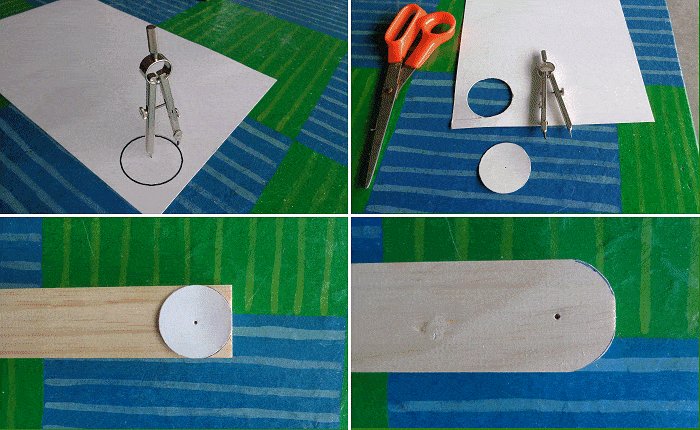
Step 1. Make a template for the rounds and bolt holes
- Six framing pieces need to be drilled (for the bolts) and rounded at one end.
- Make a template to mark the rounds and the center of the bolt holes as follows…
- With a drawing compass make a circle on a piece of card with a diameter of 45 mm (1¾”) which is the width of the framing pieces.
The hole in the center made by the point of the compass can be used to mark the center of the bolt holes. - Cut out the circle and use it to mark the rounded ends and the center of the bolt holes on the relevant pieces.
The sequence of pictures below give a visual idea of the procedure.
Step 2. Cut and drill the frame pieces
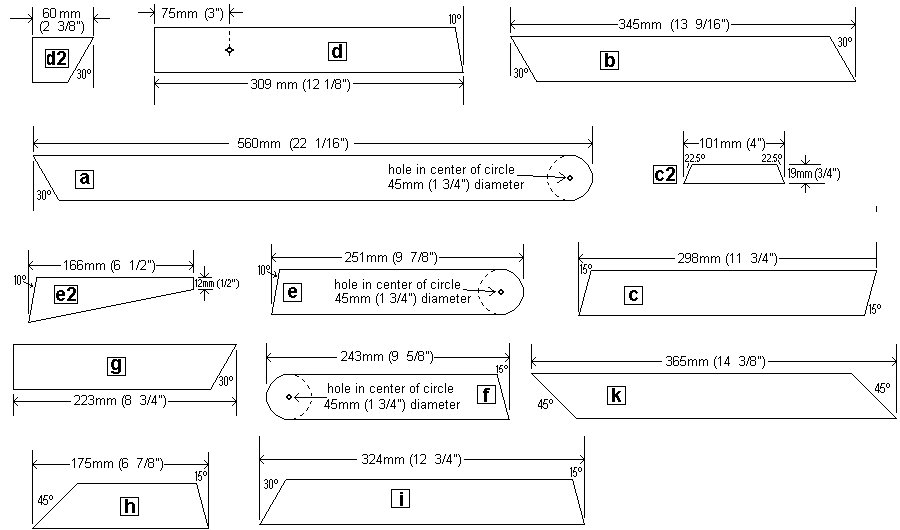
- Cut all the frame pieces [a] to [k] according to the dimensions given in the ‘individual frame pieces’ on page 7.
Cut two of each piece in mirror image (see pictures). - Refer to Step 1. on how to mark and cut the rounds.
The holes
- Pieces [a], [d], [e], & [f] (two of each – eight pieces in all) need to have an 8 mm (5⁄16″) hole drilled through them.
Refer to Step.1 on how to mark the centers of the hole. - Pieces [e] only need starter holes to house the bolt heads.
- Pay special attention to the drawings, plans, and photos, to see what side of the wood the starter holes go on – or just make sure that the two pieces [e] are a mirror image of one another when drilling the starter holes
The drilling procedure for pieces [e]
- First drill a 20 mm (¾”) starter hole just deep enough to house the bolt heads and then continue through the wood with a 8 mm (5⁄16″) hole.
![Kids' 2 in 1 Bench and Picnic Table Plan : Drilling Procedure for Piece [e]](https://static.buildeazy.com/wp-content/uploads/kids-2in1-step-2b.jpg)
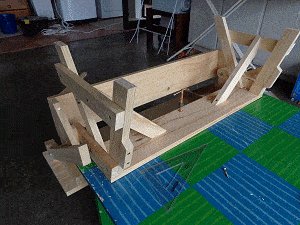
Step 3. Make up the frame sections
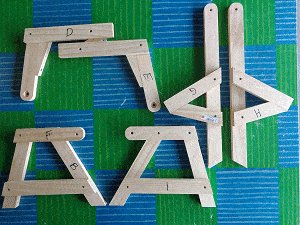
Make up the side frames, each side consisting of three separate sections:
• The top section – pieces [d], [e], & [e2].
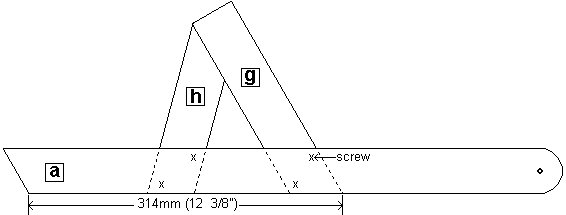
• The front section – pieces [a], [g], & [h].
• The rear section – pieces [b], [c], [f], & [i].
Important!
- Make up each pair of corresponding sections so that they are a mirror image of one another, as shown in the photo.
- Refer to the plans on page 5 and the drawings on this page for the dimensions.
- Fix the pieces at each meeting with glue and two screws.
- Take note of the position of piece [g] (front seat rail) along piece [a] (front leg) in the drawing below.
Step 4. Connect the rear sections to the top sections
- It is now time to join the frame sections together.
- Align the bolt holes in piece [e] with the bolt holes in piece [f].
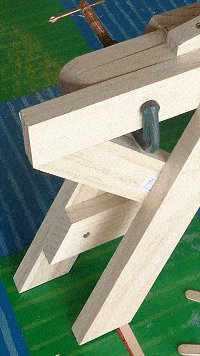
Place a washer in each starter hole and thread the bolts through the washers and the holes so that the bolt heads are housed (countersunk) in the starter holes. - Add a washer and a nylon locking nut to the end of each bolt.

Note: Each bolt is used as a pivot point for two pieces of wood, therefore the nuts cannot be tightened completely otherwise the wood would not be able to ‘pivot’ freely.
Because the nuts can only be loosely tightened (just enough to allow the wood to pivot), nylon locking nuts (or similar) are required.
- A nylon locking nut is a nut that resists further loosening or tightening under vibration and torque. It has a nylon collar insert.
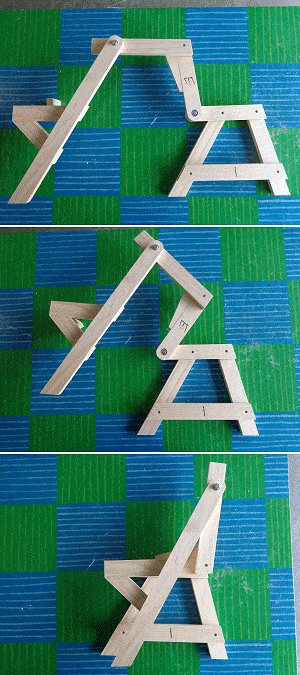
- You will now be able to pivot the top and rear sections. They should easily move from table position to seat position just as shown in the photos.
Step 5. Connect the front sections
- Make up the side frames in mirror image.
- Align the bolt holes in piece [a] with the bolt holes in piece [d].
- Thread bolts and washers through the holes and add a washer and a nylon locking nuts (or similar) to the end of each bolt.

Note: Each bolt is used as a pivot point for two pieces of wood, therefore the nuts cannot be tightened completely otherwise the wood would not be able to ‘pivot’ freely.
Because the nuts can only be loosely tightened (just enough to allow the wood to pivot), nylon locking nuts (or similar) are required.
A nylon locking nut is a nut that resists further loosening or tightening under vibration and torque. It has a nylon collar insert.
- You will now be able to pivot the front, top, and rear sections. They should easily move from table position to seat position just as shown in the photos.
Step 6. Align the frames for seating
- Fold the side frames over until pieces [e], [f], & [g] are all side-by-side, horizontal, and flush (even). Place a piece of cardboard temporary in between pieces [e] and [g] and then clamp the side frames to hold them in position until the seat boards and tabletop are fixed in place.
- The cardboard is to ensure that pieces [e] and [g] are apart and do not bind when the unit is being folded.
- Next place the two side frames apart and parallel in readiness for the seat boards to be fixed.
- You might have to place a little packer under the front legs to balance the side frames upright until the seat boards are fixed.
Step 7. Fix the seats and tabletop

- Fix the longer (front) seat to pieces [g] flush with the front and the outer sides of that piece. Glue and screw the seat in place.
- Fix the shorter (rear) seat to pieces [f] flush with the end (of [f]). The seat should fit nicely between pieces [e2].
- Do not force the seat in place. If it is too tight, cut a bit off the end.
- Turn the unit over in such a position to make it easy to fix the tabletop.
- Make the sides of the tabletop flush (even) with the ends of pieces [d] (the tabletop rails).
- Ensure the overhang of the tabletop is equal at each end and fix it with glue and screws.

Step 8. Attach the back-stop
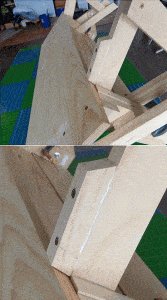
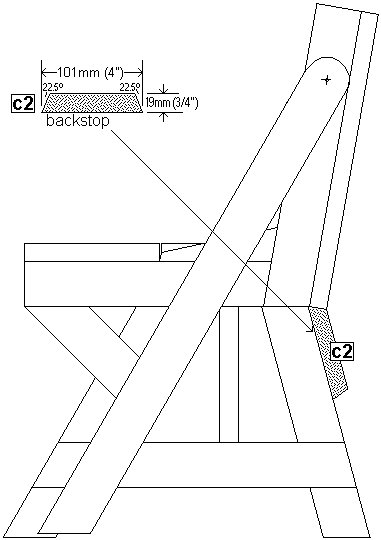
- With the clamps still holding everything in position, fix the backstops [c2] to the rear legs [c].
Sit the backstops [c2] hard up under the edge of the tabletop. - The backstops are to stop the backrest (aka tabletop) going down further than intended.
- When the backstops are fixed in place, remove the clamps and the cardboard.
Step 9. Add the front leg stops & the seat braces
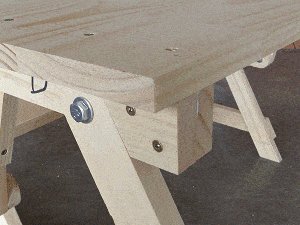
The leg stops [d2] are to stop the legs spreading out and the table from collapsing.
- When the unit is in picnic table mode, and the front legs are positioned (spread apart) according to the plans (spread dimensions also given in the plan drawing below), then fix the leg stops [d2] to the ends of the tabletop rails [d] so they are positioned flush with the ends of the tabletop rails [d] and against the front legs [a]. Fix with glue and screws.

The seat braces
- With the rear seat unit upside down and securely resting on a work table or platform of some sort, ensure that the two side seat frames are at right angles to the seat, then fix the two brace pieces [k] to the rear seat board and the rear seat lower rails [i].
- Refer to the plans for placement although it is pretty much self explanatory where they go.
Guess what? Done!


Fernando Oliveira, Brazil
I purchased several of your plans a few months ago and finally got around to building the Kids size folding picnic table.
It turned out great and my wife loves it. She says she wants to keep it instead of selling it.
Hard to make any money when she takes all my projects I build to sell.
Just wanted to let you know that item “k” – rear seat brace is angled wrong in the plan. The angles cannot be the same direction as it is drawn in the plan.
I also found that by making it 12-3/4 inches at the long ends, it fits much nicer on part “I” – rear seat lower rail with very little overhang that can be cut off for a smooth flush finish.
Thanks again for the plans.
Curtis West
Hi, just cut all my parts , but your 30% is much less sharper than yours, i,m using a trent angle ruler, any ideas please?