Contents
Introduction
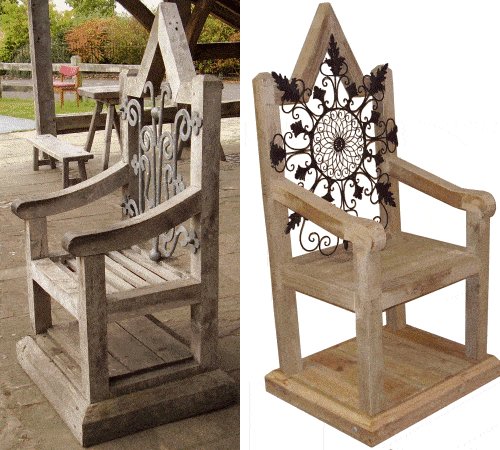
The inspiration for this project came from a chair I saw in the grounds of Nottingham Castle in Nottingham, England.
That was back in 2009.
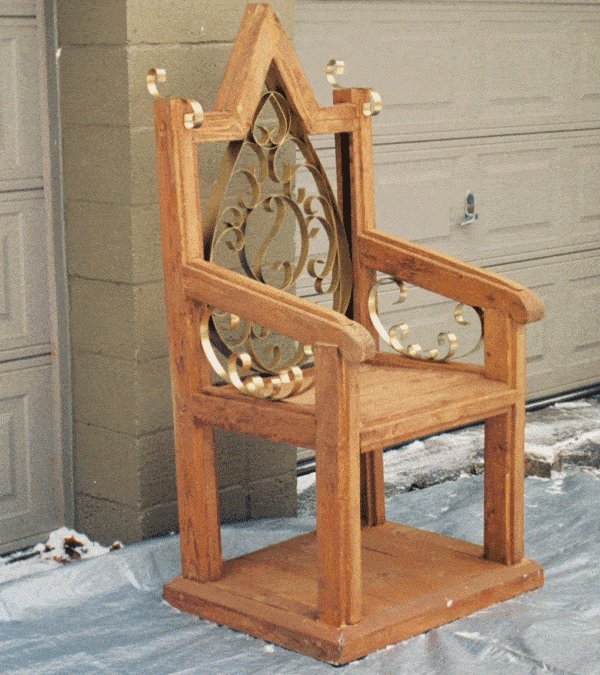
Below is a photo of the chair in Nottingham Castle and a photo of my take.
Ideal for the garden
This King chair or ‘garden throne’ is just as much a garden ornament as it is something to sit on. In fact it is probably not the most comfortable of chairs to laze or slouch in but rather a “sit up straight” chair where you can sit proud and run your eyes over your kingdom (or compost heap).
In this documentation: We begin (in this order) with a bit about wood and wood sizes, some plan drawings, the material requirements, the cutting list, and the step-by-step instructions with specific plan drawings along the way, and heaps of relevant photos.
There is a downloadable version of this project print friendly and in clean copy (free of ads). The plans can be purchased online and immediately downloaded to your computer.
King chair
$5.00- Pay online by credit card, debit card, or Paypal using Secure Server Paypal. You do not need a Paypal account if paying by credit or …
Wood and Wood Size
The measurements in this project are in both inches and millimetre. The inches are given first followed by their metric equivalents in brackets – for example: 3″x3″ (75mm x 75mm).
The wood I used to make the chair frame was treated dressed (smooth/planed) pine.
The wood size (width and thickness) I used for the frame was 3″x3″ (75mm x 75mm) actual size.
That is not a common wood size but it is the size that I wanted, so I more or less had to rip and plane it out of bigger wood. Take heart that if you decide to resize any of the wood, it is not such a great amount.
A more common dressed wood size is 3 1/2″ x 3 1/2″ (90mm x 90mm). In retrospect I would have used 3 1/2″ x 3 1/2″ (90mm x 90mm), as I think that the king chair could have handled a slightly bulkier look. Basically, If you use any stock size between 3″x3″ (75mm x 75mm) and 3 1/2″ x 3 1/2″ (90mm x 90mm) for the chair frame, it will look just fine.
The Plan drawings
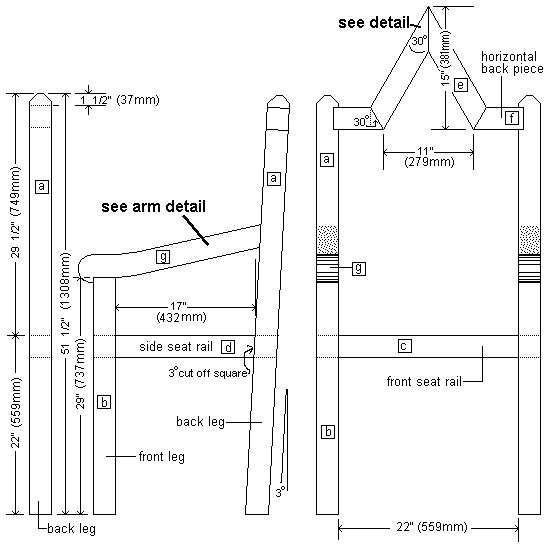
Below are plan drawings for the king seat.
For part identification and further information refer to the cutting list that follows.
Note: the plans below do not show the seat-board detail or the base. They are explained in the instructions.
Material requirements
Altogether (allowing for a bit of waste) you will need…
- 25ft (7.6m) of 3″x3″ (75mm x 75mm) wood suitable for exterior use. If you cannot source 3″x3″ (75mm x 75mm) stock, then use 3 1/2″ x 3 1/2″ (90mm x 90mm),
- 10ft (3m) of 1 1/2″ x 3 1/2″ (90mm x 45mm) wood suitable for exterior use,
- 14ft (4.2m) of 1″ x 1″ (25mm x 25mm) wood suitable for exterior use,
- 15ft (4.5m) of 1″ x 6″ (150mm x 25mm) wood suitable for exterior use,
- and 9ft (2.7m) of 1/2″ (12mm) diameter dowel (round wood).
You will also need…
- 56 of 3″ (75mm) wood screws (exterior type),
- 32 of 1 1/2″ (38mm) wood screws (exterior type),
- 4 of 3/8″ (10mm) carriage bolts 5″ (130mm) long with nuts and washers,
- exterior type wood glue,
- And some type of wrought iron or metal pattern for the chair back.
The cutting list
| ID | FOR | SIZE | LENGTH | Qty |
| [a] | back leg | 3″ x 3″ (75mmx75mm) | 51 1/2″ (1287mm) | 2 |
| [b] | front leg | 3″ x 3″ (75mmx75mm) | 29″ (725mm) | 2 |
| [c] | seat front and rear rail | 3″ x 3″ (75mmx75mm) | 22″ (559mm) | 2 |
| [d] | seat side rail | 3″ x 3″ (75mmx75mm) | 17″ (432mm) | 2 |
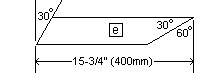
| [e] | angled back piece | 3″ x 3″ (75mmx75mm) | 15-3/4″ (400mm) | 2 |
| [f] | horizontal back piece | 3″ x 3″ (75mmx75mm) | approx 6″ (150mm) check on job | 2 |
| [g] | arm | 3″ x 3″ (75mmx75mm) | 24″ (610mm) | 2 |
| [h] | front and rear base | 1 1/2″ x 3 1/2″ (90mmx45mm) | approx 32″ (800mm) check on job | 2 |
| [i] | base side | 1 1/2″ x 3 1/2″ (90mmx45mm) | approx 26″ (650mm) check on job | 2 |
| [j] | fillet | 1″ x 1″ (25mmx25mm) | measure and cut on site | 8 |
| [k] | seat board | 1″ x 6″ (150mm x25mm) | 22″ (559mm) | 3 |
| [l] | base board | 1″ x 6″ (150mm x25mm) | approx 22″ (559mm) check on job | 5 |
Fixing method
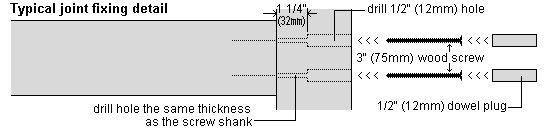
I did not use any fancy joining methods, I simply just glued and screwed. However because of the thickness of the framing wood, I first drilled a 1/2″ (12mm) diameter hole more than halfway into the face piece of wood (where each screw went) and continued all the way through with a smaller hole (screw shank thickness).
Why the 1/2″ (12mm) diameter hole more than halfway into the wood?
It saved using bigger and more costly screws, and although it left 1/2″ (12mm) diameter holes in the wood where every screw went, it was just a matter of plugging the holes with 1/2″ (12mm) dowel.
The end result looked great and was in keeping with the type of chair.
So…
Fix all joints with glue and 3″ (75mm) wood screws, four screws to each joint.
First Drill 1/2″ (12mm) starter holes all but 1 1/4″ (32mm) into each joints face piece.
Then continue through with a smaller (screw shank size) hole.
Add some glue and fasten with the screws.
Finally plug the holes with 1/2″ (12mm) diameter dowel glued in. Cut off any excess and sand.
Step 1. Commence cutting the frame pieces
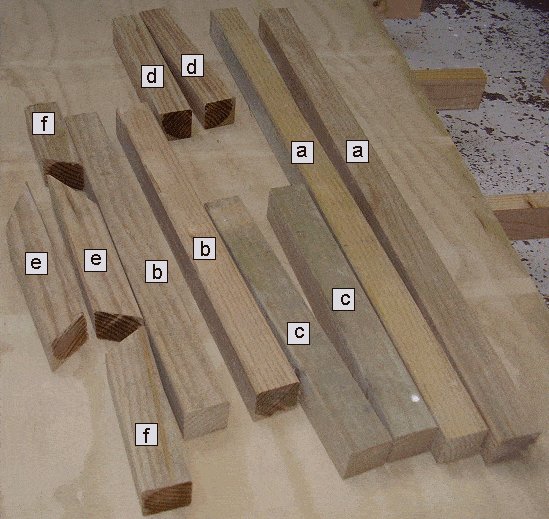
- Commence cutting the frame pieces to the lengths given below.
- Note that the back legs [a] and the side seat rails [d] all have one end cut 3° off square.
You can refer to the cutting list and plans if necessary. - First cut the two back legs [a] at 51 1/2″ (1308mm)long overall with one end (the bottom) of each leg 3° off square,
then cut the two front legs [b] at 29″ (737mm) long.
Next cut the front and back seat rails [c] both 22″ (559mm) long. - Cut the two side seat rails [d] 17″ (432mm) long with one end cut 3° inwards off square.
Step 2. Cut and make the back top
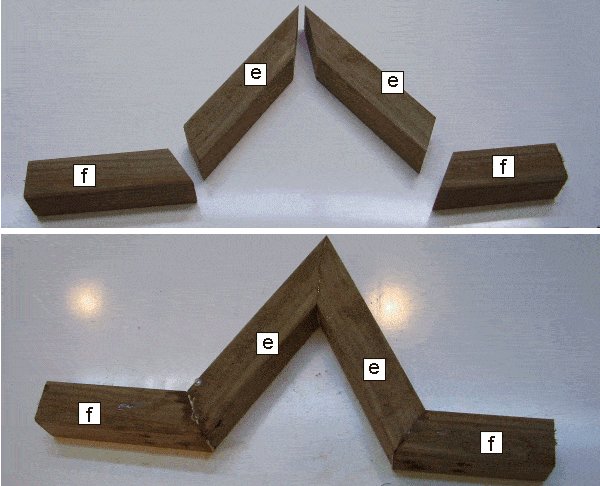
- The back top comprises of pieces [e] and [f] as shown in the plans.
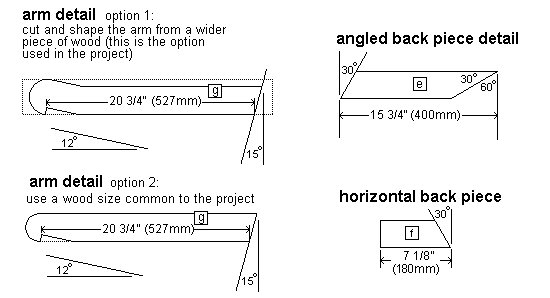
- Cut the two angled back pieces [e] to the length and angles as shown below.
- Next cut the two horizontal back pieces [f] 7-1/8″ (180mm) long with one end cut 30° off square.
- At this stage, the overall length of the back top is longer than required.
The two horizontal back pieces [f] are over length. They can be cut to the exact length later. - Glue and screw all the top back pieces together and leave to set.
Step 3: Make the side frames

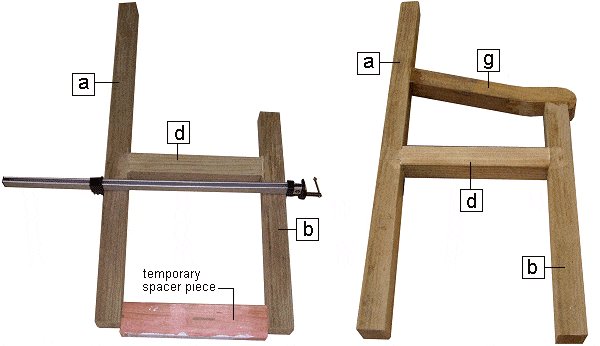
- Lay the front legs [a], back legs [b] and the side seat rails [d] loosely in place on a flat surface. Refer to the plan on page 3 for position.
- Mark the screw holes in the front legs [a] and the back legs [b].
- Take the front legs [a] and the back legs [b] and drill the screw holes.
- Refer to the fixing method diagram below for drilling and screwing detail.

- Once the screw holes are drilled, lay the front legs [a], back legs [b] and the side seat rails [d] in place again on a flat surface.
- Cut a spacer piece an inch (25mm) shorter than the side seat rail [d] and place it between the bottom of the legs.
Why an inch (25mm) shorter?
- Because the front and back legs are not parallel. The back leg is tilted 3°.
- Next glue and clamp the legs to the side seat rails and then add the screws.
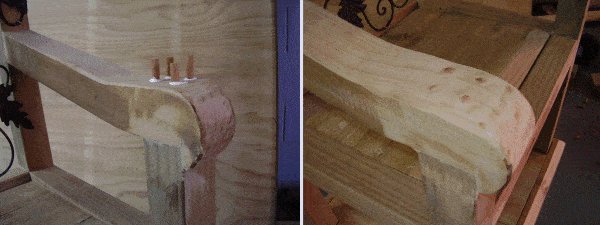
Shape and fit the arms.
- Shape and cut the arms according to the plan below. There are two options.
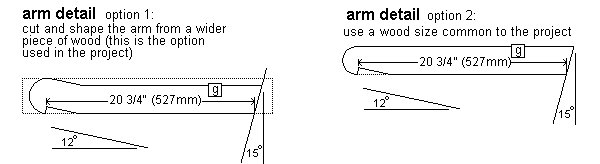
- Once shaped and cut, fix the arms [g] to the front legs [a] and back legs [b] with glue and screws.
Step 4. Rebate the back legs
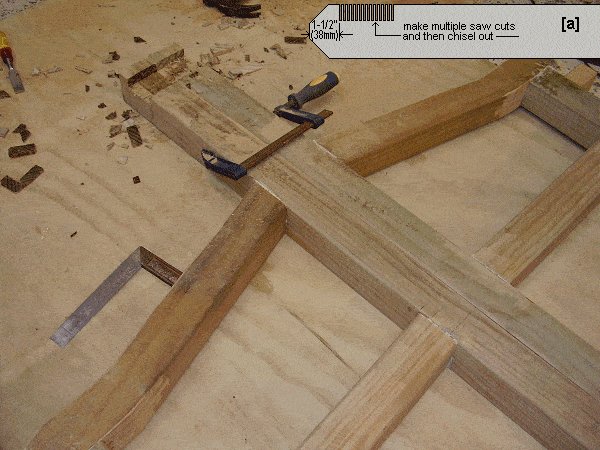
- Clamp the two side-frames together in mirror fashion.
- Mark the rebate area the width of the horizontal back piece [f] beginning 1 1/2″ (38mm) down from the top of the two back legs [a].
- Set the blade on a circular saw to a depth of approximately 3/4″ (20mm).
- Make multiple saw cuts across the rebate area.
Then chisel the area clean with a sharp chisel.

Step 5. Assemble the frame
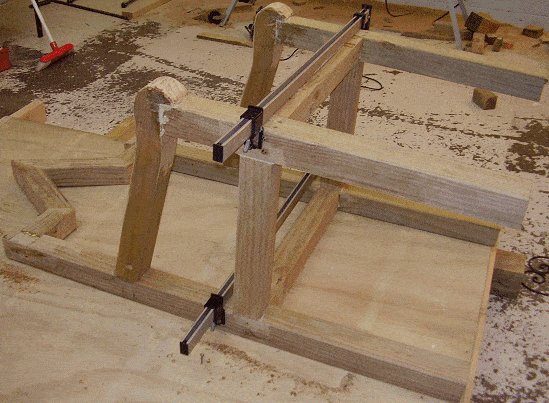
- Time to put the frame all together.
- Clamp the two side frames to the seat front and rear rails [c].
- Ensure the two back legs [a] are parallel.
- Cut the back top unit to fit neatly into the back leg rebates [a]. Remember (in step 2) the two horizontal back pieces [f] were cut over length until such time as they could be measured exactly. That time is now.
- Drill glue and screw the frame together.
- Refer to the fixing method diagram below for drilling and screwing detail.

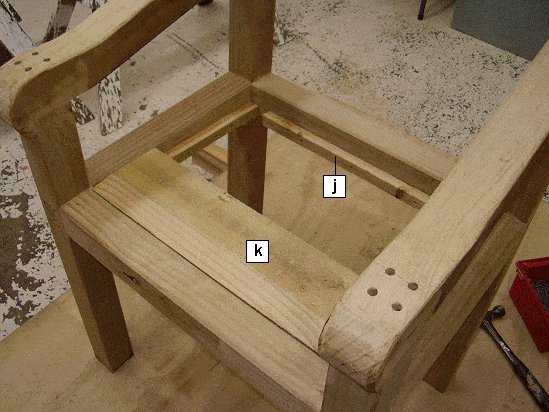
Step 6. Make the king chair seat

- Fix, with glue and 1-1/2″ (38mm) wood screws, a 1″x 1″ (25mm x 25mm) fillet of wood around the inside edge of the seat frame for the seat boards to sit on.
- Have the 1″x 1″ (25mm x 25mm) side fillets [j] slanting down towards the back of the seat, as shown in the diagram below.

- Next cut the 1″ x 6″ (25mm x 150mm) seat boards [k] to length and glue them in place on top of the fillets [j].
- The last board will need to be ripped down (cut lengthways) in order to fit.
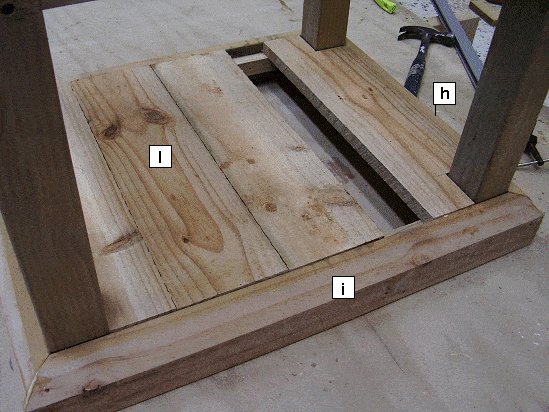
Step 7. Make the king chair base

- Angle one edge of the 1 1/2″ x 3 1/2″ (90mm x 38mm) stock to be used for the base.
- Measure (allowing for miter cuts) and cut the front and rear base pieces [h] and the two side base pieces [i].
- Bolt the two side pieces [i] to the bottom of the legs and glue and screw the front and rear base pieces [h] to them.
- Next screw 1″ x 1″ (25mm x 25mm) fillets [j] around the inside of the base pieces [h] and [i], 1″ (25mm) down from the top.
- Cut the 1″ x 6″ (25mm x 150mm) base boards [k] to length and glue them in place on top of the fillets [j].
- You will have to cut around the legs and rip the last board in order for it to fit.
Step 8. The final touches
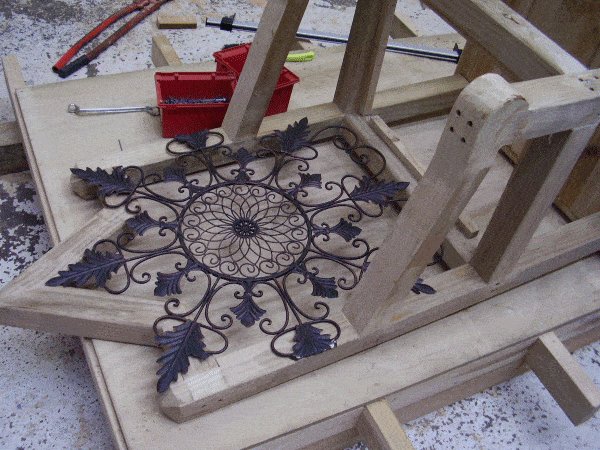
- Fit some sort of metal work to the seat back.
- This can be wrought iron, decorative metal wall hanging which can be found at some garden centers or anything similar.
As a last resort even trellis would suffice (be a poor cousin though).
- Finally, fill all the screw holes with dowel plugs, cut off any access and sand smooth.


‘Thanks.
Wasn’t that bad…
It was a good peaceful project to spend quality time with myself’
J
Garden Throne – Thank you very much for a creative and challenging project.
Jim Carr Pittsburgh, Pa
This is on my deck. Added this built in drink holder. I think a leg rest is next. Thank for plans. Sent from my iPhone.
J Dowen
Hi,
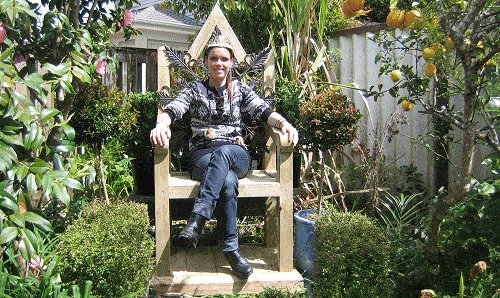
I really liked your plans for the garden throne. I needed a stage prop for my church this summer (a large throne), just what I was looking for. I took your plans and built my own at 50% bigger, added a padded seat and back, painted the rest gold. Here’s some pics. thanks,
Brian Tetter, Frederick, Maryland