Contents
Introduction

This article explains how to make a template for a spiral Wind-Spinner. To see how to make a spiral Wind-Spinner using this template click here

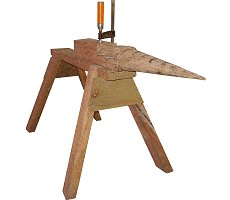
This template is made out of a piece of 4″ x 4″ (100mm x 100mm) wood 40″ (1m) long.
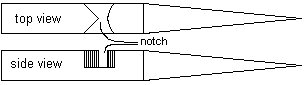
In short, the template is a piece of 4″ x 4″ (100mm x 100mm) wood with a cone shape at one end and a notch at the top of the cone.
Rod can be inserted in the notch, held in place by a plug (bolt or piece of round steel) and wrapped around the cone to form a conical spiral (cone shaped), hence the spiral wind-spinner.
Hang the spiral wind-spinner in the garden, drop a ball in the spiral, and you have a mesmerizing garden ornament that gives the illusion of the ball moving up and down the spiral when the breeze spins it.
The template can be shaped using just a circular saw and a disk sander, although just sandpaper with a sanding pad will do in place of a disk sander if you don’t mind a bit of work.
Once you have made the template, it takes less than a minute to make a spiral Wind-Spinner and you can use the template over and over again.
Step-by-step instructions and drawings are on successive pages, along with explanatory photos.
Shaping the cone
Step 1.
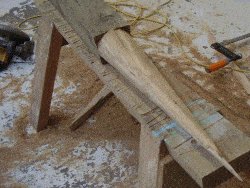
- Use a piece of 4″ x 4″ (100mm x 100mm) wood 40″ (1m) long to make the spiral Wind-Spinner.
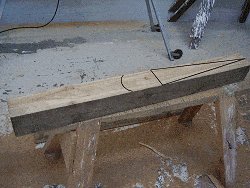
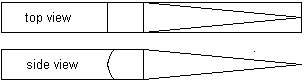
- Pencil-mark the top side according to the dimensions given below (also see the photo on the right).
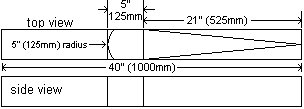
- Then cut along the point-shaped pencil lines, creating a wedge.
Step 2.
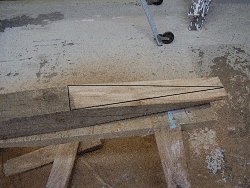
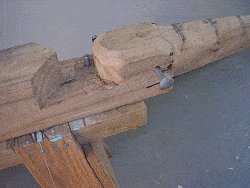
- Turn the wood on its side. Pencil-mark another point-shape on the face of the wedge, as shown on the drawing below and in the picture on the right.
- Then cut that point also.
Step 3.
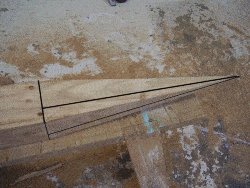
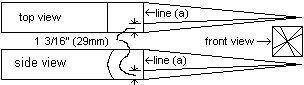
- Measure along line (a) 1 3/16″ (29mm) in from one edge and pencil a line from there to the point, as shown in the drawing below.
- In order to cut along the pencil-line using a circular saw with the blade set on a 45° angle, ensure the pencil-line is on the same edge of the wood, as is shown in the drawing and photo.
Step 4.
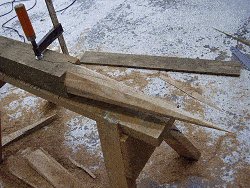
- Set the blade at 45° on your circular saw and cut along the pencil-line beginning from the point.
- Then cut along line (a) with a handsaw to get rid of the off-cut piece .
- Do the same to all four sides.

The notch and plugs
Step 5.
- Sand all the edges, making a cone.
- A disk sander would be ideal although just sandpaper with a sanding pad will suffice if you don’t mind using a bit of elbow grease.

Step 6.
- Set the blade in your circular saw to a depth of 2 1/4″ (56mm) and make multiple saw-cuts across the notch area, cutting as close to the curved line as possible.
- Then clean the notch out with a sharp chisel and round the top of the cone head with sandpaper.
Step 7.
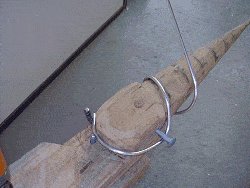
- Drill two 3/8″ (10mm) holes into the template, one in the notch area and the other in the side of the cone head.
- Position the holes approximately as shown in the drawing below.
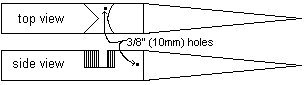
- The holes are to accommodate a couple of bolts, or 3/8″ (10mm) steel rod that can be put into the holes to hold the top of the spiral rod in place.
- Once the spiral is formed, the bolts can be pulled out to allow the spiral to slip off the template with relative ease.
- To see how to make the spiral Wind-Spinner click here. You will also find information regarding the types, thickness and lengths of rod required.
- This is my version of the spiral Wind-Spinner template and it works very well. It takes less than a minute to make a spiral Wind-Spinner using the template.
- If you can improve on the template or have a different type that works well and is easy to make, let us know.


Where do you find the balls? And what material are they made from?
But where can I find the 3″crystal ball at ?
I would check either amazon or a craft store like hobby lobby, and if you still can’t find them check on “Etsey” online. One of these options will have them, Amazon I know for sure.
can you make the spiral cone from a baseball bat