Contents
Introduction
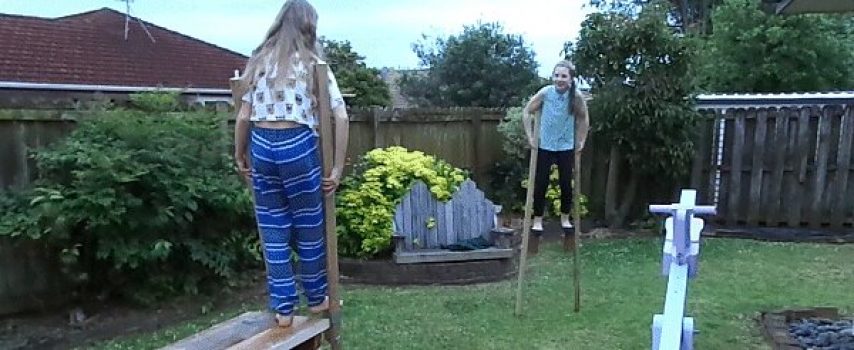
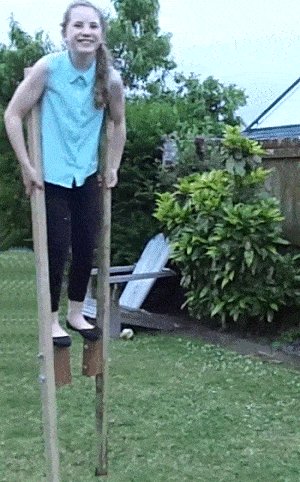
Stilts are simple to make and a lot of fun! These stilts have adjustable foot rests and can be used by kids aged from around 8 years to adults.
They are a great tool to improve a kids balance and coordination.
Most kids learn to master the art of walking on stilts in no time at all – some tend to get it straight away while others take a little longer.
If you are going to make a pair, you will probably benefit by making at least two pair at the same time.
I certainly found that to be the case with my grandkids.
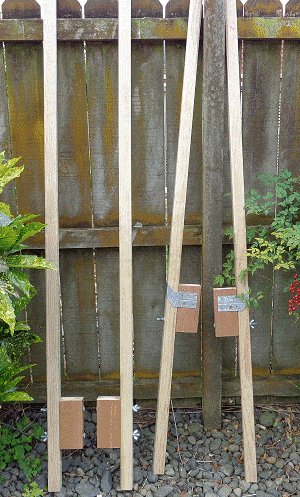
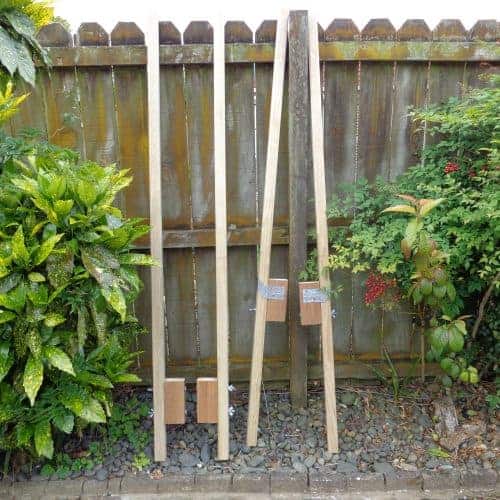
These stilts are made out of 2×2 (50 mm x 50 mm) lumber for the legs and 2×4 (50 mm x 100 mm) lumber for the footrests.
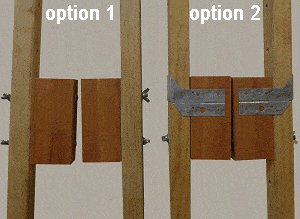
There are two footrest options.
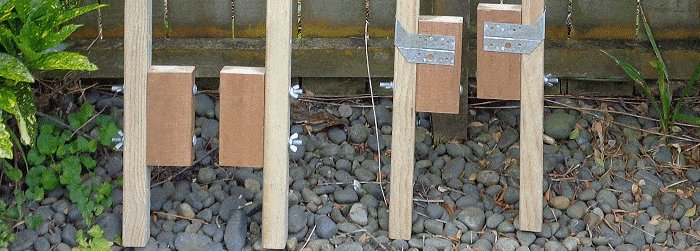
- Footrest option #1 – each footrest is fixed to the leg with two bolts.
- Footrest option #2 – each footrest is fixed with one bolts and a metal ‘wrap around’ plate (a re-shaped joist hanger).
The latter is faster for adjusting the height of the footrest and is great if the kid wants to continually change the height of the footrests.
- Pay online by credit card, debit card, or Paypal using Secure Server Paypal. You do not need a Paypal account if paying by credit or …
The plan drawing

About the measurements, the wood size and Materials
A bit about the measurements given
Note: The measurements are given in both standard (inches) and metric (millimetres).
The measurements are given in inches first, followed by millimeters in brackets (mm).
The standard (inch) measurements are best suited to North America and the metric (mm) measurements are best suited to Australasia.
The standard (inch) sizes are not an exact match to their equivalent metric (mm) sizes. So use one or the other.
A bit about the wood size
The legs are of 2×2 (50 mm x 50 mm) stock, and the footrests are of 2×4 (50 mm x 100 mm) stock.
2×2 actually finishes at 1-1/2″ x 1-1/2″, and 2×4 actually finishes at 1-1/2″ x 3-1/2″.
That is the ‘actual’ or true size (North America).
And the metric equivalent…
50 mm x 50 mm actually finishes at approximately 45 mm x 45 mm, and 50 mm x 100 mm actually finishes at approximately 45 mm x 90 mm.
That is the ‘actual’ or true size (Australasia).
Materials you will need
- Legs: Two pieces of 2×2 (50 mm x 50 mm) wood at 75″ (1905 mm) long.
- Footrests (option #1): Two pieces of 2×4 (50 mm x 100 mm) wood at 7″ (178 mm) long.
- Four 3/8″ (10 mm) carriage (coach) bolts that are 6″ (150 mm) long, with washers & wing nuts.
- Footrests (option #2): Two pieces of 2×4 (50 mm x 100 mm) wood at 7″ (178 mm) long.
- Two 3/8″ (10 mm) carriage (coach) bolts that are 6″ (150 mm) long, with washers & wing nuts.
- Two 2″ x 5″ (50 mm x 125mm) galvanized joist hangers. Note: If you can only purchase longer joist hangers, then cut to suit.
Instructions – Steps 1 to 2:
Step 1. Cut the pieces
- For each set of stilts:
- Out of 2x2s (50 mm x 50 mm) stock, cut two pieces @ 75″ (1905 mm) long
- Out of 2x4s (50 mm x 100 mm) stock, cut two pieces @ 7″ (178 mm) long.
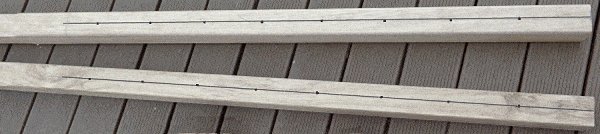
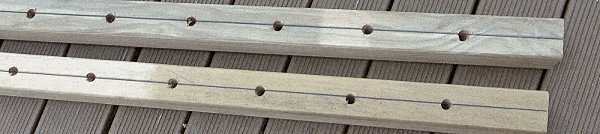
Step 2. Measure, mark, and drill the leg holes
- Mark for the holes in the legs. Measure and mark up the middle of the legs (on both sides) from the bottom, every 4″ (100 mm) up to 32′ (800mm) as shown on the drawing below.
- Mark the center of the holes (in order to start the drill bit) with a nail punch or a center punch on both sides of the legs.
- Drill 1/2″ (12 mm) holes through the legs where marked. If you are not using a drill press, drill halfway through from each side to ensure the holes are in the middle on both sides.
- The diameter of the holes are bigger than the thickness of the bolts to allow for easy placement.

Steps 3 to 4:
Step 3. Chamfer the handles

- The handles are the top part of the legs.
Chamfer the four corners of the handles 39″ (990mm) down from the top. - In other words, plane or sand the corners of the handles (top part of the legs) to make them more comfortable to hold.
Step 4. Prepare the footrests
- There are two footrest options.
- With footrest option #1 each footrest is fixed to the leg with two bolts.
With footrest option #2 each footrest is fixed with one bolt and a metal ‘wrap around’ plate (a re-shaped joist hanger).
The latter is faster for adjusting the height of the footrest and is great if the kid wants to continually change the height of the footrests.
Step 4a. Footrest option #1
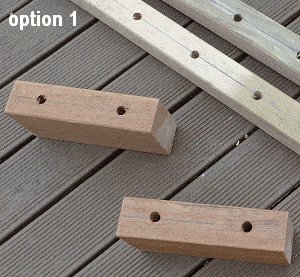
- The footrests are out of 2×4 (50 mm x 100 mm) stock, and each one is 7″ (178mm) long.
- Carefully measure and mark the drill holes on both sides of the footrests.
Ensure the marks are exactly 4″ (100 mm) apart so that they line up with the holes in the stilt legs.
Drill 1/2″ (12mm) holes through the footrests where marked. Drill halfway through from each side to ensure the holes are in the middle on both sides.
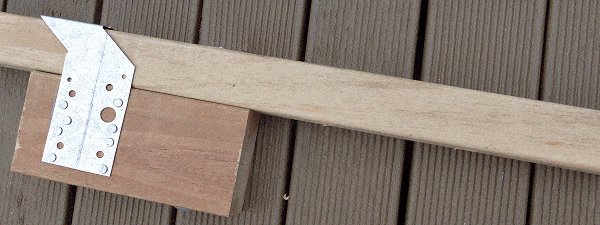
Step 4b. Footrest option #2
- The footrests for option #2 are the same as in option #1 (shown on the previous page) except each footrest has ONLY ONE HOLE instead of two.
- They also have a metal ‘wrap around’ plate which is a made out of a galvanized joist hanger that has had its angled sides made flat.
- For each option #2 footrest use a 2″ x 5″ (50 mm x 125mm) galvanized joist hanger. If you can only purchase longer joist hangers, then cut to suit.
- Straighten the sides as shown in the photos below.
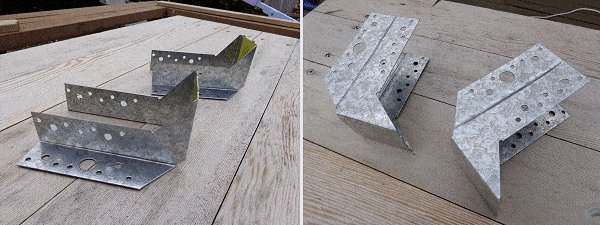
- It is then a matter of fixing the joist hangers to the top of the footrests. Wrap each joist hanger around a leg (loosely) and nail the sides of the joist hanger to the top of a footrest as shown in the photos below. Ensure that the footrest is able to slide with ease, up and down the stilt leg.
Step 5. Fit the footrests
And finally…
- Line the holes in the footrests with the holes in the legs and push the bolts through the holes.
- The bolt should be long enough to go through a footrest, a leg, and still have enough sticking out to take a washer and nut. See the drawing below for an approximate length.
- Once through, place a washer on each bolt followed by a wing nut.
- Tighten the wing nuts by hand, and then the stilts are ready to use.


