Contents
Introduction and a bit about the measurements
Introduction
How to build a decorative wheelbarrow planter.
Note: The measurements in these plans and instructions are given in both metric (mm) and standard (inches). See ‘The measurements’ segment below, for more measurement information.
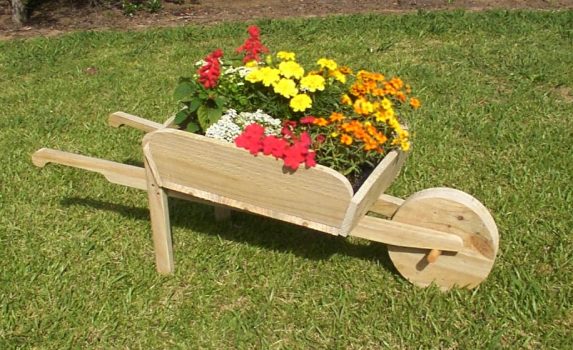
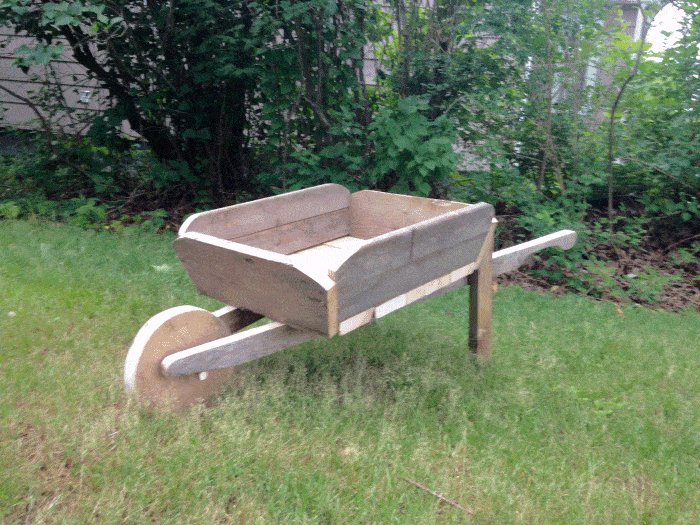
This wheelbarrow is not only ornamental but is also functional and can be wheeled about from place to place.
It is a little over 1200mm (4ft) long, 400mm (16″) high, and 400mm (16″) wide at the widest point.
All the pieces for the wheelbarrow can be cut from 50mm x 25mm (1″ x 2″) and 150mm x 25mm (1″ x 6″) boards.
It does not matter whether the wood you use is sawn (rough) or dressed (smooth), as long as it is suitable for outside use.

- Pay online by credit card, debit card, or Paypal using Secure Server Paypal. You do not need a Paypal account if paying by credit or …
|
The measurements
The measurements throughout this project are given in both metric (mm) and standard (inches).
The metric measurements are given first followed by the standard measurements in brackets ( ).
For example: 150mm x 25mm (1″ x 6″).
Some more measurement notes
Most Countries that use the metric system generally call the bigger numeral first, example: 150mm x 25mm (150 millimetres by 25 millimetres). Most Countries that use the imperial system generally call the smaller numeral first, example: 2″ x 6″ (2 inches by 6 inches).
For rounding-off purposes, the metric sizes in this project are not an exact match to the equivalent imperial sizes.
A structure built using the metric measurements will be approximately 1.6% smaller than the same structure using the imperial (ft and in) measurements. Not really worth worrying about.
The materials list and cutting list
The Materials list
Below is the shopping list. It would pay to add a bit extra to the wood tally to allow for any wastage.
It does not matter whether the wood you use is sawn (rough) or dressed (smooth), as long as it is suitable for outside use.
When cutting the lengths, always cut the longest lengths first to minimize waste.
| MATERIAL | USED FOR | AMOUNT |
| 50mm x 25mm (1″ x 2″) stock | handles and legs | 3.3m (11ft) |
| 150mm x 25mm (1″ x 6″) stock | tray and wheel | 5.2m (17ft) |
| 50mm (2″) stainless steel screws | tray and legs | 40 of |
| approximately 25mm (1″) diameter round wood, pipe or similar | axle | 225mm (9″) |
| saddle clips or U bolts | fixing axle to support rail | 2 of |
| Glue | wheel | as needed |
Cutting the pieces
Cut all the pieces to the lengths given below and then refer to the plan drawings on the following page for the shape dimensions – and then cut (shape) the pieces accordingly.
All the pieces can be cut from 50mm x 25mm (1″ x 2″) and 150mm x 25mm (1″ x 6″) boards.
Cut the following to the given lengths:
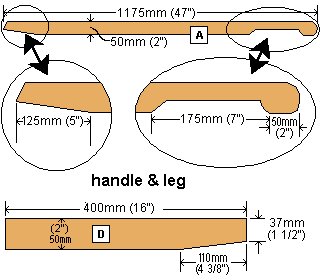
[A] From 50mm x 25mm (1″ x 2″) stock, cut 2 pieces 1175mm (47″) long for the handle/support rail pieces.
[D] From 50mm x 25mm (1″ x 2″) stock, cut 2 pieces 400mm (16″) long for the legs.
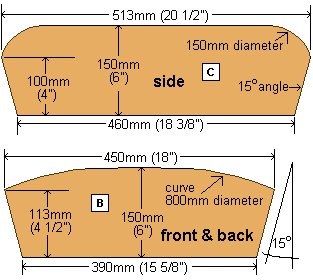
[B] From 150mm x 25mm (1″ x 6″) stock, cut 2 pieces 450mm (18″) long for the end tray panels.
[C] From 150mm x 25mm (1″ x 6″) stock, cut 2 pieces 513mm 20 1/2″ long for the side tray panels.
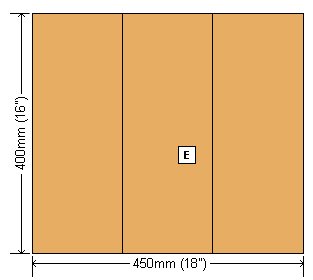
[E] From 150mm x 25mm (1″ x 6″) stock, cut 3 pieces 400mm (16″) long for the tray base,
and from 150mm x 25mm (1″ x 6″) stock, cut 6 pieces 300mm (12″) long for the wheel.
Then mark and cut (shape) the pieces as shown in the plan drawings on the following page.
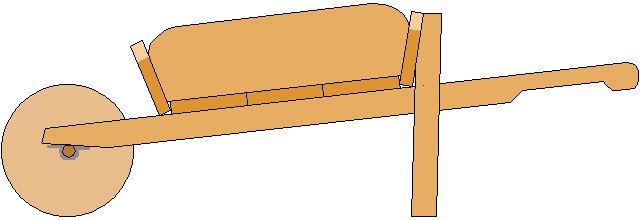
The plan drawings
Assembly instructions
Step 1. Making the tray base

- Place the two handle/support rails [A] on an even surface so that the front ends (axle end) are 75mm (3″) apart (or a width that is slightly more than the thickness of the wheel), and the handle ends are 400mm (16″) apart overall.
- The tray base is made out of three 150mm x 25mm (1″ x 6″) boards [E] that are 400mm (16″) long.
- Place the three tray base boards [E] side-by-side on top of the two handle/support rails [A], forming a rectangle 400mm (16″) x 450mm (18″).
- Refer to the plan drawing for position and fix them to the handle/support rails [A] with 50mm (2″) stainless steel screws.
Step 2. Fixing the tray side panels
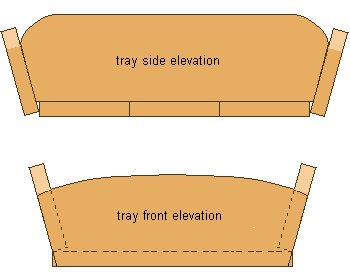
- The ends of all the tray side and end panels have been cut 15 degrees off square.
- Screw the end panels [B] to the side panels [C]with 50mm (2″) stainless steel screws, but pre-drill the holes first through the end panels [B].
- The side panels [C] sit on the tray base, but the end panels [B] sit on the two handle/support rails [A], up against the tray base.
See the picture for reference.
Wooden wheelbarrow project
Step 3. Making the wheel
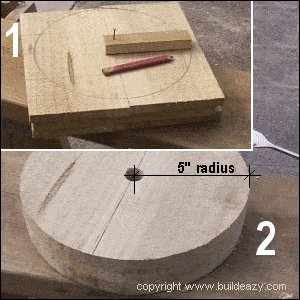
- Lay two pieces of 150mm x 25mm (1″ x 6″) board, 300mm (12″) long, side by side, on a flat surface. Then glue (with exterior type glue) another two pieces on top of that, running at right angles across the first two boards. Then glue another pair on top of that, again at right angles to the layer below. In all, there will be three layers.
- Hold them firmly together with clamps until the glue dries.
- When the glue is dry, draw a circle with a 125mm (5″) radius (see the diagram) and cut the circle out with a table scroll saw, bandsaw, or heavy duty jigsaw. Drill a 25mm (1″) hole (or a hole slightly larger than the axle) through the middle of the wheel.
Step 4. The wheel and legs

- Turn the barrow upside down.
- Cut a piece of 25mm (1″) dowel (round wood), pipe, or similar, about 225mm (9″) long (the axle) and put it through the hole of the wheel.
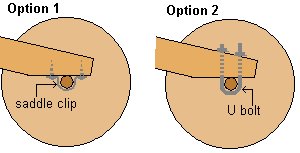
Place the wheel and axle on top of the two support rails so that the wheel is central and straight.
Fix the wheel in place by securing the axle with saddle clips screwed to the support rails. Alternatively use U-bolts.
- Finally, screw the legs to both the handles and the tray end panel [B] (refer to the picture).
Notes and tips
The finished wheelbarrow
A few pots of plants in the wheelbarrow and that’s about it.
Notes and tips
- The wheel in this project is made up of three layers of wood glued together. Two layers would also suffice. It is just personal taste. A thick wheel or a thin wheel. Obviously three layers will be stronger.
- The rounding and shaping of the tray side panels can be changed to suit your taste and artistic flair.
- Make the hole in the wheel slightly bigger than the axle. (The axle used in this project is only 225mm (9″) long. A piece off an old broom perhaps).
- Ensure all the wood is either treated or of a type that has a natural resistance to decay. In other words, do not use anything that might rot.
If you use a piece of broom handle (or similar) for the axle, chances are it will be susceptible to decay (not treated or not suitable for outside use), therefore the axle will need a preservative of sorts. If you do decide to give the axle a coat or two of preservative, you might as well do the whole wheelbarrow for a longer life.
How?
Apply light coats of boiled linseed oil thinned with mineral turpentine. Both can be purchased from most hardware stores and are inexpensive.


Wooden wheelbarrow made off a BuildEazy plan by G.A. Miedema
I had been searching for just such a project and was glad when I discovered your site. One or two things need to be ironed out if this is being made in the UK.
I printed all the details and started work with a couple of small modifications due the available timber size available in the UK.
The Wheel was cut and stuck using what we call “No more nails” – do not use this for this project it don’t stick. Use waterproof PVA or evostick and make sure that the garage is warm ( do not try to do this in the winter because the wheel still falls apart after 3 days of being glued and clamped). Eventually the wheel was complete and when cut out was tapered toward one side because the blade in the jigsaw had flexed on the way in. Either drill a pilot hole before starting to cut the wheel out or use a table scroll saw.
All the other bits went together well.
Also pipe saddles are called saddle clips in the UK and you get them from Home base in the plumbing section.
I look forward to my next project.
regards
Clive UK
Hi. What did you use to achieve the 800mm diameter curve on the front and rear panels. I’m struggling to find anything that big. Otherwise everything is good.
We made your wheelbarrow. we’re not what you call handy people but we were up to the task. Marvelous.
Adam and Eve Auckland
These are some of the things I made from you’re easy to follow plans. I wanted to keep my hands busy while I quit smoking and these three projects did the trick. I made the wishing well as a gift for my wife and the wheelbarrow planter as a gift for my Grandmother and the kids picnic table for my granddaughters.I’m now hooked on woodworking instead of cigarettes.
Thank you. Kevin in Indiana, USA