
Contents
Introduction, navigation & wood sizes
This bridge was constructed entirely on the back lawn, showing that you do not always need an elaborate workshop or shed to undertake such a project.
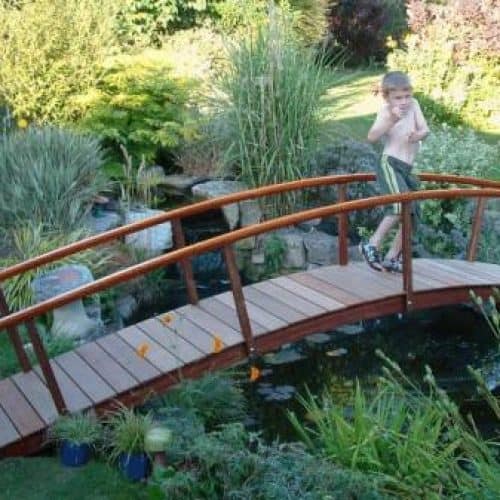
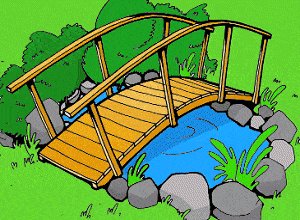
Arched Garden Bridge
$5.00- Pay online by credit card, debit card, or Paypal using Secure Server Paypal. You do not need a Paypal account if paying by credit or …
|
Lumber sizes
The measurements throughout this project are given in both Metric (mm) and Standard/Imperial inches.
The metric measurements (mm) are given first followed by the imperial measurements (inch) in brackets ().
There are only two stock sizes required for this project, both being common stock sizes.
They are…
90mm x 45mm (1 1/2″ x 3 1/2″) and 90mm x 19mm (3/4″ x 3 1/2″).
90mm x 45mm means wood that is 90 millimeters wide by 45 millimeters thick.
That is called the actual size. The nominal size of the wood relates to its size prior to being dressed (planed, surfaced, smoothed). For example, wood that is 100mm x 50mm (nominal size), becomes 90mm x 45mm (actual size) once it has been dressed (planed, surfaced, smoothed).
And the equivalent in standard…
1 1/2″ x 3 1/2″ means wood that is 1 1/2 (one and a half) inches thick by 3 1/2 (three and a half) inches wide.
That is called the actual size. The nominal size of the wood relates to its size prior to being dressed (planed, surfaced, smoothed). For example, wood that is 2″ x 4″ (nominal size), becomes 1 1/2″ x 3 1/2″ (actual size) once it has been dressed (planed, surfaced, smoothed).
Note: The 90mm x 19mm (3/4″ x 3 1/2″) boards used for making the arches must be premium and knot free. If there are any deformities in the boards, then they may snap when bending pressure is applied.
The plans, parts and materials list
Materials list
| MATERIAL | DESCRIPTION | AMOUNT |
| 90mm x 45mm (1 1/2″ x 3 1/2″) treated pine | handrail uprights – 4 @ 600 (24″) decking – 25 @ 680 (27″) spreaders – 3 @ 540 (21 1/2″) | 22m (75ft) |
| 90mm x 19mm (3/4″ x 3 1/2″) treated pine (knot free) | arch beam – 4 @ 2400 (8ft} handrail arch frame – 2 @ 2700 (9ft) handrail capping – 2 @ 3000 (10ft) shoe – 2 @ 625 (25″) | 23m (76ft) |
| Hardware | M10 (3/8″) coach/carriage bolts – 8 @ 75mm (3″) and 8 @ 120mm (5″). 50mm (2″) stainless steel screws – 50 of. Glue to suit. metal strap 30mm x 400mm (1″ x 16″) – 8 of. 100mm (4″) galvanized flathead nails – 2-5kg (5.5 lb) |
Making the laminated arch beam
Step 1. Making the template for the arch
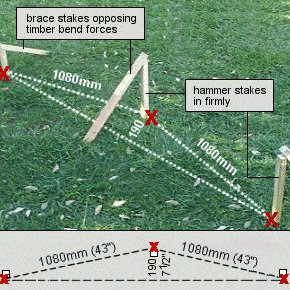
- To make the arch template, 3 stakes will need to be hammered firmly into the ground and braced opposing the bending force.(see picture).
Space the stakes as per the dimensions shown in the accompanying picture. - The arch beams the are made by bending and gluing and screwing four lengths of 90mm x 19mm (3/4″ x 3 1/2″) treated pine together.
- When the glue is dry (the next day) this newly made laminated arch beam can be ripped (cut) down the middle (lengthwise) to create two arch beams for the base of the bridge, one each side. (See Step 4 “cutting the arch boards”)
The arch handrail is made the same way, using the same template.
Step 2. Making the laminated arch beam
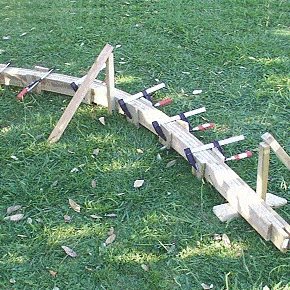
- Bend a piece of 90mm x 19mm (3/4″ x 3 1/2″) knot free board, 2400mm (8ft) long, between the arch template pegs. Bend a second board against the first, putting a generous amount of glue between the two boards.
- Repeat this action until four boards are in place forming the arch.
- Clamp the boards together and also screw along the arch approx every 300mm (12″) with 50mm (2″) stainless steel screws on both sides.
- Ensure no screws are placed along the center line of the arch beam as this line is to be cut.
Cutting the laminated arch boards
Step 3. Making the laminated handrail arch
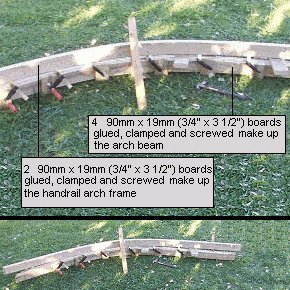
- Use the same template for the handrail arch as the beam arch (see picture).
- Make the laminated handrail arch on top of the beam arch (which is still lying in place until the glue has dried) in the same way as the laminated arch beam was made, but use only two 90mm x 19mm x 2700mm (3/4″ x 3 1/2″ x 9ft) boards rather than four.
- Be careful not to glue the handrail arch to the beam arch.
Step 4. Cutting the laminated arch boards
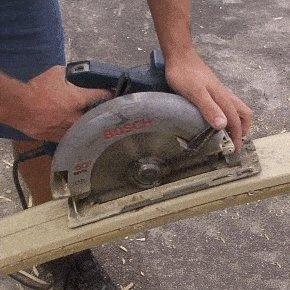
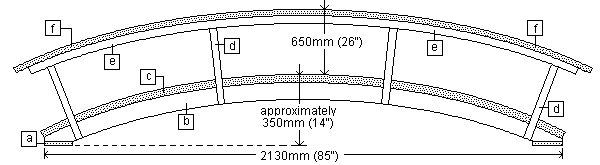
- Using a power saw, cut the laminated arch boards in half. Rip (cut) along the length of both the beam and the handrail (see picture). This will give you two laminated arch beams and two laminated arch handrail frames.
- Trim the ends of the arch beams to the dimensions shown in the plan.
Assembling the bridge frame
Step 5. Making the sides of the bridge
- Rip (cut) a length of 90mm x 45mm x 2400mm (1 1/2″ x 3 1/2″ x 8ft) treated pine in half (lengthwise) to make two pieces 45mm x 45mm x 2400mm (1 1/2″ x 1 1/2″ x 8ft).
From that cut eight handrail uprights, each 600mm (2ft) long. - Make eight wood washers 90mm x 90mm x 19mm thick (3 1/2″ x 3 1/2″ x 3/4″ thick).
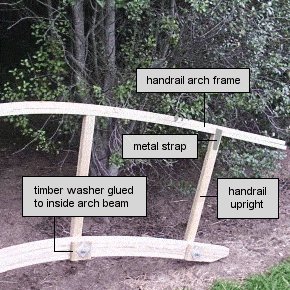
- Bolt the handrail uprights to the arch beams so that 4 uprights are spread evenly along each arch beam and so that each upright is at right angles to the arch beam.
- Use the wood washers as well as metal washers and apply glue between the wood washers and the arch beams before tightening the nuts (see picture).
- Drill and nail the handrail arch frames on top of the uprights. Secure each end with metal strap plates.
Step 6. Completing the bridge frame
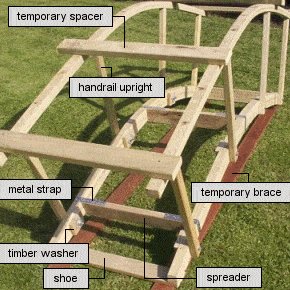
- Cut 3 spreaders 90mm x 45mm x 540mm long (1 1/2″ x 3 1/2″ x 21 1/2″ long} and fix them between the side frames, one in between the middle of the arch beams and one near each end. Secure with metal strap brace. (see picture).
- Nail 3 temporary spacers on top of the handrail arch frame to keep them parallel until the decking boards have been nailed in place.
- Nail and glue the shoes to the underside of the arch beams, one at each end.
- Nail a temporary brace from shoe to shoe, also until the decking boards have been nailed in place.
Adding the decking and the handrail
Step 7. The decking and handrail
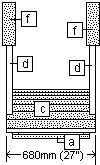
- Nail the decking boards 90mm x 45mm x 680mm long (1 1/2″ x 3 1/2″ x 27″ long) onto the arch beams with 100mm (4″) flathead galvanized nails. Begin at each end and work towards the middle. The final piece will have to be cut to fit and the deck boards will need to be checked (cut, rebated) around the handrail uprights.
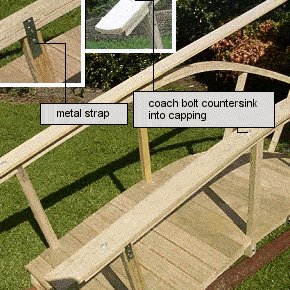
- Trim the ends of the handrail arch frames (at right angles to the end of the arch beam) and bend and fix two handrail capping boards 90mm x 19mm x 3000mm long (3/4″ x 3 1/2″ x 10ft long) to the top of the handrail arch frames. Secure with glue and m10 (3/8″) coach bolts and washers, 4 each side.
- Countersink the head of the bolts into the capping board.
Eazy with a “Z”!
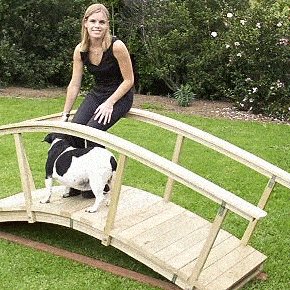
The finished bridge
Notes and tips
The 90mm x 19mm (3/4″ x 3 1/2″) boards used for making the arches must be premium and knot free. If there are any deformities in the boards, then they may snap when bending pressure is applied.
Use an exterior type glue.


Many thanks for the article on the laminated bridge. My daughter had asked me to build her a bridge to go over her pond, and after looking at many plans I decided that I could cope with your plan. I had been given a lot of mahogany by a friend who lives near by from a conservatory they had pulled down…
Harry from England
I need a arched bridge that would span a creek that is 12 feet wide with sloped banks
How do you cut the arch in two with a circular saw? (4) 1×4 beams laminated together will be 3 inches thick, but most circular saws can only cut to a depth of 2.5 inches. Also, that’s a long cut – how do you keep it straight?