Contents
The Ultimate Chicken Coop by Les Kenny
Preface
I originally designed ‘The Ultimate Chicken Coop’ for a monthly magazine called the ‘Lifestyle Block’ – a practical small farm guide..
The plans and step-by-step instructions were first published in the magazine – issue 13, on June 2005 (subject to me retaining all rights).
Since, there has been a few minor modifications made to the article.
Many people have undertaken this project over time, some being good enough to
send in a photo or photos of their handiwork along with a note or two. We greatly appreciate such input.
Photos and constructive comments are a great help to others contemplating the start of this project.
About the measurements given
All measurements throughout this project are given in both Standard/Imperial inches and Metric (mm).
The measurements are given first in inches followed by millimetres in brackets (mm).
Example: 2″ x 4″ (100mm x 50mm).
For more information on wood sizes and measurements go to ‘Wood sizes and measurement’ on page two.
Seek local knowledge
These plans and information are for the most part general. Before using them, it would be advisable to do a bit of your own research. Where necessary you may need to make changes to suit the local environment. The best type of information and knowledge available is local knowledge. Check with your local authority to see what may or may not be required from their point of view, including any animal welfare obligations.
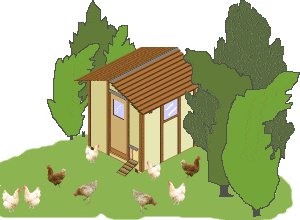
The chickens mansion
A chicken coop is a place of shelter, a safe retreat for chickens and a place where the hens can lay their eggs. A chicken coop is accompanied by a run, which is the chickens’ outside area. The scope of the run can vary greatly depending on local conditions, the type of predator (wild or domestic) that might be lurking around seeking a free chicken meal and anything else that could be a threat to the well-being of the chicken. These factors will also determine whether the chicken can be free-ranging or confined to a fenced or fully enclosed type of holding pen.
This chicken coop should comfortably house at least eight chickens and generously allows for:
- 4.5 sq ft (0.4 sq m) of space per chicken
- 3 nests shared between 8 chickens
- 9″ (225mm)of perch length for each chicken
The design also allows for:
A bit of a storage area, chicken hatchway (i.e. entrance hole), ample ventilation, ample light and a door that opens inwards and is big enough to enable easy access and cleaning of the chicken coop.
The floor is designed to take “deep litter” which is at least a 3″ (75mm) covering of wood shavings or similar.
NOTE: There is no design or allowance for any feeder system, water container or supply system. Although some people make their own, most people find it easier to purchase a feeder system /water container from the appropriate store.
Wood sizes and measurements
All measurements throughout this project are given in both Standard/Imperial inches and Metric (mm).
The measurements are given first in inches followed by millimetres in brackets (mm).
The size (width and thickness) of the wood referred to throughout this project is the nominal size.
That is in reference to the size of the lumber before it has been dressed (surfaced planed and/or seasoned).
When the wood has been dressed, (surfaced planed and/or seasoned) it is then called the ‘actual size’ which is the true size.
The actual size of lumber is smaller than the nominal size.
For example, if you have a piece of wood (lets say a piece of 2 x 4) in its rough state (prior to being dressed)
its size will be just that, 2″ x 4″ (two inches thick by four inches wide). However, once it has been dressed (surfaced, planed and/or seasoned), the finished wood will measure approximately 1 1/2″ x 3 1/2″ which is the
‘actual’ size (one and a half inches thick by three and a half inches wide).
Most Countries that use the Metric system generally call the bigger numeral first such as 100mm x 50mm.
whereas those that use the Imperial system generally put the smaller numeral first such as 2″ x 4″.
Rough or dressed wood, how does it matter?
In the overall scheme of things, it doesn’t matter that much. Use either rough or dressed. Rough wood is usually cheaper but dressed wood is
easier to work with and paint. Just remember to make allowances for the size difference when working off the plan if you use dressed (actual size) wood.
Below is a ‘nominal’ versus ‘actual’ list with all the wood sizes used in this project.
Standard (inches):
- Nominal size 2″ x 2″ vs Actual size 1 1/2″ x 1 1/2″
- Nominal size 2″ x 3″ vs Actual size 1 1/2″ x 2 1/2″
- Nominal size 2″ x 4″ vs Actual size 1 1/2″ x 3 1/2″
- Nominal size 4″ x 4″ vs Actual size 3 1/2″ x 3 1/2″
- Nominal size 1″ x 4″ vs Actual size 3/4″ x 3 1/2″
- Nominal size 1″ x 6″ vs Actual size 3/4″ x 5 1/2″
- Nominal size 1″ x 12″ vs Actual size 3/4″ x 11 1/4″
Metric (millimetres)
- Nominal size 50mm x 50mm vs Actual size 45mm x 45mm
- Nominal size 75mm x 50mm vs Actual size 70mm x 45mm
- Nominal size 100mm x 50mm vs Actual size 90mm x 45mm
- Nominal size 100mm x 100mm vs Actual size 90mm x 90mm
- Nominal size 100mm x 25mm vs Actual size 90mm x 19mm
- Nominal size 150mm x 25mm vs Actual size 140mm x 19mm
- Nominal size 300mm x 25mm vs Actual size 290mm x 19mm

Chicken coop
$5.00- Pay online by credit card, debit card, or Paypal using Secure Server Paypal. You do not need a Paypal account if paying by credit or …
|
Materials list
Excludes hardware and any feeder or water supply materials.
- Skids: 4″ x 4″ (100mm x 100mm), 2 pieces at 72″ (1800mm) Suitable for exterior use
- Floor Joists and boundary joists: 2″ x 4″ (100mm x 50mm), 36 lineal ft (11 lineal metres) Suitable for exterior use
- Corner studs: 4″ x 4″ (100mm x 100mm), 4 pieces at 72″ (1800mm
- All framing walls and roof frame: 2″ x 4″ (100mm x 50mm), 150 lineal ft (45 lineal metres)
- Perch and perch support: 2″ x 3″ (75mm x 50mm), 8 lineal ft (2.5 lineal metres)
- Nesting perch: 2″ x 2″ (50mm x 50mm), 40″ (1 lineal metre)
- Flooring, wall cladding and parts of nesting boxes: 4′ x 8′ (1200mm x 2400mm) plywood sheets 3/4″ (18mm) thick, 7 sheets suitable for exterior use
- Cladding battens, door stop and part of nesting boxes: 1″ x 4″ (100mm x 25mm), 120 lineal ft (36 lineal metres) suitable for exterior use
- Part of nesting boxes: 1″ x 12″ (300mm x 25mm), 9 lineal ft (2.6 lineal metres) suitable for exterior use
- Roofing boards and litter board: 1″ x 6″ (150mm x 25mm), 200 lineal ft (59 lineal metres) suitable for exterior use
- Tar paper, breather type building paper or similar roofing underlay: 40 sq ft (7.5 sq metres), for under the roofing boards
You will also need an assortment of hardware including nails, hinges, door latches, door bolts, window catches, glass or acrylic sheet (plastic glass) for use as window panes, galvanized flashings for openings where required as well as for roof ridge cap, and mesh/wire cloth/chicken wire for any permanent openings or air vents.
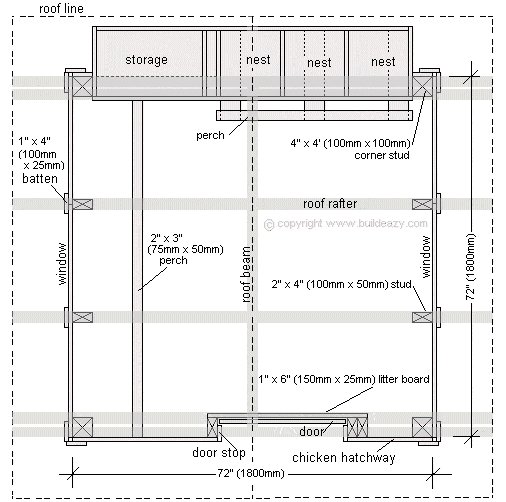
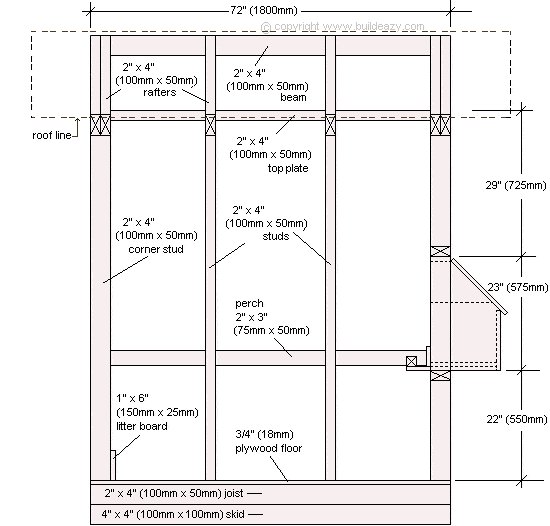
The flat plan
This is the flat plan, which is from a bird’s-eye-view, or looking down view. This plan shows the placement of the studs, roof beam and roof rafters and also the position of any doors or window, the nesting boxes and perches.
The corner studs are all of 4″ x 4″ (100mm x 100mm) stock and all the intermediate studs are of 2″ x 4″ (100mm x 50mm) stock. All the roof framing (comprising of the roof beam and the roof rafters) are also of 2″ x 4″ (100mm x 50mm) stock. The rafters and beam are represented by the gray shadow lines on the plan. The dashed line around the perimeter of the plan represents the roof line (i.e. the area that will be covered with the roofing boards).
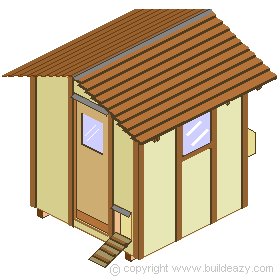
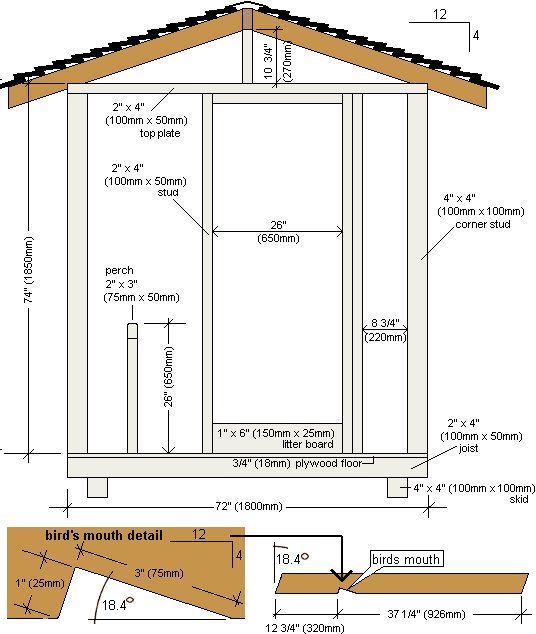
The front elevation plan
This is the front elevation plan which gives a perspective of the frame viewed from the front.
The skids (i.e. what the chicken coop sits on) are of 4″ x 4″ (100mm x 100mm) stock and the joists are of 2″ x 4″ (100mm x 50mm) stock. The 3/4″ (18mm) plywood floor is fixed to the floor joists and then the rest of the frame is built on this. The chicken coop frame (wall and roof) is all of 2″ x 4″ (100mm x 50mm) stock, except for the corner studs which are 4″ x 4″ (100mm x 100mm).
This plan also gives detail of the roof rafters and pattern for cutting out the bird’s mouth. The bird’s mouth is the “cut out” piece of the rafter that sits on the top plate, as shown in the diagram below.
The side elevation plan
This is the side elevation plan, which gives a perspective of the frame viewed from the side. This plan gives the length and height of the chicken coop and shows the placement of the studs and roof rafters. Also shown is the height of the perch and the nesting boxes.
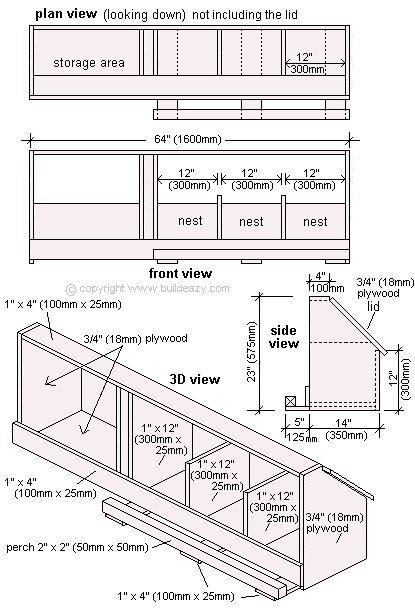
The nesting boxes and storage area plans
The front and internal partitions in the nesting boxes/storage area combination are of 1″ x 12″ (300mm x 25mm) boards. The sides, the bottom, the nesting boxes’ lid and storage area door are 3/4″ (18mm plywood). The storage area door is not shown in this plan.
There is a gap or cavity between the internal partitions separating the nesting boxes from the storage area. This allows for two separate exterior lids: one above the nesting boxes and one above the storage area. Make the lids larger than the area they are to cover, so they overhang at the sides and at the bottom. They can then be hinged to the 1″ x 4″ (100mm x 25mm) piece of wood that runs along the top of the unit.
Making the floor and the wall frames
Step 1. The floor
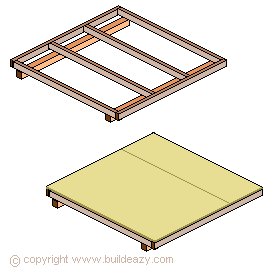
- Place the 4″ x 4″ (100mm x 100mm) skids level and parallel on firm ground. See the front elevation plan on page five for placement.
- On level ground, make up the Floor Frame comprising of two end joists, two intermediate joists evenly spaced, and two boundary joists – all 2″ x 4″ (100mm x 50mm) stock. The end result should be a square 72″ x 72″ (1800mm x 1800mm). Place the square floor frame on top of the skids and fasten in place.
- Cover the floor with 3/4″ (18mm) plywood, nailing a maximum of 8″ (200mm) apart on all joists. Any join should be on a joist.
- All the wood used in the floor structure should be suitable for exterior use.
Step 2. The frame
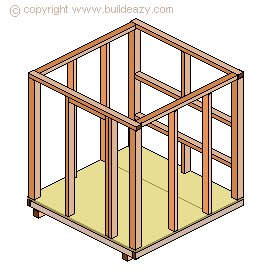
- Make up the wall frames as shown in the drawing. The dimensions and stud placements can be seen in the plans (‘looking down view’ on page four) and the height of the horizontal nest support members in the rear wall can be seen in the plans (‘side elevation’ on page six). The four corner studs are of 4″ x 4″ (100mm x 100mm) stock. The rest of the frame is 2″ x 4″ (100mm x 50mm) stock.
- In this particular case there is no bottom plate – the studs are nailed directly to the floor. This will make the floor easier to clean out.
- The positioning of the studs either side of the door can be altered if need be, to suit a different size or style of door.
Making the nests and the roof frame
Step 3. The nests and the roof beam
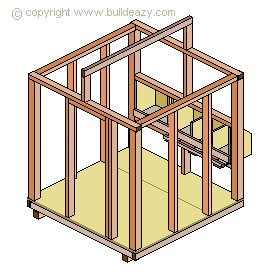
- Make up the nesting boxes/storage area combination unit, as shown in the plans (‘the nest’ on page seven).
- Note that the storage area door is not shown in the plan and it can be added later.
- Insert the nesting boxes/storage area combination unit, between the two pieces of 2″ x 4″ (100mm x 50mm) horizontal members in the rear wall, and fix in place.
- Next, fix two 2″ x 4″ (100mm x 50mm) uprights,
one on top of the front wall frame and one on top of the rear wall frame. The two uprights, which are 10 3/4″ (270mm) long, are the roof beam supports. - Fasten the 2″ x 4″ (100mm x 50mm) roof beam on top of the two roof beam supports.
Step 4. The roof frame
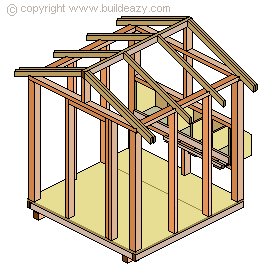
- Cut the roof rafters from 2″ x 4″ (100mm x 50mm) stock to the dimensions as shown in the plans (‘front elevation’ on page five). There will be 12 altogether, six each side of the roof.
- Fix the rafters to the beam. The placement of the rafters is shown in the plans (‘looking down view’ on page four).
- Note that there is a double rafter at each end of the roof. This is so the inside top of both front and rear walls can be lined, thus eliminating any high ledges that could be a problem to the chickens.
Fixing the wall cladding
Step 5. The wall cladding (siding)
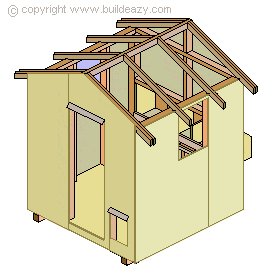
- Fix 3/4″ (18mm) thick exterior-type plywood to the frame, making sure that all joins are over a stud.
- Make the bottom of the chicken hatchway opening at least 3″ (75mm) above the floor level to stop any litter falling out.
- Insert galvanized flashing at the top of the doorway, the chicken hatchway and above the nesting boxes lid.
- The flashing should tuck under the plywood cladding by about 2″ (50mm) at the top of each opening and then angle out, also about 2″ (50mm). The flashing is to deflect the rain or any dripping.
- Note that the windows will not need any flashing as they are tucked up under the eaves of the roof.
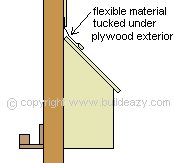
- Before fixing the plywood cladding above the nesting boxes, run a flexible waterproof type of material under the plywood and over the top of the lid. This is to waterproof the hinged area of the lid, yet still allow the lid to be lifted. Even heavy-duty waterproof canvas will do the trick, although the end of the canvas would need to be wrapped around and fixed to a strip of wood or similar that will act as a weight and stop the canvas from blowing up.
Fixing the roof boards and battens
Step 6. The roof and the battens
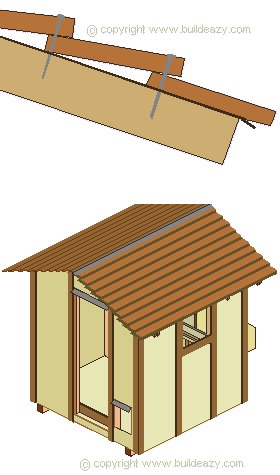
- Lay tar paper, heavy breather-type building paper or similar roofing underlay over top of the rafters, ensuring it is taut and waterproof prior to putting on the roofing boards.
- Nail the 1″ x 6″ x 8ft (150mm x 25mm x 2400mm) roofing boards to the rafters with 3″ (75mm) galvanized flathead nails.
- Start at the bottom of the rafter and then work your way up, overlapping each board by at least 1″ (25mm). Nail through both boards where they overlap and ensure the overhang at each end of the chicken coop is equal.
- Apply a galvanized flashing (ridge capping) at the apex of the roof, covering at least 4″ (100mm) each side.
- Fix the 1″ x 4″ (100mm x 25mm) battens over the plywood cladding at each join, each stud, and at the corners and sides of every door and window. Preferably the battens should have a groove each side of the join to stop water being drawn up by capillary action.
- Screw the 1″ x 6″ (150mm x 25mm) litter board to the inside of the studs at each side of the door opening. The litter board is just to stop the litter from falling out. When the chicken coop needs a clean out, the litter board can be removed.
Door, hatchway and windows
Step 7. Door, hatchway, and windows
The door
- A basic door can be made from 3/4″ (18mm) thick exterior plywood.
- A hole can be cut out for a window and covered with a piece of clear acrylic sheet (plastic glass) about 2″ (50mm) bigger than the hole, all the way around. The acrylic sheet can be fixed to the door with screws. Drill the screw holes in the sheet first and apply a bead of clear waterproof sealant around the edge of the acrylic sheet before screwing it in place.
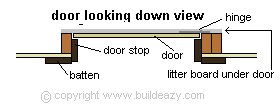
- The door should have a 1/4″ (6mm) gap each side and the bottom should be slightly above the top of the litter board. When the door is hinged in place (to open in), add the door stops (see diagram).
- I also have an article on how to make an automatic chicken house door.
The windows
- The windows in the walls can be made in the same way as the door window (mentioned above).
The hatchway
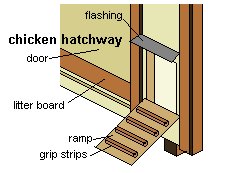
- Make the chicken hatchway door so that it is hinged at the bottom and can be opened down to form a ramp. Make the door bigger than the hole, so when the door is closed it will fit between the battens on the side and tuck neatly under the flashing at the top.
- You will need to add some type of pad bolt or latch to keep the hatchway door closed.
The perch, the mesh and ventilation
Step 8. Perch, mesh, ventilation
- Add the perch as shown in the plans ‘front elevation’ and ‘side elevation’). The perch can be supported by a 2″ x 2″ (50mm x 50mm) prop at one end and fixed to the lower part of the storage box at the other end with a joist hanger (or similar type of fixing bracket).
Ventilation
- At the top of the side wall there will be a gap between the top of the wall cladding and the underside of the roofing boards. This gap can be covered with a suitable mesh or purpose-made vents. They can be fitted between the rafters and fixed to the top of the plywood exterior cladding.
And finally!
- A bit of paint and it’s finished!
Different climatic conditions and environments may necessitate additions and/or variations to this basic plan. For example, in hotter climates the chicken coop may need to be insulated and have windows that can be opened. In colder areas the chicken coop may need to be insulated and have shutters that can cover any ventilation areas.
As stated at the beginning, the best type of information and knowledge available is local knowledge, so ask around.


I have been a fan of your site for a few years, but have no woodworking experience. Two years ago we purchased a farm.
My first project was a work bench, although I didn’t use any specific plans, I did use skills I read about on your site.
When we acquired two chickens it was time to put my limited skills to use!
This chicken coop is my first big project. I made it 4′ x 4′ x 4′ and insulated it for a Canadian winter. It didn’t need a roof, being in our barn, but I wanted to build one anyway.
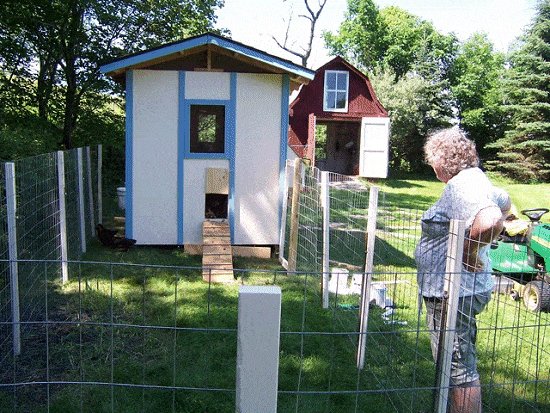
The picture shows the coop before it is insulated and outer plywood put on. It often reaches -15 C even inside the barn
Thanks for great plans. We and the chickens love their coop (made a few changes to suit us)
Melva & David Brady
Hi,
I used your free plans to build this chicken coop. Although I have NO experience it came together without too many glitches. I did change the inside a little but for the most part, I did what your plans suggested.
I would recommend these plans to anyone with little or no building experience.
Just wanted to share some pics.
Thanks a million.
Frankie.
We built your chicken coop. Here is a photo or two.
John Beaty
Hello,
I just finished a chicken coop based off your plans. Your site was a lot of help with Ideas. Thanks
I did make many changes most of them are cosmetic to match the house, the biggest change is I framed it like you would a house and used pier pads for the foundation. This made it much easier to insulate and sheet the inside walls.
I would say with all the labor that went into this project if I was to do it again I would make it 8’x 8′. It wouldn’t take much more in labor but it would increase your material cost.
I call it an architectural out building sounds better when I look at the material and labor cost. LOL
Thanks again I hope you enjoy the pic’s ED
Hi, Just wanted to say thanks to you. Through your website I got the inspiration to build my own hen house. It was a lot cheaper than commercially available ones and was specific to my needs. I now have four hens and they laid their first egg today. Great. Thanks,
MickE
Great plans. Built your coop with some modifications. Made it 6’x8′ to accommodate larger flock. Had a sloping site so we poured cement pillars. Increased the overhang all around to match overhang on our house and provide additional shelter. Got a couple small windows off craigslist and made one windw of our own. Installed an old barn door we had in the garage. Looks great with its rusty old hinges. Because we live in Massachusetts we put the nesting boxes inside the coop to keep them a bit warmer. Also made the nesting boxes 9″ high to discourage eating of, and soiling of, the eggs (read somewhere that it helps). Made the chicken door guillotine style with a pulley system so that we can open and close it without going into the house or the yard. Have a roosting rack that folds up with a removable board below it to shunt droppings to a cleanout door, which is at wheelbarrow height for collecting discarded shavings. Took about 4 good weekends all told with fencing in the yard. The family pitched in which made it more fun. Cost about $900. Chicks move in soon.
Tim Mangini
Hey, this isn’t a real reply but I was wondering what the cost of this would end up being and If there’s a better option also I already got a big fenced area for them to run around in.
I think this is a great plan, but I feel kind of dumb after reading it wondering how many of what size boards I would need to go order. It’s hard to figure out how much something will cost if you can’t figure out what you’re supposed to get in the first place.