Contents
Introduction, overview
This project has been completely re-built and re-written.
The basic design of the table has been kept pretty much the same as the original, as it has proven to be a very good and robust design.
User concerns regarding the original version have been mainly to do with the prose rather than the design, citing unclear angle information, certain hard to understand segments, and lack of explanatory detail as being the main culprits.
Hopefully all those concerns have been addressed in this version.
Ft and inch version:
Other changes (from the original plan) include using 2″x6″ wood instead of 2″x4″ for the legs,
and adding an allowance for an umbrella, albeit off center.
Metric version:
Other changes (from the original plan) include using 150mm x 50mm wood instead of 100mm x 50mm for the legs, and adding an allowance for an umbrella, albeit off center.
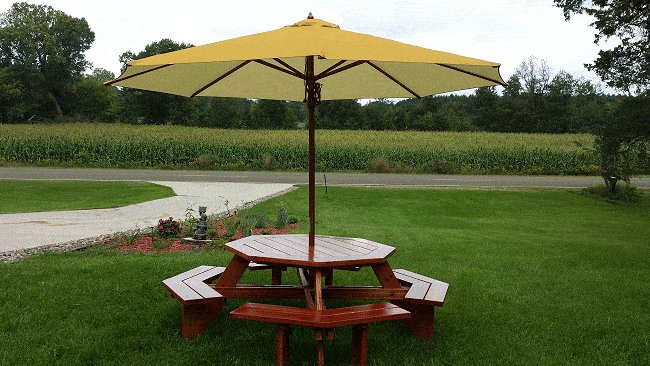
Hexagonal picnic table
$5.00- Pay online by credit card, debit card, or Paypal using Secure Server Paypal. You do not need a Paypal account if paying by credit or …
|
Overview
This table basically comprises of two hexagonal frames, an upper frame and a lower frame. The upper frame being for the table and the lower frame being for the seating.
Each frame consists of six spokes, or arms, spreading out evenly from the middle (axis), therefore each frame has six sections.
Each section forms an equilateral triangle.
Tabletop boards and seat boards are fixed to the upper and lower frames respectively.
The upper and lower frames can be made up independently of each other on a flat surface.
Once the frames (upper and lower) are made, the table can easily be assembled by laying the upper frame (table top) upside-down on an even surface, propping the lower frame (also upside-down) above it, and then by bolting the six legs to the spokes of both frames.
Ft and inch version:
The frames are made out of 1 1/2″ x 3 1/2″ wood. The tabletop boards, seat boards and the legs are made out of 1 1/2″ x 5 1/2″ wood
Metric version:
The frames are made out of 90mm x 45mm wood, and the tabletop boards, seat boards and the legs are made out of 145mm x 45mm wood.
Wood sizes, Angles, Material list
About the wood sizes
All dimensions are in millimeters.
The size of the wood referred to in his project is the actual size, which is the size of the wood after it has been dressed (smooth, planed, finished).
When the wood is dressed, the actual size is then less than the nominal size.
Ft and inch version:
For example: 150×50 when dressed may be 145mm x 45mm actual size, and 100×50 when dressed may be 90mm x 45mm actual size.
Metric version:
For example: 150×50 when dressed may be 145mm x 45mm actual size, and 100×50 when dressed may be 90mm x 45mm actual size.
The actual sizes can vary slightly from area to area but that should not have any effect on the dimensions given throughout this project. What will vary, depending on the actual size of the lumber, is the gap between each row of tabletop boards and seat boards.
About the angles
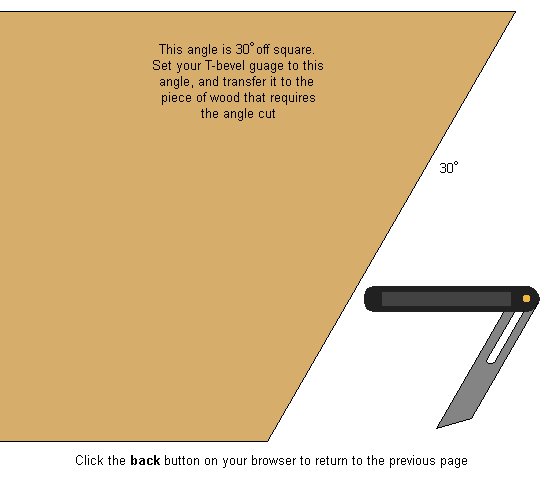
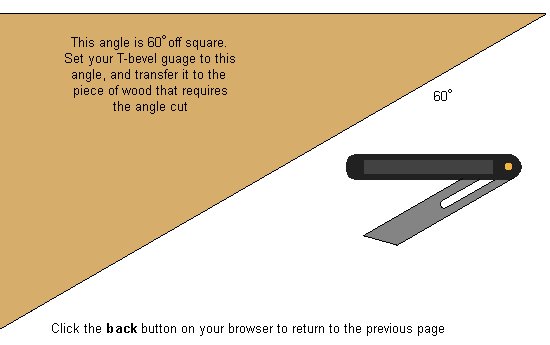
There are two different angle cuts required for this project. One (the most required) is 30 degrees off square, the other is 60 degrees off square.
To cut the 30 degree angle, simply set the blade on your miter saw to the required angle. The 60 degree angle will have to be cut with a handsaw, as miter saws will not do such a cut.
Don’t know how to get a 30° or 60° angle?
Click on one of the links below to bring up an angle pattern image. You can then print out that image and use it as a pattern.
30° pattern
60° pattern
Ft and inch version:
Below is the materials list. followed by plans and then instructions.
| Nominal size | Actual size | Used for | Amount |
| 2″ x 4″ | 1 1/2″x 3 1/2″ | frame spokes | 50ft |
| 2″ x 6″ | 1 1/2″x 5 1/2″ | tabletop boards and seat boards | 125ft |
| 1/2″ x 4 1/2″ galvanized carriage bolts with nuts and washers | bolting legs to frame spokes | 24 | |
| galvanized metal strap | tie the spokes together | 7ft | |
| 4″ galvanized flathead nails | 4 lb |
You will also need six pieces of 3/4″ plywood about 12″ long and 4″ wide (or similar), a bit of glue and a handful of screws. The plywood pieces are fixed to the underside of the seat boards for added strength.
Metric version:
Below is the materials list. It is followed by the plans and then the instructions.
| Material | |||
| Nominal size | Actual size | Used for | Amount |
| 100 x 50 | 90mm x 45mm | frame spokes | 16 metres |
| 150 x 50 | 145mm x 45mm | tabletop boards and seat boards | 40 metres |
| 12mm x 110mm galvanized coach bolts with nuts and washers | bolting legs to frame spokes | 24 | |
| galvanized metal strap | tie the spokes together | 2 metres | |
| 100mm galvanized flathead nails | 1.5 kg |
You will also need six pieces of 18mm thick plywood about 300mm long and 100mm wide (or similar), a bit of glue and a handful of screws.
The plywood pieces are fixed to the underside of the seat boards for added strength.
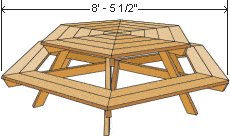
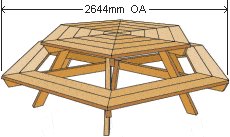
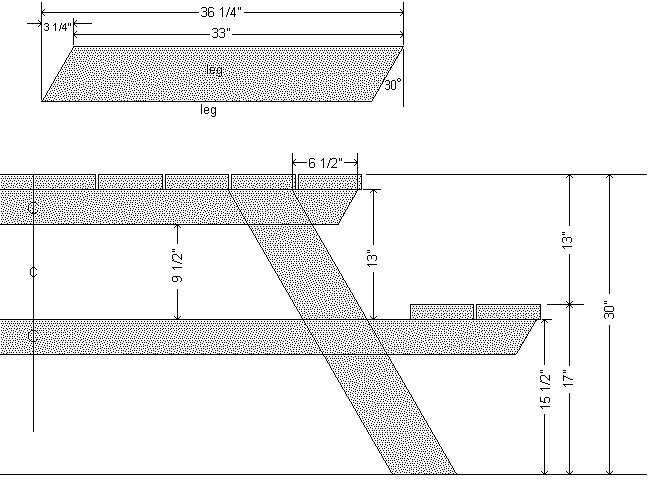
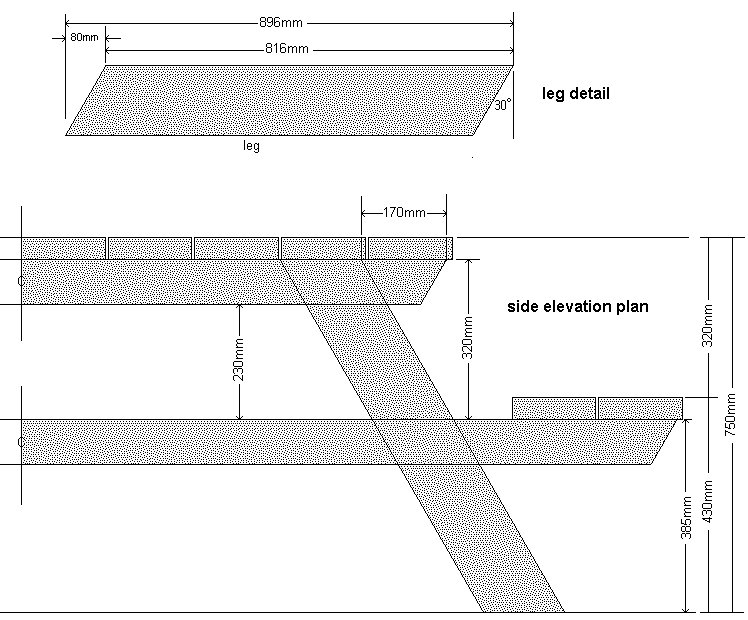
Plans: Side elevation, Legs, Spoke pieces
Side plan and leg cutting detail
Ft and inch version:
Metric version:
Frame spoke cutting list
Ft and inch version:
Metric version:

Plans: Spoke cutting detail
Frame spoke cutting detail
Ft and inch version:
Metric version:
Frame junction detail
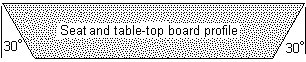
Plans: Table and seat board cutting detail
Table and seat board cutting list and detail
Ft and inch version:
Metric version:
Cut the spokes to length
Instructions
This table basically comprises of two hexagonal frames, an upper frame and a lower frame. The upper frame being for the table and the lower frame being for the seating.
Each frame consists of six spokes, or arms, spreading out evenly from the middle (axis), therefore each frame has six sections.
Each section forms an equilateral triangle.
Tabletop boards and seat boards are fixed to the upper and lower frames respectively.
The upper and lower frames can be made up independently of each other on a flat surface.
Once the frames (upper and lower) are made, the table can easily be assembled by laying the upper frame (table top) upside-down on an even surface, propping the lower frame (also upside-down) above it, and then by bolting the six legs to the spokes of both frames.
Ft and inch version:
The frames are made out of 1 1/2″ x 3 1/2″ wood. The tabletop boards, seat boards and the legs are made out of 1 1/2″ x 5 1/2″ wood.
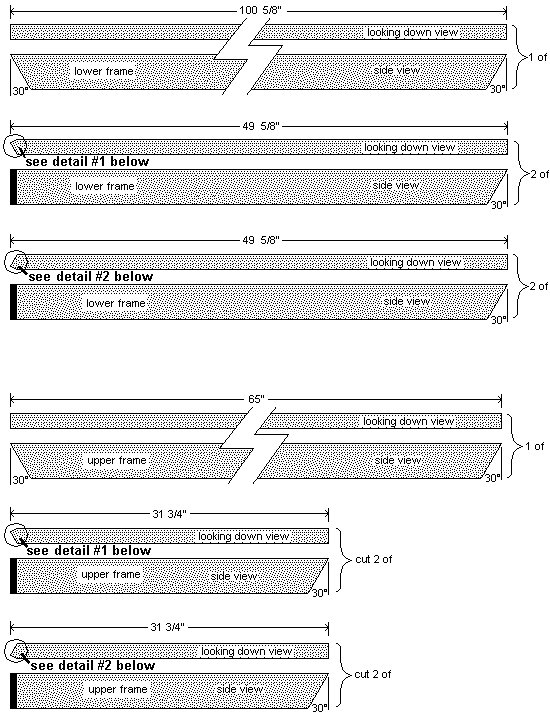
Step 1: Cut the spokes to length
The spokes are the arms that run out from the middle of the upper and lower frames. They are all made out of 1 1/2″ x 3 1/2″ wood (ex 2″ x 4″).
For the lower frame
- Cut 1 piece @ 100 5/8″ long with an angle cut 30° off square at both ends.
- Cut 4 pieces @ 49 5/8″ long, with a square cut at one end and a 30° off square cut at the other end.

For the upper frame
- Cut 1 piece @ 65″ long with an angle cut 30° off square at both ends.
- Cut 4 pieces @ 31 1/4″ long, with a square cut at one end and a 30° off square cut at the other end.
Metric version:
The frames are made out of 90mm x 45mm wood. The tabletop boards, seat boards and the legs are made out of 145mm x 45mm wood.
Step 1: Cut the spokes to length
The spokes are the arms that run out from the middle of the upper and lower frames. They are all made out of 90mm x 45mm wood (ex 100 x 50).
For the lower frame
- Cut 1 piece @ 2616mm long, with an angle cut 30° off square at both ends.
- Cut 4 pieces @ 1288mm long, with a square cut at one end and a 30° off square cut at the other end.

For the upper frame
- Cut 1 piece @ 1696mm long, with an angle cut 30° off square at both ends.
- Cut 4 pieces @ 828mm long, with a square cut at one end and a 30° off square cut at the other end.
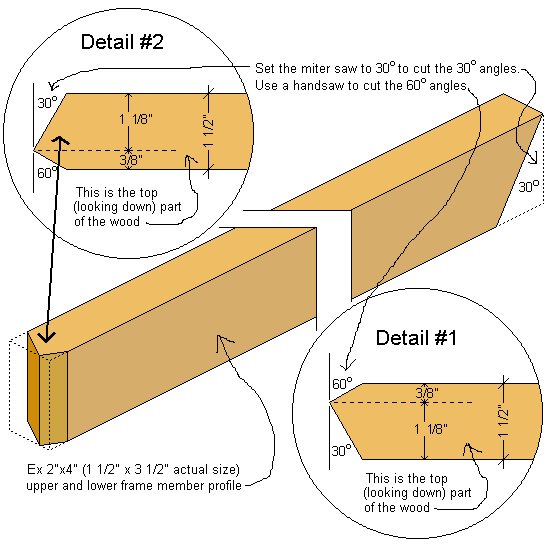
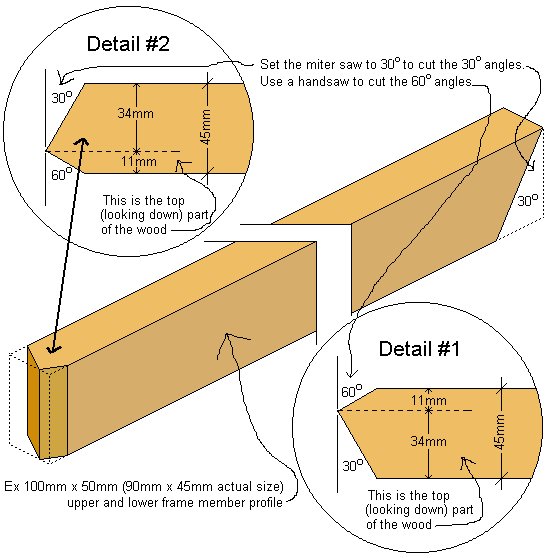
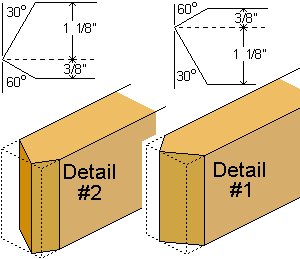
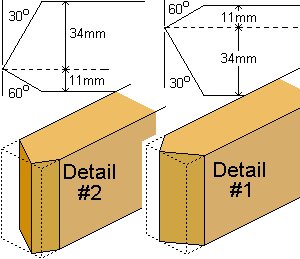
Shape the ends of the spokes
 Step 2: Shape the square ends of the spokes
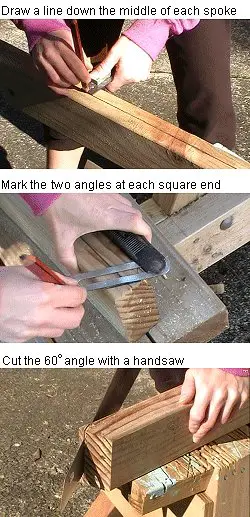
- Draw a center line along the top of every spoke.
The tabletop and seat boards will join on those lines. - Using a T-bevel or pattern, mark the angles (for cutting) at the square cut ends of the spokes.
Each end will require two adjoining cuts forming a sort of an off-center point. One cut will be 30° off square and the adjoining cut will be 60° off square.
The 30 degree cut can be made using a miter saw. The 60 degree angle will have to be cut with a handsaw, as miter saws will not do such a cut. - Refer to the drawing below for dimensions.
Ft and inch version:
Metric version:
- Note: Detail #1 is a mirror image of Detail #2.
- In all, you will need to cut 4 spokes with the Detail #1 profile (two for the upper frame and two for the lower), and 4 spokes with the Detail #2 profile (also two for the upper frame and two for the lower frame).
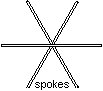
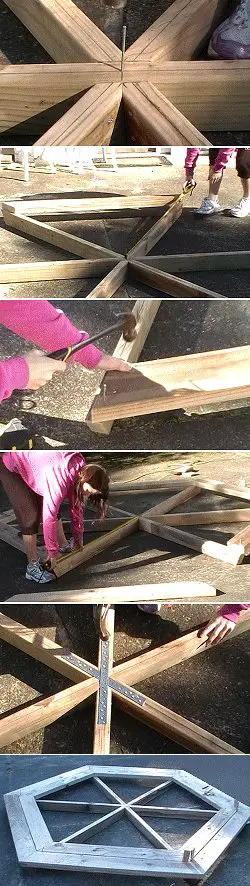
Assemble the spokes
A bit of angle information
To cut a 30 degree angle, set the blade on your miter saw to the required angle. The 60 degree angle will have to be cut with a handsaw, as miter saws will not do such a cut.
Don’t know how to get a 30° or 60° angle?
Click on one of the links below to bring up an angle pattern image. You can then print out that image and use it as a pattern.
30° pattern
60° pattern
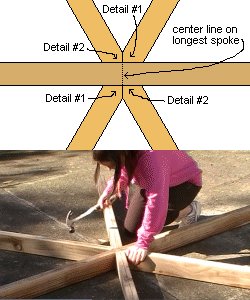
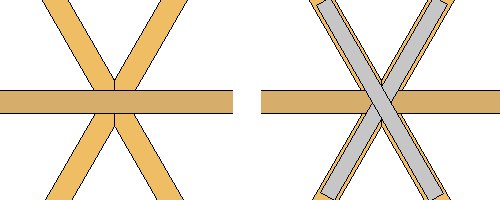
Step 3: Assemble the spokes for the upper and lower frames
- Mark the center point on the longest upper spoke and the longest lower spoke.
Align the points of the shorter spokes to the center lines of the respective longest spokes (for upper frame and lower frame). See the profile detail in ‘Step 2:’ above. - Note: The upper frame and the lower frame are made up in the same way. They are the same in every way, with the exception of the lower frame having longer spokes.
- Use the pictures and the plans to determine the placement of the spokes at the junction (where they all meet in the middle).
Then nail the spokes together.
Do not fix the metal strapping yet – we will do that later on when we are sure that the spokes are evenly spread.
Cut the tabletop and seat boards
Step 4: Cut some tabletop and seat boards
Ft and inch version:
- The tabletop and seat boards are made out of 1 1/2″ x 5 1/2″ (ex 2″ x 6″) wood.
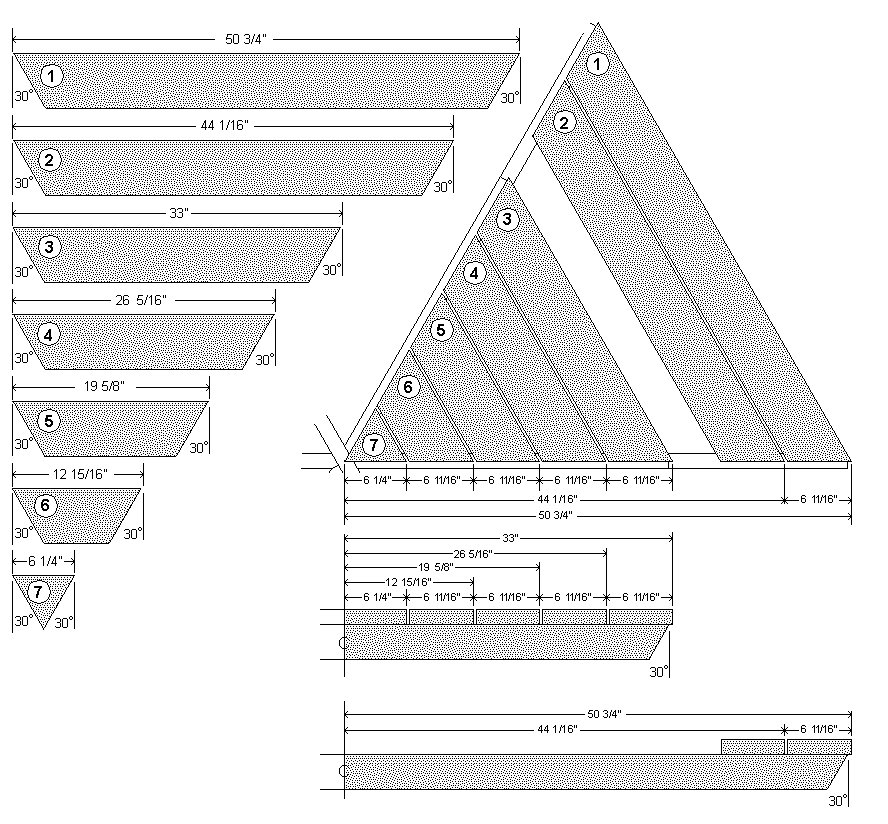
- First cut the six longest seat boards which are 50 3/4″ long with an angle cut 30° off square at both ends.
- Cut one board first, and then use that as a pattern to mark and cut the other five.
- Then cut the six longest tabletop boards, which are 33″ long with an angle cut 30° off square at both ends.
- Cut one first, and then use that as a pattern to mark and cut the other five.
- Next cut one only of each of the remaining different sized tabletop and seat boards, which is 1 @ 44 1/16″, 1 @ 26 5/16″, 1 @ 19 5/8″, 1 @ 12 15/16″, and 1 @ 6 1/4″.
Why only cut one of each and not all six?
So we can lay them in place first to ensure that they all fit before cutting the rest. You know, just in case we have made a mistake with the measurements, the cutting, or something… heaven forbid.
Metric version:
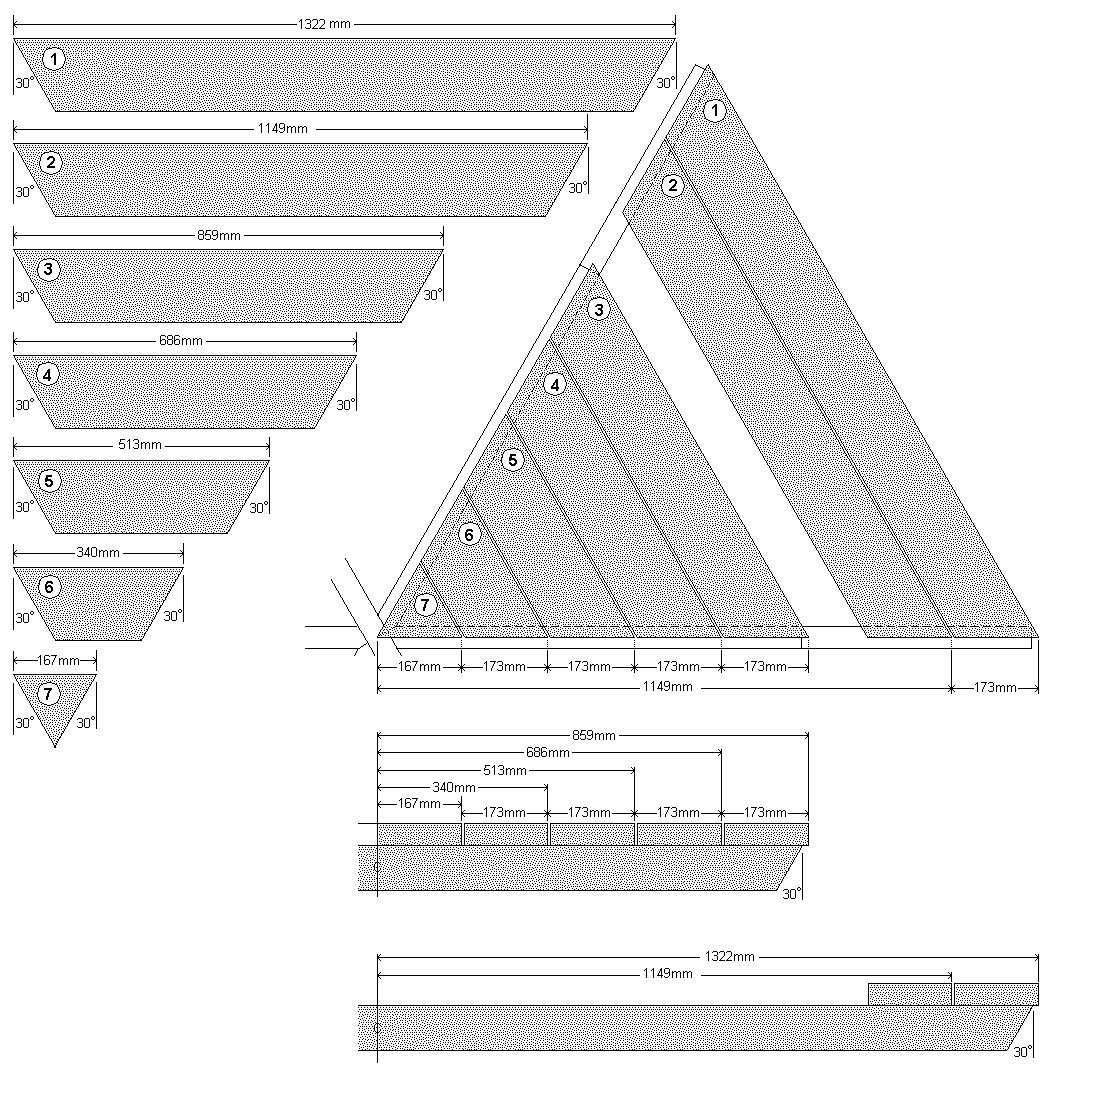
- The tabletop and seat boards are made out of 145mm x 45mm (ex 150 x 50) wood.
- First cut the six longest seat boards which are 1322mm long with an angle cut 30° off square at both ends.
- Cut one board first, and then use that as a pattern to mark and cut the other five.
- Then cut the six longest tabletop boards, which are 859mm long with an angle cut 30° off square at both ends.
- Cut one first, and then use that as a pattern to mark and cut the other five.

- Next cut one only of each of the remaining different sized tabletop and seat boards, which are 1 @ 1149mm, 1 @ 686mm, 1 @ 513mm, 1 @ 340mm, and 1 @ 167mm.
Why only cut one of each and not all six?
So we can lay them in place first to ensure that they all fit before cutting the rest. You know, just in case we have made a mistake with the measurements, the cutting, or something… heaven forbid.
Fix some seat boards
Step 5: Determine the position of the first seat board
- Partially hammer a nail in the very center of both the lower and upper frames.
- This is the axis from where we can measure out the distances along the spokes for the tabletop seat board and the seat board placement.
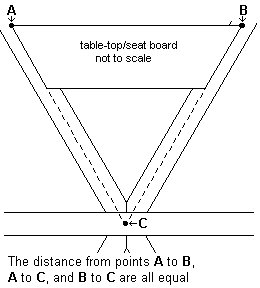
The equation
When any tabletop or seat board is in place, the length of that board should be the same as the distance from the outside ends of the board to the center of the frame (the axis nail).
In effect, each board forms one side of an equilateral triangle.
Fix the rest of the seat boards
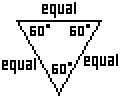 An equilateral triangle
An equilateral triangle has three equal sides, and three equal angles, always 60°.
An equilateral triangle has three equal sides, and three equal angles, always 60°.
So, armed with the above information, position the first board.
Ft and inch version:
- The first seat board is 50 3/4″ long. Therefore each end of the board should be 50 3/4″ from the axis (center of the frame). Also, each end of the board should be aligned to the middle of a spoke.
- When you have achieved that, you have created an equilateral triangle, and the spread of the spokes will be 60°.
- Partially whack a nail in both ends of the first board, just to hold it in place for the time being.
Metric version:
- The first seat board is 1322mm long. Therefore each end of the board should be 1322mm from the axis (center of the frame). Also, each end of the board should be aligned to the middle of a spoke.
- When you have achieved that, you have created an equilateral triangle, and the spread of the spokes will be 60°.
- Partially whack a nail in both ends of the first board, just to hold it in place for the time being.
Step 6: Fix the rest of the seat boards
- Position the other five (1322mm or 50 3/4″) long boards to complete the first round.
- Ensure the boards are the same distance from the center and all joins are in the middle of the spokes, and then drill and nail them securely in place.
- You can now fix metal strap to the top side of the spokes at the junction over the center of the frame.
- Now begin the next round of seat boards. Place one (1149mm long or 44 1/16″ long) in position just to check that it is the correct length. If so, cut the other five, position them in place around the frame, and then drill and nail them to the spokes.
Fix the tabletop boards
Step 7: Fix the tabletop boards
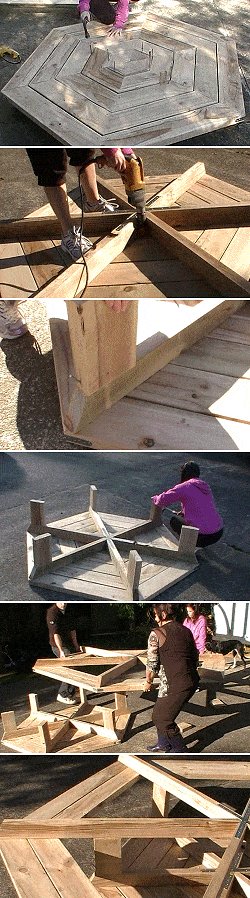
- Fix the tabletop boards to the upper frame in the same manner as the seat boards were fixed to the lower frame in steps 5 and 6.
- Once the outside run of boards is fixed in place and the rest of the boards have been cut, lay them in place, row by row.
- Use wedges or packers between the gaps if necessary, to help position and hold the boards in place until nailed.
Step 8: Drill the umbrella hole
- Turn the tabletop unit upside down.
- Drill a hole through an innermost tabletop board as close as possible to the junction where the spokes join.
- Use a 40mm or 1 1/2″ (or there about) drill bit, but check your umbrella first, just in case it has a larger than normal diameter pole.
- Do not drill all the way through – drill just until the point of the drill breaks slightly through the board.
- You can complete the hole from the other side when the table is turned upright.
- Drilling through both sides should help prevent the possibility of tearing around the edges of the hole.
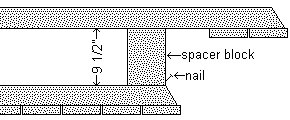
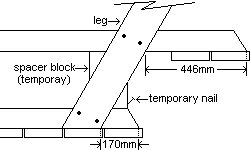
Step 9: Add temporary spacers
- The purpose of the spacer blocks are to hold the upper and lower frames apart at the correct distance until such time as the legs can be fixed in place.
- The upper frame is currently sitting on the ground in the upside-down position.
Ft and inch version:
- According to the plans, the distance between the upper frame and lower frame is 9 1/2″.
- Therefore the spacer blocks will need to be 9 1/2″ long.
- Cut six spacer blocks 9 1/2″ long out of 1 1/2″ x 5 1/2″ wood.
- Temporarily nail the spacer blocks to the ends of the upper frame (tabletop) spokes.
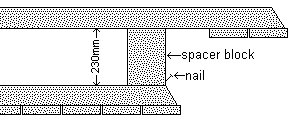
Metric version:
- According to the plans, the distance between the upper frame and lower frame is 230mm.
- Therefore the spacer blocks will need to be 230mm long.
- Cut six spacer blocks 230mm long out of 145mm x 45mm wood.
- Temporarily nail the spacer blocks to the ends of the upper frame (tabletop) spokes.
Align the upper and lower frames
Step 10: Align the lower frame
- Lift up the lower frame (in upside-down mode) and place it carefully on top of the spacer blocks.
Ft and inch version:
Metric version:
- All the spokes of the lower frame should be directly above the spokes of the upper frame.
- Don’t forget, the whole thing is upside down at this stage. That is why the upper frame is lower, and the lower frame is upper.
Ensure that the lower frame overhangs the spacer blocks evenly all the way around.
Now you are ready to fix the legs in place.
Cut and fix the legs to the spokes
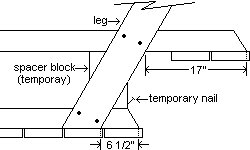
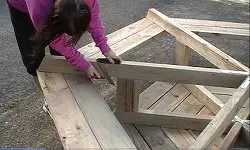
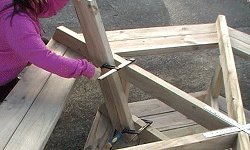
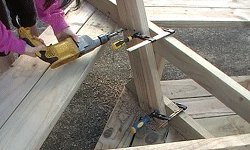
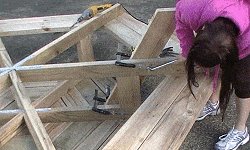
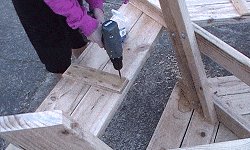
Step 11: Cut and fix the legs to the spokes
Ft and inch version:
Cut six legs out of 1 1/2″ x 5 1/2″ stock to the dimensions given in the drawing below.

Metric version:
- Cut six legs out of 145mm x 45mm stock to the dimensions given in the drawing below.
- Fix the legs to the spokes using the pictures below for guidance.
Ft and inch version:
Metric version:
Picture 1. The dimensions, with the table upside-down.
Picture 2. Mark where the legs are to go. Refer to Picture 1. for placement.
Picture 3. Clamp the legs in place.
Picture 4. Drill the holes for the bolts.
Picture 5. Put in the bolts, add a washer per bolt, tighten the nuts, and take off the clamps.
Picture 6. Cut six strips of 18mm thick plywood about 100mm wide by 300mm long. Then glue and screw them to the underside of the seat boards for added strength.
Drop in the umbrella
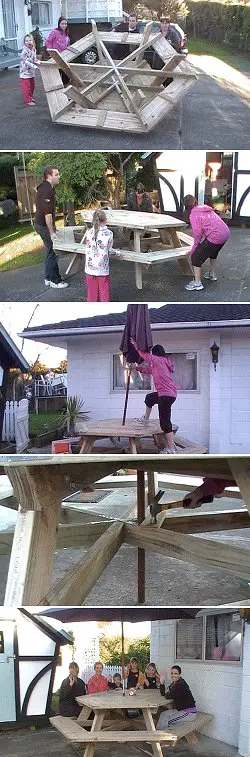 Step 12: Drop in the umbrella and enjoy!
- Kick out the spacer blocks.
Well, that’s pretty much done apart from the umbrella, and of course it is still upside down.
“Mmmmmmmmm. What will we do?”
“I know…. We’ll turn it up the right way.”
“Good thinking. There! Now let,s move it over there.”
“No. Move it a bit that way.”
“No. This way.”
“I’ve got all the weight.”
“Owwww, my foot.”
“If you do more lifting and less moaning, maybe we’ll get it in place sometime this year.”
- Anyway, once in position, pop the umbrella into the hole in the tabletop.
- Then position a piece of board against the pole underneath the table and nail it to the lower frame spokes.
- Allow a little bit of play. If the board is too hard against the umbrella pole, you will never get the umbrella out.
Done!
If you decide to have a go at this project, we’d love to get your comments and photos of your handiwork.


Great plan for a picnic table.
I used treated deck boards for the top. The last board needed to be ripped and rounded over with a router, but it kind of adds a trip effect to the finished project.
Also securing the spokes of the table to a piece of plywood prior to installing the seats or tops helps to ensure they will stay in place during construction.
The distance between spokes is equal to the radius of the table. My kids love the large table.
The extra blocking on the lower spoke and blocking under the table allowed drilling a hole for and umbrella.
Robert Boone
Love my table…of course there were some modifications.
First the size had to be reduced to fit comfortably on our deck. Away with the bench seats and the outer 2×6 ring was changed to 2×4.
As a first time miter saw user I had some difficulty with the upper frame bevel cuts. ( I don’t believe the Imperial dimensions for the long face (1 3/4″) are correct for dressed lumber.) So I cut six 15″ gussets/spreaders and installed them between the upper frame arms to assure 60 degree angles before assembling the frame and nailing the upper metal straps.
The spreaders also served as a “backstop” for the 2×6 legs which were installed inside the spreaders.
This eliminated the lower frame and also kept the feet inside the table perimeter for safety (tripping that is… you’d appreciate that if you knew the condition my guests sometimes manage to achieve.)
The 7″ inner triangles ended up with a truncated tip also due to the dressed size of the lumber. So, if I had to have a plug it may as well be substantial. Three rings of 2×2 (1 1/4 x 1 1/4 dressed) were added and a scrap piece of 2×6 was cut for the hexagonal center. This I think added an interesting architectural relief to the table.
Lastly, because these inner pieces float, and my grandchildren love puzzles, I carefully numbered them on the bottom.
Thank You, Kent
North Carolina
This plan makes a beautiful table!
I’m a math teacher and I used your plan for a summer project for some of my 8th grade students who were willing to come up to school for 3 weeks to learn and work.
This table will go in next to our school’s garden beneath a tree.
There were plenty of lessons on fraction and decimal conversions, angle measurements, equilateral triangle and trapezoid characteristics, and we even used the Pythagorean Theorem to figure out if we could fit the completed table out of our school’s courtyard doors once complete.
Three things I would do differently if I were to build another one:
1) It seems like the seats are too low to the ground by an inch or so.
2) I would use crates or car jacks to set the seat frame- this was, by far, the most difficult part.
3) The stain we chose seems to be too dark for pine.
Three things we modified from the plan:
1) If you build according to the plan then you will have half inch gaps in between the trapezoids on the table top because the wood you actually buy isn’t 6 inches wide- it’s more like 5.5 inches…so we re-calculated and drafted a table top with no gaps and brought the seats in closer a bit
2) we used 1×6 lumber instead of 2×6 for the table top surface to make the table lighter.
3) We added chunks of 2×4 for seat support at the end of the lower frame pieces.
4) We took the recommendation of someone else on this site and cut our frame pieces in 60 and 120 degree angles.
Total cost in material = $170
Total time to build (with students and teaching them etc.) = 35 hours
Many thanks!
Ingrid Ristroph
Martin Middle School in Austin, Texas
Thanks for the plans. My wife is very pleased with the result.
Regards,
Mark Edwards, Worthing, England
This table was very easy to build. I originally made all my cuts with a circular saw but I got worried that my angles weren’t true so I went back and made all the cuts with a miter saw. You have to flip the board over to cut the last tiny bit on your 2×6’s but it made for a very clean cut. This was a Christmas gift for my mother and she loved it. Thanks for such a great free site.
Ben Davidson
That was a great plan!!! Everything was exact except for my chop saw. It slipped a little during my cuts for the table top, but everything turned out fine. Thanks a lot for this site of free plans. I live in Canada and it cost $150 to build. A lumber store in the area had a much smaller one for $149. This one gives you lots of leg room. Thanks Again.
Corey and Lynne
The hexagon picnic table is a great project… easily seats a large number of adults. Ours takes a lot of abuse.
Recommendations would be to double up the seat supports by sistering a second 2x and using 2×6’s for the legs instead of 2×4. We priced #1 cedar and composite and found the cedar to be very affordable – total price with hardware was $250 US. Snowcat
It is a great bbq table to sit at. We easily fit 6 adults and 3 children around it. Was unable to source the 150 x 40 at my timber yard (had to order specially and more expensive)so used 150 x 50 which made the table heavier (It is not one to move too often). Also used 100 mm flatheads as they didn’t have 90 mm either. I think the h4 and h3 are around the wrong way in the description. A drop saw is quite useful for this project to get the angles right. Still with one I spent about 5-6 hours cutting and measuring (may be I’m slow). Putting together it helps to have 2 people as the seat and table sections are heavy. Found that car jacks were useful for getting the seat section at the right height. Could cost more than $300 for the materials. Paul
You probably won’t see more modifications made to a set of your freebie plans than this project.
I’ve always liked this table design but what suited my requirements was just the table (minus the benches) and provision for an umbrella. The former wasn’t all that difficult to figure out… switch the frames over and lose the seating “gap” allowance from the dimensions. Finishing with a centered space for an umbrella in both frames was a bit more tricky but achieved by reinforcing stringers bridging the gap left when breaking the two long 2×4 frame members.
The metal strapping had to go but was replaced by screws, glue, bolts and quite a few pocket hole joints. A bonus provided by the use of these extra stringers was being saved the 90″ cuts and only having 120″ ones throughout.
All in all a fun project that combined a good set of plans with some interesting brain work as well. I’ve already received many compliments for a patio table with a unique design…
Brian Hughes
This is my third Buildeazy project. I am so happy I found this site. I was an absolute beginner in woodworking. Our farm allows me to build quite large projects. My first was a chicken coop. My sister purchased the ad-free plans for me and we are more than happy to help support such a great site.
Recently I finished a hex picnic table for my sister (Nana) and my two great-nephews! It will have many uses as you can see.
Again I purchased the downloadable ad-free, easy to follow plans.
I made the frame out of SPF and the seats and top out of cedar. I’m so pleased with the table but, man, is it heavy!! I had to assemble it in place.
Kelly
Here’s another hexagonal table made of knotty cedar – the third I have built as a donation for the Otto Specht School in Chestnut Ridge, NY.
This one took me two days with very little scrap wood left over.
The plans show lengths of each piece, but don’t calculate the actual amount of number you will need.
This might be helpful when you go to buy the wood if you want to minimze waste – and cost:
2×4 – 3 @ 10′, 3 @ 8′; 2×6 – 5 @ 10′, 5 @ 8′, 7 @ 6′.
Instead of the plywood the plans call for under the seats, I used the 9.5″ temporary braces used when attaching the legs.
It saves on wood, and is pretty invisible if you cut the ends facing outside at a 30 degree angle.
I believe the cedar braces will last longer than plywood.
Instead of nails, I used 2.5″ construction screws and filled the holes with plastic wood.
The screws are quicker, stronger, and cleaner than nails.
I used teak oil after sanding to 220 grade with an orbital sander (80 – 150 – 220).
The tables I made last summer still look like new!
Now that I have the routine down, I know I can build the next one in a day, including pickup of lumber, screws, straps, and carriage bolts (I use 3/8″ diameter and 2.5″ length).
Bill Kelly
I wanted to send a couple of pictures of our hexagonal picnic table we built using your on-line plans, along with some verbiage you can post, if you wish. Thanks for making them available!
===================
Thanks for making the plans available. Here are a couple of pictures of the table at various stages. Hopefully, they will be helpful for someone else who decides to build it. Overall, it probably took us 4 – 5 hours to cut everything and put it together.
Total cost for all materials at the time we built it was about $200. I ended up using 3″ Deck-Mate screws for everything instead of nails and also put a piece of angled 2×4 under the middle of each seat instead of a piece of plywood.
Ryan Parmenter
Thanks for these plans… Made this (amended) version using re-cycled timber for the tabletop. Three tables in one?
– Basic garden table
– Table with removable inserts in place
– Existing umbrella accommodated by removing one section.
Rod Stebbing
Here is my take on the hexagonal picnic table. I had 3 solid weekends in the shop to build this one.
Ed Deford
Attached you will find two photos of the 4 hexagon picnic tables we built for my son’s Eagle project. It took me about a week to cut and stain the wood and then one day (with a lot of help) to put them together.
Mike G
Enclosed is a photo of my table using your plans with a few modifications. Thanks for the help to build a lifetime of enjoyment.
It took me a whole year to make my hexagon picnic table. I needed the proper tools, time,and the weather here has been rain,rain,and rain.
I covered it up for the winter then restarted working back on it beginning of spring.
I messed up a couple of times on several different spots. This project wasn’t as easy as it looks to make. I followed the instructions i saw on your website. Everything worked out just fine.
I sanded off all the boards,hosed off the whole table with an air hose to rid of the dust, and finally I used water proofer with honey gold stain mixed in for the finishing touch.
I think it looks alright. My neighbor still doesn’t believe I made this all by myself,but I did.
ty for the instructions guys! Of course adding an umbrella makes it look even more slick.
Northern Ohio,
I built this table back in July for my wife’s birthday, she was extremely happy as this is a plan she picked out for me to build for her.
I worked on this project off and on for three days, I have a large stack of treated lumber but only had 2×8’s so i ripped each and every board to the 2×4’s needed for the spokes and the 2×6’s needed for the seat and top boards. I chose to use 2×6’s for the legs because of the weight factor and to maximize the life span of the table.
I built this with the old plan and did have trouble understanding the directions for the angles on the spokes, but after some trial and error and a few misscut boards i figured it out. I did decide to use an 18″ circle of 3/4 plywood underneath the bottom spokes with glue and screws for strength and i also added 2×6 runners cut on the same 30 degrees underneath the center of the seats for better support. if you look at the picture you can see the circle underneath as well as the additional runners underneath the center of the seats.. the entire table was put together with 3″ wood screws and is solid as a rock, it is also extremely heavy and I am sure it will be in our backyard for many years to come..
Charles Medlin Rockwood, Tennessee
Here is a picture of the tables I referenced in my comments on your web site.
Bill Kelly
Hi there.
Attached find pic of my hexagonal picnic table, made per your instructions. Could not be happier. Rock Solid, comfortable.
I don’t remember if it said this in the instructions, but if it doesn’t, you should remind all the dum-dums (e.g., ME) to buy GALVANIZED nails/screws. Genius McGee over here bought the indoor kind and, sure enough, they are rusting already. Hopefully, when I sand and stain/seal it, it will help keep the rusting to a minimum.
One other thing I would recommend is changing the length of the carriage bolts suggested. 4-1/2 inch long bolts leaves a lot of excess threading, which people could snag their thighs on getting up.
I will definitely be coming to your site in the future.
Great design, love the table! Thanks guys!
Dan Wiley