
Contents
Introduction
Board-and-batten shed plans, drawings, instructions
Similar articles: Narrow shed | Tudor style shed
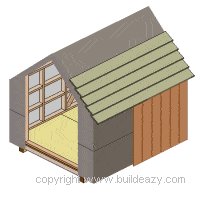
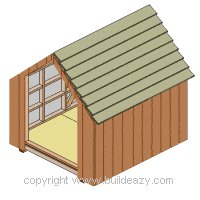
This article contains plans, drawings and step-by-step instructions for a 2100mm x 2400mm (7ft x 8 ft) Board-and-batten Shed. Contents at bottom of page.

- Pay online by credit card, debit card, or Paypal using Secure Server Paypal. You do not need a Paypal account if paying by credit or …
|
This sturdy shed is constructed of 100×50 (2×4) framing and board-and-batten siding. The same boards that clad the walls are also used to clad the roof.
The footprint (ground area) is 2100mm (7ft) wide and 2400mm (8ft) deep.
The shed stands 2700mm (9ft) high at the apex which is the highest point, and tapers down to 1400mm (4′ – 8″) high at each side.
Double doors with a 1300mm (52″) wide opening allows for easy access into the shed.
The structure sits on skids, thus making the shed relocatable.
The dimensions in this detailed plan-set are in both metric and imperial. All measurements are given first in millimeters followed by feet and/or inches in brackets.
The step-by-step instructions are accompanied by drawings for easier understanding.
To begin building your Board-and Batten Shed, skim thru all the pages to get a feeling of the project and then start at the Instructions page.
The ‘Parts List’ below gives lengths of individual pieces. For overall quantities and all other materials go to the Shopping List
Note 1: All dimensions are given in both metric and imperial. Measurements are given first in millimeters followed by ft and/or inches in brackets.
Note 2: The size (width and thickness) of the lumber referred to in the ‘Parts List’ below is the nominal size. Because most framing lumber is dressed or seasoned the actual size of the lumber will be less than the nominal size.
For example: 100×50 (2×4) lumber when dressed or seasoned will have an actual size of approximately 90×45 (1 1/2″x 3 1/2″).
The measurements given in all the plans in this project are the ‘actual sizes’.
The Parts List
| Part ID/Size | For | Amount and Lengths | Comments |
| Floor and Sub-floor | |||
| [a] Skids 100×100 (4×4) | Under floor | 2 pieces 2400mm (96″) | Treated |
| [b] Joists 100×50 (2×4) | Floor frame | 9 pieces 2010mm (81″) | Treated |
| [c] End joists 100×50 (2×4) | Floor frame | 2 pieces 2400 (96″) | Treated |
| [e] Floor panel 18mm (3/4″) plywood | Floor | 2 pieces 2100×1200 (4ft x 7ft) | Treated. Cut from standard 2400×1200 (4ft x 8ft) shts |
| Frame: Wall and Roof | |||
| [f] Bottom plates 100×50 (2×4) | Front/rear walls | 2 pieces 2100mm (84″) | |
| Side walls | 2 pieces 2220mm (89″) | ||
| [g] Top plates 100×50 (2×4) | Side walls | 2 pieces 2220mm (89″) | |
| [h] Studs 100×50 (2×4) | Side walls | 10 pieces 1175mm (47 5/8″) | |
| Front wall | 2 pieces 1200mm (48″) 2 pieces 1500 (60″) | Cut 45° angle one end of all front wall studs | |
| Rear wall | 2 pieces 1200mm (48″) 2 pieces 1500 (60″) 2 pieces 1950 (78″) | Cut 45° angle one end of all rear wall studs | |
| [i] Trimmer studs 100×50 (2×4) | Front wall | 2 pieces 1480 (59 3/4″) | Cut 45° angle one end of both trimmer studs |
| [j] Apex Block 100×50 (2×4) | Apex Block | 1 pieces 300 (12″) | Cut 45° angle to suit |
| [k] Blocking 100×50 (2×4) | All walls | Cut to suit. Approximately 18m (60ft) altogether. | |
| [l] Raking Top Plate 100×50 (2×4) | Front and rear walls | 4 pieces 1530mm (61 3/16″) | Cut 45° angle both ends |
| [m] Raking header 100×50 (2×4) | Front wall | 2 pieces 1040mm (41 5/8″) | Cut 45° angle both ends |
| [n] Ridge blocking 100×50 (2×4) | Ridge | Cut to suit. Approximately 2100mm (84″) altogether. | |
| [0] Brace blocking 100×50 (2×4) | Rear and side walls | Cut to suit. Approximately 5.5m (18ft) altogether. | |
| [p] 30mm (1 1/4′) wide galvanized metal strap ties | Tie raking top plates and rafters together | 7 pieces 300mm (12″) | |
| [z] Rafters 100×50 (2×4) | Roof | 10 pieces 1485mm (59 3/8″) | Cut 45° angle both ends |
| [z1] Collar ties 100×50 (2×4) | Roof | 5 pieces 800mm (32″) | Cut 45° angle both ends |
| Exterior Cover: Siding and Roof | |||
| [q] Building wrap / Builders felt | Wrap frame | 22 sq meters (230 sq ft) | |
| [r] Vertical boards 250×25 (1×10) | Siding | 50 meters (164 ft) altogether | |
| [s] Vertical battens 75×25 (1×3) | Siding | 50 meters (164 ft) altogether | |
| [t] Trim 100×25 (1×4) | Exterior corners and around door opening | 10.5 meters (35ft) altogether | |
| [u] Roof sheathing 12mm (1/2″ plywood) | Roof | 4 shts 1500mm x 1200mm (4ft x 5ft) | |
| [v] Roof boards 250×25 (1×10) | Roof cover | 16 pieces 2400mm (96″) | |
| [w] Galvanized L shaped ridge flashing | Roof ridge | 1 piece 2400mm (96″) | |
| [x] Rake boards 150×25 (1×6) | Gables | 4 pieces 1800mm (72″) | |
| [y] Rake caps 100×25 (1×4) | Cables | 4 pieces 1800mm (72″) | |
| Door | |||
| [d1] Slats 150×25 (1×6) tongue and groove | Door | 10 pieces 2250mm (90″) | |
| [d2] Braces 100×25 (1×4) | Door bracing | 9.5 meters (32ft) | |
| [d3] Astragal 50×25 (1×2) | Door | 1 piece 2250mm (90″) | |
| [d4] Stop 50×25 (1×2) | Door stop | 5 meters (17ft) | |
| [d5] Hinges 150mm (6″) “T” hinges | Doors | 6 of |
Plans, Layout
The drawing below shows the shed floor layout (fig.1), the shed roof layout (fig.2) and the wall stud placement (fig.3).
There are some explanatory notes below the drawing.
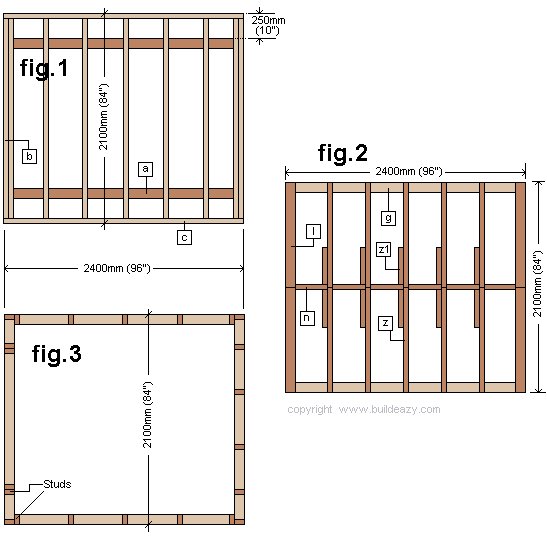
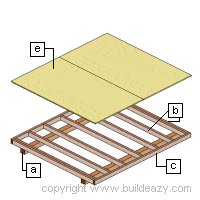
fig.1 – Floor layout
- The floor layout plan gives the overall dimensions of the floor frame.
- The floor frame is constructed of 100×50 (2×4) joists [b] and end joists [c] and sits on 100×100 (4×4) skids [a].
- All floor frame lumber should be treated or otherwise suitable for exterior use.
- Individual member lengths are given in the Parts List.
fig.2 – Roof layout
- The shed roof layout plan gives a birds-eye view of the roof frame layout. The members shown in the roof frame plan are the side wall top plates [g], the front and rear wall raking top plates [l], the middle rafters [z], the collar ties [z1] and the ridge blocking [n].
- All the members in the roof frame are 100×50 (2×4) stock.
- Individual member lengths are given in the Parts List.
- Drawings showing individual member lengths and angle cuts are below in the Plans section, (Front and Roof Plans)
fig.3 – Stud layout
- The shed stud layout plan gives a birds-eye view of the wall stud layout.
More detail, placement measurements as well as individual member lengths and angle cuts are shown below in the Plans section, (Front and Roof and Rear and Side Plans)
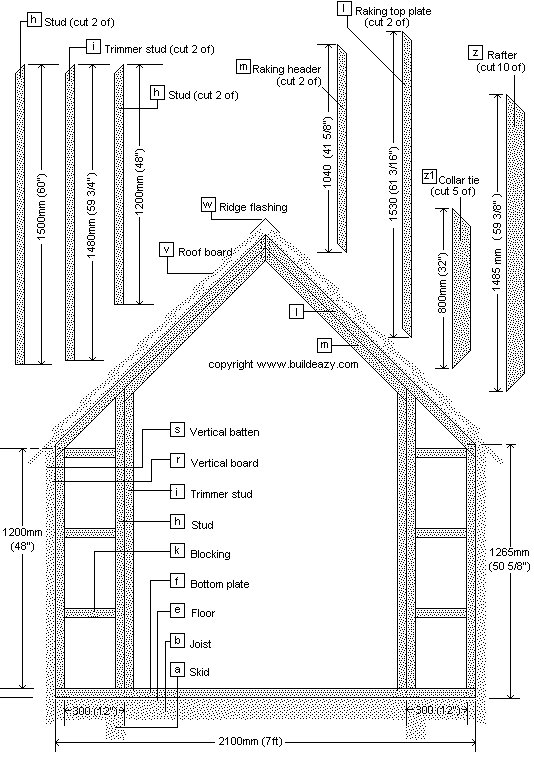
Plans, Front and Roof
Here’s the front wall frame with all necessary dimensions. There are also drawings of individual wall frame members and roof rafter members showing angle cuts and lengths.
All frame lumber is 100×50 (4×2) stock and all angle cuts are 45°
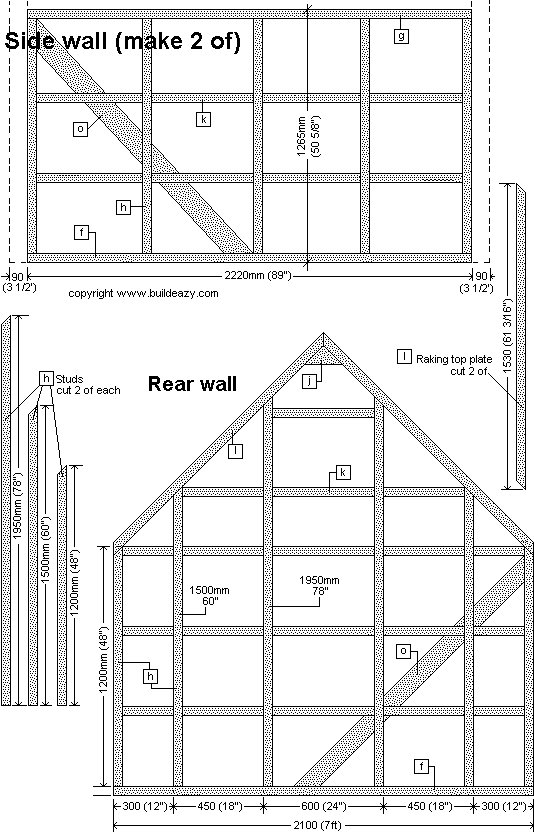
Plans: Rear and Side Frames
Plans: Identifying the Members
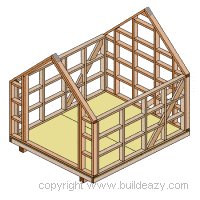
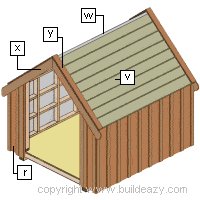
Below is a drawing identifying most parts of the shed. There is a parts description below the drawing and also individual member lengths are given in the Parts List in this article.
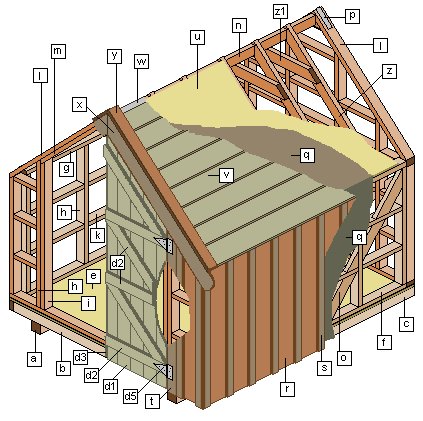
[a] Skid [b] Joist [c] End Joist [e] Floor [f] Bottom Plate [g] Top Plate [h] Stud [i] Trimmer [k] Blocking [l] Raking Top Plate [m] Raking Header [n] Ridge Blocking [o] Brace Blocking [p] Metal Strap [z] Rafter [z1] Collar Tie [q] Building Wrap / Builders Felt [r] Vertical Board [s] Vertical Batten [t] Trim [u] Roof Sheathing [v] Roof Board [w] Ridge Flashing [x] Rake Board (Rake Board) [y] Rake Cap [d1] Slat [d2] Brace [d3] Astragal [d4] Stop [d5] Hinge
Instructions:
Step 1: Get an understanding of the project
- It is easier to take on a project armed with a good understanding of exactly what is involved.
This is best achieved by first reading through the content to get familiar with all the terminology and procedures and to get an overall ‘feeling’ for the project.
The content includes plans, nailing information, shopping list and glossary which is an alphabetical list of words or terms used within this project and their meanings. - Info: This project is in both metric and imperial. All measurements are given in millimeters (mm) first, followed by feet and/or inches in brackets.
- The metric sizes are not an exact match to the equivalent imperial sizes. A shed built using the metric measurements will be approximately 1.6% smaller than a shed built using the imperial (ft and in) measurements. The imperial measurements are more suited to North America. The metric measurements are more suited to Australasia.
Step 2: Making The Floor
Note: All lumber used for the floor frame should be suitable for exterior use.
- Position the two skids [a] level and parallel on firm ground free of any vegetation.
- Space the skids apart so that (inside) measurement from skid to skid is 1400mm (56″).
- Make up the floor frame consisting of 9 joists [b] and 2 end joists [c] to the dimensions as shown in the Floor Plan.
- Use a hard level surface such as a concrete drive or garage floor as a work area.
- Use the Floor Plan for layout reference and the Parts List for individual member sizes and lengths.
- The finished floor frame should be a rectangle 2100mm x 2400mm (7ft x 8ft).
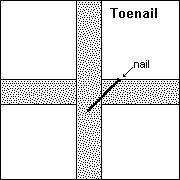
- When the floor frame is made, position it in place on top of the skids. Ensure the floor frame is a true rectangle (all corners are 90° / right angles) and then fix it to the skids. Toenail (angle nail) thru the joists into the skids.
- Fix the 18mm (3/4″) plywood sheets [e] to the floor frame. Use 60mm (2 1/2″) galvanized nails to fix the plywood floor to the floor frame nailing 150mm (6″) apart along the seams (where the sheets join) and a maximum of 200mm (8″) apart around the perimeter and along all intermediate joists .
Step 3: Making the Shed Wall Frames

- The board and batten shed has four wall frames which are the front frame, rear frame and two side frames.
- Cut all the 100×50 (2×4) wall frame members (studs, plates etc) to the lengths given in the Front Wall Plan and the Rear and Side Wall Plans.
- Cut the longest pieces first to minimize wastage.
- The studs in the front and rear walls are all varying sizes and the tops have angle cuts at 45°.
- The raking top plates and raking headers have 45° angle cuts at both ends.
- Refer to the Front Wall and the Rear and Side Wall plans for layout and member placement and the Parts List for individual member sizes and lengths.
- Make each wall frame up separately on a flat even surface.
Step 4: Standing the Frames
- Lift the four shed frames upright onto the floor and nail them together at the corners ensuring that the corners of the frames are flush.
- Position the wall frames on the floor so that the outside edges of the bottom plates are flush with the outer edge of the floor.
- Commence nailing the bottom plates to the floor beginning as close as possible to the corner studs at all four corners and then continuing the rest of the way along the plates but DO NOT NAIL the bottom plate in the door opening as that part is to be discarded.
- Cut out the bottom plate in the door opening with a hand saw.
- If the wall frames were made square and the floor is level, then the frames should automatically be plumb (vertical).
Step 5: Doing the Roof Frame
- Cut 10 rafters [z] and 5 collar ties [z1] to the lengths and with the angle cuts as shown in the Front and Roof plan.
- Make up 5 rafter frame sets with each set containing a pair of rafters and a collar tie as shown in the drawing below.
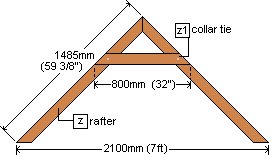
- Bolt the collar ties [z1] to the rafters [z] with 10mm (3/8″) galvanized carriage bolts that are long enough to go thru both collar tie and rafter.

Info: The purpose of the collar ties are to stop the rafters from spreading under weight and forcing the side walls out. This is more crucial if the roof is not covered with sheathing. However, in this particular project the roof is fully covered with sheathing and because the pitch of the roof is 45°, not only does the sheathing brace the roof but also does the same job as the collar ties.
Instructions continued:
Step 6: Putting on the Roof Sheathing
- Cover the roof area with 12mm (1/2″) plywood. You will need four sheets cut at 1500mm x 1200mm (4ft x 5ft), two each side of the roof.
- Make the plywood flush with the top of the ridge, the outside edge of the side walls and the outside edge of the front and rear walls. Nail a maximum of 200 (8″) apart along the ridge blocking [n], the rafters [z], the raking top plates [l] and the side wall top plates [g].
- Ensure that the middle join is on a rafter. Use 50mm (2″) galvanized nails.
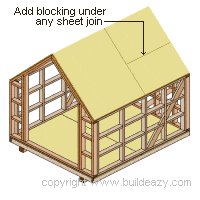
Note: If using plywood sheet off-cuts it will be necessary to add blocking between the rafters where any joins occur.
Step 7: Putting on the Wrap and Roof Boards
- Cover the shed frame in building wrap or builders felt. Make the wrap taut and waterproof and hold in place with staples or small flathead nails.
- Cut 16 lengths of 250×25 (1×10) roof boards [v] at 2400mm (8ft) long.
- Start on one side. Have the first (lower) board overhang the side wall by half of its width and nail it in place. See fig.2 below.
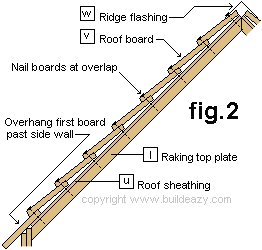
- Work upwards overlapping each board by 50mm (2″). Nail thru the boards where they overlap at points along the lines of the rafters [z] and raking top plates [l] using 90mm (3 1/2″) galvanized nails. See fig.2 above.
- Do the same on the other side of the roof.
Step 8: Putting on the Vertical Boards
- Fix the 250×25 (1×10) vertical boards [r] to the wall frames beginning at the corners.
- On the side walls cut the vertical boards at a length long enough to tuck under the lower overhanging roof board [v] and run below the floor joists.
- On the font and rear walls cut the vertical boards at a length long enough to be flush with the top of the raking roof and run below the floor joists. The tops of the boards will need to be cut on a 45° angle to match the rake of the roof.
- Nail all vertical boards [r] to the horizontal blocking [k] with nails spaced approximately 75mm (3″) apart including the nail that will be going through the batten. Leave a gap about the width of a nail shank between each board.
Step 9: Put on the Trims, Flashing and Battens
- Cap the top roof boards with a piece of L-shaped galvanized flashing [w] running the length of the ridge. Ideally the ridge flashing should be wide enough to cover at least 100mm (4″) along each plane (side) of the roof. (See fig.2)
- Cut 4 lengths of 150×25 (1×6) rake board [x] at 1800mm (6ft) long.
- Make a 45° angle cut at one end and make a round cut at the other end on all 4 boards.
- Fix the rake boards [x] to the tops of the vertical boards [r] at both front and rear gables. Ensure the top edges of the rake boards are flush with the top of the roof boards [v].
- Add the 100×25 (1×4) rake cap [y]. Miter the top end of each length of rake cap at a 45° angle. The rake cap sits on top of the rake board [x] and covers the ends of the roof boards [v].

- Fix the 75×25 (1×3) vertical battens [s] over each vertical board join. Preferably, the battens should have a groove each side of the join to stop water being drawn in by capillary action.
- Nail on the center line of the vertical batten, thru the gap between the vertical boards and into the blocking. Overlap battens at corners using 75×25 (1×3) batten on one side of each corner and 100×25 (1×4) trim on the other side.
- Using one length of 100×25 (1×4) stock and one length of 75×25 (1×3) stock at each corner will give a balanced look. (see fig.3).
The Door: Making a Door
- It is more common than not when making a shed door to fix the bracing on the inside. However, by fixing the bracing to the outside of the door as done in this project, does have its advantages.
- 1.) It makes for a neater door stop finish. The door stop is a strip of wood or a small batten that is attached to the door jambs on both sides and on top of the door thus stopping or limiting draught and/or rain.
- 2.) It makes for a neater astragal finish. The astragal is the molding that covers the gap between a pair of doors when closed. The astragal is fixed vertically to the back of the outer edge on one of the doors. It also stops or limits draughts and rain.
- Also… Hinging the door/s to the surrounding trim (door casing) allows for the doors to be opened right back 180•
Lumber
- Use 150×25 (1×6) tongue-and-groove lumber for the vertical door slats and 100×25 (1×4) for the door bracing.
- Use a lumber suitable for exterior applications such as cedar or treated pine.
Making a Door Instructions
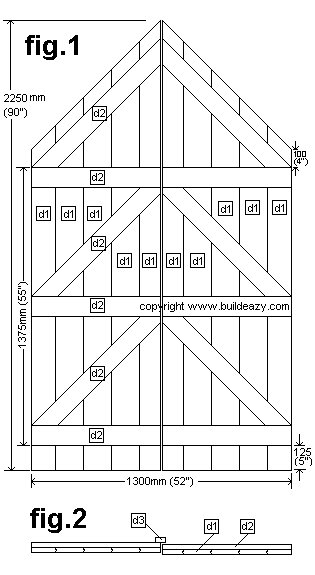
Step one:
- Cut 10 T&G (tongue-and-groove) door slats [d1] 2250mm (90″) long.
Step two:
- On an even surface join five slats [d1] together with the face (best side) up forming a rectangular panel.
- The width of the rectangular panel will be wider than the required door width at this stage.
Step three:
- Cut three pieces of 100×25 (1×4) horizontal braces [d2] the same width as the rectangular panel, arrange them in their right places and screw them to the door slates. Refer to fig.1 for the placement of the horizontal braces.
- Use wood screws suitable for exterior use and of a length just slightly less that the thickness of the brace and slat combined.
Step four:
- Turn the rectangular panel over. Measure and mark the required door width central on the panel and cut off (rip down) the excess each side.
Step five:
- Cut off the top 45° corner.
Step six:
- Turn the panel over. Measure, mark, cut and screw in place the three 100×25 (1×4) angled braces [d2].
- Door one is finished.
Step seven:
- Make a second door the same as the first by repeating steps two-thru-six and use fig.1 for reference.
Note: Make the second door a mirror image of the first, that means that the top 45° corner on the second door will be opposite to that of the first.
- Use the fig.1 dimensions as a guide only. The exact door measurements should be taken from the door opening (rough opening) in the wall frame once the shed shell (frame, siding, roof) is complete. Allow 6mm (1/4″) gap between the door and frame all the way around and between the two doors.
Step eight:
- Add the hinges to the horizontal braces on the doors and then ‘hang’ the doors in place by fastening the loose ends of the hinges to the trim surrounding the door opening.
Step nine:
- Fix 50×25 (1×2) molding (door stop) to the jamb around the inside perimeter of the door/s to cover the gap between the door edge and the jamb.
Note: Do not fix the door stop tight against the door on the hinged side. A little bit of play is needed to ensure the edge of the door does not bind against the door stop when the door is being opened or closed.
Step ten:
- Fix a length of 50×25 (1×2) wood [d3] (the astragal) vertically half-on to the back of the outer edge on one of the doors. (see fig.2)
Step eleven:
- Add the slide bolts and latch set.
Final note. Wind: It is presumed that this shed will be tucked away in a sheltered part of the back yard without any real concern about the wind, and because it is a heavy and solid structure, it is highly unlikely that it is going to blow away under normal conditions.
However…..
If the shed is situated in a windy area and there are concerns, then additional securing measures should be taken. The shed will need to be fastened against uplift.
1.) Concrete a pile or post into the ground under each corner of the shed and fasten to the bottom plate with a metal strap or similar type of fastener.
2.) At each corner fasten the bottom plate to the stud with a metal strap or similar type of fastener.
3.) At each corner fasten the stud to the top plate with a metal strap or similar type of fastener.
Nailing and Fastening Information
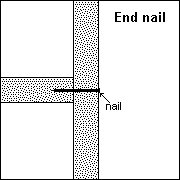
For the most part of this project galvanized common nails can be used. A common nail has a flattish round head about twice the diameter of the nails shank that is clearly visible after the nail has been driven home.
However, If you prefer a finished external wall covering (siding) that does not display any nail heads then a nail such as a ‘brad’ that can be set (punched) in to the wood and covered with putty or filler will need to be used.
The Frames

- Use 90mm (3 1/2″) galvanized nails for all wall and roof framework. Use 2 nails at each meeting.
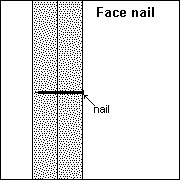
- Most nailing options are obvious. Where possible face nail and end nail. For example, end nail all plates to studs. When it is not possible to ‘end nail’ such as with a row of blocking between studs, then the only option is to toenail.
The Floor
- Use 90mm (3 1/2″) galvanized nails to construct the floor frame and to ‘toenail’ the joists to the skids.
- Use 60mm (2 1/2″) galvanized nails to fix the plywood floor to the floor frame nailing 150mm (6″) apart along the seams (where the sheets join) and a maximum of 200mm (8″) apart around the perimeter and along all intermediate joists .
The Rafters
- When the rafters are made up according to plan and fixed in position on the sidewall top plates, secure against uplift by nailing a hurricane tie to the bottom of each rafter and the top plate as shown in the drawing. Use eight 38mm (1 1/2) galvanized flathead nails per hurricane tie or special product nails that may come with the purchase of the hurricane ties.
Roof Sheathing
- Use 50mm (2″) galvanized nails. Nail a maximum of 200 (8″) apart along all rafters, raking top plates, top plates and ridge blocking.
Vertical Boards
- Nail the boards to the horizontal blocking with 60mm (2 1/2″) galvanized nails spaced approximately 75mm (3″) apart (including the nail that will be going thru the Batten).
Roof Boards
- Use 90mm (3 1/2″) galvanized nails. Nail thru the roof boards where they overlap. Nail along the lines of the rafters and raking top plates.
Vertical Battens
- Use 75mm (3″) galvanized nails. Nail on the center line of the batten, through the gap between the boards and into the blocking.
Trim, Rake board, Rake cap
- Use 75mm (3″) galvanized nails and nail where necessary.
Final note. Wind:
It is presumed that this shed will be tucked away in a sheltered part of the back yard without any real concern about the wind, and because it is a heavy and solid structure, it is highly unlikely that it is going to blow away under normal conditions. However….. If the shed is situated in a windy area and there are concerns, then additional securing measures should be taken. The shed will need to be fastened against uplift.
1.) Concrete a pile or post into the ground under each corner of the shed and fasten to the bottom plate with a metal strap or similar type of fastener.
2.) At each corner fasten the bottom plate to the stud with a metal strap or similar type of fastener.
3.) At each corner fasten the stud to the top plate with a metal strap or similar type of fastener.
Shopping List and Glossary
Note: Most of the lumber quantities in the shopping list below are given in total lineal (running) amounts. Individual part lengths are given in the Parts List.
Nails / Screws / Fasteners / Miscellaneous
- 500gms (1 lb) 38mm (1 1/2″) Flathead galvanized nails for Ridge flashing and hurricane ties.
- 500gms (1 lb) 50mm (2″) Galvanized nails for Roof sheathing
- 1.5kg (3 1/2 lbs) 60mm (2 1/2″) Galvanized nails for Vertical boards
- 1.5kg (3 1/2 lbs) 75mm (3″) Galvanized nails for Battens and trims
- 6kg (13lbs) 90mm (3 1/2″) Galvanized nails for Roof boards, and all framing
- 175 38mm (1 1/2″) wood screws (exterior) for Door, hinges, door stop.
- 7 of 30mm (1 1/4′) wide x 300mm (12″) long galvanized metal strap ties for Tie raking top plates and rafters together.
- 10 150mm (6″) Hurricane ties for Securing rafters to top plate.
- 1 piece 2400 (8ft) 100×100 (4×4) galvanized L shaped metal flashing for Ridge flashing.
- 6 150mm (6″) T-Hinges for Doors
- 2 100mm (4″) Slide bolts for Door hardware
- 1 Latch set for Door hardware
Building wrap
- 22 sq meters (230 sq ft) Building wrap / Builders felt for cover
Total wood
- 2 pieces 2400mm (96″) 100×100 (4×4) Treated lumber for Skids
- 23 meters (75ft) 100×50 (2×4) Treated lumber for Floor frame
- 100 meters (330ft) 100×50 (2×4) Framing lumber for Wall and roof framing
- 90 meters (295ft) 250×25 (1×10) boards suitable for exterior use for siding and roof boards
- 50 meters (164 ft) 75×25 (1×3) battens suitable for exterior use for Siding vertical battens
- 7 meters (23ft) 50×25 (1×2) battens suitable for exterior use for Door stop and astragal
- 28 meters (92ft) 100×25 (1×4) stock suitable for exterior use for Exterior corners, around door opening, Rake cap and door braces
- 4 pieces 1800mm (72″) 150×25 (1×6) stock suitable for exterior use for Rake boards (gable fascia)
- 10 pieces 2250mm (90″) 150×25 (1×6) tongue and groove suitable for exterior use for Door slats
- 3 Sheets 12mm x 1200 x 2400 ( 1/2″ x 4 ft x 8 ft) plywood suitable for exterior use for Roof sheathing
- 2 Sheets 18mm x 1200 x 2400 ( 3/4″ x 4 ft x 8 ft) plywood suitable for exterior use for Floor


How much will all the material cost?
Hi. Sorry I cant help you on that one as I don’t do costings or price lists for any of my plans simply because they go to any amount of countries and can be online for some years. Hence a price from a few years ago would not be relevant today and likewise a price from one place may not be the same in another place. Also the types of lumber suitable for any particular job can vary. It is best to get a costing in your own locality.
All the best
With respect !!!