Contents
Introduction: An arbor or a pergola?
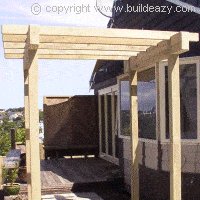
This structure might be called either an arbor or a small pergola, but we will call it an arbor. What’s the difference?
Definition of an arbor
A shelter of vines, branches or latticework covered with climbing shrubs or vines. A walk-through garden structure that can support plants and generally complements the landscape.
Definition of a pergola
A structure usually consisting of parallel colonnades supporting an open roof of girders and cross rafters. A structure with open wood-framed roofs, often latticed and supported by regularly spaced posts or columns, and covered by climbing plants such as vines or roses, shading a walk or passageway. Pergolas are distinguished from “arbors,” which are less extensive in extent and structure.
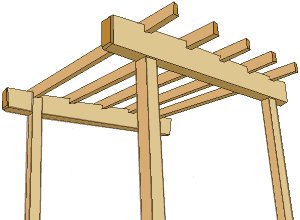
This arbor is also designed to be very sturdy, as in a lot of cases an arbor can be a rather flimsy garden structure. This arbor consists of 100×100 (4″x 4″) posts concreted into the ground, 200×100 (4″x 8″) beams checked and bolted to the posts and 100×50 (2″x 4″) rafters fixed to the beams.
About the wood sizes
The size of the wood referred to in his project is the actual size, which is the size of the wood after it has been dressed (smooth, planed, finished).
For example: When a pieces of wood 2″ x 4″ rough size (called the nominal size) is dressed (smooth, planed, finished), it becomes approximately
1 1/2″ x 3 1/2″ in size, which is the actual size.
All measurements throughout this project are given in both Standard/Imperial inches, and Metric (mm).
The measurements are given first in inches, followed by millimeters (mm) in brackets ( ).
1 1/2″ x 3 1/2″ means wood that is 1 1/2 (one and a half) inches thick by 3 1/2 (three and a half) inches wide.
And the equivalent in metric…
90mm x 45mm means wood that is 90 millimeters wide by 45 millimeters thick.
The plans and lumber requirements
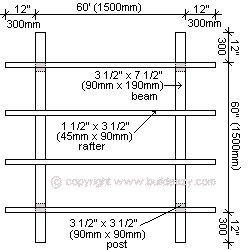
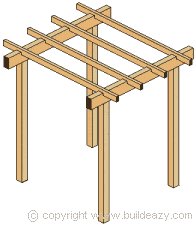
Below are the plans for the entry arbor with dimensions in both metric and imperial (ft & ins). The plans include front elevation, side elevation, flat plan, and also a 3D view.
Lumber requirements.
Use lumber suitable for exterior use.![]() Posts: 4 pieces 3 1/2″ x 3 1/2″ (90mm x 90mm) @ 9ft (2700mm) long.
Posts: 4 pieces 3 1/2″ x 3 1/2″ (90mm x 90mm) @ 9ft (2700mm) long.![]() Beams: 2 pieces 3 1/2″ x 7 1/2″ (190mm x 90mm) @ 7ft (2100mm) long.
Beams: 2 pieces 3 1/2″ x 7 1/2″ (190mm x 90mm) @ 7ft (2100mm) long.![]() Rafters: 4 pieces 1 1/2″ x 3 1/2″ (90mm x 45mm) @ 7ft (2100mm) long.
Rafters: 4 pieces 1 1/2″ x 3 1/2″ (90mm x 45mm) @ 7ft (2100mm) long.
Arbor front plan
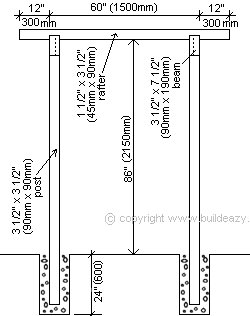
Arbor side plan
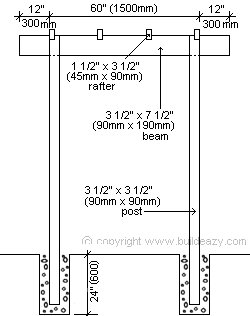
Arbor plan
Arbor 3D view
Building instructions
1. The arbor posts
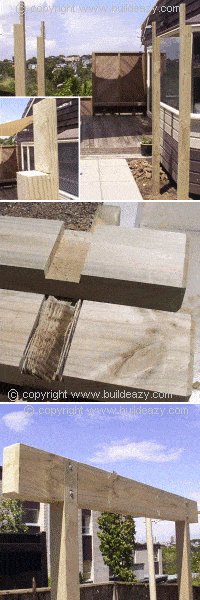
- Dig four holes 14″ (350mm) square by 24″ (600mm) deep.
- Position the holes as shown in the arbor plan (Page 2). Concrete the posts in place and wait until the concrete cures (usually the next day) before cutting the tops of the posts to the required height.
- For a detailed description of how to position the posts, mix and pour the concrete, and cut the top of the posts (including the rebate), go to here, and although it is for a different arbour, the method is the same.
2. Cut and trench the arbor beams
- Mark and trench (checkout, rebate) the two beams. The dimensions are shown in the Arbor plan (Page 2).
- This can be achieved by setting the blade on a circular saw to the required depth and making repeated saw cuts across the beam where the trench is to go. Finish by chiseling out the grooves with a sharp chisel. The more saw cuts, the easier the chiseling.
3. Position the arbor beams
- Bolt the beams to the top of the posts with 12mm (1/2″) galvanized coach/carriage bolts. Use two bolts at each meeting, eight in all. (See picture.)
Building instructions continued
4. Cut and trench the arbor rafters
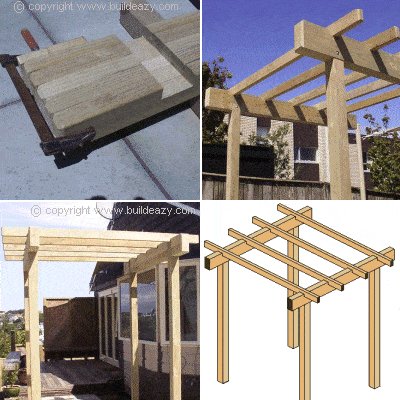
- Cut the five rafters to length (see the arbor plan (Page 2) for dimensions) and then clamp them altogether.
- Next trench (checkout, rebate) the rafters in the same manner as the beams were trenched in step 2.
5. Position the arbor rafters
- Position the rafters in place on top of the beams. (See the arbor plan (Page 2) for dimensions). The rafters can be fixed in place with 4″ (100mm) (galvanized nails through the top of the rafters into the beams.
Finished!
That’s it. Enjoy!


