Contents
Introduction
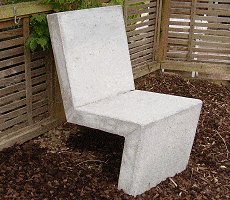
One of the good things about concrete furniture is that you can’t move it. Once it’s there, it’s there. Nobody is going to walk away with it.
One of the bad things about concrete furniture is that you can’t move it. Once it’s there, it’s there.
So it’s important to put a little bit of thought into where the chair is going to rest, simply because once it’s there, you’re stuck with it!
This project is done in three parts over a period of time.
The first part involves making a form (mold) the desired shape of the chair, filling it with concrete and some strategically placed reinforcing steel, and then leaving it until the concrete sets.
The second part involves digging a footing hole, taking the form (mold) off the (now hardened) concrete chair, positioning the chair over the footing hole by sitting it on temporary blocks and then filling the footing hole up with concrete.
Whoooa! Hold it right there!
A very important note.
The concrete chair is very, very, very heavy. When you try to position it you will need some strong men who know how to lift and position heavy objects, or some type of suitable mechanical lifting device. The chair is not only heavy but also an awkward shape to try and maneuver. You have been warned.
The third part is the easiest. Once the footing concrete has cured, simply take out the temporary blocks and give the edges of the chair a bit of a grind.
From start to finish, the project should take around a month to complete. It is a bit of a waiting game as it is advisable to allow the concrete in the form (mold) a couple of weeks the cure (harden) and then another couple of weeks for the concrete in the footing to cure. Of course it could be done in less time, but to get the best result the longer the better, as it takes concrete (as a rule) about a month to reach 90% of its strength.
The plans, material requirements and instructions with pictures included, are on successive pages.
Use the menu at the top to jump back and forth as need be.
The Plans and the Material Requirements.
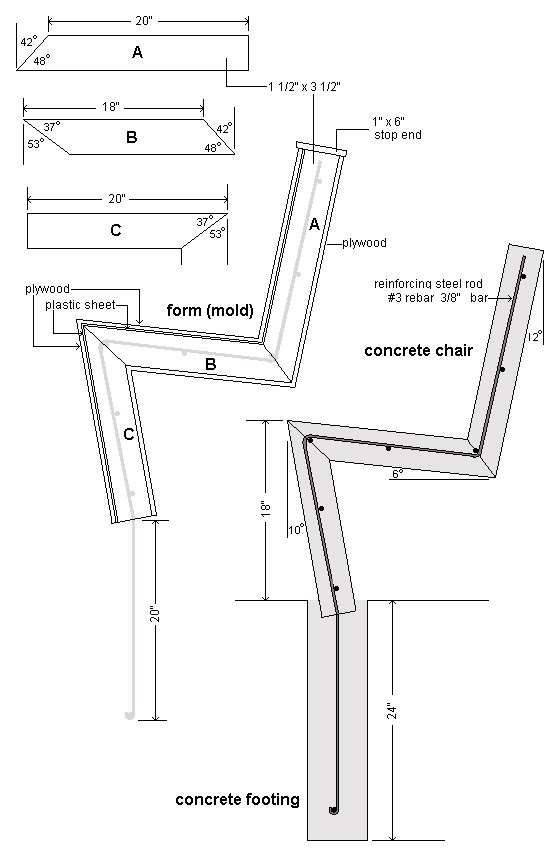
Below are the plan drawings with the material requirements listed below.
For this project you will need…
For the sides of the form
- 12ft of 1 1/2″ x 3 1/2″ lumber.
For the back of the form
- Plywood (at least 1/2″ thick)
- one piece 21 1/2″ wide by 15 1/2″ long
- one piece 21 1/2″ wide by 16 1/2″ long
- one piece 21 1/2″ wide by 23 1/2″ long
For the front of the form
- Plywood (at least 1/2″ thick)
- one piece 21 1/2″ wide by 20″ long
- one piece 21 1/2″ wide by 18″ long
- one piece 21 1/2″ wide by 20″ long
- Also, three pieces of plastic sheet the same width and length as the front plywood above.
- The plastic sheet can be any thickness (for example 1/8″). Its sole purpose is to give the concrete a smooth finish.
For the top of the form
- The stop end
- one piece of 1″x6″ board 21 1/2″ long
Reinforcing steel
- 30ft of deformed (ribbed) reinforcing steel rod #3 rebar (3/8″ thick).
- You can find more information about reinforcing steel here.
Concrete
- You can make mix your own concrete using cement, sand and gravel. For information about how to mix concrete click here.
- Alternatively you can buy bags of cement, gravel and sand (or similar type of aggregate) already mixed, which only require the addition of water to make concrete. I used seven 80 lb bags. You may need more or less depending on the size of the footing hole.
Other bits and pieces
- Screws to hold the form together, tie wire to hold the reinforcing steel together, some wood (plywood or board) for the form bracing, and a load of blocks to pack the chair up and for form strengthening.
Making the form
Step 1. Cut the sides of the form
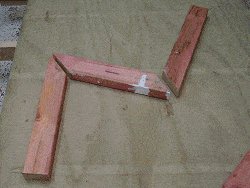
- The form is the mold that holds the concrete and reinforcing steel in place until such time as the concrete hardens.
- Cut all the side pieces for the form (mold) out of 1 1/2″ x 3 1/2″ wood. (That is, 2″x4″ that has been dressed or planed).
- Refer to the plans on page 2 for the lengths and angles.
- Lay the pieces for each side in place on a flat surface. Nail the joins securely.
Step 2. Brace the sides of the form
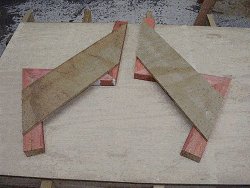
- Lay the two sides on a flat surface in mirror fashion.
- Nail a diagonal brace to each side as shown in the picture.
- The braces can be made out of plywood or boards at least 6″ wide.
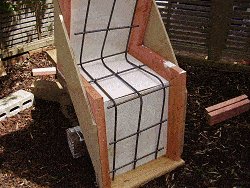
Step 3. Attach the front to the form
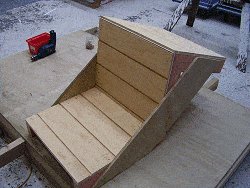
- The front of the form consists of plastic sheet under plywood.
- The plastic sheet will give the concrete a smooth finish.
- Cut both the plastic sheets and the front plywood pieces to the dimensions given in the materials requirement list on page 2.
- Lay the plastic sheets and the plywood front pieces in place (the plastic sheets will be under the plywood front piece) and fix with screws, screwing through both the plywood and the plastic into the sides of the form.
Step 4. Plastic sheet in the form
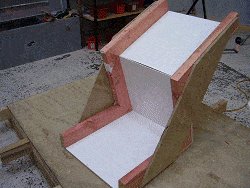
- Turn the form over.
- The picture shows the plastic sheet in the front of the form.
- The plastic sheet is to give the concrete a smooth finish and is optional if you don’t mind a rougher finish.
- The concrete in the form will take on a finish the same as the inside of the form itself. For example, smooth plastic will give a smooth finish to the concrete, whereas wood will give the same finish as the wood used.
Placing the reinforcing steel
Step 5. Positioning the form for the steel and concrete
- Sit the form UPSIDE-DOWN on blocks of wood, or any other suitable solid structure.
- Ensure the top stop end (which is now at the bottom, because the chair is upside-down) is resting on the ground.
- IMPORTANT
- Don’t prop the form on anything flimsy, as once the concrete goes in, it will be very heavy.
Step 6. Preparing the reinforcing steel
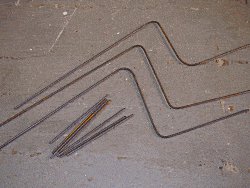
- Cut and bend three pieces of #3 rebar (which is 3/8″ diameter rod) to the shape of the chair allowing for an extra 20″ protruding past the bottom of the form. Refer to the plans
- Tip: Use water pipe to help bend the steel. See the picture below.

Step 7. Placing the steel in the form
- Place the steel reinforcing in the form so that it makes a grid and tie it together with tie wire.
- The steel should be sticking out the top of the form by about 20″.
- The top is really the bottom because the form is currently upside down, remember?
- The steel that is sticking out of the form will eventually become the steel that goes into the footing hole.
Pouring the concrete
Step 8. Fix the back form cover
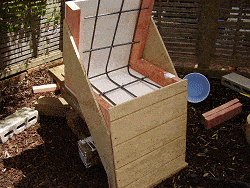
- Screw the back cover (piece of plywood) to the form sides as shown in the picture.
- Ensure that the reinforcing steel is pretty much central in the cavity.
- The steel should not be within 1 1/2″ of the form at any place. In other words, ensure that there will always be ample concrete covering all parts of the reinforcing.
Step 9. Mix and pour some concrete
- Start mixing and pouring.
- You can fill up to the top of the seat part as shown in the picture.
- You can make mix your own concrete using cement, sand and gravel. For information about how to mix concrete click here.
- Alternatively you can buy bags of cement, gravel and sand (or similar type of aggregate) already mixed, which only require the addition of water to make concrete. I used seven 80 lb bags. You will use more or less depending on the size of the footing hole.
- Vibrate the form as you go to ensure a smooth finish and that there will be no air pockets in the concrete.
- This can be done by continually tapping around the form with a hammer.
- You will see the concrete settle as you vibrate.
Step 10. More back cover and more concrete

- You can now screw the rest of the cover in place and top up with concrete.
- Ensure the cover is well secured with screws and clamps so that it will withstand the fair amount of vibration which is necessary to settle the concrete and remove the air pockets.
- You can now forget about it for a couple of weeks to allow the concrete to get nice and hard.
The footing and more concrete
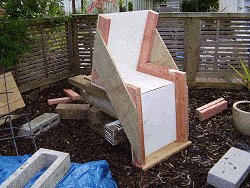
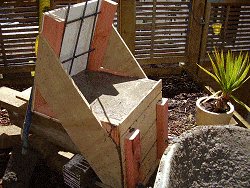
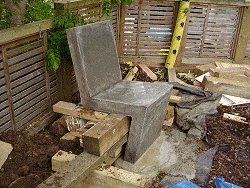
Step 11. Take off the form
- Two weeks later.
- You can now take off the form-it should come apart easily enough by simply unscrewing the screws.
- Presumably, you have left it for a couple of weeks and the concrete is nice and hard.
- Once stripped of the form, the chair will have to be moved to its rightful place over the footing hole (once it is dug).
- This chair is very heavy, so please read the warning in the introduction on page one. Actually, you probably won’t so I will say it again.
- A very important note.
- The concrete chair is very, very, very heavy. When you try to position it you will need some strong men who know how to lift and position heavy objects, or some type of suitable mechanical lifting device. The chair is not only heavy but also an awkward shape to try and maneuver. You have been warned.
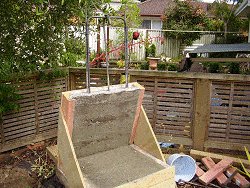
Step 12. Dig the footing and position the chair

- Dig the footing hole to a depth at least 4″ below the reinforcing steel, and a width and depth that will also give the reinforcing steel at least 4″ concrete cover all the way around.
- Sit the chair in position on blocks.
- Did I mention how heavy and awkward the chair is to maneuver?
- Please read the warning in the step above.
Step 13. Pour the footing concrete
- Fill up the footing hole with concrete.
- Ensure all the reinforcing steel is well surrounded and vibrate the concrete in the footing by continuously poking a stick in and out and all around it.
- You can now leave it for another couple of weeks.
The final touches
Step 14. A grind and a clean up
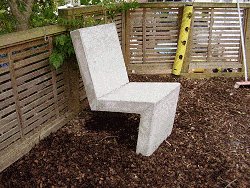
Two weeks later.
Wakey wakey, time to go back and finish the job.
Really it’s just simply a matter of taking the packing blocks out, grinding all the sharp edges along the concrete and a bit of a clean up.
Done!


