Contents
Introduction
All measurements throughout this project are given in both standard (ft and inches) and metric (mm).
The imperial (standard) measurements are given first followed by the metric measurements in brackets ().
The doghouse stands 34″ (850mm) high, it is 32″ (800mm) wide, and 48″ (1200mm) long.
It will accommodate a reasonably large dog but is still suitable for smaller dogs.
The doghouse is constructed out of 150mm x 25mm (1″ x 6″) boards for the floor and roof, 50mm x 50mm (2″ x 2″) lumber for the framing and skids and 10mm (3/8″) thick exterior type plywood for the walls.
Doghouse
$5.00- Pay online by credit card, debit card, or Paypal using Secure Server Paypal. You do not need a Paypal account if paying by credit or …
|
A bit about the framing lumber size
If you use dressed (smooth, surfaced, planed) lumber for the frame, then the finished (actual) size of the wood (width and thickness) will be less than the size given above.
50mm x 50mm (2″ x 2″) wood, when dressed (smooth, surfaced, planed) will become approximately 1 1/2″ x 1 1/2″ (45mm x 45mm).
If you use dressed lumber you will need to make adjustments to the measurements given in the cutting list. Refer to note 2 on the next page for more information.
Alternative wood sizes
If 2″ x 2″ (50mm x 50mm) stock is not available in your area, one option is to rip (cut lengthwise) 2″ x 4″ (100mm x 50mm) stock in half. The latter is very common.
If 1″ x 6″ (150mm x 25mm) boards are unobtainable, then use different size boards or even plywood.
Treated wood and your dog
Some dogs gnaw on wood and some treated woods contain preservatives that can be toxic. If you have such a dog then be careful of the type of wood that you use. Some woods are naturally resistant to decay and do not need treatment. Your local lumber store will be able to advise you on the best types of wood to use.
About the painting
Any untreated wood should be painted using Wood Primer, Enamel Undercoat and Super Gloss Enamel. When dried the paint would be non-toxic to dogs chewing, but any damage taking the paint system back to bare wood would eventually allow water and increase the danger that the lumber may eventually begin to rot.
Identifying the parts
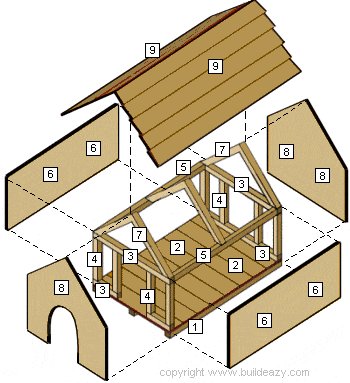
The cutting list
Note 1: Items (1), (2), (6), (8), and (9) in the table below should be wood suitable for exterior use. Read the notes on the previous page for information on measurements, wood sizes, alternatives and treated lumber.
Note 2: If you use dressed (smooth, surfaced, planed) lumber for the frame, then items (4) and (5) will have to be cut accordingly. They will need to be slightly longer than the lengths given below.
| ITEM No. | MATERIAL / SIZE | AMOUNT AND LENGTH | DESCRIPTION |
| (1) | 2″ x 2″ (50mm x 50mm) | 3 @ 48″ (1200mm) | Under floor skids |
| (2) | 1″x 6″ (150mm x 25mm) | 8 @ 31 1/4″ (780mm) | floor boards |
| (3) | 2″ x 2″ (50mm x 50mm) | 4 @ 31 1/4″ (780mm) | end wall plates |
| (4) | 2″ x 2″ (50mm x 50mm) | 8 @ 14″ (350mm) | studs |
| (5) | 2″ x 2″ (50mm x 50mm) | 2 @ 44″ (1100mm) | side wall plates |
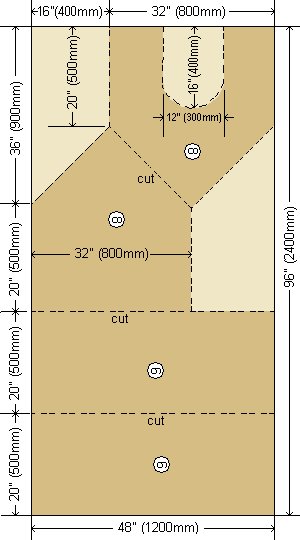
| (6) & (8) | 1 sheet 3/8″ (9mm) exterior plywood. | cut as per plan | wall cladding |
| (7) | 2″ x 2″ (50mm x 50mm) | 6 @ 22″ (550mm) | rafters |
| (9) | 1″x 6″ (150mm x 25mm) | 10 @ 60″ (1500mm) | Roofing boards |
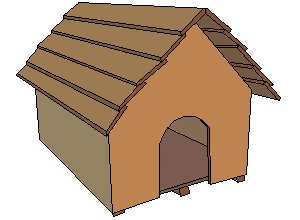
The plans
Instructions
Step one
- Cut all the pieces according to the cutting list on page 2 and cut the plywood wall panels to the shapes and dimensions as shown in the plans on the previous page.
Step two
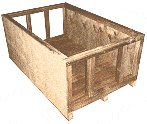
- Fix the 8 floorboards (#2) to the three under floor skids (#1) with 3″ (75mm) galvanized nails. Ensure the finished floor dimensions are 31-1/4″ x 48″ (780mm x 1200mm). The three under floor skids should be evenly spaced with two each side and one in the middle. Go to the plans on the previous page for reference.
Step three
- Nail the front and rear frames comprising of top and bottom plates (#3) and studs (#4) together. Overall frame dimensions of both front and rear frame should be 18″ (450mm) high and 31-1/4″ (780mm) wide.
- Ensure the placement of the intermediate studs allow a gap of 12″ (300mm) for the doorway. See diagrams for reference. Stand and fix the front and rear frames in place at each end of the floor.
Step four
- Fix the 2 sidewall top plates (#5) in place.
Step five
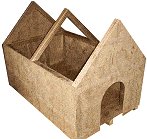
- Fix the wall panels (#6, #8) to the frames using 2″ (50mm) galvanized flathead nails.

Step six
- Fix the rafters (#7) in place.
Step seven
- Fix the 10 roofing boards (#9) (5 each side) to the rafters beginning with the lowest board. The roof boards are 60″ (1500mm) long and the House is 48″ (1200mm) long, therefore the roof boards should overhang each end of the House by 6″ (150mm). The first roofing board should overhang the sidewalls by 1″ (25mm) to 2″ (50mm). Fix the rest of the roofing boards in place checking that all overlaps are even.
- Finally, cut out the portion of the bottom plate (#3) that is in the doorway.
All done.
EAZY WITH A “Z”


Thank you for the design!
We adjusted the size to suit our two dogs and made the roof removable (by installing two extra cross-beams instead of nailing to the frame) for easier cleanup inside.
We kept the cutout for the door so that we can keep out any neighborhood cats, squirrels, raccoons, etc that may want to nest on the dog bed inside.
We still need to weatherproof the roof ridge, but there’s no huge rush here yet.
Because we wanted taller sides, but not a very tall dog house, the roof angle was adjusted to 60 degrees. And, as you can see, we left the bottom plate so the door has something to stop it and the bed doesn’t work it’s way out.
Hi, I’m fifteen and I have been building this dog kennel from your plans. It’s been such a great summer holiday project.
I built it for my Irish Staffordshire bull terrier. I found these plans very useful and straight forward, but my dad and I modified the size to 700mm x 1050mm.
We also used 34mm by 34mm pieces of timber for the frame and feather edge board for the roof. It took us just under a week off and on to complete what with having to wait for the paint to dry and the right weather conditions.
Thanks Sean Williams
I used your dog house design and it was fantastic! It is easy to modify the plans to fit individual needs!
I wanted the house to be insulated,
so I added insulation to the outer walls and an additional outer shell so that the dog could not chew on the insulation.
I also had extra shingles I wanted to use so I did 1 x 6s on the sides instead of the roof.
As expected the dog house weighs more than originally intended. It takes 4 grown men just to lift it.
Completion dimensions were 51.5 x 34 outside and 48×32 inside. My friends call it the dog house of doom because its so heavy.
They said its a monument to the seriousness of dog house building and the frightening power that one women with a miter saw can wield.
This project took me 1.5 days to from start to finish. Approximately 16 hours of labor.
Patty ~ from Iowa
Here is how we modified the Build Eazy dog house to accommodate our very large dogs (2).
First we needed the dog house to be much bigger and have an opening large enough for our greyhounds to get in without having to crawl or bend. They don’t do that.
Their legs are like stilts with no give. We used a packing skid (found at a hardware store for nothing) as the base and filled it with cedar chips to keep the bottom of the house warm.
We wanted the house to match our custom fence so battens were added to the side and the roof got a cedar shake roof. Because it is so big, I suggested to the hubby to add a window. So I went to the local antique mall and found a photograph framed in this oval frame.
The frame was then used as a window after it was painted and inserted into the premeasured hole. I also added our dogs names “Lola and Finch”.
We also added faux stone to the “foundation” to match our retaining walls and then painted the whole thing to match our custom fence.
It is fabulous. Both dogs can get in and are safe and warm.
Thanks
Petree Eastman
Hi!
Thanks for the Dog Kennel Plan. We are sending some pictures about our Dog Kennel made with your plan.
We will finish it with the dog’s name and some paintings.
Regards Pedro
Thanks for the doghouse plans.
I modified them a little as the pictures will show. Pine clap board siding, black shingles, white with blue trim. This was a great weekend project even if you are a beginner to woodworking just take your time.
Also a tip; if you use clap board siding; prime the knots with primer and paint one coat of paint on both sides before assembly. This step will help the paint to last longer. When nailing the clap board on make sure the rough side is the outside exposed to the weather. Remember the smooth side in. This applies to any wooden siding you will save yourself time and money over the years on paint and painting.
Works every time
Hope you enjoy the pictures,
Wayne, Nova Scotia, Canada
Hi there, Thank you so much for the dog house plans. They were very easy to follow and modify.
As my dog is just a little gal I reduced the size of the project, Added a shake roof and cedar trim.
I also used plywood for the floor as well as a 2×2 square framed base to allow the addition of a sheet of styrene insulation.
Thanks again for great plan 🙂
The instructions were great! materials were all easy to find, my girlfriend and I managed to build it in about 6 hours, the only modification we made was the addition of a asphalt roof, a solid plywood floor and a weather resistant dog door rather than the open door.
Also because the furing strips aren’t true 2×2’s the lengthwise cut “sidewall top plates” should be 45″ or so.
Thank You Jesse P.
Hi I used your plan but decided that asphalt bricks are better than wooden roof.
Lucianna -our Labrador- really enjoys it. I painted it red as our football team Olympiakos!!!
Regards Takis T
Hi
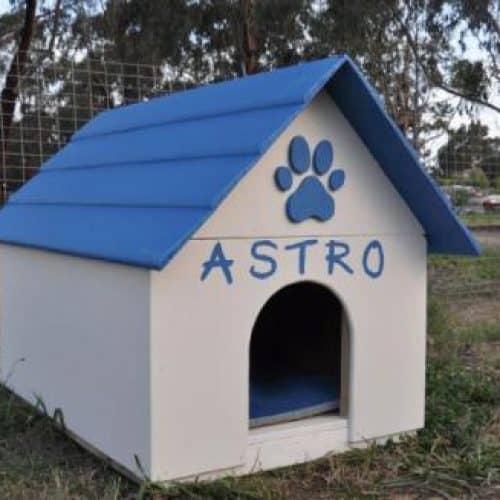
We just thought we would send in some photos of the dog house we built using your plans as a base for our project with some variations.
Changed the flooring to a bit better timber, shorten it slightly, added a hinged roof and used weatherboard for the roof.
My wife and I are really happy with it and Astro loves it already. This dog house is built strong and we can see it lasting a long time.
Thanks Brett, Rachel & Astro
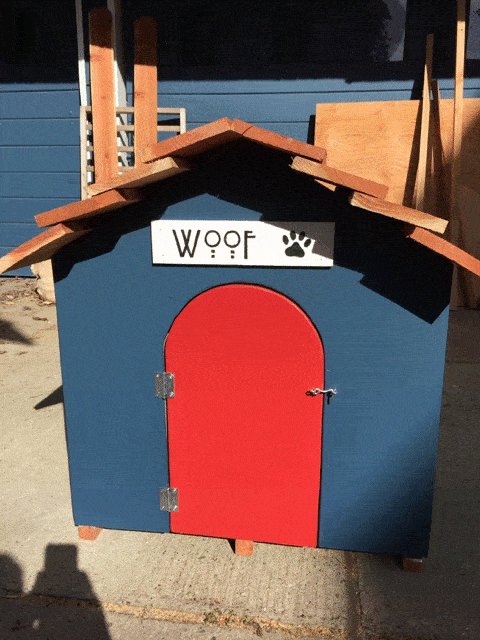
Hello , We just want to share the dog house that my fiancee and I build. Thanks for the building plans, we added the hindges so we can access the house to clean it easier.
Sincerly,
Chanpen and Ryan
Just finished the dog house with your plans. I had to adjust a little as we have three large dogs, but it was very easy. Although I made a few mistakes, I think I did fairly well it being my second project following plans.
Thanks
Cheri, Fuzzy-Wuzzy, Maximus and Helga
Thanks,
I just want to say thanks to all the people on Buildeasy.
The project was rally easy to make following the instructions.
The Dog Kennel is huge and comfortable (I think).
There is room enough for 2 medium size dogs and more.
Percy D. Lizano C
This was easy to build (made even easier with a mitre saw) and is so huge I even added another small compartment in the side for the cat. Wouldn’t use it though. Wonder why?!
Paul Trappett
Exactly what I needed! This is how I envisioned how to build a dog house… Thanks for the help.
B. Scofield
Great thanks for the help, just what I needed, TOP MARKS TO YOU.
Robin Indonesia