Contents
Introduction and Description
Introduction
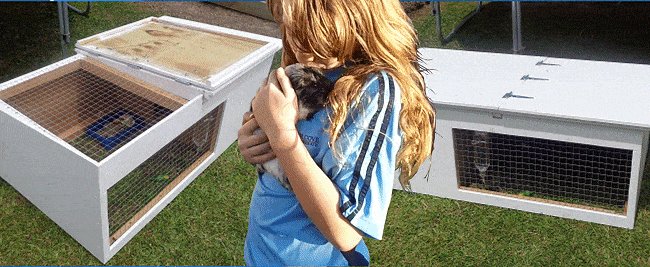
This is an outside hutch where the guinea pig can spend the warmer months.
In the summer an outside hutch is great, guinea pigs love to eat fresh grass. Come winter, this particular guinea pig is moved to a cage inside the house.
This hutch was purpose-made for Milo, my granddaughter’s guinea pig.
Milo already had an inside cage, but we decided he’d benefit from an outdoor house where he could safely spend time outdoors during the warmer months – fresh air and green grass.
Different places have different climates and conditions.
There is no knowledge as good as local knowledge. So, before you embark on this venture, why not have a chat to the staff at your local pet store, or to a neighbor who has guinea pigs, to see if this type of hutch will suit your needs.

Guinea pig hutch
$5.00- Pay online by credit card, debit card, or Paypal using Secure Server Paypal. You do not need a Paypal account if paying by credit or …
Description
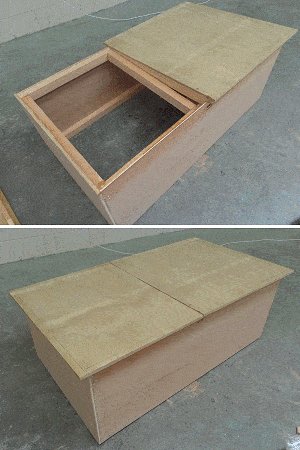
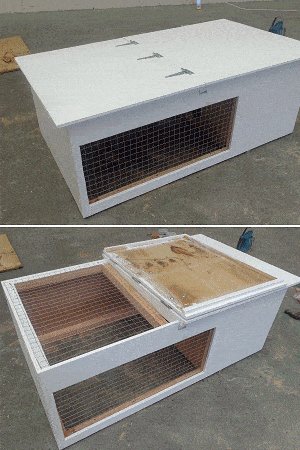
The hutch has a ‘no floor’ grass area, as well as a floored sheltered room. The lid can be folded back to open up the ‘no floor’ grass area.
When the lid is folded back, a meshed roof keeps out any unwanted predators.
Should the weather look dicey, the lid can be folded down. It can also be taken off completely to clean the hutch.
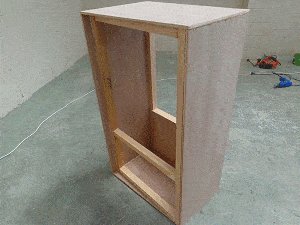
Basically, this hutch is a box with a lid.
The box has an internal wall that splits it into two rooms.
One room is without a floor and has an open mesh window and mesh top (the outside area). The other has a floor and no windows (the shelter area).
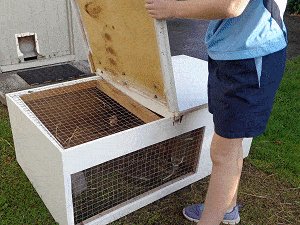
The lid is in two parts, hinged together. The lid can be a half cover (covering shelter area only), full cover (for bad weather), or taken off altogether (for cleaning).
The lid is plywood with a rim fixed around it. The rim keeps it snugly in place on top of the box, stopping it from falling off.
The lid is slanted to allow water run-off.
Overall, the box is 50″ (1270mm) long by 26-3/4″ (619mm) wide: a one pig hutch.
Tried and tested
This hutch has been up, running and occupied by Milo for six months prior to these writings.
The hutch is in good stead, as is the happy and healthy guinea pig.
In fact, he has spent the summer months outside in the hutch and is due to move to his inside cage for the winter.
The measurements throughout this project are given in both standard (inches) and metric (mm).
The standard measurements are given first, followed by the metric measurements in brackets ( ). For example: 2×2 (50mm x 50mm).
The sizes mentioned herein are the nominal sizes (in name only). The real (actual) sizes of the wood will be less once the wood has been dimensioned (dressed, planed).
For example: 2×2 stock (nominal size) once dressed will be 1-1/2″ x 1-1/2″.
What you will need
Use a wood suitable for outside use. Use wood that has no toxins: hardwoods such as aspen are good. Do not use cedar or pine, as they are now believed to contain harmful phenols (aromatic hydrocarbons) and oils.
Guinea pigs need something hard to chew on and will gnaw their hutch if there is nothing else. Keep a piece of deciduous wood in the hutch; this will provide useful exercise for their teeth and help to keep them in good condition.
- 1/2″ (13mm) Plywood: You will need 1 and 1/4 sheets of 4×8 plywood to cut all the pieces. If you are able to acquire a 1/4 sheet, all the good, otherwise you will have to put up with bit of wastage.
- 1×1 (25mm x 25mm) wood: You will need 14ft (4.25m) for the lid rim.
- 2×2 (25mm x 25mm) wood: You will need 33ft (10m) for the frame.
- You will also need: Welded mesh to suit, three T-hinges, nails and screws and staples to suit.
The wood that I used
I used a hardboard plywood for the box but a treated plywood for the lid, as I figured the guinea pig would not be able to gnaw, lick, or rub against the roof.
I used treated pine for the 1×1 (25mm x 25mm) lid rim, as it is out of reach of the guinea pig.
I used hardwood for the 2×2 (25mm x 25mm) frame.
After six months of living in the hutch, Milo the guinea pig has not gnawed at any part it. That could be because he has always had something else to gnaw on, such as pieces of deciduous wood or other suitable chewable bits and pieces from the pet store.
What’s ahead
First up are all the plans, listed from Plan 1 to Plan 7.
They can be referred to throughout the instructions that follow.
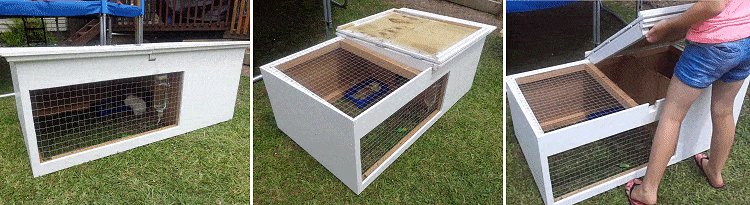
The instructions are also accompanied by photos.
Plans 1 to 4
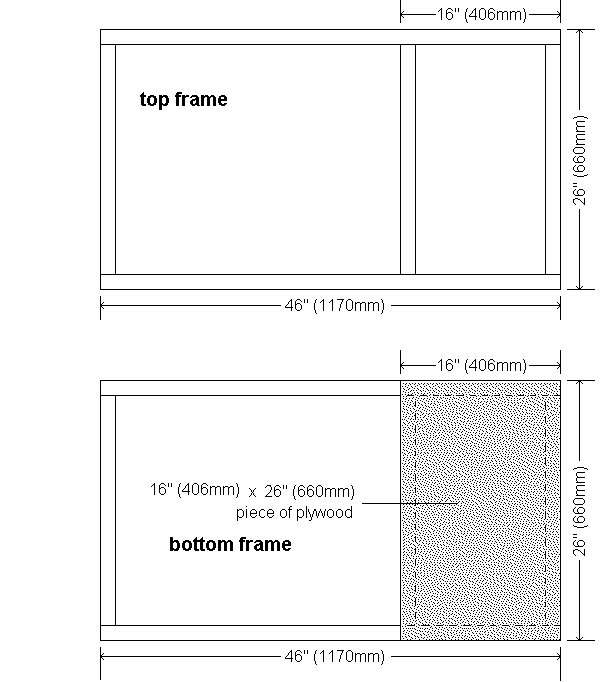
Plan 1: The top and bottom frames
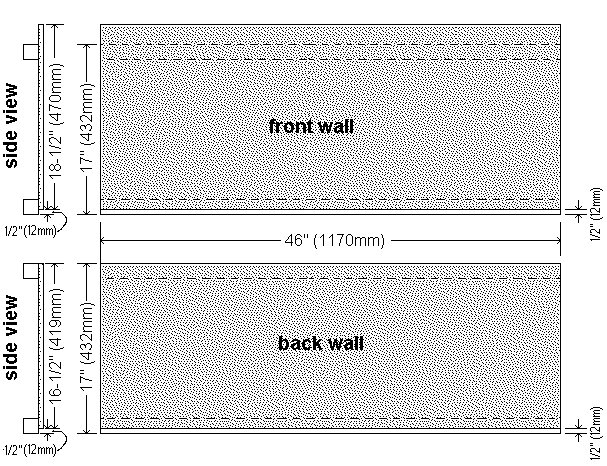
Plan 2: The front and rear walls
Plan 3: The end walls
Plan 4: The internal wall
Plans 5 to 6
Plan 5: The lid – side views
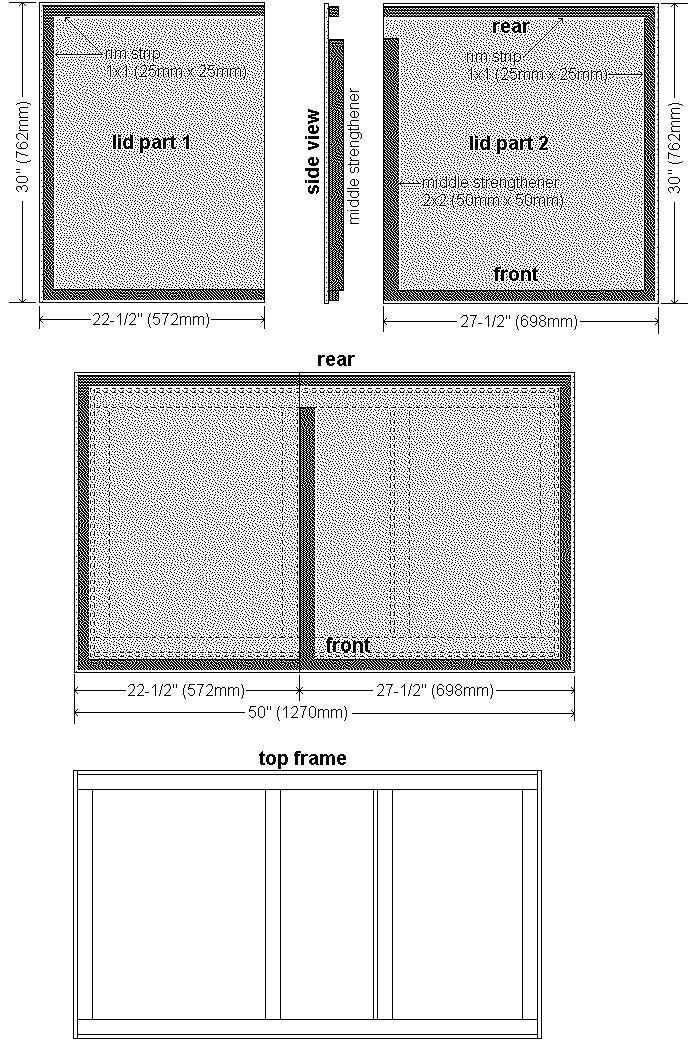
Plan 6: The lid – plan views
Plan 7: Window and mesh
Top and bottom frames | Front and rear walls
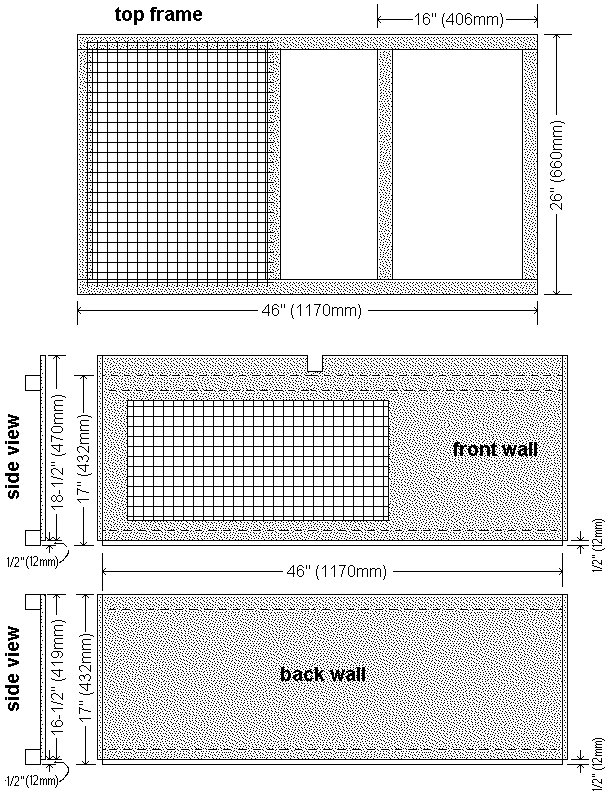
Step 1: Make the top and bottom frames
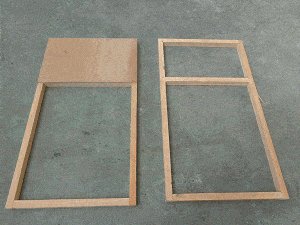
- Out of 2×2 (50mm x 50mm) stock make two rectangle frames 26″ (660mm) x 46″ (1170mm). To both frames, add a cross-member 16″ (406mm) in from one end. On one of the rectangle frames fix a piece of plywood (the floor) 16″ (406mm) x 26″ (660mm), as shown in the picture and Plan 1.
Note: The sizes mentioned here are the nominal sizes (in name only). The real (actual) sizes of the wood will be less once the wood has been dimensioned (dressed, planed).
For example: 2×2 stock (nominal size) once dressed will be 1-1/2″ x 1-1/2″
Step 2: Fix the front and rear walls
Note: The front wall is 2″ (50mm) higher than the back wall.
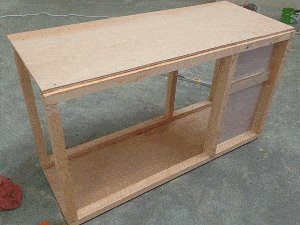
- Stand the rectangle frames on edge, parallel, and apart 17″ (432mm) overall.
Out of 1/2″ (13mm) plywood, cut the back wall panel to the dimensions given in Plan 2.
Fix it to the frames, ensuring one edge begins 1/2″ (12mm) up from the bottom of the bottom frame, and the other edge is flush with the top of the top frame.
Refer to the picture and Plan 2 for detail. - Flip the unit over.
- Out of 1/2″ (13mm) plywood, cut the front wall panel to the dimensions given in Plan 2.
- Fix it to the frames, ensuring one edge begins 1/2″ (12mm) up from the bottom of the bottom frame, and the other edge runs past the top of the top frame by 2″ (51mm).
- Refer to the picture and Plan 2 for detail.
The end and internal walls
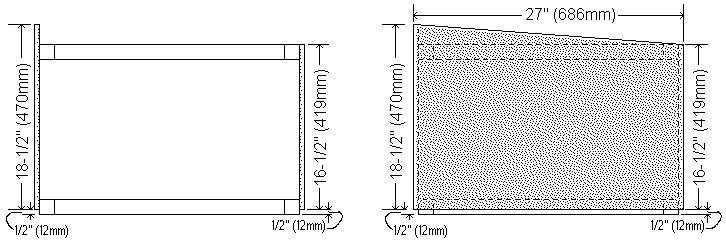
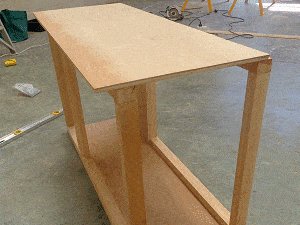
Step 3: Fix the end walls
- Out of 1/2″ (13mm) plywood, cut the two end wall panels both 26-3/4″ (680mm) wide and 18-1/2″ (470mm) high at one side, raking down to 16-1/2″ (419mm) high the other side.
Refer to Plan 3 for detail. - Stand the unit on end and fix one end wall, then flip the unit over and do the same on the other end.
- Refer to the picture Plan 3 for detail and placement.
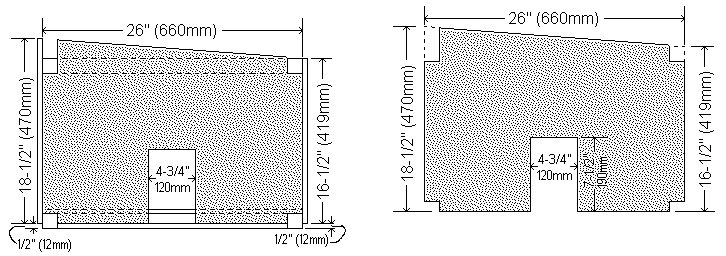
Step 4: Cut and fix the internal wall
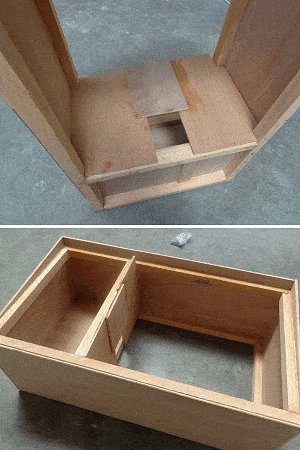
- The internal wall divides the box into two rooms.
One room is without a floor, where the guinea pig can frolic on (and eat) the grass.
The other is a shelter area with a floor and no windows. - Out of 1/2″ (13mm) plywood, cut the internal wall panel 26″ (660mm) wide and 18-1/2″ (470mm) high at one side, raking down to 16-1/2″ (419mm) high the other side.
- Rebate the four corners around the horizontal wall-frame members. Refer to Plan 4.
- Cut out the doorway according to the dimensions given in Plan 4.
- Fix the internal wall to the top and bottom cross-member framing pieces.
Make the lid
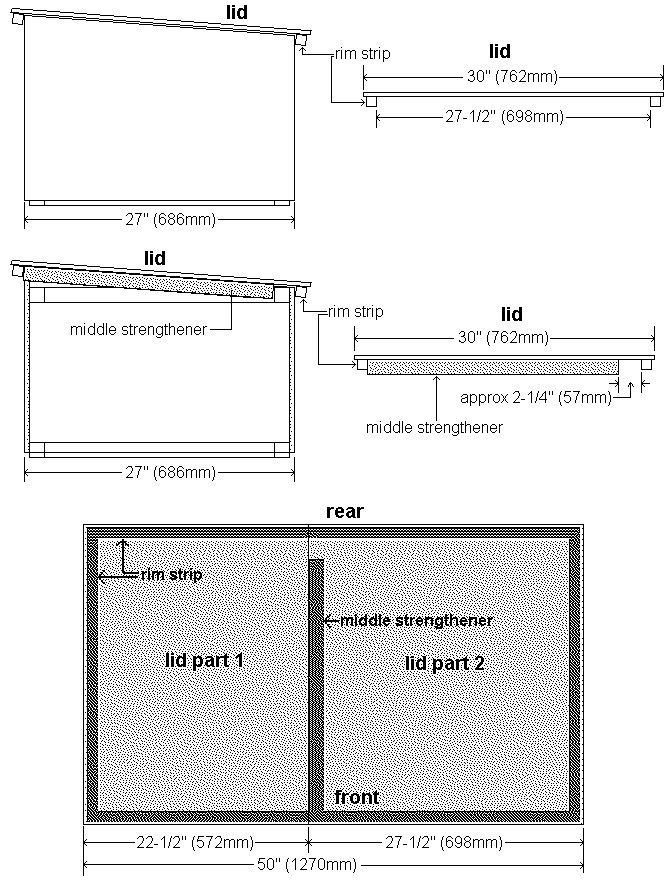
Step 5: Make the lid
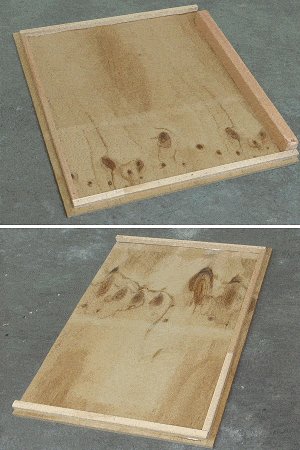
The lid is in two parts. They are hinged together.
The lid is plywood, with a rim around the underside of it. The rim keeps it snugly in place on top of the box, stopping it from falling off.
The lid is slanted to allow water run-off.
- Out of 1/2″ (13mm) thick plywood, cut two rectangle pieces – lid part 1 & lid part 2.
- Lid part 1: 30″ (762mm) x 22-1/2″ (572mm).
- Lid part 2: 30″ (762mm) x 27-1/2″ (698mm).
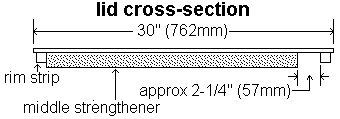
- Run a 1×1 (25mm x 25mm) rim around 3 edges of both pieces, but NOT the edges that butt up to one another (i.e. not the hinged edge).
Refer to Plan 6 for placement and dimensions. - On lid part 2 only, add a 2×2 (50mm x 50mm) strengthener piece to the hinge edge.
Note that the strengthener piece does not go all the way across. There is a gap at one end between the strengthener and the rim. The gap fits over the top of the back wall.
Refer to Plan 6 and the drawing below.
- Note: Ensure that the rim will fit around the box.
Prepare the box for the lid
Step 6: Prepare the box for the lid
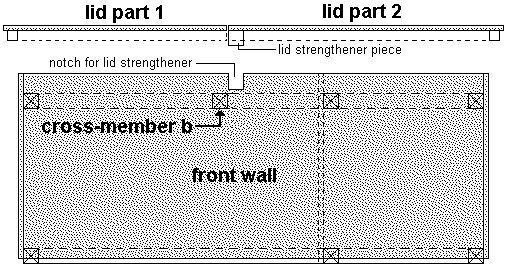
- Cut a notch in the plywood at the top of the front wall to take the lid strengthener piece.
Sit lid part 2 in position on top of the box in order to mark where to cut the notch. - When the notch is cut, sit lid part 2 in place.
- Out of 2×2 (50mm x 50mm) stock, add a cross-member (b) to the top frame. Refer to the plan drawing at the top for position. It will go next to the lid strengthener piece (when lid part 2 is in place).
- Then place lid part 1 in position to see how it plays out. All being well, paint the lid.
- Note: Do a good paint job on the lid with a good quality paint to help protect it against the weather.
- Even though the plywood used is suitable for outdoors, weather extremes can still cause it to wrap somewhat. A good covering of paint on the outside of the hutch will give far greater protection.
The window and mesh
Step 7: Cut a window in the front wall
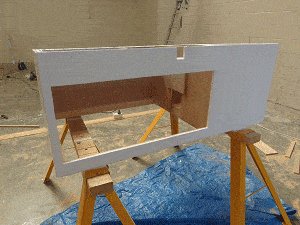
- Cut a window in the front wall in the ‘grass’ area. Make it as large as possible but ensure the edge of the hole is at least 1″ (25mm) away from the top and bottom frames, and the walls each side to allow for mesh ‘overhang’.
- Paint time.
As mentioned, even though the plywood used is suitable for outdoors, weather extremes can still cause it to wrap. A good coat of paint on the outside of the hutch will give far greater protection.
Step 8: Fix the mesh
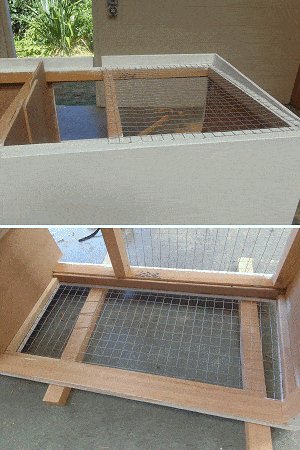
- Use a welded mesh
- Not all wire grids are the same! The maximum spacing for the grids should be 1-1/2″ (38mm). Adult guinea pigs have been known to get stuck in cages with larger grids.
- Cut the window mesh bigger than the window hole by 1″ (25mm) all the way around.
Fix it from inside using staples, or wooden (non toxic) strips fastened around the edge of the mesh (sandwiching the mesh in). - Cut the ceiling mesh 1″ (25mm) bigger than the ceiling hole all the way around.
Fix it to the frame using staples or similar. - Refer to Plan 7 for the mesh placement.
Hinge the lid
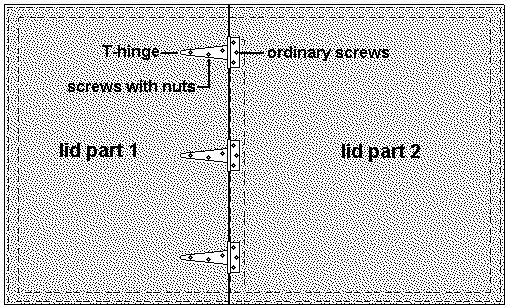
Step 9: Hinge the lid

- Place lid part 1 and lid part 2 in position on top of the box.
- Join them with T-hinges positioned as shown in the picture.
Note: Use screws with nuts to secure the hinges to the plywood on lid part 1.
As the plywood is only 1/2″ (13mm) thick, the nuts will help ensure that the screws will not pull out.
It’s done !
Guinea Pig care guide
Disclaimer: Although all due care is taken, no responsibility is accepted by BuildEazy for any wrongful information. As mentioned earlier, there is no knowledge as good as local knowledge. So, before you embark on this venture, why not have a chat to the staff at your local pet store, or to a neighbor who has guinea pigs, to see if guinea pigs are for you, and if this type of hutch will suit your needs.
General overview
Guinea pigs are “grazers” that are indigenous to South America. In their natural habitat, they form large, extended family groups. Also known as “cavies”, domestic guinea pigs are one of the easiest small pets to care for, making them ideal pets for children. Also worth noting is that guinea pigs aren’t the kind of lap-pet that enjoys sitting still and being petted for long periods of time.
The average life span of a guinea pig is four to seven years. If you intend your child to be the main caregiver of the guinea pig, please ensure they a) handle their pet gently, and b) understand their pet needs daily care and attention. If you’re after easy care, then choose a guinea pig with a short, smooth coat; long-haired guinea pigs will need regular grooming.
Domestic guinea pigs enjoy company – so much so that if you’re not able to spend much time with your guinea pig each day, it’s probably a good idea to get another one as a companion so it doesn’t get lonely. However, adult guinea pigs of the same sex do tend to fight, so you may want to select either two female littermates, or two young male littermates. Alternately, you could try a father and son, or mother and daughter pairing. If you intend to keep a group of guinea pigs, same-sex groups will usually tolerate each other provided they have enough room.
If confined to a cage, guinea pigs will need to be exercised daily in a safe, larger area where they can run around. Bedding materials need to be changed once or twice a week.
Keen to own a guinea pig?
Want more specific information?
Then read on!
Housing
Guinea pigs don’t like high temperatures or rapid changes of temperature, so you should aim to provide a nice, roomy hutch that is protected from wind, rain and direct sunlight. The hutch should be escape-proof, with an enclosed, sheltered area for sleeping and resting, and an exercise area (typically with a strong wire-mesh front to admit light and air). It’s recommended you move the hutch to a new grassy spot every day.
The roof of the hutch should be sloping and well-weatherproofed. It’s recommended the roof overhang the hutch so when it rains, the sides stay dry and the rain is less likely to affect the interior of the hutch. (A damp hutch can lead to serious illnesses, such as pneumonia!).
For easy cleaning, each compartment should have a separate, well-fitting door with good hinges and catches. And if your hutch doesn’t allow much room for exercise, be prepared to let your guinea pig out to run around outside in a safe, enclosed larger area.
In bad weather, you might want to bring your guinea pig inside for exercise. If you’re not keen on giving them the run of the house when you’re not around to supervise, you might like to think about an indoor hutch. Alternately, you could use a large wooden tray or box. Cover the base with newspapers and spread over some lining material (cat litter, wood shavings), then top with straw.
If you do let your guinea pig roam around inside, you will need to watch them like a hawk. They like to chew things that may include electrical cords and the like! Make sure the area is guinea pig-proof, and have a treat on hand, as well as a place for them to hide and something to chew. If you’re caught out by bad weather, and not prepared for an extended inside session, the bathroom is a good last resort. Remember to provide water!
Bedding materials
Some options for bedding materials in the hutch are layers of newspaper, a layer of “litter” that absorbs urine (such as cat litter, peat, wood shavings or sawdust), and finally, a nice thick layer of hay or straw. (Make sure wood shavings etc. are untreated – treated woods may contain preservatives and other nasties that could be poisonous to your guinea pig. Evidence also suggests it’s best to avoid cedar shavings, as well as artificial fiber bedding.) If you opt for shredded paper, be sure to change it daily. And if you aren’t using hay as bedding, then remember to feed some to your guinea pigs!
Whatever you decide to use, remember that the lining material should absorb urine, and the topping should provide warmth and insulation, and allow the guinea pig to burrow.
Remove wet bedding daily, and do a thorough clean-out of the entire bedding at least weekly. It’s also recommended to clean food bowls and water vessels every day.
Feeding
To stay healthy, guinea pigs need a diet that’s rich in Vitamin C, so it’s probably best to stick to a varied diet that includes dried hay, supplemented with pellets or crushed oats, and plenty of fresh vegetables. If you’re unsure, check with your local veterinarian.
Here are some tips:
Hay is a good source of roughage for your guinea pig. Meadow hay is preferred, but legume hay such as clover can be a good substitute – avoid alfalfa hay, though, as it’s too high in calcium. Note that it’s best to stick with one kind of hay rather than mixing them up, as sudden changes of diet can cause digestive problems.
Grass is a super-food for your guinea pig! But don’t be tempted to feed it lawn clippings. Also try sow thistle, dandelions, chick weed, and dock. But…
AVOID hemlock, buttercup, pink clover, rhubarb leaves, or potato leaves: these are poisonous!
Don’t be tempted by fancy pellets or oats with nuts and dried fruits; these are high in fat and can lead to obesity.
Aim for a cup or two of fresh vegetables that are high in Vitamin C each day (e.g. turnip, mustard or dandelion greens, kale, Brussels sprouts, parsley, silver beet, broccoli leaf, cauliflower). And wash greenstuff to remove any pesticide residue.
Note that iceberg lettuce has hardly any nutritional value, so it’s not recommended. Carrots and bean peelings (using a potato peeler) are favorites, as are carrot tops, celery and cabbage. You could also try apples (seeds removed), pears, melons, spinach and corn.
If you’re worried your guinea pig isn’t getting the recommended average of Vitamin C per day, ask your vet about Vitamin C supplements. (You can crush chewable Vitamin C tablets and dissolve them in the guinea pig’s water if necessary, but be sure to check the dosage with your vet.)
Provide fresh water daily – drip-feed bottles are recommended.
Heavy earthenware food containers can prevent spillage.
Finally, guinea pigs need something hard to chew or they’ll resort to gnawing their hutch! Keep a piece of deciduous wood in the hutch for them to gnaw on – it’s good for their teeth. (Speaking of teeth: A guinea pig’s teeth will keep on growing, which is why they need things to gnaw to keep them at a manageable length. If your guinea pig’s teeth become too long they can cause heath problems, and they’ll need to be checked by your veterinarian.)
Handling
Guinea Pigs will respond best to gentle handling and petting as they can be a little timid. They can get stressed with over-handling, so it’s a good idea to supervise them around young children, who’ll often want lots of cuddles.
Your guinea pig may not like being picked up at first, so please be patient. When you pick up your guinea pig, place a hand on its shoulders – this should make it crouch. Then scoop up the guinea pig with a hand under the chest and belly, and when it’s off the ground, support its hind legs with the other hand. If it doesn’t like that position, try holding it against your chest (nose up toward your face) or cradling it in your arms.
If your guinea pig keeps wriggling, squeaks a lot, or gets restless, put it down straight away and perhaps offer a bit of fresh vegetable as a treat – positive reinforcement is always good. Mind you, all that could also be a sign you guinea pig was about to take a wee!
And if your guinea pig just doesn’t seem to appreciate being picked up at all, then don’t be too upset; sometimes it just needs to get used to you. You might try sitting down and putting the guinea pig in your lap, or even laying on the ground, and offering a treat. Try some sneaky petting, while it’s gobbling the snack.
Sometimes your guinea pig will leap or jump about. It can look a bit strange, but it means they’re happy! This bouncing around is called “popcorning”.
The main thing to remember is that often the more time you spend with the guinea pig, the faster it will become used to you. And one last tip for children: the less time they spend running around after the guinea pig and trying to pick it up, the less likely it will be scared of them… and keep running away!
Grooming
It’s not usually necessary to give your guinea pig a bath, as they are generally very clean and self-groom regularly. If they’ve gotten a bit grubby, brush them with a nice, soft brush. You could also gently clean them with a damp flannel/washcloth. It’s recommended that you brush and comb short-haired guinea pigs once a week, whereas long-haired guinea pigs will need daily brushing/combing. It’s good practice to always wash your hands before – and after! – handling your guinea pig.
Toenails
Every month to six weeks, check your guinea pig’s toenails to see if they need trimming. If your guinea pig is getting plenty of exercise and running about on rough surfaces like paths and pavement, the nails shouldn’t need too much trimming. But if they start to get long you will need to clip them. It’s important to keep an eye on toenails because they can start to curl back into the pad of the foot, leading to bleeding, infections, and sometimes even crippling the guinea pig.
If you’re a bit nervous about clipping your guinea pig’s toenails, ask your vet to show you how. If you are happy tackling it yourself, you can use either human-style nail-clippers, or the special pet ones you can buy in pet stores – the kind used for cats. The most important thing is not to cut right to the “quick” of the nail. (For guinea pigs with white nails, that’s the pink part. For guinea pigs with dark nails, the quick will be the slightly darker part at the end of the nail.)
General Health
A healthy guinea pig will be active and alert and interested in interacting with you (or its companions). It will communicate often – usually in squeaks. Its fur should look sleek and healthy, and it should move about normally. It should eat regularly and drink regularly, and its droppings should be dry and firm. And so long as you provide hard food and a block to gnaw on, your guinea pig shouldn’t suffer from overgrown teeth.
Symptoms that may indicate illness, or a problem, include: runny poos, noticeable loss of weight, patchy fur or bare patches, excessive scratching, skin lesions or weeping skin, lethargy, discharge from eyes or nose, excessive drooling, bleeding gums.
Runny poos/diarrhea may simply be due to you having introduced a new foodstuff, or a larger quantity of fresh foodstuffs than your guinea pig is used to. Things may settle down naturally, however if diarrhea continues, please take your pet to the vet; it’s easy for a small animal like a guinea pig to quickly become dehydrated and die.
Please don’t ignore excessive scratching or bare patches, as your guinea pig might have mites, parasites or a fungus infection. Note that skin ailments and lice infestations are common if soiled bedding isn’t regularly removed.
Note that guinea pigs sneeze just like humans do! And just like humans, excessive sneezing can be a concern – especially if accompanied by sniffles, wheezing or a constantly runny nose. Too, mention has been made of guinea pigs being allergic to certain antibiotics, so if your vet hasn’t had experience treating guinea pigs, please get them to check that the antibiotic they prescribe isn’t harmful. You may also need to quarantine your guinea pig from its companions until it recovers; keep your sick pet in a place with a constant temperature (not too warm or too cold) and provide plenty of water.
Another thing to watch out for is swollen joints, stiffness or trouble moving around. Any of these could be a symptom of Vitamin C deficiency. Your vet may wish to review your guinea pig’s diet, and recommend a Vitamin C shot.
To summarize: If you’re worried about your guinea pig for any reason, please take it to your veterinarian as soon as you can.
Reproduction/Breeding/Desexing
Please consult your local veterinarian.
Sources
Guinea Pig FAQ by Emily Rocke
NZ Cavy Club
SPCA (NZ)
Animates


