Contents
Introduction, measurements, wood sizes
Introduction
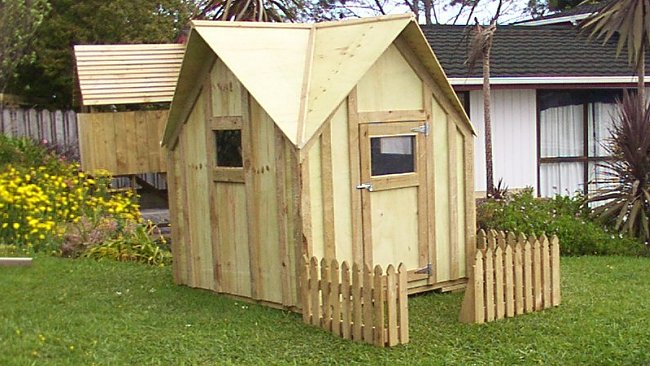
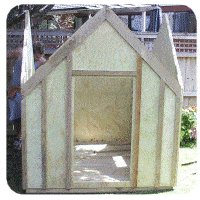
The roof on this kid’s cottage does require some thought, but with a bit of patience and by carefully following the plans and instructions you will soon end up with a very professional-looking playhouse.
This plan-set consists of detailed plans followed by step-by-step instructions.
The playhouse is specifically designed to minimize wastage.
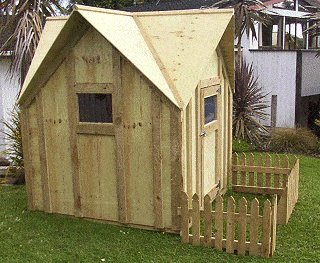
When its finished, the cottage will provide hours of fun for the kids!
Description
Floor area – 1600mm x 1600mm (64″ x 64″);
Overall height- 1900 (76″);
The roof and walls of the playhouse are constructed of plywood and battens.
The floor is a basic lumber frame, decked with battens (as floor boards).
About the measurements
All measurements throughout this project are given in both Metric (mm) and Standard/Imperial inches. The measurements are given first in millimeters (mm), followed by inches in brackets ( ).
Wood sizes
The wood sizes (widths and thicknesses) used for this project are as follows;
For the battens: 100mm x 25mm (1″ x 4″) and 50mm x 25mm (1″ x 2″)
For the floor frame: 100mm x 50mm (2″ x 4″)
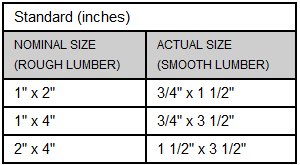
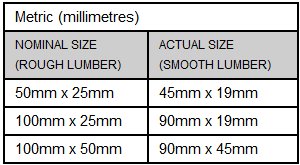
The lumber sizes given in this project are for rough lumber, i.e., lumber before being dressed, surfaced or made smooth.
If you prefer to use smooth lumber (dressed, surfaced) for the battens and floor frame, the size (width and thickness) will be slightly smaller than the sizes mentioned above.
When dressed, 100mm x 25mm (1″ x 4″) wood becomes approximately 90mm x 19mm (3/4″ x 3 1/2″) in size,
50mm x 25mm (1″ x 2″) wood becomes approximately 45mm x 19mm (3/4″ x 1 1/2″),
and 100mm x 50mm (2″ x 4″) wood becomes approximately 90mm x 45mm (1 1/2″ x 3 1/2″)
Either smooth or rough stock can be used for this project.
Below is a table giving the approximate size difference between rough and smooth lumber. For this project we used rough – you can use either.
Floor boards and battens
The floorboards and the battens around the top of the walls are of 100mm x 25mm (1″ x 4″) stock.
All the vertical wall battens are of 50mm x 25mm (1″ x 2″) stock.
In this project, we rip (cut lengthwise) 100mm x 25mm (1″ x 4″) stock down the middle to obtain the 50mm x 25mm (1″ x 2″) required for the vertical battens.
Material requirements
Lumber and plywood sheets
• 6 shts of 2400mm x 1200mm (4′ x 8′) plywood, 9mm (3/8″) thick, exterior grade, for the walls/roof.
• 9.6m (32ft) of 100mm x 50mm (2″ x 4″) lumber for floor frame
• 63m (210ft) of 100mm x 25mm (1″ x 4″) boards for floorboards and battens
Hardware
• 12 metal straps (or similar type fasteners) 150mm (6″) long for the door and roof beams.
• 200 only 32mm (1 1/4) wood screws
• 0.5 kg ( 1 lb) of 90mm (3 1/2″) galvanized flathead nails
• 0.5 kg ( 1 lb) of 30mm (1 1/4″) galvanized flathead nails
• 40 of 40mm (1 1/2″) small nails to fix window beading to battens
• 1 only door handle
• 2 only 150mm (6″) Tee-hinge and screws
• 1 piece of 900mm x 450mm (18″ x 36″) acrylic sheet (plastic glass) to cut into three pieces for the window panes
• Glue, sealant as needed
The Plans
The drawings below consist of the following:
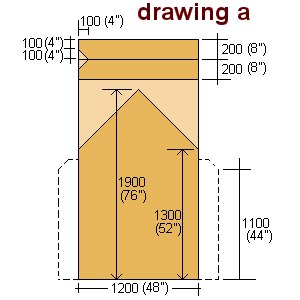
• The wall panels (drawing a)Cut the wall panels out of 1200mm x 2400mm (4′ x 8′) plywood sheets. One sheet will do one side. A total of four sheets required.
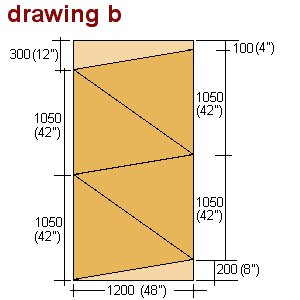
• The roof panels (drawing b)Cut the roof panels out of 1200mm x 2400mm (4′ x 8′) plywood sheets. Four panels can be cut from each sheet. A total of two sheets required.
• Front wall (drawing c)
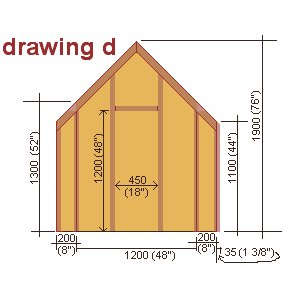
• Rear wall (drawing d))
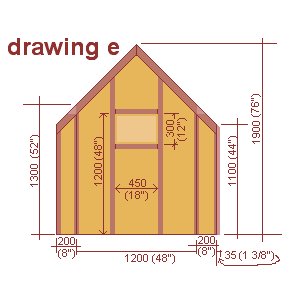
• Side walls (drawing e) Make two of these walls.

The Plans (continued)
Floor frame and floor
Corner detail
The door

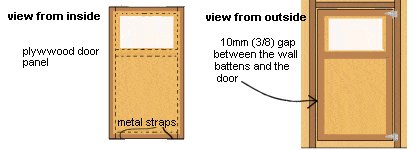
Note: Use the plywood off-cut from the door opening in the wall to make the door. Re-trim the edges of the plywood off-cut so that it is at least 10mm (3/8″) smaller than the door opening all the way around.
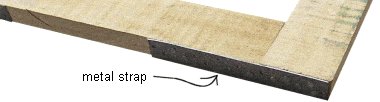
- Nail 150mm (6″) long metal straps (or similar type fasteners) to the top and bottom of the door (4 pieces in all) securing the top and bottom horizontal members to the side vertical members.
- Also ensure that there is at least a 10mm (3/8″) gap between the wall battens around the door opening and the finished door. (See drawing i)
The Instructions
Step 1. Mark and cut
- Mark and cut all the plywood panels, both wall and roof, to the shape and dimensions as shown in drawing a and drawing b in The Plans section.
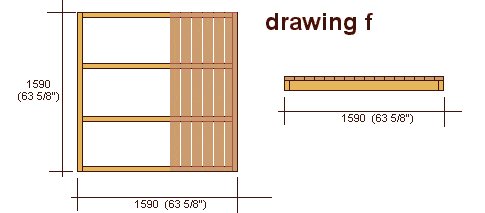
- Cut the floor frame members as per drawing f in The Plans section.
- Cut the floorboards: 16 @ 1590mm (63 5/8″) out of 100mm x 25mm (1″ x 4″) stock. Also put aside 20m (65ft) of 100mm x 25mm (1″ x 4″) stock for the battens that go around the top of the walls, the roof beams, ridge capping, and valley boards.
The remainder of the 100m x 25mm (1″ x 4″) stock can then be cut in half lengthwise, making the 50m x 25mm (1″ x 2′) stock that will be used for the vertical battens and the door.
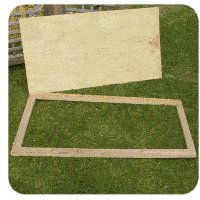
Step 2. The floor frame
- On a flat surface, make up the floor frame consisting of four joists and two end members out of 100mm x 50mm (2″ x 4″) treated stock to the dimensions as shown in drawing f in The Plans section.
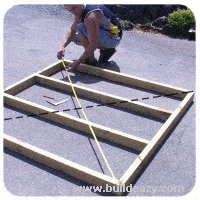
- When the floor frame has been nailed together, it is then ready to be made square.
Note: The frame is square when the distances between the opposing diagonals are equal.
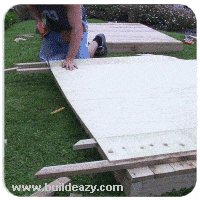
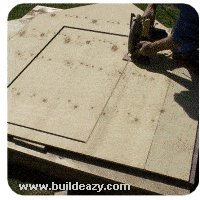
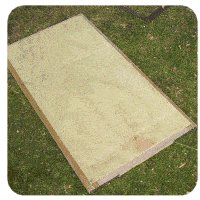
Step 3. The flooring
- Commence nailing the 100mm x 25mm (1″ x 4″) floorboards to the floor frame, beginning flush with one end. Continue placing and nailing the rest of the boards tight against one another, until the floor is covered.
- The last board will most likely need cutting lengthwise to finish even with the end of the floor frame.
Making the walls
Step 4. The walls
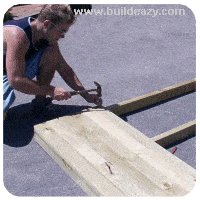
- Cut all the required battens slightly over length. The ends can be cut off after they have been nailed (or screwed) to the plywood wall panels. Cut all the vertical and raking wall battens with a 45 degree angle at the top end. The raking wall battens are of 100mm x 25mm (1″ x 4″) stock and the vertical (upright) battens are of 50mm x 25mm (1″ x 2″) stock.
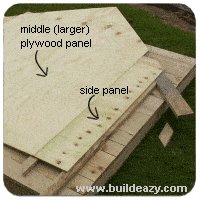
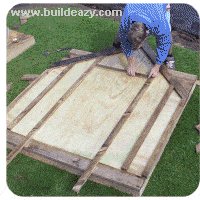
- Lay the perimeter battens on a flat surface (such as the cottage floor) under the middle (larger) plywood panel, so that the top raking battens are flush (even) with the top rake of the plywood panel and the side battens are half under the plywood panel sides. Refer drawings c, d, e in The Plans section.
- Nail or screw the plywood to the battens at 150mm (6″) intervals.
- Add the two smaller side plywood panels as per drawings c, d, e in The Plans section.
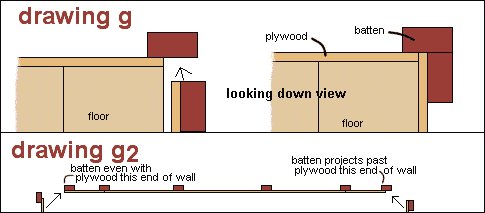
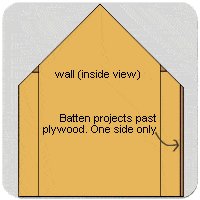
ALSO TAKE NOTE: The vertical batten is flush (even) with the plywood at one end of the wall, but at the other end the batten projects past the plywood by 35mm (1 3/8″) which is the thickness of a batten plus the plywood. This is the same with all four walls. Refer drawing g and drawing g2 in the Plans section for clarity.
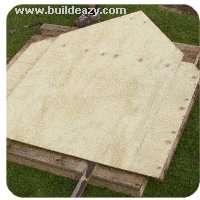
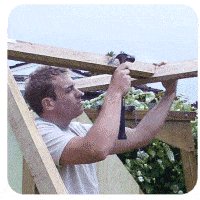
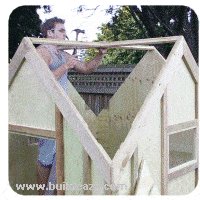
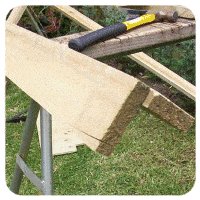
Step 5. The walls (continued)
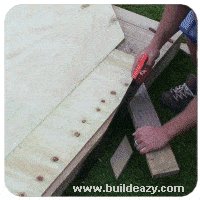
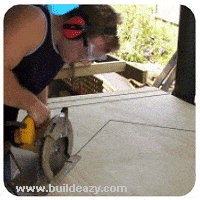
- When the plywood panels have been nailed or screwed to the perimeter battens and the battens under the joins, the overhanging ends of the battens can then be cut off (see the two pictures above).
Adding battens, window/door openings
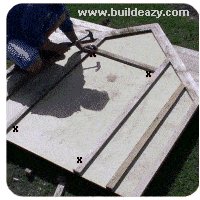
Step 6. The intermediate wall-battens
- Turn the wall over so the outside of the wall is facing up, i.e. all the battens are showing.
- Position the intermediate battens.
- Refer to drawings c, d, e in the Plans section for placement.
- Nail or screw the intermediate battens to the plywood, just enough to hold them in place until the wall is flipped over.
Note: The cottage floor makes a good working platform.
- Flip the wall over again and nail (or screw) through the plywood into the battens.
- The ends of any over-length intermediate battens can now be cut off flush (even) with the bottom of the wall.
- The placement of the battens around the wall perimeters are the same on every wall. However, the intermediate battens vary from wall to wall depending on window or door placement. Refer drawings c, d, e of the Plans section for clarity.
Step 7. The window and door openings
- Determine the door and windows cut-out area by making a nail hole through the plywood at all four corners. Make the two top corner nail holes 25mm (1″) down from the top door frame batten, and 25mm (1″) in from the side battens.
- Make the two bottom nail holes 70mm (2 3/4″) up from the bottom of the wall, and 25mm (1″) in from the side battens.
- Flip the wall over. The nail holes mark the corners of the door opening.
- Draw a cut-out line from hole to hole and cut out with a circular power saw. Adjust the blade to a depth slightly more than the thickness of the plywood.
Levelling the floor and standing the walls
Step 8. Levelling the floor and standing the walls
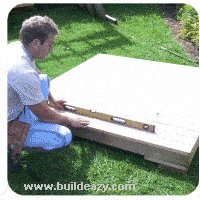
- Time to start putting it all together!
- Put the floor in place and ensure that it is level.
- To achieve this, you may have to put blocks or packers at varying points under the floor joists.
- Partly hammer in some temporary holding nails around the sides of the floor frame.
- Position them (the nails) 200mm (8″) in from each corner and 70mm (2 3/4″) down from the top of the floor.
- In all there will be 8 temporary nails, two along each side of the floor.
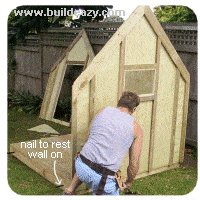
- This gives something to sit the walls on until such time as they (the walls) can be fixed permanently in place.
- Commence standing the walls by sitting one of them on the nails and then sliding it in place until the plywood is flush with the corner of the floor at one end and projecting 10mm (3/8″) past the floor at the other end.
- Refer drawing g of the Plans section for clarity.
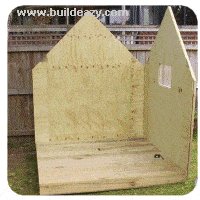
- Nail along the bottom of the wall into the joist.
- Continue with the other three walls in the same manner.
- It will now become obvious why the ends of each wall are made differently, why one end of the wall is flush with the floor area and why one end projects past… It all now (or should) fit neatly into place!
Making the roof
Step 9. Making the roof beams and fixing the roof panels
- For the roof beam cut two pieces of 100mm x 25mm (1″ x 4″) stock the same length as the floor, which should be 1590mm (63 5/8″) long.
- Rip down (cut lengthwise) each piece so that one side is 25mm (1″) wider than the other side, thus being able to make a symmetrical inverted ‘V’ when the two pieces are nailed together at right-angles. Confused? take a careful look at the diagram below.
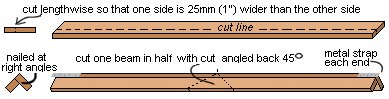
- Next cut one of the beams in half and then cut back at an angle of 45 degrees. (Also see diagram.)
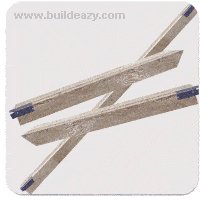
- Then fix a metal strap (or similar fastener) to the square-cut end of each beam (4 in all).
- Run (overhang) the metal straps by 35mm (1 3/8″) past each beam.
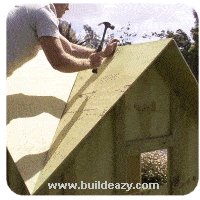
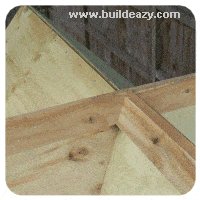
Fixing the roof beams in place
- Sit the long beam in position at the apex between the two side walls. The metal strap overhang will stop the beam from falling while it is being nailed in place.
- Next, fix the half beams in place in the same manner between the apex of the front and rear walls and the middle of the long beam.
Fixing the roof panels in place
- First nail the top of the roof panels flush (even) with the top of the beam.
- When the tops of all roof panels are fixed securely to the roof beam, THEN nail the panels to the raking (top) wall battens.
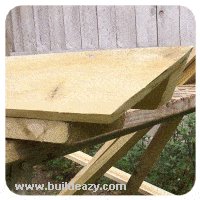
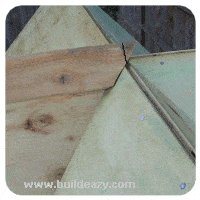
Fitting the ridge capping
Step 10. Making and fitting the ridge capping
- Make up the ridge capping in the same way as the roof beams were made in STEP 9.
- Make each one (four altogether) slightly longer than the length of the ridge along each dormer. Cut a 45 degree angle inwards at one end of each piece.
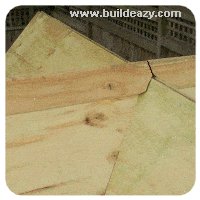
- Two of the pieces ONLY will need the end of the point cut off, vertically and directly above the adjacent ridge. See top-right picture below.
- Fix the ridge capping to the apex of the roof by nailing through the ridge capping into the roof beam.
First fix in place the two pieces of ridge capping with the points cut off (see picture) and then the other two pieces at right angles.

Fitting the valley boards
Step 11. Fitting the valley boards
- Make up the four valley boards out of 50mm x 25mm (1″ x 2″) stock slightly longer than the valley, as the ends can be cut off later. Cut two bevels along each valley board as shown in the illustration below.
- This is best done on a bench saw with the blade tilted 30 degrees. With a certain amount of skill, it can also be done with a circular power saw by holding the member in a vice type workbench.
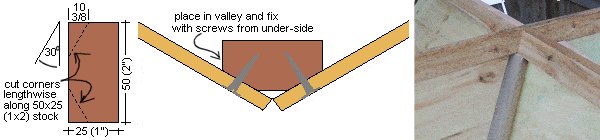
- The top of the valley board will need marking and cutting to fit snuggly into the corners of the ridge capping. This may need a bit of trial and error.
Trimming the ends of the ridge and valley boards
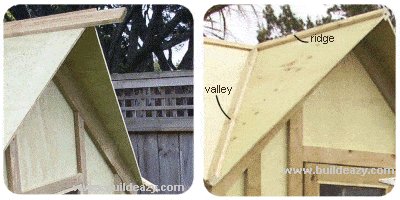
- With a sharp handsaw cut off the ends of the ridge capping and the valley boards so they are flush (even) with the plywood roof panels.
Making the door
Step 12. Making the door

- Make up the door to the dimensions as shown in drawings h and i in the Plans section.
- First, make up a rectangular frame from 50mm x 25mm (1″ x 2″) stock.
- Nail 150mm (6″) long metal straps to the top and bottom of the frame (4 straps in all) securing the top and bottom horizontal members to the side vertical members.
- Ensure that there is at least a 10mm (3/8″) gap between the wall battens around the door opening and the frame. Refer drawing i of The Plans section.
- Next nail the plywood panel to the frame.
- Use the plywood off-cut from the door opening to make the door. The edges of the plywood off-cut will need to be trimmed so that it is at least 20mm (3/4″) smaller than the frame all the way around.
- Cut out the window opening in the same way as shown in step 8.
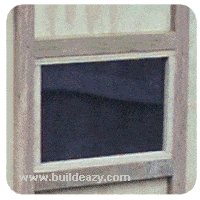
Fit the acrylic (plastic) window panes
- Cut the acrylic sheet with a bench saw or sharp handsaw to fit neatly in between the battens surrounding the window openings. The acrylic panes can be held in place with beading resting against the acrylic and nailed to the surrounding battens.
Note: The beading can be a ripping or off-cut from the left over batten lumber.
Fitting the door
Step 13. Hanging the door
- Hold the door in place with packers or wedges (ensuring an even gap all around) and add the hinges.
- Lastly, add a door handle of sorts and there’s the door!
The finishing touches
- Get the kids involved with the finishing touches.
This step is only limited by your (or their!) imagination.
Add a fence of sorts, a planter box or a few paving stones, maybe even a paint job.
This is the time to stamp your individuality onto the project.
Have fun!


How hard would this be to move?
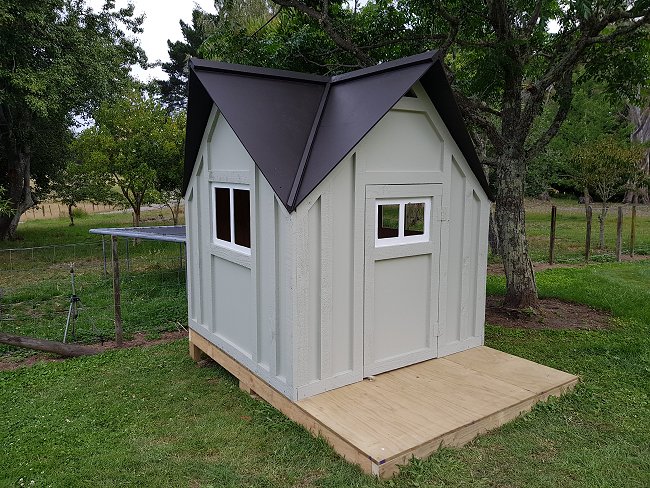
Hi, I purchased your plan and build this playhouse for my two grand daughters.
Attached hereto a pic of the end result.
I will add railings for the deck later.
Thanks. Good plan and easy to build. Regards
PC & Nici Groenewald
Hey! About how much did you spend on materials? If you don’t mind my asking, haha.