Contents
Introduction and about the measurements
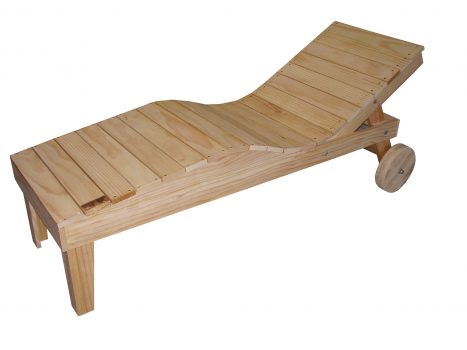
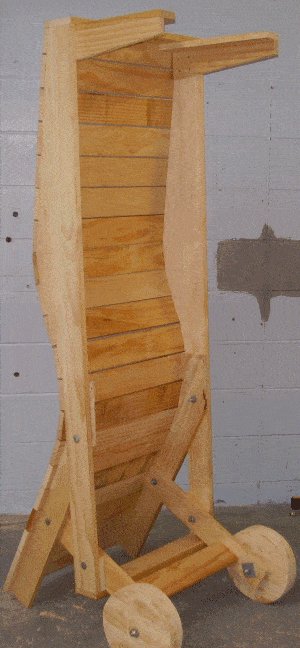
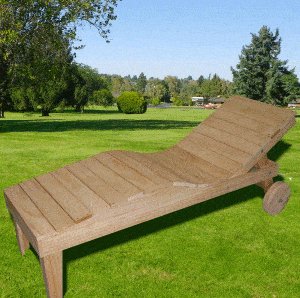
A lounger to relax in. This sun lounger is a bit different to most in so much as the back-rest cannot be adjusted. It is set permanently in its optimal position. This lounge chair can easily be moved from place to place in wheelbarrow fashion on its laminated wooden wheels. This particular lounger was made in early 2009. It has stood the test of time structurally and has proven to be a very comfortable unit. Over the years it has given many a comfortable relax.
The wood
This sun lounger is constructed solely out of 1″x 4″ (25 mm x 100 mm) wood which when dressed/planed becomes 3/4″ x 3 1/2″ (19 mm x 90 mm) finished (actual) size. The latter is what is used and what will be referred to throughout this project.

- Pay online by credit card, debit card, or Paypal using Secure Server Paypal. You do not need a Paypal account if paying by credit or …
|
The measurements.
The measurements throughout this project are given in both Standard (inches) and metric (mm). The standard measurements are best suited to North America and the metric measurements are best suited to Australasia and some other countries. The imperial (inch) sizes given in this project do not convert exactly to their corresponding metric (mm) equivalents (for practical reasons), so use one or the other and you should have no problems.
The Plans
Materials & the cutting list
| ITEM | DESCRIPTION | STOCK SIZE | LENGTH | QTY |
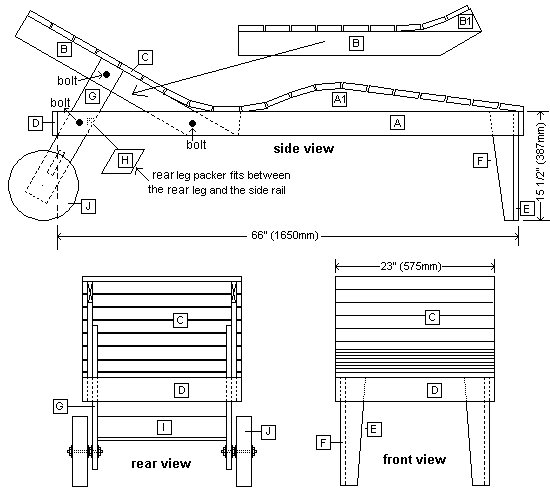
| [A] | side rail | 3/4″ x 3 1/2″ (90 mm x 19 mm) | 66″ (1650 mm) | 2 |
| [A1] | side rail add-on | 3/4″ x 3 1/2″ (90 mm x 19 mm) | 40″ (1000 mm) | 2 |
| [B] | backrest rail | 3/4″ x 3 1/2″ (90 mm x 19 mm) | 34 3/4″ (870 mm) | 2 |
| [B1] | backrest rail add-on | 3/4″ x 3 1/2″ (90 mm x 19 mm) | 13″ (325 mm) | 2 |
| [C] | slat | 3/4″ x 3 1/2″ (90 mm x 19 mm) | 23″ (575 mm) | 20 |
| [D] | end rail | 3/4″ x 3 1/2″ (90 mm x 19 mm) | 23″ (575 mm) | 2 |
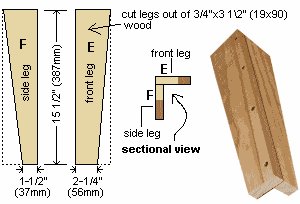
| [E] | front leg | 3/4″ x 3 1/2″ (90 mm x 19 mm) | 15 1/2″ (387 mm) | 2 |
| [F | side leg | 3/4″ x 3 1/2″ (90 mm x 19 mm) | 15 1/2″ (387 mm) | 2 |
| [G] | rear leg | 3/4″ x 3 1/2″ (90 mm x 19 mm) | 22″ (550 mm) | 2 |
| [H] | rear leg packer | 3/4″ x 3 1/2″ (90 mm x 19 mm) | 6″ (150 mm) | 2 |
| [I] | rear leg brace | 3/4″ x 3 1/2″ (90 mm x 19 mm) | 18 1/2″ (462 mm) | 1 |
| [J] | wheel | 3/4″ x 3 1/2″ (90 mm x 19 mm) | 12″ (300 mm) | 18 |
Hardware:
- 110 wood screws 1 1/2″ (38 mm) long.
- Four 3/8″ (10 mm) carriage bolts 2″ (50 mm) long.
- Two 3/8″ (10 mm) carriage bolts 2 3/4″ (70 mm) long.
- Wood glue.
For the wheel axles:
- Two pieces of 1/2″ (12 mm) galvanized threaded rod 5 1/2″ (138 mm) long, four 1/2″ (12 mm) nuts, two 1/2″ (12 mm) lock nuts, and eight 1/2″ (12 mm) washers.
Step 1: Cutting the pieces to length and shape
This project is made completely out of 3/4″ x 3 1/2″ (90 mm x 19 mm) wood.
- Begin by cutting all the pieces of wood to the lengths given in the cutting list.
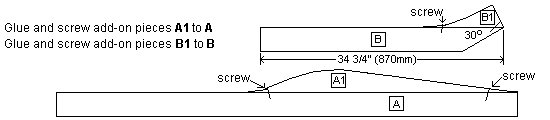
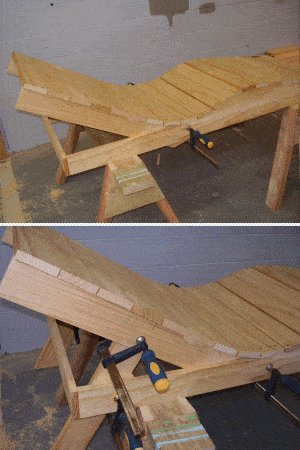
Cut the longest pieces first to minimize wastage. - Next mark the shape and cut pieces A1 and B1, which are the add-on pieces for the side rails and the backrest rails.
- The marking can be done by using the grid method and making a couple of cardboard patterns (templates).
The grid spacings are 1″ (25 mm).

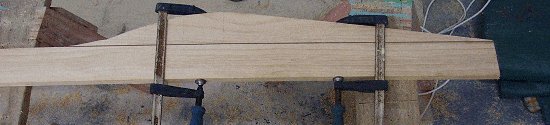
- When you have made the two cardboard patterns (templates), use them to mark the cutting lines on pieces of wood A1 and B1. See the picture below.

- Then cut the wood along the lines using a power saw, jig-saw and handsaw where needed.
- When the add-on pieces A1 and B1 are cut, attach them to the two side rails A and the two backrest rails B.
- Once glued and screwed, clamp the pieces together until the glue has dried.
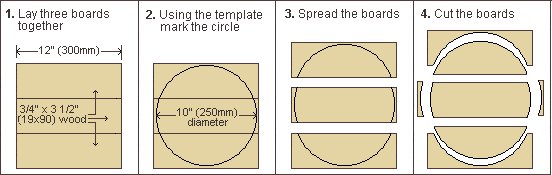
Steps 2 and 3: Making the wheel template and cutting the wheel pieces
Step 2: Making the wheel template
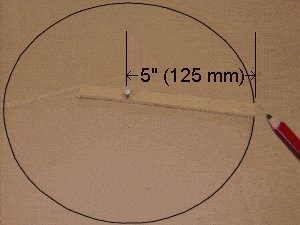
- First make a rotatable arm. Do this by cutting a strip of card or a thin piece of wood about 3/8″ (10mm) wide by 6″ (150mm) long, which is slightly longer than the required radius.
- Insert a push pin or small nail through the arm 5″ (125mm) from one end. Pin the arm to a sheet of card.
- Rotate the arm in a circle using the push pin/nail as the pivot point.
- Hold a pencil at the end of the rotating arm to mark the circle.
- Once marked, remove the arm and cut out the circle.
Step 3: Cutting the wheel pieces
- To make the two wheels you will need 18 pieces of 3/4″ x 3 1/2″ (90 mm x 19 mm) wood that is 12″ (300mm) long.
Step 4: Gluing the wheel pieces together
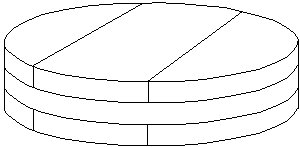
- Each wheel is made up of three layers of wood.
Each layer consists of three pieces of board placed together forming a circle. - Use the following instructions and also refer to the pictures below.
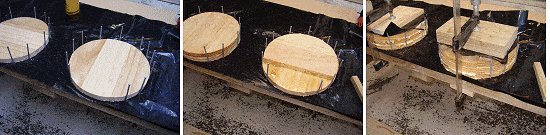
- Lay three pieces of board, making a circle (the first layer) on a tabletop or other even surface. It is a good idea to put some plastic (or something similar) under the boards to protect the tabletop from glue spillages.
- Hold the first layer in place by hammering a few nails around the perimeter of the circle as shown in the picture below.
- Add glue to the first layer and then place a second layer on top, making sure that the boards in the second layer run across (at right angles to) the boards in the first layer.
- Also make sure that you use a good exterior-type glue suitable for the task. Your local stockist should be able to advise you.
- Add glue to the second layer and then place the third layer on top, also making sure that the boards in the third layer run across (at right angles to) those in the second layer.
- Cover the top with a bit of plastic to protect the surface, then use a block of wood and clamp the layers together until the glue dries.
Steps 5 to 7: The main frame & front slats
Step 5: Unclamping and sanding the wheels
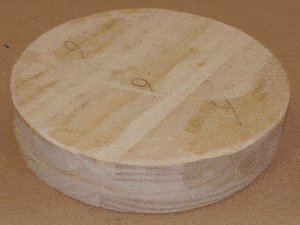
- Once the glue has dried, unclamp the wheels and sand them smooth.
Step 6: Assembling the side rails and end rails
- Lay the two side rails on a couple of saw horses, and glue and screw the two end rails to them, one at each end.
- Pre-drill the screw holes in the end rails prior to fixing.
Step 7: Fixing the front slats

- Pre-drill all the screw holes in the front slats, two holes at each end of each slat. Make the holes 1/2″ (12mm) in from the sides and 3/8″ (9mm) in from the ends.
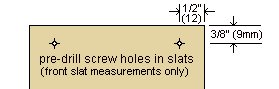
- Fix (glue and screw) the two end slats first (see drawing below), and then add the intermediate slats, making sure they are evenly spaced.

Step 8: Fixing the backrest slats
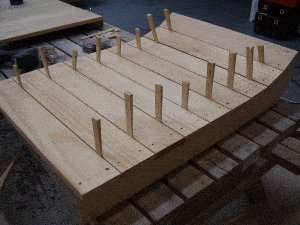
- Pre-drill all the screw holes in the backrest slats, two holes at each end of each slat. Make the holes 1/2″ (12mm) in from the sides and 1 1/8″ (28mm) in from the ends.
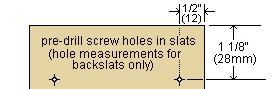
- Fix (glue and screw) the two end slats first, and then add the intermediate slats, making sure they are evenly spaced. Wedges of wood are handy to help space the slats. (See picture.)
IMPORTANT: Note that the drill holes in the front slats are positioned differently to those in the backrest slats. Why?
The front slats are fixed flush to the side rails, whereas the back slats overhang the backrest rails by 3/4″ (19 mm) each side. (See drawing below.)

- The frame with the backrest rails must be able to fit in between the frame with the side rails, as you will see in Step 9.
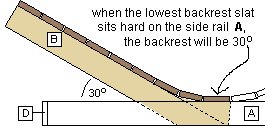
Step 9: Positioning the backrest and the rear legs
- The backrest frame should tuck neatly in between the side rails of the main frame.
- Position the backrest frame by eye, so that the slats in both frames appear like a seamless run from one to the other.
- When the lower-most slat on the backrest is sitting hard on the side rails of the main frame (see drawing below) and is parallel with the side rails, you can then clamp the backrest rail to the side rail on each side. The backrest should now be sloping up 30°.
- When the backrest is positioned and clamped, then the rear legs can also be positioned and clamped.
- The legs should be at right angles to the backrest and as hard up to the end rail as possible. Refer to the plans for placement.
Note that there is a packing piece that fits between the rear leg and the side rail. Refer to the plans for further detail.
Step 10: Adding the bolts, the rear leg brace and the wheels

- When the backrest and rear legs are positioned correctly and held steadfast with clamps, they can then be fixed permanently with bolts.
- Refer to the plans for bolt placement and refer to the hardware list for bolt sizes.
- Then screw in the rear leg brace.
- Next drill a 1/2″ (12mm) hole in both rear legs, up 2″ (50mm) from the bottom for the wheel rod (axle).
- Also drill a 1/2″ (12 mm) hole through the middle of both wheels and then fit them.
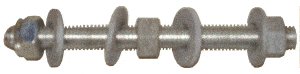
How to fit the wheel
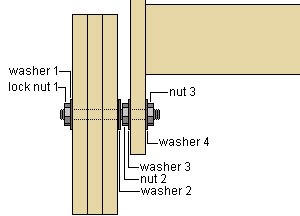
Follow the instructions below, referring to the accompanying drawing.
- Add locknut 1 to the end of a piece of 1/2″ (12 mm) galvanized threaded rod 5 1/2″ (138 mm) long.
- Add washer 1, then add the wheel and then washer 2.
- Add nut 2 but do not tighten it against the wheel. Allow the wheel to spin freely.
- Add washer 3 and then thread the end of the rod through the hole in the rear leg.
- Add washer 4 and nut 3 then tighten nut 3 against nut 2 so that the rod is locked firmly in the rear leg.
- Ensure that the wheel can still spin freely.
Step 11: Making and fitting the front legs
- Cut the front and side legs as shown in the drawing below. You will need two front leg pieces E and two side leg pieces F. (Note that the picture below only shows one pair).
- Screw pieces E to pieces F.
- Once the two legs are made, it is just simply a matter of tilting the lounge on its end and screwing the legs in place from underneath.
Done!


I really like your plans and like that its all made from 1×4’s
What type of wood did you use or recommend.
Thanks Carl