Contents
Introduction, Description & Measurements
Introduction
This is the 4th version of this particular project.
This updated version (take 4) of our previous plans highlights the value of user feedback and contributions. Many of the changes and improvements implemented in this version are as a direct result of user input.
One of the features of this version is the three options given on how to shape the individual pieces, and one of these options was contributed by a user.
This style of chair is pretty much universal, and the chair goes by various names depending on the region. ‘Adirondack’ chair, ‘Cape Cod’ chair, and the ‘Muskoka’ chair appear to be most common, but there are more.
Cape Cod Chair
$5.00Description
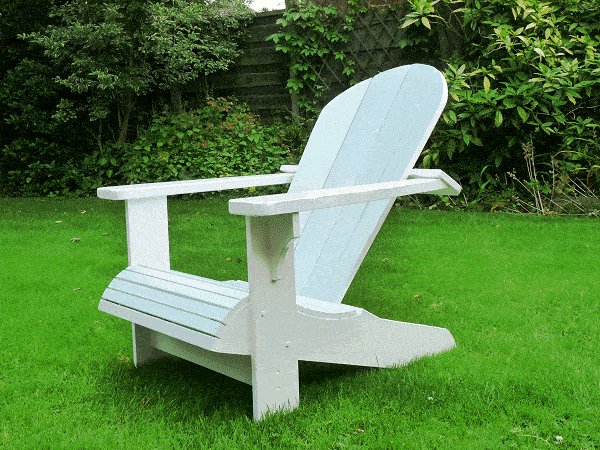
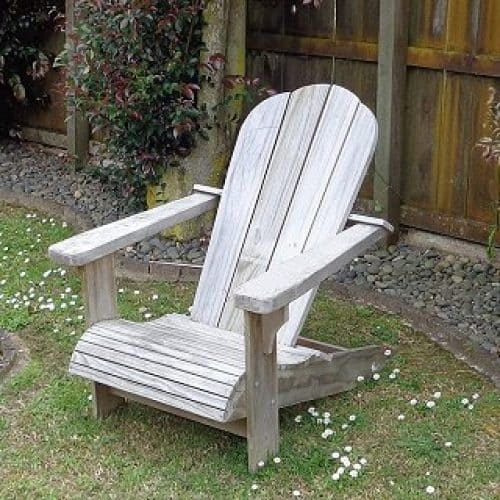
Our chair is bigger than most similar designs – more substantial and a bit more laidback (by that we mean the angle of the back recline). Furniture these days tends to be a bit more flimsy than that of yesteryear. This chair leans more towards the ‘old’ rather than the ‘new’.
It’s a chair you can sit comfortably in, kick back and relax.
Measurements
The dimensions given in this project are in both imperial (inches) and metric (mm).
Throughout the script, the imperial measurements are given first, followed by the metric measurements in brackets ( ).
For example: 2″ x 4″ (100mm x 50mm).
Note that most countries that use the imperial system generally call the smaller numeral first, for example: 2″ x 4″ (2 inches by 4 inches). Most countries that use the metric system generally call the bigger numeral first, for example: 100mm x 50mm (100 millimetres by 50 millimetres).
For rounding-off purposes, the imperial sizes in this project are not an exact match to the corresponding metric sizes.
In fact, a structure built using the imperial measurements (inches) will be approximately 1.6% larger than the same structure using the metric (mm) measurements – not really worth worrying about.
The imperial measurements are more suited to North America. The metric measurements are more suited to Australasia and other countries.
The size (width and thickness) of the wood used in this project is the ‘actual’ (true) size.
That is, the size of the wood after it has been dressed (surfaced, planed and/or seasoned). For example: 1 1/2″ x 5 1/2″ is ex 2″ x 6″, and the metric equivalent 140mm x 45mm is ex 150mm x 50mm.
Materials & cutting list
Structure
All the wood used for this project is 3/4″ (19mm) thick, with the exception of the arms which are 1 1/2″ (45mm) thick. That is to give a bit of meat to the arms and something substantial to screw the upper back support to.
What you will need
- For the seat sides, legs, back slats, upper back support, and the seat slats you will need…
38ft (11.5m) of 3/4″ x 5 1/2″ (140mm x 20mm) wood, allowing for a little bit of wastage. - For the front and rear spacers, lower back support, and arm braces you will need…
8ft (2.4m) of 3/4″ x 3 1/2″ (90mm x 20mm) wood, allowing for a little bit of wastage. - For the arms you will need…
64″ (1600mm) of 1 1/2″ x 5 1/2″ (140mm x 45mm) wood.
Note: When cutting, cut the longer pieces first to minimize wastage.
You will also need…
- Around 90 exterior-type 1 1/2″ (38mm) long screws.
- Four 3/8″ x 2″ (10mm x 50mm) galvanized carriage bolts and washers.
- Exterior-type glue
The cutting list
| ID | PART | STOCK SIZE | LENGTH | NO. REG’D |
| [a] | seat sides | 3/4″ x 5 1/2″ (140mm x 20mm) | 39″ (975mm) | 2 |
| [b] | rear spacer | 3/4″ x 3 1/2″ (90mm x 20mm) | 23 1/4″ (580mm) | 1 |
| [c] | legs | 3/4″ x 5 1/2″ (140mm x 20mm) | 22 3/4″ (570mm) | 2 |
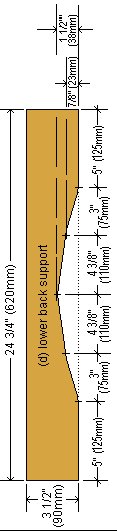
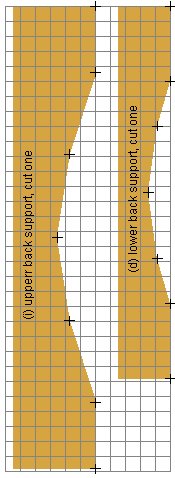
| [d] | lower back support | 3/4″ x 3 1/2″ (90mm x 20mm) | 24 3/4″ (620mm) | 1 |
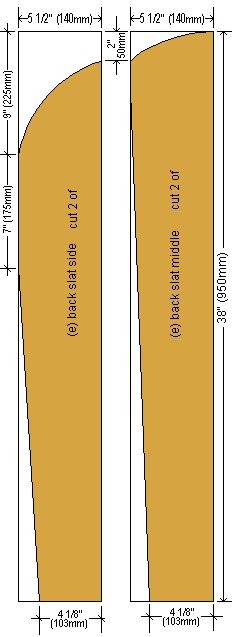
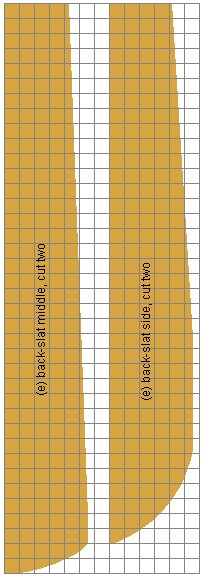
| [e] | back slats | 3/4″ x 5 1/2″ (140mm x 20mm) | 38″ (950mm) | 4 |
| [f] | arm braces | 3/4″ x 3 1/2″ (90mm x 20mm) | 7″ (175mm) | 2 |
| [g] | seat slats | 3/4″ x 1 3/8″ (35mm x 20mm) Rip (cut lengthways) from 3/4″ x 5 1/2″ (140mm x 20mm) stock | 24 3/4″ (620mm) | 16 |
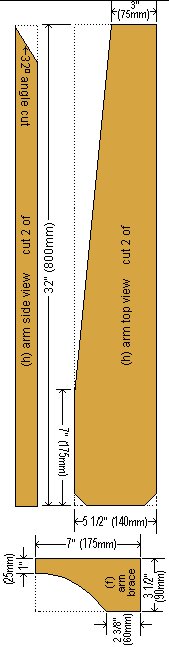
| [h] | arms | 1 1/2″ x 5 1/2″ (140mm x 45mm) | 32″ (800mm) | 2 |
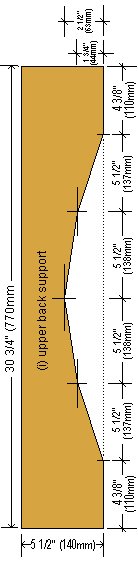
| [i] | upper back support | 3/4″ x 5 1/2″ (140mm x 20mm) | 30 3/4″ (770mm) | 1 |
| [j] | front spacer | 3/4″ x 3 1/2″ (90mm x 20mm) | 24 3/4″ (620mm) | 1 |
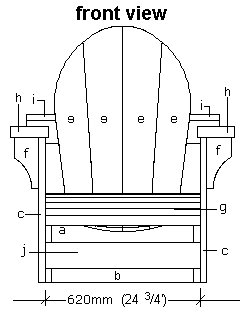
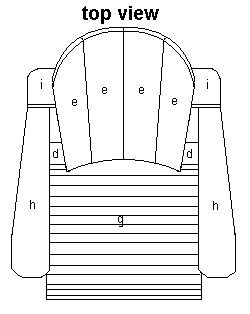
The side, front, & top elevation plans
Elevation plans
Side elevation plan

Shaping the wood by measurements
Shaping the wood: Option 1 – By measurements

Shaping the wood by grid plan
Shaping the wood: Option 2 – By grid plan
The grid plans below show the drawings scaled in a grid where the line spacings represent 1″ (25mm).
- To create a full size pattern, draw a grid onto cardboard with line spacings 1″ (25mm) true size.
- Then copy (draw) the shapes below, onto the cardboard using the grid lines as reference points.
- Cut the patterns out of the cardboard and use them to mark the chair pieces.


Shaping the wood by pattern printout
Shaping the wood: Option 3 – By pattern printout
This option involves downloading a PDF file containing a full size pattern for every piece of wood that requires shaping.
- Simply download the pattern file to your computer and have it printed out in full size.
- The file is a contribution from one of our readers.
- Quote: “As a thank you for the free plans you provided, I’d like to GIVE YOU a PDF file with the drawings. Users can email them to any copy, office supply or blueprint store, and get an ‘E-sized’ drawing (34″ x 44″)”.
- We know this works well because we tried it ourselves.
To download the file to your computer

Right click on the ‘PDF plan’ image to the right and a pop-up menu will appear.
From the menu select “Save Target As…” or “Save Link As…” depending on your browser.
Then select the directory where you would like the plans saved. For example, your desktop.
What then?
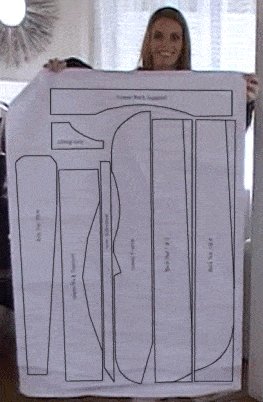
You can email the file to any copy, office supply or blueprint store, and get an “E-sized” drawing 34″ x 44″ (864mm x 1118mm)
Or…
You can put the file on a common portable data storage unit such as a USB stick and take it to the printers.
Note: E-size is a US standard 34″ x 44″. The metric equivalent is 864mm x 1118mm.
The point equivalent is 2448 x 3168.
Most blueprint stores would understand those measurements.
Alternatively
- You can print the file yourself onto standard A4 paper.
- How? On the printer setting page select ’tile large pages’ (if applicable) and ensure scale is set to ‘100%’.
- It should print out the full size pattern on tiles (A4 pages). In all, about 20 pages.
- It will then just be a matter of joining the pages together in sequence while gluing them onto a big piece of cardboard.
- Once dry, you can then cut out the full size patterns, and they are ready to use.
Shaping and cutting the pieces
Step 1. Cut the pieces to length
Take note, the two arm pieces are thicker than the other pieces.
Altogether there are three different stock sizes required.
Cut all the pieces to the lengths given below or refer to the cutting list on page 6.
From 3/4″ x 5 1/2″ (140mm x 20mm) stock…
- Cut two pieces at 39″ (975mm) long, for the seat sides.
- Cut two pieces at 22 3/4″ (570mm) long, for the legs.
- Cut four pieces at 38″ (950mm) long, for the back slats.
- Cut four pieces at 24 3/4″ (620mm) long, for the seat slats, and then rip each piece into four equal strips making 16 slats.
- Cut one piece at 30 3/4″ (770mm) long, for the upper back support.
From 3/4″ x 3 1/2″ (90mm x 20mm) stock…
- Cut one piece at 23 1/4″ (580mm) long, for the rear spacer.
- Cut one piece at 24 3/4″ (620mm) long, for the lower back support.
- Cut two pieces at 7″ (175mm) long, for the arm braces.
- Cut one piece at 24 3/4″ (620mm) long, for the front spacer.
From 1 1/2″ x 5 1/2″ (140mm x 45mm) stock…
- Cut two pieces at 32″ (800mm) long, for the arms.
Step 2. Make the patterns and/or mark the wood

Some of the pieces will need to be shaped, therefore the shape must first be drawn on wood.

You can either make a pattern and trace the shape onto the wood, or mark directly on the wood by measuring from a plan drawing.
In this documentation there are three options on how to do this.
- Option 1 – Measuring off a plan (see page eight).
- Option 2 – Making a pattern using a grid (see page nine).
- Option 3 – Printing out a full size pattern (see page ten).
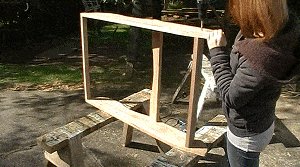
Step 3. Cut the shapes
Once all the shapes have been marked onto their respective pieces of wood, either by tracing around a pattern or by measuring from a plan drawing, cut them out using a tool such as a jig-saw to cut any curved lines.
Assembling the seat unit
Step 4. Fix the lower back support to the seat sides

- Place the two seat sides (a) on an even work surface (saw-horses, etc.) and fix the lower back support in place with glue and wood screws.
- Note: For every joining, ensure that there is ample glue and pre-drill all screw holes in the covering piece of wood.
Step 5. Fix the rear spacer
- Fix the first seat slat (g) in place (just to keep the seat sides parallel) and then turn the unit on its side and fix the rear spacer (b) in place.
- Pre-drill the screw holes in the seat-slat (one each end) and also through the seat-sides (two each side, where the rear spacer lines up) and allow ample glue.
Step 6. Fix some of the seat slats

- Turn the unit upright.
The first seat slat (g) is already fixed in place. - Add another 10 seat slats, one next to the other, in the same manner i.e., pre-drill, glue and screw.
- Note: Do not fix the rest (the last 5) just yet, we will do that at a later stage.
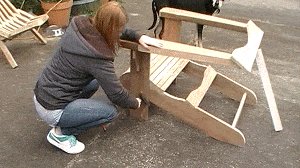
Step 7. Join together a leg, brace and arm
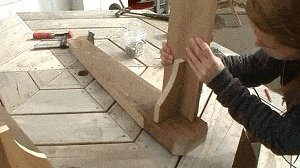
Join together the legs (c), braces (f) and arms (h) in the following order.
1) Glue and screw the braces to the arms. Refer to the ‘side elevation plan’ on page 3 for placement. Screw through the arm (pre-drill first) into the brace.
2) Lay the arms upside down and centralize the leg and brace combinations (also upside down) on the arms, 2″ (50mm) in from the front.
Assembling the arm and leg unit
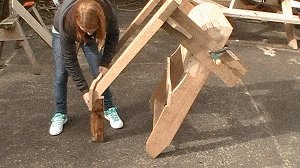
Step 8. Toe-nail the legs to the arms

- Once the legs and braces are positioned correctly on the arms (currently in upside-down mode, see step 7.), they can then be secured.
- Do this by gluing and toe-nailing (skew, angle nailing) through the sides of the braces and legs into the arms.
Pre-drill the nail holes in the braces and legs to avoid splitting.
Step 9. Align the two arms with one-another
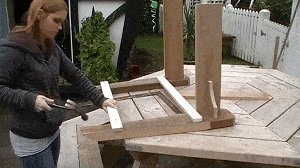
- Lay the two leg, brace and arm combinations upside-down on a flat surface.
Space them apart, parallel. The distance between the legs (currently in upright position) should be 24 3/4″ (620mm), which is the length of the front spacer (j). - Lay and fix (temporarily) a couple of strips of wood across the arms to hold them (the arms) parallel in position, just until the upper back support (i) and the front spacer (j) have been added.
Step 10. Add the upper back support and the front spacer
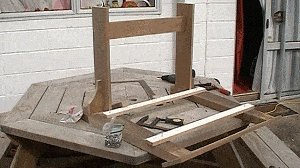
- Add the upper back support (i) and the front spacer (j).
- Refer to the ‘side elevation plan’ on page 3 for positioning.
- You will probably need a hand to hold them in place while fixing.
Step 11. Prepare the seat
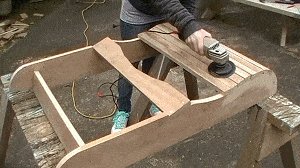
- Now is probably a good time to give the seat slats a good sanding to make sure the seat profile is nice and rounded.
- Not all the seat slats are fixed in place at this stage.
This is to allow room for the back slats to be fixed without too much problem.
Joining it all together
Step 12. Join the arm assembly
- Place the arm/leg assembly on even surface and prop it up so that the arms are parallel with the even surface.
- Then slip the seat assembly in between the legs, so that it sits on the front spacer (j).
- Position the seat assembly in relation to the arm/leg assembly as shown in the ‘side elevation plan’ on page 3.
- Then firmly clamp the legs to the seat sides.
Step 13. Tilt the chair in preparation for the back slats
- At this point everything should be in its rightful position, i.e., the arms should be parallel with the surface and the leg should be 29″ (725mm) from the very back of the seat sides as shown in the ‘side elevation plan’ on page 3
- Now tilt the chair back and prop it slightly off the ground in order to place and fix the back slats with ease.
Step 14. Fix the back slats
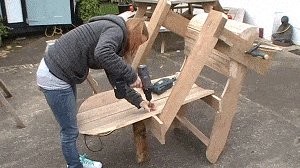
- Put glue along the shaped edges of both the upper back support (i) and the lower back support (d).
- Lay the two middle back slats (e) in place. The positioning will be obvious. Make the bottom of the back slats flush with the bottom of the lower back support.
- Pre-drill the screw holes and screw the back slats to the back supports.
- Then place the two side back slats one each side of the middle back slats, and screw them in place.
The final touches
Step 15. Secure the legs/seat sides
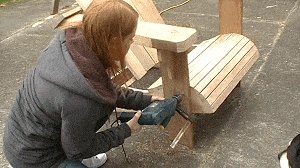
- Now you can permanently fix the legs to the seat sides.
- Drill two 3/8″ (10mm) diameter bolt holes through each leg and seat side.
Refer to the ‘side elevation plan’ on page 3 for positioning. - Insert 3/8″ x 2″ (10mm x 50mm) galvanized carriage bolts with washers into the holes and tighten them.
Step 16. The remaining seat slats
- You can now add the rest of the seat slats.
Don’t forget to use ample glue first, and pre-drill the screw holes in the seat slats. - The edge of the last seat slat may need a bit of shaping to fit it neatly against the back slats.
- Each seat slat only requires one screw at each end. That along with the glue is sufficient.
Step 17. Final touch-up
Just the final touch-up now.
A bit of a sand here and there.
Paint?
Whatever you like. Limited only by your imagination. A white chair would pretty much fit anywhere, whereas a specialist color might be just the trick to suit a particular surrounding.
Step 18. Done!
Well, that’s about it: A big, strong, and comfortable, ‘Cape Cod’, aka ‘Adirondack’, aka ‘Muskoka’ chair.
Happy relaxing!


G’Day from Down Under and a big thanks to you guys at Buildeazy for the Adirondack Chair plans.
We’ve just completed the first of the two chairs to go by our pool and are really pleased with the outcome. We made some minor mods, but mostly followed your guidelines. Once we’ve finished the chairs, we’re going to make a small table with the top designed to match the seat backs.
All the best from,
Nick, Lindsay, Lukas
Melbourne, Australia
Hi From Australia. I have just completed a half size Adirondack chair for my three year old granddaughter.
Note the hand painted fairy on the back slat. I used recycled hard wood from an old BBQ trolley.
Thank you for a great plan.
Barry, Port Macquarie, Australia.
I am a colonel in the United States Air Force Medical Service and am stationed at MacDill Air Force Base in Tampa Florida as the medical group commander.
In December 2009, I left Tampa for a deployment to Joint Base Balad, Iraq.
My first real deployment in 24 years of service in the Air Force.
It hit home in mid-December that I was leaving for Iraq when I had to pack away my work shop at the house.
I have been a serious woodworker since 1999. My forte is mostly clocks, shadow boxes and pens, but I’m willing to venture outside my comfort zone.
When I arrived at my deployed location, I was please to find out that there was an expeditionary (aka austere) self-help shop on the installation and in fact it was located right around the corner from the hospital I would be working in.
After establishing where my office was located and seeing each of the executive offices on the south side had patios, I decided one or more Adirondack chairs would be a nice addition to the space.
After “Googling” Adirondack Chairs on the net, I reviewed several options that popped up until I settled on the design I found on Thingstobuild.com.
Editors note: http://www.thingstobuild.com is a subsidiary of https://www.buildeazy.com/
I printed the design and then contacted the self-help shop to gain access for my project.
I was told by the enlisted manager that I was welcome to come over, get safety certified and have access to the shop to build the chairs. He explained that I could make the chairs out of any material I wanted as long as it was pine. Yes, the only building material in this expeditionary self-help shop was pine.
I told him my preference then would be to make them out of pine.
Over the next three Sunday mornings, I was able to produce three of the chairs with only minor modification from the original design (pictures attached).
The chairs have been a big hit and they are in fact much more comfortable than I had anticipated.
Even the Air Force Surgeon General who was visiting thought they were fantastic.
This project was a great way to get my woodworking fix while spending six months 7,000 miles away from family and home.
My first project when I get settled in back in Tampa, FL will be to make some not-so-expeditionary Adirondack chairs for my wife and me.
Thank you very much for making these designs available.
DENNIS L. BEATTY, Col, USAF, MSC
I have build 4 chairs in 2009, and want to thank you very much. The chairs are really fantastic. I have made them from mahogany.
Greetz from Holland
I adapted you Adirondack chair plans to make a garden bench that I wanted to show you. I simply made a back support piece then carried the seat planks right up and over the back. Thanks for the basic plan. Mimi, France
Hi there,
Thanks for the great plans. I really enjoyed building the adirondack chair. I liked it so much that I built a bench that I’ve attached a picture of. If someone builds the chairs the bench uses the same principles and can be easily built.
Sincerely,
Jake
Here are the chairs I made from your plans. I made them from pallets.
Sent from my iPod
Joel
This is the Adirondack chair that I built from your plans, using scrap lumber.
The plans work great. Thanks for posting them.
My next chairs will be with new lumber using the pattern I made from the first chair.
David
Dear BuildEazy,
Here’s my Adirondac Chair, I substituted 6 x 2’s for the arms and I used tannalised timber throughout. Thanks for a super plan BuildEazy, I’m starting another one next week!!!
Mark, Dublin, Ireland.
I have made a few minor changes to the plan, but the original plan was very good.
I was not able to find any step by step instructions on how to assemble the chair once all of the pieces were cut.
I managed to figure it out. I have used Western Red Cedar, and I am in the process of wood plugging all of the screw holes that I have countersunk.
It takes a lot of extra time, but it really makes the chair look great when it is done.
I have found that Red Cedar really cuts easy, but at the same time, it really marks easy, so be careful when using it.
I may used pressure treated Hemlock for the frame and legs next time. The cost of Cedar is pretty high as well.
I will probably make a few more chairs for family and friends. This was a fun project.
Rob Stevenson (Comox, British Columbia, Canada)
Adirondack chairs and Greenhouse.
I just wanted to send along pictures of two recent Buildeazy projects that I completed.
My wife and I love to spent time outside in our ever expanding garden so we thought a greenhouse, using your plans, would be a great addition to our planting hobby. (See photo of the greenhouse https://www.buildeazy.com/greenhouse/).
The greenhouse plan was simple, well laid out and easy to understand. I am sure that we will enjoy it for many years to come.
The second project was a pair of adirondack chairs.
I searched the web and viewed many different styles of adirondack chairs, yours however was most like the chairs that I remember from years ago at a family lake house.
I used several pieces of 1x12x12 cedar that I had in storage to complete these chairs and side table.
After finishing with 3 coats of clear satin spar varnish they are not only good looking but will hold up to the elements for years to come.
We are currently searching your plans for our next project. Thank you for providing such a great website!
Kevin and Valerie Cowan Upstate South Carolina
Hello, This was my first major project for me. I would like to thank you for your plans that I found very helpful. My chair has a plaque on the upper back brace which reads”Made in Canada by Grampa D” -2008
We’re expecting our first Grandchild this year in August.
It will be very comfy holding the baby.
Thank You Larry D. Ontario,Canada.
Hi, Thank you for the wonderful plans. I really enjoy making the Adirondack chairs. I make them with pressure treated wood for legs and bottom and with pine for rest, I have made for 14 so far and give them to friends and family as gifts.
Bob Letendre, Swansea MA
Hi There — this is a comment on the “Adirondack Chair” project.
I just built this chair — it’s a nice design, and not too tricky. When it was all done, though, my wife and I both found that there was too much backward “lean” to the back. So I did a certain amount of jiggering, and tilted the back up by several degrees; it’s more comfortable for me this way.
To build the chair with less lean, there are three changes that you need to make to the plans as printed.
1. On the Chair Frame, when cutting out the “notch” that will hold the lower back brace, you need to cut out less, at a less steep angle. Where the plan suggests a 106 deg. angle, use about a 95 deg. angle, and only cut down 1/4″. Then cut along a line from that point to the middle of the frame, as on the plan.
2. The arms should be 3″ shorter, so 28 1/2″.
3. The angle cut at the back end of the arms needs to be 20 deg. instead of 32 deg.
That’s it. Make these 3 changes, and everything fits together as the original, but the back is 11-12 degrees more upright.
One other person commented that the chair could be a little narrower; I’d agree. Also, if you reduce the overall width to 23 3/4″ or less, then you can get 4 slats out of an 8 foot 1 x 2, rather than three. So all you have to do is reduce the width of:
a) the lower back brace
b) the upper back brace
c) the slats
d) the front spacer
e) the back spacer
by a consistent amount (1-3″). There’s enough room between the back slats and the arms at the top to make this change without changing the curved cut of the top and bottom back braces.
Have fun with it! I’m really happy with my chair, now that I’ve jiggered it into shape.
Kirk Ormand Oberlin, OH
Hi Buildeazy Team,
Thank you very much for your perfect plan!
In Hamburg I’ve seen these chairs in a similar design 20 Years ago.
Here in Germany they call them a ‘Hummel Chair’. In 2008 I decided to build some wooden chairs and I remembered the look of those chairs.
My internet search brought me to your homepage. The material I used was the rest of my Siberian Larche constructed terrace.
The first chair is finished, the second will be ready next weekend. I’m very satisfied and proud to built them.
Kai, Hamburg in Germany
Here is a chair I built from your plans which I modified slightly. I used Eastern Red Cedar and they turned out beautiful. Thank’s for such a good looking chair.
Ben Hewett North Carolina
I found these plans very easy to follow. I used western red cedar. It took me about 5 hours per chair. My wife loves them.
I also built a matching table. Thanks for the great website.
Ben Davidson
Just completed my first two chairs from the excellent plans.
I used some mahogany I acquired years ago.
I fitted a wedge between the arms and upper rear support as I only used single thickness arms.
Alan Williams
Just a big thanks from sunny cape town south Africa…just built the Adirondack chair …had lots of fun doing it…and wow how comfortable and sturdy. Thanks for a great plan Wayne Haylett CT ZA
more great plans lads,, my wife wont see me again this weekend !!!!!!!!!!!!!!! keep it up ! Paul Mcdermott
Hello from Upstate New York my fellow wood workers !
Owning a construction firm I started creating items for my wife that she and I wanted in our home (Entertainment Center, Dinning Room Table and Chairs, etc). Only being 30 minutes away from the Adirondack Mountains we are always on an adventure in our spare time. Going to the Adirondack Museum in the summer last year we discovered these nice rustic chairs. My wife begged me for a few months to make a set for our new deck over looking the St. Lawrence River. I thought it would be a special gift to give her on Christmas. With only 12 hours total on both chairs they were beautiful. I woke up about 4 am on Christmas morning and put them in our living room . The next morning I was relaxing in them watching TV in one of the chairs. She came out and just cried ! SHE LOVED THEM !!! Now they stay in the living room because they are so comfy.
Thank You So Much !!
John and Leslie Alexandria Bay, NY
Just built two of the Adirondack chairs. Cool plans ! I used 5/quarter treated decking that I had laying around. Here is a picture of one of the chairs. You may use the picture as you wish. – Click on image to enlarge.
Eddie Brater lll. Harrison Ohio.
Thanks for the plans!
I built a couple of these chairs last year and they are a real hit with everyone who sits in them.
Steve Brockton, Northampton, England
Hello from Glasgow Scotland just finished the chair and its looking very smart with its new coat of olive green preservative. apart from misreading the chair frame angle of 106deg. I cut it at 160deg. which turned the side frames into the back and front stretchers so all was not lost! and a bit of a struggle at the final assembly “only one pair of hands im afraid”it turned out great I would recommend this project to anyone now for the two seater version and some decent weather to try them out so thanks again for everything . Danny Fay Scotland
I have just finished my chair and I am stoked with the results! thanks to you guys! Steve and Di
This is a Fabulous Project For Me. I’ve seen this chair being made on all sorts of programs and wanted so badly to be able to make one myself. Now I can. Thanks for the plan. Andrew
suppose one can’t complain about a free set of plans, eh? And I shouldn’t, they are excellent, and the drawings a brilliant addition. It’s just that those of us who don’t think in metric…. are s.o.l. I note that your new porch swing plans are in both metric and inches and for one, I would vote for having all the plans in both, if you could manage it.
You might want to mention on the Adirondack Chair Plans site that Adirondack is a huge national park in upstate New York, popular with American titans of industry in the 19th century, and still very unpopulated in the winter months, and known for both its rustic furniture, as well as for beautiful mountains, lakes and rivers. A great place to visit, because of its remote location, even in the summer it is not crowded.
All the best,
Mike Connelly Brunswick, Maine
I have completed 2 of these chairs and what fun I had doing so. The chair are in my tv room because of its comfort. Have orders to make more so it goes to show great plan, great project and great comfort.
Brent Nicol Cape Town Somerset West
I had been itching for about a year to make one of these, I now have completed two, and plan to make a half dozen more for the family members, everyone that has seen them, then sits for a spell, just love them. Found the plan very easy to follow, and the chair assembly was/is a piece of cake.
John North Island New Zealand.
Greetings from sunny South Africa – this time from the whale watching capital of the world : HERMANUS !!
I have also just completed the Adirondack chair using – as a basis – your fantastic FREE plan ! And what A beautiful chair it turned out to be !! I am really so pleased with my Adirondacks ( I made two ! )
After some thinking, looking at pictures of other Adirondacks, and planning in my head, I made the following
Changes to your basic plan :
6 Back slats instead of 4
Raised the Leg to 600
Instead of using a 45mm arm with an angle at the back, I opted for a 45mm upper back frame cut at an angle and fitted below the arm at the back
A more flowing pattern for the arm brace
Increased the chair frame size to 180 X 30 X 1000
The above changes made for a really handsome chair – and I am rightly pleased ! Thank you, Buildeazy, for Helping me with a lovely project !
Please put me on your mailing list for forthcoming free plans !
Morne
Hi Morne
Any chance I could see a pic of your design?
[email protected]
Thanks,
James
I have just finished building my first Adirondack chair, based on your specs. Your design was the best, by far, of all the designs I was able to locate on the internet
I have to tell you that it turned out beautifully. The proportions were just about right. The only change I would suggest is that the chair be narrower by about 2-3″.
Thanks for furnishing such detailed drawings.
Irv Berman
Hey thanks a lot for the Adirondack chair plan, It worked out fantastic although I haven’t decided on a finish for it yet.
I added a few modifications to the plan because I really needed the chair to fold for storage, just thought maybe some others may also be interested in how I did this although it isn’t rocket science as I’m sure you would agree.
During the build I wasn’t really sure if the mods would work properly, but I can assure you they do.
I could have went with another design that folds as part of the plan but decided against it due to liking your robust design so much. Over the moon for my first wood project, now for some footrests and a table to match.
I attach photos of my Cape Cod Chair. Before and after painting (white with duck egg blue seat and back).
This is the most technically difficult wood working project I have undertaken and I had 1 or 2 head scratching moments. I started out with the version 1 of the plans which I had saved years ago (it took me about 8 years to finally pluck up the courage to attempt it) then realised that there are new instructions that are easier to follow.
It is built from ‘5th’ planed ‘Red Wood Pine’, which I understand is scotch pine (not Sequoia!) which is readily available in the UK, cheapish and fairly durable but very heavy. I would have loved to have used cedar, but good cedar is expensive and difficult to obtain in the UK.
I had never used a table saw before and bought an extremely cheap and nasty one specifically for the project. I was worried about cutting the 32 degree angle on the arms but that worked reasonably well with new sharp hand saw and a bit of care.
Thanks for a great project.
Hi, just wanted to say Thank you very much for being so generous with your plans for the Adirondack Chair.
I really enjoyed building these chairs and your plans are so easy to follow. Cheers.
Thank you so much for the plans for Cape Cod Chair.
I am not a builder by any means but managed to put together a very comfortable chair using the plans.
Family now requesting me to build them one..but first i gotta have time to enjoy my chair..
Nico – Auckland, New Zealand
Here’s my handiwork! Great chairs! I used eastern white cedar 1x and laminated two pieces for the arms.
I needed to add an extra brace near the top of the backs in order to keep the boards straight, but it worked out fine.
Stain is Behr clear redwood. Thanks for the great plans!
Peter Brown
Hi, Thank you very much for your perfect plan!
Years ago I’ve seen these chairs in a similar design and wanted to purchase them.
Now I built my own four Adirondack chairs of your design.
The picture the latest chairs just fit for me and the family.
H Kornaat The Netherlands
Greetings, Buildeazy Team.
I bought the plans for the Adirondack Chair a few weeks ago. Siwsan said she wanted a pair, so what could an obedient and well trained husband do but say, ‘Yes, dear’?
A fairly easy build, the first one took a few days, the second,less than a day.
Now to make a pair for my brother and wife, in Rtorua?. Such is life, but they are very dear to me, these two.
Problems during the build, nothing major, really, the photos (Included) will show a slight change in the front of the arms on one of the chairs. A semicircular front will become the standard from now on.
Also, for short people, the front leg will be reduced by 50mm not, as one might suspect, from the bottom of the leg, but the top. This to keep the ground to seat height correct.
For the next two, I shall cut the angle where the top back support attaches to the rear of the arms, first, before I cut the taper to the arm itself. Much easier to do it this way, and increases safety when cutting, as it means the Compound mitre saw will always be cutting to my right, and controlled by my stronger arm.
The top and bottom back support rails will be installed dry, uncut and then scribed as to the cuts needed to provide full support for the four back rest upright boards. Then, of course, glued and screwed into their permanent position. The off cut from these will be an infill piece to close the gap between the last seat rail and the front of the back boards.
The tops seat rails were rounded on the edges, somewhat roughly, and smoothed to provide an even contour at the contact areas for the users legs.
Because these chairs will always be outside, and enjoying New Zealand?s stronger sunlight, with the hole in the ozone layer, and tempered by a high rainfall in our specific area, all joints are glued with a foaming gap filling polyurethane adhesive and screwed with stainless steel screws. Attaching the front legs to the seat sides is the only joint not glued, but held with two galvanised coach bolts.
All in all, a well thought out design. I will take progress photos of the next two, describing each process and why.
Bob P.
Salut je suis un artisanat algérien
Hi I am an Algerian craftsman
No name given
Video: https://www.youtube.com/watch?v=B26nIjvsYVc&feature=youtu.be
I used your plans for the Adirondack Chair and drew it up in AutoCad with a few minor changes. I extruded the parts and assembled them according to your plans and created a couple bmp’s and thought I’d send them to you.
Hope I didn’t infringe on any copyrighted material.
Thanks for an easy build. The video on YouTube was great too. I was stuck on how to get the arms together.
Steve Willison
Great design,im attemting to build some for my patio.could you send me plans for the songle chair.
Great build. I made one change that made the chair a bit more sturdy in the arm rest area. Instead of using nails to attach the arm rests with the legs, I chose to attach 2 pieces of wood (on each side) of 3 x 2 1/4 with screws (pictures attached). It’s not visible from the top or sides of the chair and looks fine even when you squat down to look. This gave the arm rests a very sturdy hold to the legs. I used a piece of scrap from the 1×6 wood left over. Overall it’s a great looking chair and now I’m in trouble because the better half wants a second one and a matching table. I’m thinking stain/sealer to keep the wood grain look. What do you think?
Adirondack chairs never dies! Best chair by far.
I have made a few, about 20 years ago. It is time to make a few more to my varenda.
Looking at this specific project, I have the feeling that the arm was set way too high. Wonder how it deteriorates the general conform of the chair.
Claudiano
These plans were simple to follow for me. Western red cedar was used. I spent roughly 5 hours on each chair. Thank you for the useful information.
Good plans, once I got my head round the assembly, it went fine. Made mine from pallet wood, here is the first one.
Excellent plans!
Found these plans online and want to give it a try.
Had it printed at Staples. Cut out and glued them to 1/8″ luan for templates.
I am in the middle of making one out of 3/4″ pine with treated pine for the ground contact sections.
This one will be just like the plans but the next one I build I will alter slightly. The 24 3/4 width of the slats and braces I will change to 23 3/4 to cut down on waste and the slats will be 1.5″ wide so I can just buy 2 pieces of 1x2x8 pine and get 16 slats.