Contents
Making the formwork profile
Introduction

When the concrete gate posts were first made we didn’t give too much thought as to what sort of cap would adorn the tops.
Then, while on a Sunday drive, we spotted a post with a suitable cap and took a photo: that’s it to the left. The challenge was to make something similar!
This is how we made our concrete caps.
Making the formwork
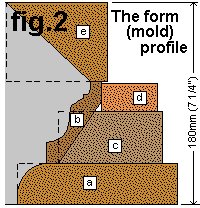
- Formwork for the mold had to be made to give the desired profile (shape) to the concrete cap.
- The profile (shape) was achieved by putting together an assortment of various profiled woods.
- The profile of the mold was not going to be exactly the same as the cap that was being copied because the mold was subject to the profiles of wood that could be sourced locally.
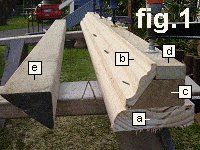
- The formwork was made up in one continuous length about 2400mm (8ft) long, using a compilation of various profiled woods.
- The length was then cut into smaller segments to make the mold.
The wood used was…
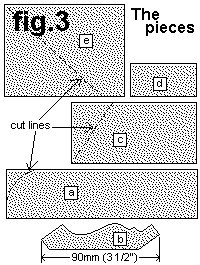
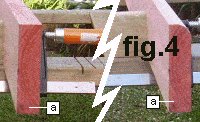
Piece [a]: 140mm x 35mm (5 1/2″x 1 3/8″) stock.
One of the corners were rounded (fig.4) using a plane and sand paper.
Piece [b]: 90mm (3 1/2″) wide decorative cornice trim
Piece [c]: 90mm x 45mm (3 1/2″x 1 1/2″) stock with one side cut on an angle
Piece [d]: 50mm x 25mm (1″x 2″) stock
Piece [e]: 90mm x 70mm (2 1/2″x 3 1/2″) stock with one side cut on an angle
Assembling the formwork pieces
- The pieces were then glued, temporarily nailed and clamped together (fig.1).
- The nails were only used to help hold everything together until the glue dried.
Making the form
Cutting the mold pieces
- When the glue dried the temporary holding nails were pulled out of the length of formwork and the clamps were removed.
- The formwork was then cut into the pieces required to make the mold.
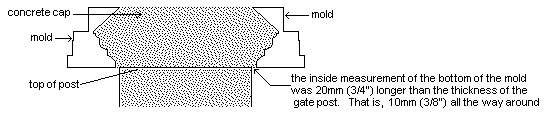
- The mold was made in ‘picture frame’ type fashion.
- The inside measurement at the narrowest point was 20mm (3/4″) more than the thickness of the gate post.
- In short, the bottom of the finished concrete cap was to be bigger than the top of the concrete post by 10mm (3/8″) all the way around.
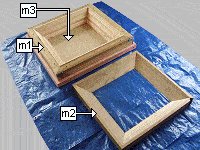
The pieces that made up the mold
- When all the mold pieces were cut there were…
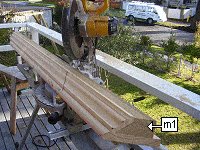
- Four pieces that made the lower part of the mold [m1].
- Four pieces to make the upper part of the mold [m2].
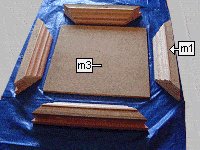
- One piece of 20mm (3/4″) thick sheet board (plywood or similar) to make the base of the mold [m3].
- Four strips of wood [m4] fixed to the top of the lower part of the mold [m1] to hold the upper part of the mold [m3] in place. (See next page).
Assembling the mold
- The upper [m2] and lower [m1] mold was put together in picture frame type fashion.
- All the corners were screwed together so that the mold could be easily disassembled.
- The base [m3] was then screwed to the underside of lower part of the mold [m1].
Applying oil and diesel to the mold

- A mixture of 50% used car oil and 50% diesel was brushed over the mold.
- The mixture acted as a releasing agent, allowing the mold to be pulled cleanly away once the concrete had dried.
Preparing the form
Leveling the mold
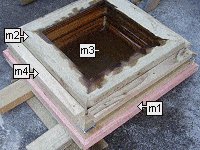
- The lower part of the mold [m1] was packed level on the ground.
- The upper part of the mold [m2] was placed on top.
- Some strips of wood [m4] were screwed around the top of the lower mold [m1] to hold the upper part of the mold [m2] in place.
Applying oil and diesel to the mold again
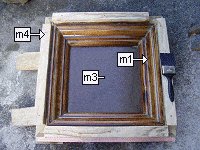
- The top part of the mold [m2] was removed and another coat of used car oil and diesel mixture was applied to the inside of the mold.
- Any excess was wiped off with a rag.
Clamping the mold shut
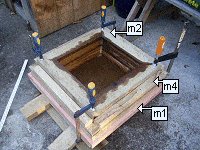
- The top part of the mold [m2] was then put back in place on top of the bottom part of the mold [m1] and clamped tight.
Placing concrete into the mold
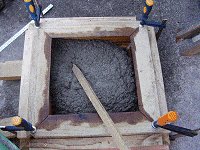
- Wet concrete was then placed inside the mold.
- For information on how to mix concrete click here
- The concrete was poked continuously a few times after each shovel-full to help get rid of any air pockets and make the outsides of the concrete smooth.
All the concrete in
- When the mold was full, the wet concrete was again poked repeatedly with a stick to settle the concrete, get rid of any air pockets and make the concrete nice and smooth against the mold.
- The outside of the mold was also repeatedly tapped with a hammer, making vibrations to settle the wet concrete even more.
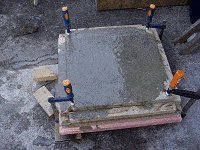
The unveiling
- The mold containing the concrete was left in the shade, covered with wet or damp cloths and left for about four or five days to allow for curing and minimize the risk of cracking.
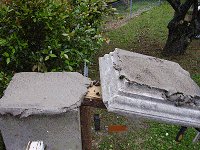
- The clamps were then taken off, and the top part of the mold [m2] came away with ease. The cap was then turned upside down, screws at two corners of the lower mold [m1] were taken out and the rest of the mold came away, also with ease.
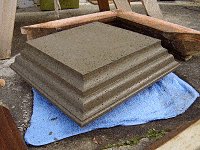
- The concrete finish wasn’t too bad. There were a few small air pockets around the outside but it was perfect for the rustic look that was wanted.
- The mold was cleaned, re-brushed with oil and diesel, put back together again and used to make another two concrete caps.
- When the caps were taken out of the mold, they were left for another few days to further harden just to ensure that no edges would be damaged while handling.
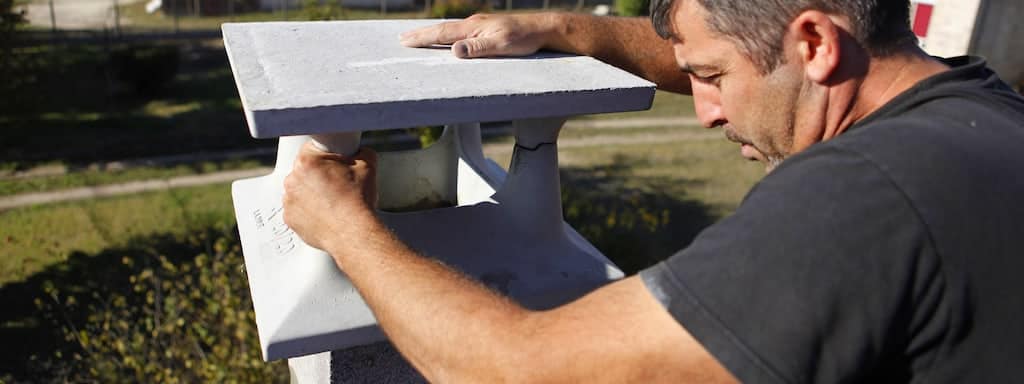
Making the mortar and placing the cap
Preparing the post top
- Metal washers were packed level and glued close to the edge of each corner on top of the concrete posts.
- As the cap was heavy, about 80kg (177 lbs), the washers made level points for the cap to sit on, eliminating the hassle of trying to make the cap the right height and level once the mortar had been applied.
Lifting the cap
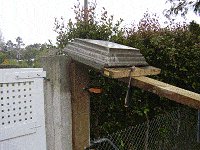
- A strong, well-supported plank was used to slide the cap towards the top of the concrete post.
- The cap at that stage was upside down.
Mixing the mortar
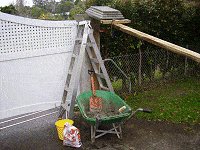
- Dry mortar mix was put in a wheelbarrow and mixed with water until a uniform, fairly stiff, paste-like mixture was achieved.
- The dry mortar mix came in a pre-mixed 25kg (55lb) bag which was enough to do three caps, allow for plenty of spillage and still have some left over.
- Mixing instructions were on the bag.
Applying the mortar
- The top of the concrete post and the cap were brushed clean.
- The mortar was applied to both the top of the concrete post and to the concrete cap.
Turning the cap over in place

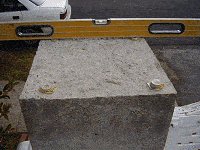
- The cap was then flipped over on to the top of the post.
- The cap was twisted slightly back and forth until it sank into the plaster and sat level on the washers.
- The excess mortar that oozed out the sides was scraped off with a trowel and the lower part of the post was hosed to get rid of all the spilt mortar.
- And that’s that!


Very informative and well put instructions. You were obviously working on your own, and I assume lifting the pillar cap would have been heavy work. I’ve used Perlite in the concrete mix to reduce the weight, to no detriment to finish of cap.