Contents
Introduction
Why have a kid sleep in a full-size bed when a kid’s-sized bed will do the trick ever so comfortably and free up much needed bedroom space?
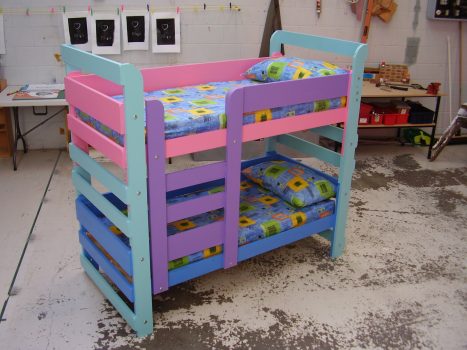
These beds are for kids. They are not full size and will not accommodate adults. They are ideal for places unable to fit a full size set of bunks. They can be used as bunks (one on top of the other) or as two single beds that can be tucked neatly into a corner.
The bunk set comprises of two single kids beds, two bunk ends, and a ladder.
Once made, The beds, the bunk ends, and ladder can be easily assembled to make the complete bunk set (one bed on top of the other).
The bunks and bed frames can just as easily be disassembled, should you wish to revert back to two single beds or even one.
With these plans and instructions you can make as little as one bed or make the complete bunk set which can be assembled and disassembled at will.
There are only three different stock sizes required for this project. They are 3/4″ x 3 1/2″ (90mm x 19mm), 3/4″ x 5 1/2″ (140mm x 19mm), and 3/4″ x 1 1/2″ (40mm x 19mm).
Those wood sizes are common stock and should be available in most areas.
Kids Bunk Beds
$5.00
|
Important safety notes
Bunks are a real space-saver but there are a lot of safety concerns when it comes to bunk beds, brought about by the number of accidents which do happen with them.
Read ‘a few bunk bed safety guidelines’ on pages 14 and 15 and then ponder if bunk beds are the best option for you.
It is recommended that only kids six years or over use the top bunk, that firm rules be dished out by the parents or guardians, and that bunk beds be built to a strict criteria.
Identifying the parts
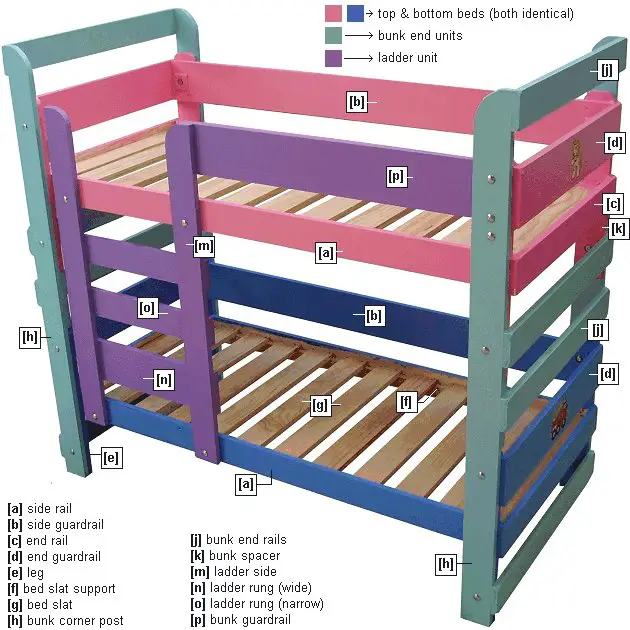
The bunk set comprises of five individual sections – which are two single kids beds, two bunk ends, and a ladder.
Once the sections are made, they can be easily bolted together (assembled) to make the complete bunk set (one bed on top of the other).
The bunks can just as easily be disassembled, should you wish to revert back to two single beds or even one.
About measurements, bunk size, mattress
Bunk size
Each bed is 64 1/2″ (1641mm) long overall and 30″ (750mm) wide, and is the perfect size for kids up to the age of 10 or so.
The overall bunk unit is 64 1/2″ (1641mm) long, 31 1/2″ (787mm) wide and 57 1/2″ (1437mm) high.
The mattress area is 63″(1575mm) by 27″ (675mm).
If you already have a mattress that is a slightly different size, with a little bit of thought it shouldn’t be too difficult for you to alter the plans to suit.
About the mattresses
Use 4″(100mm) thick foam rubber mattresses.
Sometimes it is cheaper to buy standard size single mattresses and cut them to size.
There always seems to be special or sale somewhere for such items. It is not too hard to cut a standard size single foam rubber mattress. Just take off the cover, cut the foam rubber to size with a long bladed craft knife and re-sew the cover to suit.
About the measurements
The measurements throughout this project are given in both Standard (inches) and Metric (mm).
The standard measurements are given first followed by the metric measurements in brackets ( ).
For example: 3/4″ x 3 1/2″ (90mm x 19mm).
For rounding-off purposes, the metric sizes in this project are not an exact match to the equivalent imperial sizes.
A structure built using the metric measurements will be approximately 1.6% smaller than the same structure using the imperial (ft and in) measurements. Not really worth worrying about.
The imperial measurements are more suited to North America. The metric measurements are more suited to Australasia and other countries.
The size (width and thickness) of the wood used in this project is the ‘actual’ (true) size.
That is the size of the wood after it has been dressed (surfaced, planed and/or seasoned).
The ‘nominal’ size of the wood is in reference to its size before being dressed.
The ‘actual’ size of the wood is smaller than the ‘nominal’ size.
Below is a ‘nominal’ versus ‘actual’ chart, listing the wood sizes that are used in this project.
| Standard (inches) | |
| NOMINAL SIZE | ACTUAL SIZE |
| 1″ x 4″ | 3/4″ x 3 1/2″ |
| 1″ x 6″ | 3/4″ x 5 1/2″ |
| Metric (millimetres) | |
| NOMINAL SIZE | ACTUAL SIZE |
| 100mm x 25mm | 90mm x 19mm |
| 150mm x 25mm | 140mm x 19mm |
Materials, Cutting list for the beds
The cutting list for the beds
Note 1: The list below is for two beds. If you only want to make one bed, then halve the list. The cutting list for the bunk ends and ladder is on the next page.
Note 2: Dimensions in the cutting list are finished (actual sizes). Also, when purchasing the wood be sure to allow extra for waste.
Wood
| ITEM | DESCRIPTION | STOCK SIZE | LENGTH | HOW MANY PIECES |
| [a] | side rail | 3/4″ x 3 1/2″ (90mm x 19mm) | 63″ (1575mm) | 4 |
| [b] | side guardrail | 3/4″ x 5 1/2″ (140mm x 19mm) | 63″ (1575mm) | 2 |
| [c] | end rail | 3/4″ x 3 1/2″ (90mm x 19mm) | 30″ (750mm) | 4 |
| [d] | end guardrail | 3/4″ x 5 1/2″ (140mm x 19mm) | 30″ (750mm) | 4 |
| [e] | leg | 3/4″ x 3 1/2″ (90mm x 19mm) | 22″ (550mm) | 8 |
| [f] | bed slat support | 3/4″ x 1 1/2″ (40mm x 19mm) | 63″ (1575mm) | 4 |
| [g] | bed slat | 3/4″ x 3 1/2″ (90mm x 19mm) | 27″ (675mm) | 24 |
Hardware
176 wood screws 1 1/2″ (38mm) long, 32 screw caps, and some wood glue.
Note 1: The screws should be long enough to go almost through two thicknesses of wood.
Materials, Cutting list for the bunk ends
The cutting list for bunk ends and ladder
Note: The list below is for the two bunks and the ladder only.
To make the complete bunk set, you will also need the materials listed on the previous page.
Wood
| ITEM | DESCRIPTION | STOCK SIZE | LENGTH | HOW MANY |
| [h] | bunk corner post | 3/4″ x 3 1/2″ (90mm x 19mm) | 57 1/2″ (1437mm) | 4 |
| [j] | bunk end rails | 3/4″ x 3 1/2″ (90mm x 19mm) | 31 1/2″ (787mm) | 8 |
| [k] | bunk spacer | 3/4″ x 3 1/2″ (90mm x 19mm) | 7 1/2″ (187mm) | 2 |
| [m] | ladder side | 3/4″ x 3 1/2″ (90mm x 19mm) | 41 1/2″ (1037mm) | 2 |
| [n] | ladder rung (wide) | 3/4″ x 5 1/2″ (140mm x 19mm) | 22″ (550mm) | 1 |
| [o] | ladder rung (narrow) | 3/4″ x 3 1/2″ (90mm x 19mm) | 22″ (550mm) | 2 |
| [p] | bunk guardrail | 3/4″ x 5 1/2″ (140mm x 19mm) | 1 @ 40″ (1000mm) | 1 |
You will also need a small piece of MDF board or plywood about 5/16″ (9mm) thick to make some nut guards from.
Hardware
- 12 5/16″(8mm) carriage bolts 1 3/4″ (45mm) long, plus nuts and washers.
- 10 5/16″(8mm) carriage bolts 2 1/2″ (65mm) long, plus nuts and washers.
- 60 wood screws 1 1/2″ (38mm) long.
Note Check the bolts will go through two thicknesses of wood and three thicknesses of wood respectively, and take a washer and nut neatly. It is important that the bolt does not stick out past the nut when tightened. If so, cut excess length off with a hacksaw.
PLANS – The bed
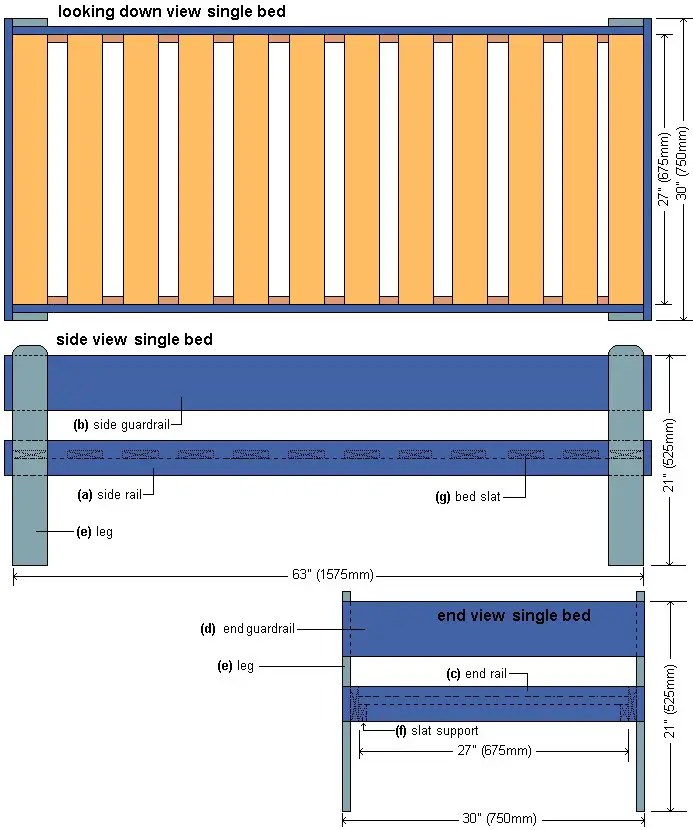
Bed plans
Above are the plans for a kids bed.
You will need to make two of these. The plans for the for the bunk ends and ladder are on the next two pages.
PLANS – The bunk ends
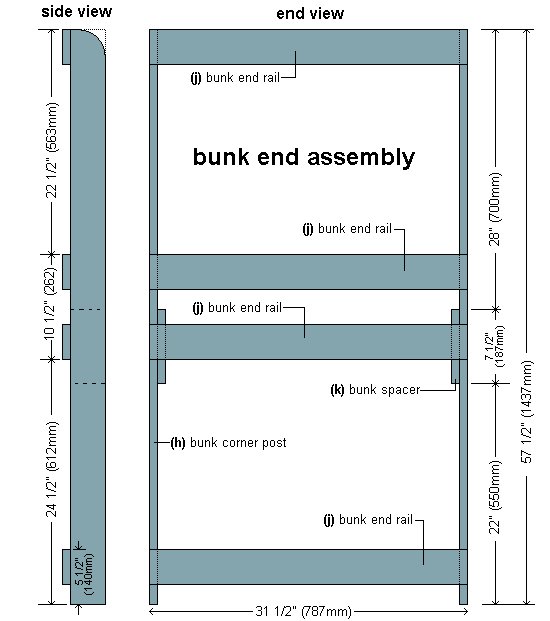
The bunk end plan
Above are the plans for a bunk end. You will need to make two of these. The plans for the beds are on the previous page, and the plans for the ladder are on the next page.
PLANS – The ladder
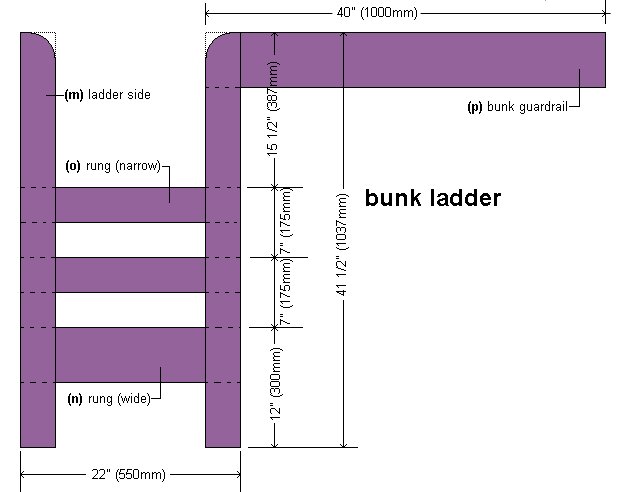
The bunk ladder plans
Above are the plans for the bunk ladder. The plans for the for the beds and the bunk ends are on the previous two pages.
Making the bed – Base and ends
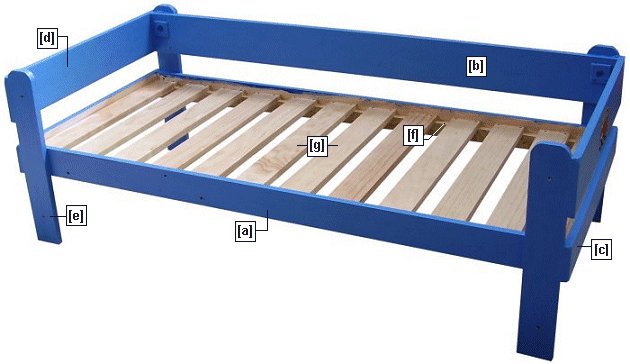
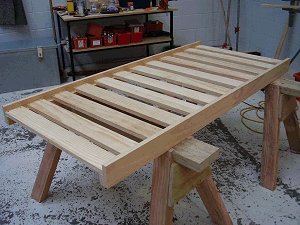
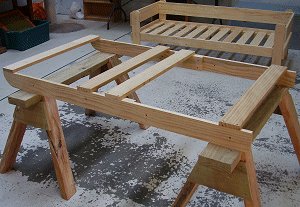
Step 1: Make the bed base
- Cut all the pieces according to the measurements given in the cutting list on page 4.
- Glue and screw the two slat supports (f) to the two side rails (a).
Screw about every 8″(200mm) apart and pre-drill the screw holes through the slat supports (f). - Place the side rails apart on a couple of sawhorses and spread the bed slats (g) along the top of the slat supports, allowing approximately 2″ (50mm) gap between each slat.
Glue and screw the slats to the slat supports. Use two screws at each end of every slat.
Pre-drill the screw holes through the slats (g).
Step 2: Make the bed ends
- Round the top ends of the legs with a jig-saw, sander or other suitable tool. Refer to drawing above.
- Lay the legs (e) on edge on a couple of sawhorses.
- Place the end rail (c) and the end guardrail (d) in position on top of the legs and glue and screw them in place.
- Use two screws at each end of both the rail and the guardrail.
Pre-drill the screw holes through both the rail and the guardrail.
Note 1: Ensure that the rail and guardrail are at right angles (square) to the legs.
Note 2: Ensure that the distance in between the two legs is the same as the overall width of the bed base.
Making the bed – Ends and side guardrail
Step 3: Fit the bed ends
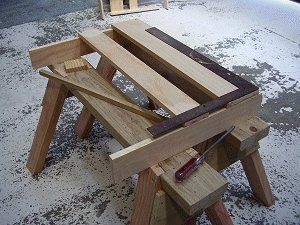
- Lay the bed base on its side, on top of a couple of sawhorses.
- The two bed ends should fit snugly into place, one at each end of the bed base.
- Add a bit of glue and slip the legs (e) of the bed ends over the side rails (a) of the bed base.
- Butt the ends of the side rails (a) up tight to the end rails (c) and then screw through the insides of the side rails (drill first) into the legs.
Step 4: Add the side guardrail
- Now just a matter of adding the side guardrail (b) to the back of the bed.
- Fasten the side guardrail (b) to the top part of the legs (e) in line with the end guardrails (d).
- Use four screws at each end of the side guardrail.
Pre-drill the screw holes through the side guardrail. - Sand any sharp corners and paint.
Making the bunk ends and ladder
Step 5: Cut the pieces
- Cut all the pieces for the two bunk ends and the ladder according to the measurements given in the cutting list on page 5.
- Always cut the longest pieces first and then cut the shorter pieces out of the off-cuts.
- The four bunk corner posts (h), the bunk guardrail (p) and the two ladder sides (m) will each need to have one of their corners rounded as shown in the plan drawings in pages 7 and 8.
Use a jig-saw, fret saw or similar tool.
Step 6: Make the two bunk ends
- Lay the bunk corner posts (h) on edge on a couple of sawhorses.
- Place the bunk end rails (j) on top of the bunk corner posts, position them and then glue and screw in place.
Refer to the drawing above for placement. - Use two screws at each end of each rail (j).
Pre-drill the screw holes through the rails (j).
Note 1: Ensure that the rails (j) are at right angles (square) to the corner posts (h).
Note 2: Ensure that the distance in between the corner posts (h) is the same as the overall width of the bed including the legs.
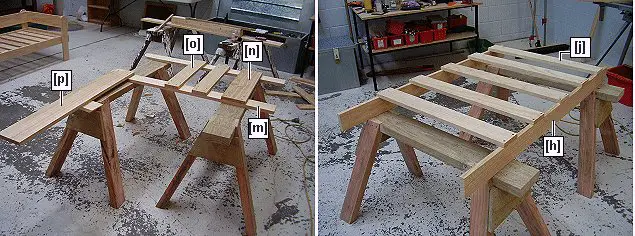
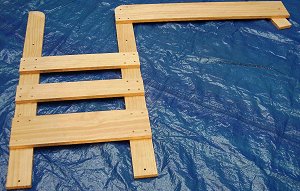
Step 7: Make the ladder
- Make the ladder up on a flat surface or on a couple of sawhorses.
- Refer to the ladder plan on page 8 for dimensions.
- Glue and screw all joins.
- Use four screws at each join and pre-drill the screw holes through the rungs (n), (o) and through the bunk guardrail (p).
Assembling the bunk and adding the ladder
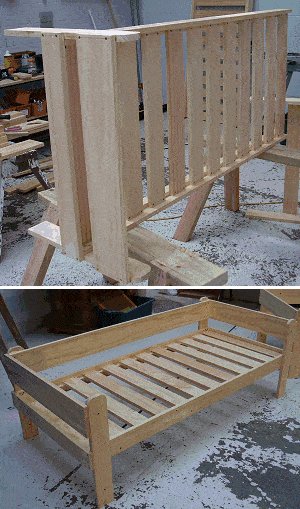
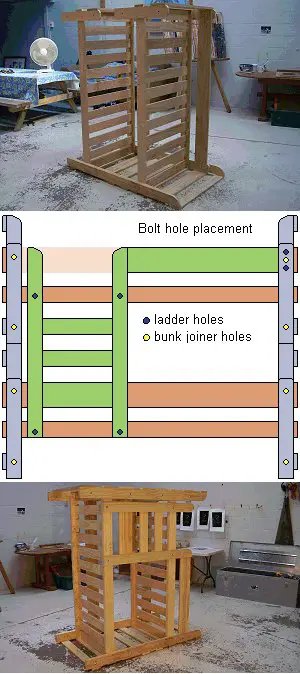
Step 8: Assemble the bunks
- Lay one of the bunk ends flat on the ground.
- Place the beds (standing on their ends) in position in between the bunk corner posts (h).
- Then place the other bunk end in position on top of the beds.
- Hold everything firmly in place with a few clamps.
- Drill the bolt holes and add the bolts. Refer to the drawing on the right for hole placement.
Refer to the hardware list on page 5 for bolt sizes.
Make the bolt hole sizes the same diameter as the bolts.
Step 9: Attach the ladder
- Attach the ladder while the unit is still standing on end.
- Hold the ladder in place with two or three clamps.
- Drill the bolt holes and add the bolts.
- Refer to the drawing on the right for hole placement.
- Refer to the hardware list on page 5 for bolt sizes.
- Make the bolt hole sizes the same diameter as the bolts.
- You can then tip the bunks over to their right position.
Safety note:
These bunk beds are designed for each bed to have a foam rubber mattress 4″ (100mm) thick.
It is important that there is at least 5″ (125mm) between the top of the mattress and the top of the guardrail.
A mattress any thicker will be contrary to the safety guidelines.
Finishing – Nut guards and screw caps
Step 10: Nut guards and screw caps
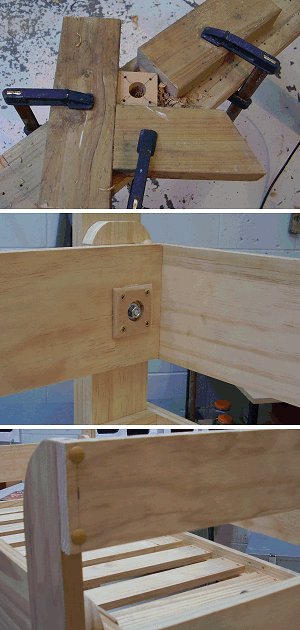
- Make some nut guards. In this context a nut guard is basically a small piece of plywood or MDF board, made to surround a nut and thus help prevent possible injury to a kid who scrapes against a nut or bolt protruding from a bunk rail.
- Cut a few pieces of 5/16″ (9mm) thick MDF board or plywood about 2 1/4″ (55mm) x 2 1/4″ (55mm) square.
- Stack the pieces on top of one another and lock in between some pieces of wood held by clamps. (See picture.)
This enables the pieces to be held firmly in place while being drilled. - Drill the center hole 1″ (25mm) diameter and make the four screw holes near the corners 1/8″ (3mm) or screw shank size.
- Fix (glue and screw) the nut guards around every bolt that could cause injury to skin if scraped against.
- Next pop screw caps over the screw heads.
- Finally, sand any sharp corners or edges, see who you can find in the family to help with the painting and have a look at ‘a few bunk bed safety guidelines‘ on the next page.
Enjoy!
Safety guidelines – Must read
A few bunk bed safety guidelines
There are a lot of safety concerns when it comes to bunk beds, brought about by the number of accidents that do happen with them.
Bunk beds are a very good space-saving option and although they can be safe, a few safety guidelines need to be adhered to. Remember, it is the high number of bunk bed accidents that makes reading and understanding these guidelines so important.
Below are some basic guidelines.
Note: These are just a few of the Recommend ed guidelines for bunk beds.
Below are excerpts and some of the main points taken from the U.S. Consumer Product Safety Commission ( www.cpsc.gov/businfo/regsumbunkbed.pdf ) and Consumer Affairs Victoria Aust. (www.consumer.vic.gov.au).
Check to see if your country has Recommend ed specifications other than those mentioned below.
- Bunk beds need to be built to a certain criteria. See more about that on the next page.
- Kids under the age of six should not use the top bunk.
- Strict rules should be dished out by the parents or guardians, i.e. kids should be made aware that bunk beds are not for playing on and that the ladder is the only way up and down. Kids can tend to use bunks as a play area and too often climb up side rails and anything but the ladder. Ensure that the person who is using the top bunk can easily and comfortably climb up and down the ladder.
Teach children the correct way to get in and out of bunk beds.
Bunk beds are not intended for play. Establish rules and ensure they are obeyed. - Keep the floor area near the bunk beds clear of any toys and sharp objects which may cause serious injury if a child falls on them. There should be no obstacles with any sharp edges, including furniture and toys nearby in case of accidental falls.
- Have a soft area around the bunks, i.e. carpet, mats etc.
- Ensure that the mattress fits snugly into the mattress area.
If you have any concerns whatsoever, consider two individual beds instead. This bunk bed set can easily be converted to twin beds.
Safety guidelines continued next page…
Safety guidelines continued – Must read
Safety guidelines continued
Bunk beds need to be built to a certain criteria.
1) Woods and hardware should be of a high quality.
2) Guardrails should be on both sides of the top bunk.
There should be no gaps wider than 3 1/2″ (90mm) or narrower than 9″ (225mm) in any part of the bed including guardrails.
3) The top rail should be at least 5 inches (125mm) above the mattress top to prevent your child from rolling over the rails. (Consumer Affairs Vic. Aust. state that the minimum height above the mattress should be 6 1/4″ or 160mm.)
4) The guardrail on the side of the bed next to a wall or on the side opposite to a ladder, must run continuously from one end of the bed to the other.
5) A guardrail on the side of the bed away from the wall does not have to run continuously from end to end of the bed, BUT the distance between either end of the guardrail and the end of the bed nearest to it cannot be greater than 15″ (375mm).
6) Edges and points, including corners accessible under normal use, should be suitably rounded.
7) All fastenings such as screws, nails, dowels, nuts and bolts should be flush and smooth, with no protrusions of more than 5/16″ (8mm), anywhere on the bed.
8) Make sure bunk beds and ladders are sturdy and secure.
9) Use night lights to help children find ladders in the dark.
10) No bunk bed may be painted with lead-containing paint.
Above are excerpts and some of the main points taken from the U.S. Consumer Product Safety Commission ( www.cpsc.gov/businfo/regsumbunkbed.pdf ) and Consumer Affairs Victoria Aust. (www.consumer.vic.gov.au).
Some more stuff… USA Safety Standard
A new mandatory standard for bunk beds is expected to improve safety for the hundreds of thousands of children who use them. Since mid-2000, the U.S. Consumer Product Safety Commission requires all bunk beds sold in U.S. to comply with the standards:
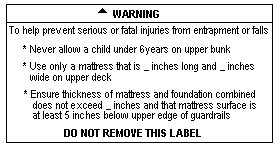
- Every bunk bed must have an affixed label that states the bed’s manufacturer, model, and mattress size information.
- Every bunk bed must have a warning label that advises against placing children under six years of age in the upper bunk.
- If the bunk bed is taller than 30 inches, it must have a continuous guardrail on the wall side of bed.
- Openings on the upper and the lower bunks must be small enough that a child’s head, torso or limb cannot pass through them.

