Contents
Preface
How it started
“Granddad, could you please make me a dollhouse for my birthday?”
That’s where it all started.
I had made dollhouses before for my kids, but that was some thirty years ago.
I recalled the pleasure that my daughters got out of their dollhouses, and remembered some of the key construction points that made their dollhouses so special.
I would implement those same measures into my grandkids doll’s house as I did into my kids’ dollhouses way back when.

Doll's house
$5.00- Pay online by credit card, debit card, or Paypal using Secure Server Paypal. You do not need a Paypal account if paying by credit or …
|
My dollhouses of yesteryear had easy access, and the minimum number of rooms for a liveable house.
Fewer rooms meant that less furniture had to be made to furnish the house, which meant the kids were less likely to lose interest before completely furnishing the dollhouse.
I also remember the enjoyment the kids got out of making their own furniture from cardboard, blocks of wood, or anything else they could get their hands on.
Possibly a larger house with numerous rooms could have curbed that enthusiasm.
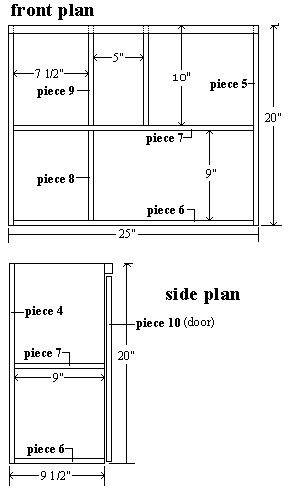
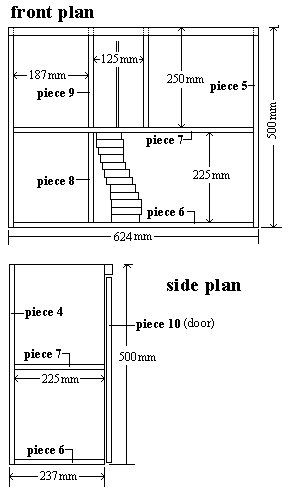
So, I would make a house with four rooms and a hall. That would allow for the basics: a bedroom, kitchen/dining, bathroom/toilet, living room, and a hall with a spiral staircase.
I would make the house narrow, with full opening front doors and a lift-off roof, making it easy to furnish and play with.
Introduction
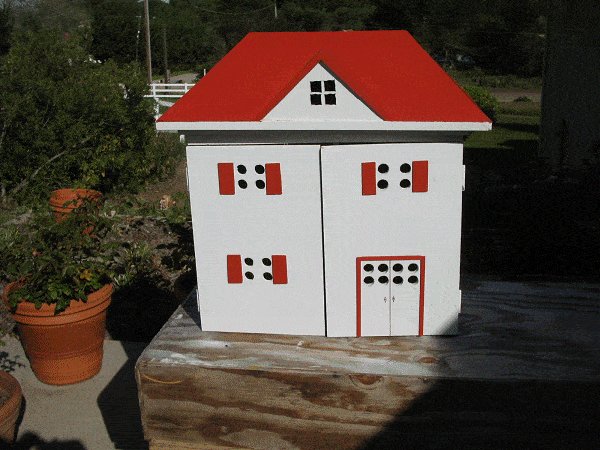
Description
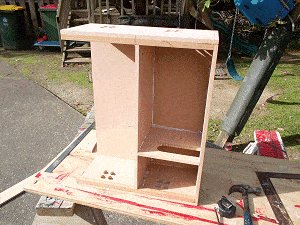
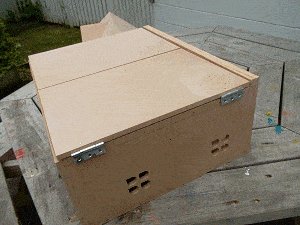
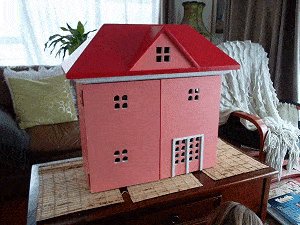
This dollhouse has five rooms including the hall. It has a spiral staircase running from the lounge room into the hall on the top floor.
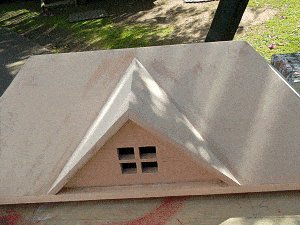
The unit is wide and narrow and is covered with a 45° hip roof that can be removed. The roof has a dormer in front, also with a 45° pitch.
Two opening doors span the front of the building. The full-size doors and the lift-off roof make the dollhouse easy to access and use.
Part identification
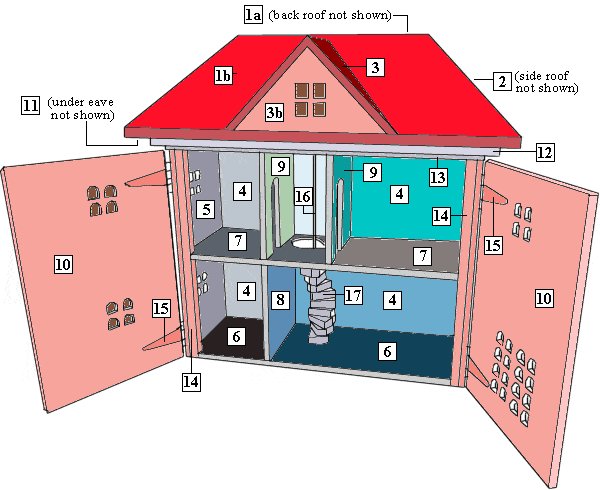
[1a] Back roof
[1b] Front roof
[2] Side roof
[3] Dormer roof
[3b] Dormer front wall
[4] Back wall
[5] Side wall
[6] Bottom floor
[7] Top floor
[8] Lower internal wall [9] Upper internal wall
[10] Door (front wall)
[11] Eave soffit
[12] Frieze board
[13] Front wall beam
[14] Side vertical strip
[15] Hinge
16] Staircase pole
[17] Step
The wood and the size of the dolls house
The wood
Ft and inch version:
The dollhouse is constructed from 1/2″ MDF board, with the exception of the eave and frieze boards, which are made from 3/4″ thick wood. There is also a 3/4″ x 3/4″ strip of wood that runs up the front of each side wall to give support to the door hinges.
Metric version:
The dollhouse is constructed from 12mm MDF board, with the exception of the eave and frieze boards, which are made from 18mm thick wood. There is also a 18mm x 18mm strip of wood that runs up the front of each side wall to give support to the door hinges.
The size of the dollhouse
Ft and inch version:
This dollhouse stands 28″ high. It is 29″ wide x 14¼” deep at the roof. The actual body depth including the doors is 10¼”.
Metric version:
This dollhouse stands 700mm high. It is 725mm wide x 355mm deep at the roof. The actual body depth including the doors is 255mm.
Materials you will need
Ft and inch version:
- MDF board 1/2″ thick:
- I piece @ 4ft x 4ft.
- I piece @ 4ft x 2ft.
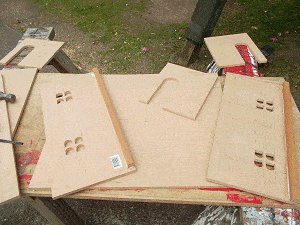
- All the required MDF pieces can be cut from the sheets mentioned above, as shown in the ‘cutting the pieces from standard sheets’ picture.
- ¾” x 2 ½” wood:
- 8ft for the eave soffit (piece [11]).
- ¾” x ¾” wood:
- 10ft for the frieze board and the side strips (pieces [12] and [14]).
- ¾” x 1 ¾” wood:
- 30″ for the steps (piece [17]).
- ¾” x 1″ wood:
- 25″ for the front wall beam (piece [13]).
Note: If you cannot source the exact wood sizes (widths and thicknesses) mentioned above, near enough is good enough.
Metric version:
- MDF board 12mm thick:
- I piece @ 1200mm x 1200mm.
- I piece @ 1200mm x 600mm.
- All the required MDF pieces can be cut from the sheets mentioned above, as shown in the ‘cutting the pieces from standard sheets’ picture.
- 70mm x 18mm wood:
- 2400mm for the eave soffit (piece [11]).
- 18mm x 18mm wood:
- 3000mm for the frieze board and the side strips (pieces [12]and [14]).
- 43mm x 18mm wood:
- 750mm for the steps (piece [17]).
- 25mm x 18mm wood:
- 624mm for the front wall beam (piece [13]).
Note: If you cannot source the exact wood sizes (widths and thicknesses) mentioned above, near enough is good enough.
You will also need…
Ft and inch version:
- 20″ of 1/4″ rod for the staircase pole. It can be steel, aluminum, wire, wood, or just about anything.
- And you’ll need some good wood glue and a few small nails.
Metric version:
- 500mm of 6mm rod for the staircase pole. It can be steel, aluminum, wire, wood, or just about anything.
- And you’ll need some good wood glue and a few small nails.
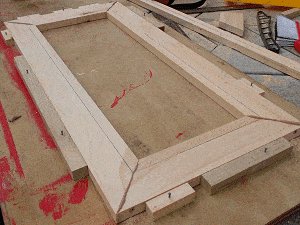
Steps 1 to 3. The eave soffit, the frieze board and preparing for the roof
The roof
Ft and inch version:
The roof is a 45° pitched hip roof with a dormer. It is constructed from 1/2″ MDF board, all except for the eaves (the underside of the overhang at the bottom of the roof), which is constructed from ¾” x 2 ½” and ¾” x ¾” wood.
Metric version:
The roof is a 45° pitched hip roof with a dormer. It is constructed from 12mm MDF board, all except for the eaves (the underside of the overhang at the bottom of the roof), which is constructed from 70mm x 18mm, and 18mm x 18mm wood.
Step 1. The eave soffit
Ft and inch version:
- Out of ¾” x 2 ½” wood, cut two pieces 29″ long with a 45° miter at each end. Also cut two pieces 14¼ long with a 45° miter at each end.
- Then glue and nail the four pieces together in ‘picture frame’ style.
- Fix some temporary blocks around the perimeter to hold it all in place.
Metric version:
- Out of 70mm x 18mm wood, cut two pieces 725mm long with a 45° miter at each end. Also cut two pieces 355mm long with a 45° miter at each end.
- Then glue and nail the four pieces together in ‘picture frame’ style.
- Fix some temporary blocks around the perimeter to hold it all in place.
Step 2. The frieze board
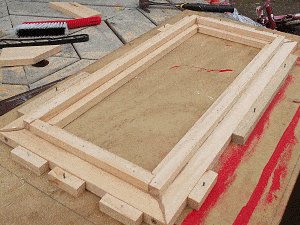
The frieze board is the bit that runs around the underside of the roof and encircles the house walls.
Ft and inch version:
- To fix the frieze board to the soffit, cut to length, and glue and nail ¾” x ¾” wood on top of the soffit (‘picture frame’), 2″ in from the edge, all the way around.
Metric version:
- To fix the frieze board to the soffit, cut to length, and glue and nail 18mm x 18mm wood on top of the soffit (‘picture frame’), 50mm in from the edge, all the way around.
Step 3. Preparing for the roof
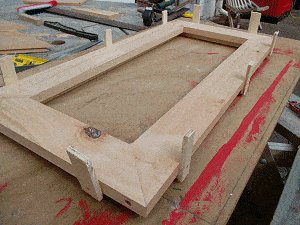
- When the glue has dried, turn the eave unit over so it is actually the right way up.
- Fix some temporary wood pieces around the outside of the eave unit (‘picture frame’).
- This is to hold the pitched roof pieces in place until the glue dries.
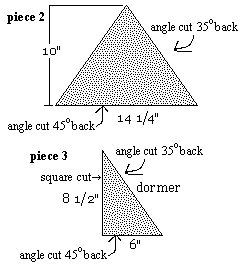
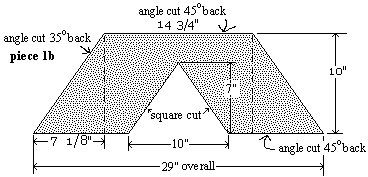
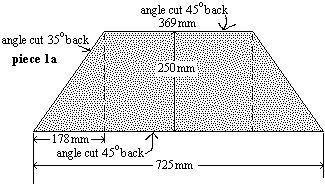
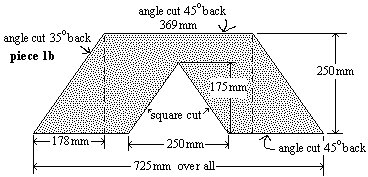
Step 4. Cutting the roof pieces
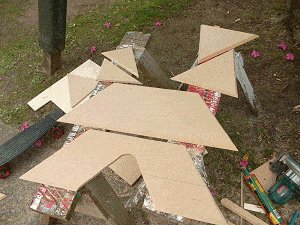
Ft and inch version:
- The roof pieces that sit on top of the eaves are all cut from 1/2″ MDF board.
Metric version:
- The roof pieces that sit on top of the eaves are all cut from 12mm MDF board.
Below are the drawings of all the individual pieces with both the measurements and the angles.
Note that most of the cuts are compound angle cuts. You will have to set the blade on your circular power saw or bench saw to the required angle for most of the cuts. The angles are given in the drawings below.
There are three different angle cuts required to cut all the roof pieces. They are – a square cut (normal), a 35° of square cut, and a 45° of square cut.
What this means is where it says “angle cut 35° back” in the drawings below, you will need to make that cut with the saw blade on your circular or bench saw tilted 35°. Likewise with the cut that says “angle cut 45° back”: you will need to make that cut with the saw blade on your circular or bench saw tilted 45°.
Ft and inch version

Metric version

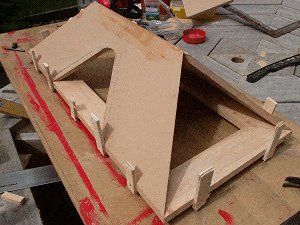
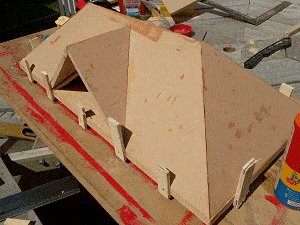
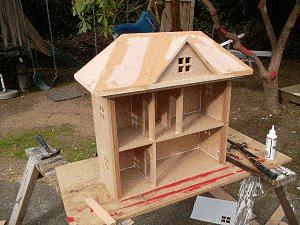
Step 5. Putting the roof together
- Once all the MDF roof pieces have been cut, apply glue to all the edges and position them in place on the eaves (the picture frame) and lean them against each other.
- The temporary holding strips of wood that have been fixed to the sides of the eaves (as in Step 3) will hold the bottom of the MDF roof pieces in place, and by leaning the pieces in towards the center and propping them against one another, the roof will take shape automatically. The sequence of pictures below shows the order of placement, which is as follows:
- Picture 1: The front and back pieces [piece 1a] and [piece 1b] glued, placed, and propped against each other.
- Picture 2: The side pieces [pieces 2] glued, placed, and propped against the front and back pieces.
- Picture 3: The dormer pieces [pieces 3] glued, placed, and propped against the front piece and against each other.
- Picture 4: The insides of the dormer being trimmed in readiness for the dormer front wall.

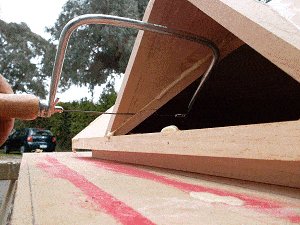
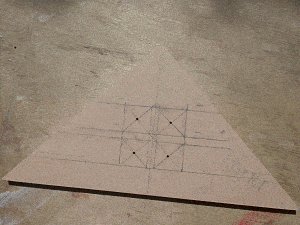
Step 6. Fitting the dormer front wall
Ft and inch version:
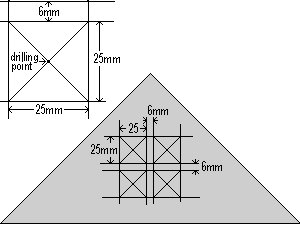
- First mark the size and shape of the dormer front wall onto a spare piece of MDF board.
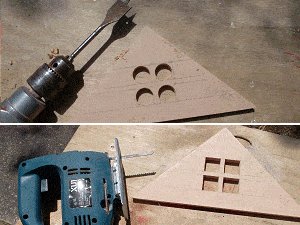
- Do this by holding a piece of 1/2″ MDF board up against the front of the dormer and marking (with a pencil) the dormer opening (from inside the dormer) onto the piece of MDF board.
- Then cut the triangular dormer front wall and mark, drill, and cut out the windows.
- The procedure for cutting out the windows is the same for every window in the dollhouse, i.e. marking the center of the window, drilling through the center with a 1″ drill bit, and then making the window square with a jigsaw.
Metric version:
- First mark the size and shape of the dormer front wall onto a spare piece of MDF board.
- Do this by holding a piece of 12mm MDF board up against the front of the dormer and marking (with a pencil) the dormer opening (from inside the dormer) onto the piece of MDF board.
- Then cut the triangular dormer front wall and mark, drill, and cut out the windows.
- The procedure for cutting out the windows is the same for every window in the dollhouse, i.e. marking the center of the window, drilling through the center with a 25mm drill bit, and then making the window square with a jigsaw.
- The pictures below show the order of making the windows and fitting the dormer front wall.
- Picture 1: Mark where the windows are to go and find the centers.
- Picture 2: Center punch the middle of the windows (a starting guide for the drill bit).
- Picture 3: Drill the holes and then make square with a jigsaw.
- Picture 4: Apply some glue and fit the dormer front wall into the opening.
Ft and inch version:
Metric version:
Steps 7 to 8: Cutting the wall, floor and door pieces and cutting the arched internal doorways
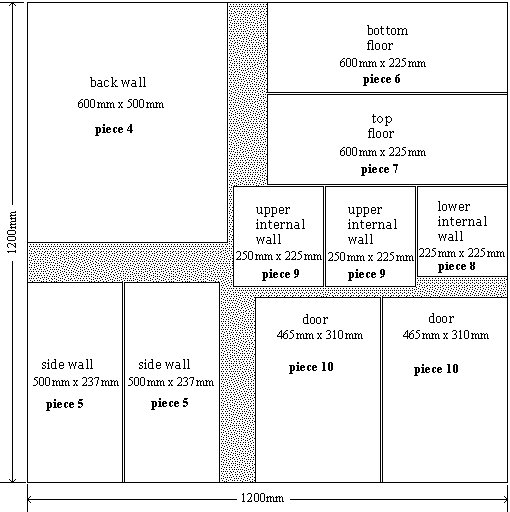
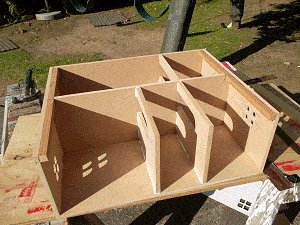
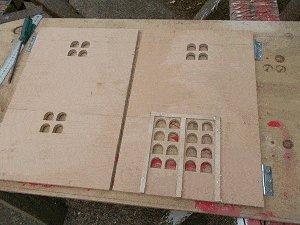
Step 7. Cutting the wall, floor, and door pieces
Ft and inch version:
- From 1/2″ MDF board, cut all the pieces to the dimensions given in the drawing below.
- All of the pieces can be cut out of a 4ft x 4ft sheet, as shown in the drawing below.
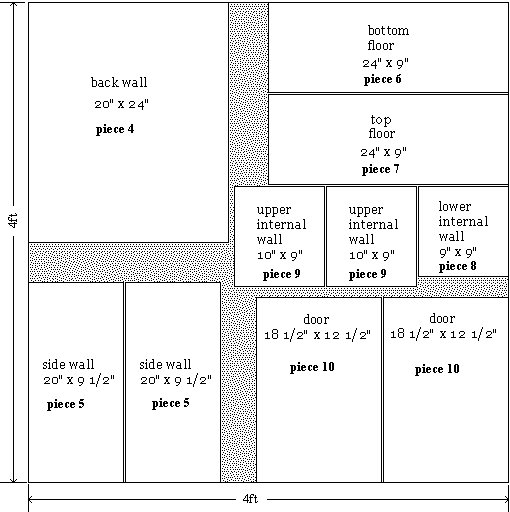
Metric version:
- From 12mm MDF board, cut all the pieces to the dimensions given in the drawing below.
- All of the pieces can be cut out of a 1200mm x 1200mm sheet, as shown in the drawing below.
Step 8. Cutting the arched internal doorways
Ft and inch version:
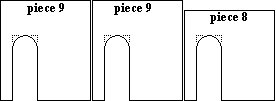
- Cut the internal door holes 2½” wide and 6½” high with an arched top (optional). Set them back 1½” from the front end of the walls. This applies to all three internal walls.
Metric version:
- Cut the internal door holes 62mm wide and 162mm high with an arched top (optional). Set them back 37mm from the front end of the walls. This applies to all three internal walls.
Steps 9 to 10 Fixing the vertical side strips and assembling the walls, floors and doors
Step 9. Fixing the vertical side strips
Ft and inch version:
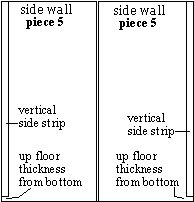
- Fix a length of ¾” x ¾” wood (with glue and nails) vertically up the front end of both side walls.
Off-set the bottom of the vertical side strips ½” (the thickness of the floor board) up from the bottom. - The vertical side strips are there to give added support to the hinges.
Metric version:
- Fix a length of 18mm x 18mm wood (with glue and nails) vertically up the front end of both side walls.
Off-set the bottom of the vertical side strips 12mm (the thickness of the floor board) up from the bottom. - The vertical side strips are there to give added support to the hinges.
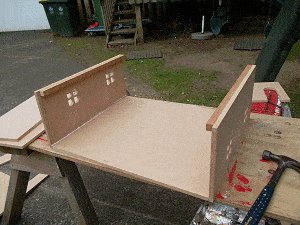
Step 10. Assembling the walls, floors, and doors
- To assemble the walls and floors refer to the plan below for measurements, and the sequence of pictures for the order of assembly.
- Use glue along all the joins and use small nails where needed.
Ft and inch version:
Metric version:
Step 10 continued… Assembling the walls, floors, and doors
The pictures below continue showing the order of assembly.
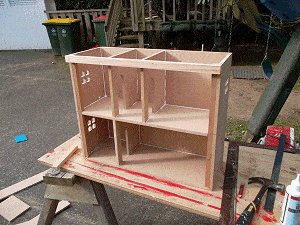
- Picture 1 below: Putting hinges on the doors and trying them for size.
- Picture 2 below: The doors taken off so the window holes can be made. Window placement is a personal preference. Refer to step 6 for details on how to make the holes.
Step 11. Making the spiral staircase
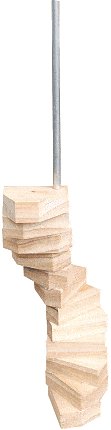
Ft and inch version:
- The spiral staircase is a series of small wooden blocks (steps) fanned around a length of ¼” rod, and glued together.
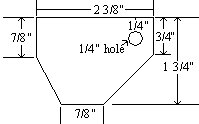
- Making the steps: From a length of 3/4″ thick wood approximately 1¾” wide (more or less), cut 12 pieces (steps) at 2 3/8″ long, and shape them as shown in the drawing below.
- Drill a 1/4″ hole through each piece, also shown in the drawing.
- Thread a 1/4″ thick x 20″ long rod (the pole) through the holes in the steps. Have the pole sticking out 1/2″ at the bottom.
- The part that sticks out goes into the hole in the bottom floor.
- Apply glue between each step and then fan them around to make a spiral of even treads.
- Then clamp them together until the glue dries.
- Drill a 4½” diameter hole in the top floor where you want the stairwell to be, and a 1/4″ hole in the bottom floor directly below to take the bottom end of the pole.
Metric version:
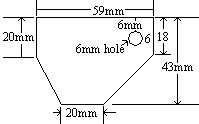
- The spiral staircase is a series of small wooden blocks (steps) fanned around a length of 6mm rod, and glued together.
Making the steps: From a length of 18mm thick wood approximately 43mm wide (more or less), cut 12 pieces (steps) at 59mm long, and shape them as shown in the drawing below. - Drill a 6mm hole through each piece, also shown in the drawing.
- Thread a 6mm thick x 500mm long rod (the pole) through the holes in the steps. Have the pole sticking out 12mm at the bottom.
- The part that sticks out goes into the hole in the bottom floor.
- Apply glue between each step and then fan them around to make a spiral of even treads.
- Then clamp them together until the glue dries.
- Drill a 112mm diameter hole in the top floor where you want the stairwell to be, and a 6mm hole in the bottom floor directly below to take the bottom end of the pole.
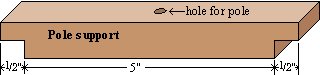
Ft and inch version:
- Next cut a piece of 3/4″ x 1 1/2″ (or similar) wood, 6″ long (the pole support). Rebate the ends of the pole support as shown in the drawing below and drill a 1/4″ hole in the middle of it.
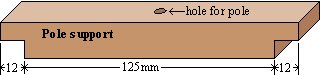
Metric version:
- Next cut a piece of 18mm x 40mm (or similar) wood, 150mm long (the pole support). Rebate the ends of the pole support as shown in the drawing below and drill a 6mm hole in the middle of it.
- The hole is to take the top end of the staircase pole.

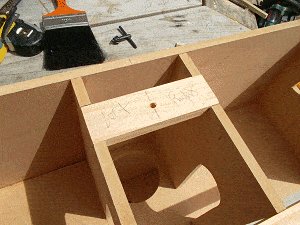
- Cut into the top of the internal walls so that the top of the pole support piece sits snugly in place, and ensure the hole (in the pole support) is directly above the pole hole in the bottom floor.
Note: There is no need to fix (glue or nail) the pole support permanently. You will need to remove it and replace it while fitting the staircase.
Step 12. A bit of paint and that’s that
And that’s it… as far as the building process goes.
Time to get imaginative with the painting and decorating.
Once painted, the spiral stairs can be put in place, the doors fitted, and the roof popped on.
Let the kid (or kids!) get involved with the decorating – they will love it.
Furniture can be made out of cardboard, blocks of wood, or bits and pieces found around the house – just to mention a few possibilities.
It is a good idea to have the dolls before the furniture-making process begins, to ensure everything is size compatible. Have fun!


On page 8 of the purchased plans it states to cut both pieces 1a and 1b to an overall length of 29 inches. I think this length should be 26 inches to correspond with the 26 inches used to cut the long side of the eave soffit on page 7. After I got all of the roof pieces cut out I started to put it together and saw that pieces 1a and 1b were too long. Assuming I am correct and 1a and 1b should be 26 inches then my next question is, does the 14 3/4 measurement at the top of 1a and 1b have to be shortend by the same amount or does it stay the same? I am enjoying this project and will be able to not make silly mistakes when I build my second one as soon as I finish this one. I certainly am learning how to cut the 35 and 45 degree angles. The secret when using a skill saw is to always be able to see where the blade is cutting and not rely on the guide on the saw.
Buildeazy reply:
Thank you for pointing that out. There was a measurement error in Step 1. The long side of the eave soffit in Step 1 should be 29 inches (not 26 inches).
It has now been rectified.
Les Kenny
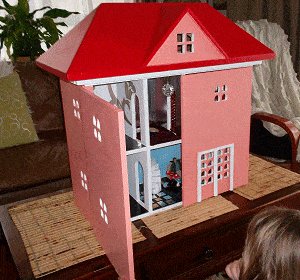
Here a some pictures of my finished doll house. As you can see I added some shutters to the windows. I want to give you some feedback of my experience doing this build.
1. When I had finished the build, the roof did not fit. I had to saw away part of the frieze board to make it fit. The reason for this was that in placing the frieze board in 2 inches from the outside edge of the frame only leaves 10 1/4 inch of space (14.25 minus 4 equals 10.25). The doll house is 9 inches wide plus the back (1/2 inch) plus the board added across the top front for stability (3/4 inch) which totals 10.25. To solve this problem as I build my second doll house, I am putting the frieze boards in by only 1 3/4 inches. This will allow plenty of clearance for the roof to fit.
2. If the two piece 3 pieces are cut as shown on page 6 of the plans they will not work since they are identical. I plan to move the lower piece 3 to the upper right hand corner of the board as a mirror image and I think it will work fine.
3. This one you are already aware of. That is the incorrect length ( 26 vs 29) on the first board I cut on page 7 of the plans.
4. On page 9 of the plans you show the inside of the dormer being trimmed for readiness for the front wall. This would be much easier if you marked the dormer on the front of the roof and trimmed out what is necessary prior to gluing the dormer in place.
Started my second doll house today and hope to have an easier time based on my experience of building my first one.
E. Stevens
Hi, thanks for posting this. What scale is this 1/12 or 1/24?
Thanks