Contents
Introduction, the plans and cutting list
This project, as with other Buildeazy projects, is designed with the home handyman or DIYer in mind.
Joints that might require the expertise of a more seasoned woodworker are non-existent. Instead, all joints are secured with bolts and/or screws and maybe a bit of glue. Because of this, the project only requires the most basic of tools to undertake a professional job, but does not lack in strength.
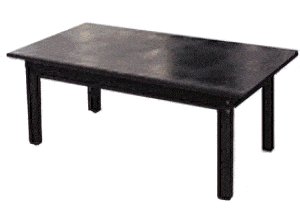
The table is 600mm (24″) wide, 1200mm (48″) long, and is 400mm (16″) high.
Medium size coffee table
$5.00- Pay online by credit card, debit card, or Paypal using Secure Server Paypal. You do not need a Paypal account if paying by credit or …
|
The Plans
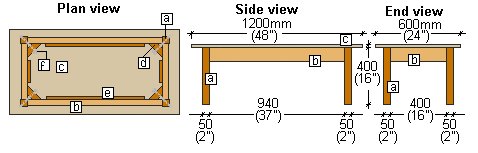
The Cutting List
| Item | Description | Quantity and Length |
| a. | Legs: 50mm x 50mm (2 “x 2”) | 4 @ 400mm (16″) |
| b. | Top rails: 100mm x 50mm (2″ x 4″) | 2 @ 940mm (37″) and 2 @ 400mm (16″) |
| c. | Table top: 20mm (3/4″) board | 1 @ 1200mm x 600mm (2ft x 4ft) |
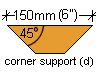
| d. | Corner supports: 100mm x 50mm (2″ x 4″) | 4 @ 150mm (6″) long and angled in at 45degrees both ends. |
| e. | Fillets: 25mm x 25mm (1″ x 1″) | 2 @ 150mm (6″) and 2 @ 700mm (28″) |
| f. | Coach (carriage) bolts: 6mm (1/4″) thick | 4 @ 150mm (6″) and washers and wing-nuts to suite. |
| Screws | Wood screws: | 30 @ 40mm (1 1/2″) long and 16 @ 60mm (2 1/2″) long. |
Measurements, wood, and wood sizes
Measurements
All measurements throughout this project are given in both Metric (mm) and Standard/Imperial inches.
The measurements are given first in millimeters (mm), followed by inches in brackets ( ).
Wood types
The type of wood is a personal choice but should be of a good grade. Are you going to paint the finished table? Maybe stain and varnish it? Take this into consideration when choosing the type of wood. For the table top, use a piece of 20mm (3/4″) thick MDF (medium density fibre board), custom wood, plywood or similar type of board.
Wood sizes
The widths and thicknesses of the wood are common sizes that can be obtained from most building suppliers or lumber stores.
Also, note that the stock sizes (widths and thicknesses) given throughout this project are the sizes before the wood is dressed or surfaced (the nominal size). For example: a piece of 100mm x 50mm (2″ x 4″) wood might actually be 90mm x 45mm (1 1/2″ x 3 1/2″), which is called the actual size.
Below is a ‘nominal’ versus ‘actual’ table, listing the wood sizes used in this project.
| Standard (inches) | |
| NOMINAL SIZE | ACTUAL SIZE |
| 1″ x 1″ | 3/4″ x 3/4″ |
| 2″ x 2″ | 1 1/2″ x 1 1/2″ |
| 2″ x 4″ | 1 1/2″ x 3 1/2″ |
| Metric (millimetres) | |
| NOMINAL SIZE | ACTUAL SIZE |
| 25mm x 25mm | 20mm x 20mm |
| 50mm x 50mm | 45mm x 45mm |
| 100mm x 50mm | 90mm x 45mm |
Fixing the top rails and corner supports
Step 1. Cut the members
- Cut all the members (pieces of wood) to the measurements given in the ‘plans’ and ‘cutting list’ on page one.
Step 2. Fix the top rails to the table top
- Place the table top (c) upside down on an even floor, saw stools or workbench. Position the top rails (b) on the underside of the table top so that they are touching at each corner and also centered on the table top, as shown in the diagram.
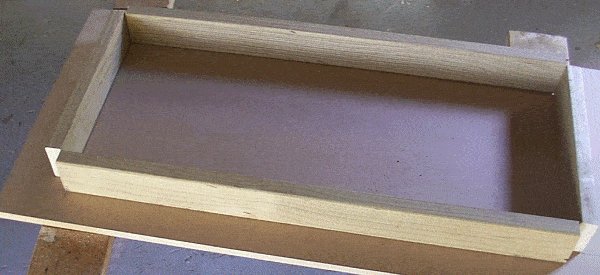
- Next, lay the 4 fillets (e) in place against the top rails (b) and the underside of the table top (c).
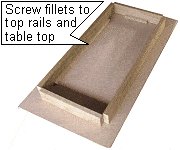
- Screw through the fillets (e) into the table top (c) and then screw through the fillets (e) into the top rails (b). Sometimes it might be easier to pre-drill the screw holes through the fillets.
Step 3. Fix the corner supports to the top rails

- Lay the 4 corner supports (d) in place in the corners against the top rails (b) and fasten with screws; four to each corner.
Preparing and fixing the legs
Step 4. Chisel an edge off the top of each leg
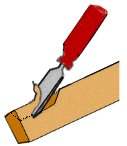
- With a chisel, take the arris (sharp edge) off one side of each leg (a), beginning about 60mm (2 1/2″) down from the top and continuing up to the top.
- Make the depth of the chisel cut about 10mm (3/8″).
- This is so the bolt-head will be against a flat area of wood rather than an arris.
Step 5. Fix the legs to the top rails
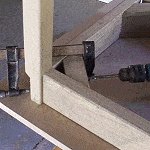
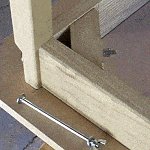
- Clamp the legs to the top rails (b),and drill a hole all the way through each corner support (d) and leg (a).
See pictures. - Make the holes slightly bigger than the thickness of the bolts.
- Insert the bolts and tighten.
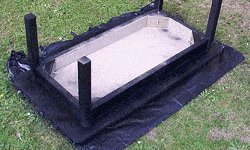
Step 6. The final touches
- Finally paint, stain, varnish or oil the table.


This is a really great plan. I managed to recycle all the required wood from past projects-gone-bad and the salvage bin from my local lumber yard. Took a little extra work with an orbital sander but well worth the effort. Total cost came to about $20 over the course of about two weeks to complete, but this could be done in a few evenings or easily in a weekend provided you don’t have to travel back to the store.
Pay special attention when drilling holes for the bolts. A mistake here can make the table go wonky in spite of the painstakingly accurate measurements taken at the start.
Take your time, measure carefully, don’t be afraid to go back to the store to get the proper tools and you’ll be pleased with the result when it’s sitting in your living room. Vast improvement over the usual IKEA swag…
Sean, British Columbia, Canada
Hello Folks,
Enclosed are some pictures of the coffee table I built using the plans on your website.
I needed a coffee table so that my wife and I could have dinner while watching our favorite show, without craning our necks over the cats.
I also needed plans or guidance that did not involve dependence on high-end specialty power tools. I found that on your website.
The project took me about four weekends and cost me about $40 in materials.
The top is made of 3/4 inch birch plywood. The corner brackets were cut from a 2×4 stud. I used a mitre box to cut the 45 degree angle on each end. I had to substitute a 1X1 strips of trim for the fillets because the home improvement stores in my area did not carry the size described in the plans. The substitution worked just fine.
I used a handsaw to cut out the flat area on the legs where the carriage bolts are placed. I think this works better than cutting it out using a chisel. You should clamp the piece properly in order to use the saw so I can see why the chisel is also an option.
Since my tabletop is plywood, I wrapped the edge of the top using a veneer tape. The stuff can be applied using a household iron and can be trimmed, sanded and stained.
I used a Minwax oil based stain called Red Mahogany. I did pretreat the tabletop with a pre-stain. Primarily because I had some from a prior finishing project. I dont think its necessary.
I sealed the top with two coats of fast drying polyurethane (sanding in between of course).
Thanks for the clear and detailed plans. I will be building more projects from your site.
Carlos Ramos Belleville, New Jersey, USA
Thank you very much from sunny MacKay in Queensland Australia for the easy to read and easy to follow plans, as a novice woodworker I need all the help I can get.
regards Steve
Well I think it was a great project for the weekend. I enjoyed it a lot, it is now standing in my living room. I used Tasmanian oak for the table top, iron bark for the top rails, fillets and corner supports. It came up tremendous with the colour contrasts and a “Cabots” polyurethane clear finish.
Regards Phil and Jarryd
Dear Buildeazy, I recently finished working on my coffee table with the plans listen on your site. I really enjoyed working on it and I think the table came out looking pretty good. (at least me and my wife are happy with the results)
The plans were very easy and clear. I did make one alteration. In stead of using the wooden fillets I used metal figure 8 tabletop fasteners. thank you very much!
I have included some of the photo’s. If you have any questions, please let me know.
Marc Gelderblom
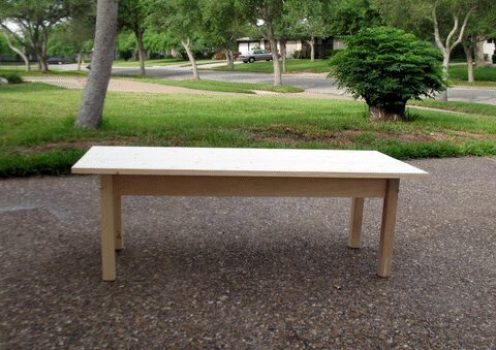
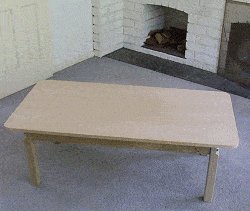
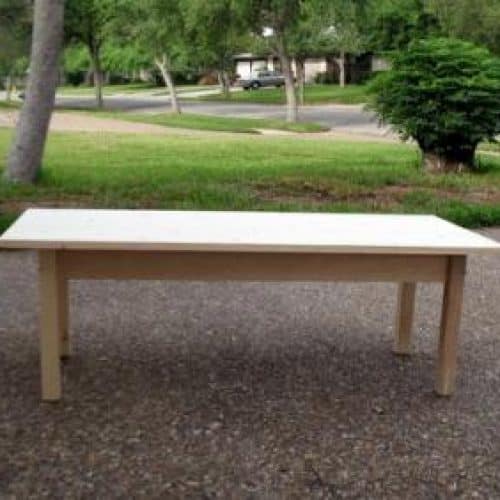
Another successful build. I downloaded your coffee table plans and then began to make adjustments for the lumber available in Corpus Christi. For example:
Top: 48 in x 20 in x 3/4 in.
Side Rails: 3.5 in x 3/4 in
Legs: 15 3/8 in x 1.5 in x 1.5 in.
Carriage Bolts 6 in x 1/4 in.
Since my tool choice is very limited and most cuts are made with hand saws I needed to purchace wood that was at least cut on one end. I made amends for off-square cuts with wood filler and it works fine. Notice in the pictures that my braces are slightly different than yours but they work fine. My carriage bolt is smaller than recommended but this table is really sturdy. Instead of shaving the legs to accept the bolts I took the chance to drill at the arris . With luck and a steady hand and a slight tap with a hammer it worked fine. The legs I purchased were a little short but I made up for that with the cushions on the bottom. I used glue only on the legs as I attached them to the top and the side panels. Total cost about $50 US. Not including staining (which begins today) it took me a total of about one day. I could cut that time in half now that I know what to do.
Anyway, many thanks for the plans. I hope to see more kid-oriented projects on your web site. I am trying to introduce my grandkids and their friends to tools and how to use them safely. And they have something to show off when a project is finished.
Thanks again.
Jake Jacobi Corpus Christi, Texas USA