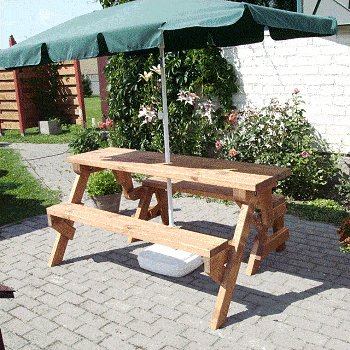
This folding picnic table also has an optional ‘clip-on’ backrest piece that you can easily attach to add to the height, providing extra support in outdoor settings when the unit is in bench mode, enhancing both comfort and aesthetics.
The ‘clip-on’ arm actually contributes to back support and, depending on personal preference, adds a decorative touch to the bench, making this outdoor project even easier to customize.
I have tried to make this project as easy as possible, taking feedback into consideration.
There is also a simplified version with better explanations and loads of photos and drawings:

|
The size of the thing
In picnic table mode, the overall footprint (space it occupies on the ground) measures 60″ (1524mm) long by 47-1/4″ (1200mm) wide. In bench seat mode, the footprint is 60″ (1524mm) long by 21-1/2″ (545mm) wide. The height stands at 29″ (737mm).
For additional versatility, this DIY project includes detailed plans that can be adapted for various heights, making it suitable for both children and adults.
It is built using one wood size only – 2×4, a very common stock size.
The bench arms that have adorned other outdoor models are omitted here to reduce work and materials, making this DIY project easier to build.
Additionally, bench arms are better left out when the unit is in picnic table mode for more convenience.
This entire unit is constructed solely from standard 2x4s (which measure approximately 1 1/2 x 3 1/2 inches, actual size).
In terms of customization, users can choose to modify the size of the wood or length of the table using our detailed plans. For specific adjustments, refer to the section ‘Changing stock size and/or table length’ in the appendix, available for free download.
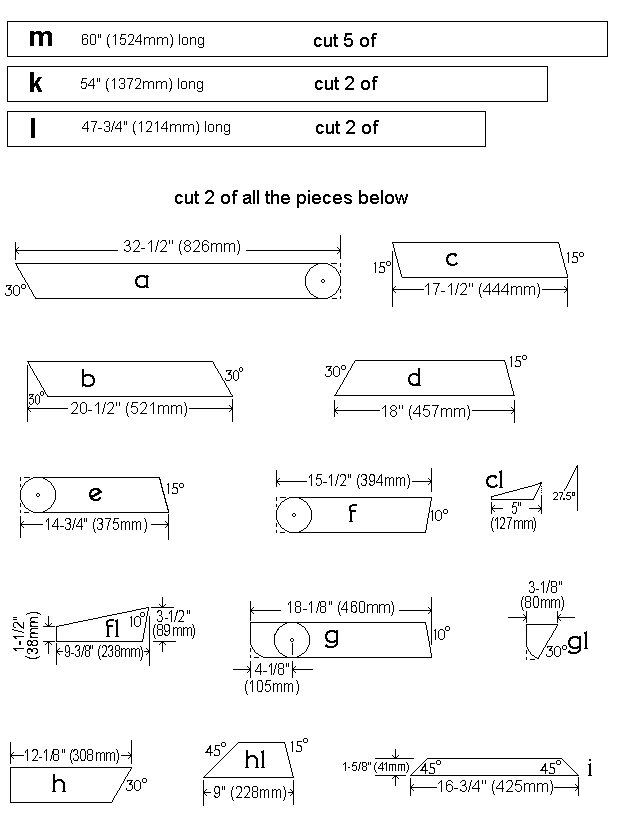
All pieces for this DIY project can be cut from just 9 pieces, each 8ft in length of 2×4 lumber. This efficient use of materials makes it a top project to build, following our detailed plans.
What’s included in this guide
In this guide, you’ll find free plan drawings, a shopping list, a cutting list, and a detailed diagram showing how to cut the pieces from the 9 pieces of 8ft 2×4 to minimize waste. The content also includes a diagram of every single piece with precise dimensions, followed by step-by-step instructions replete with images, available for free download.
The measurements
The measurements in this project are provided in both inches and millimeters. For instance, 2×4 (50mm x 100mm). The inches are listed first, followed by their metric equivalents in parentheses.
Be aware of ‘nominal’ (in name only) dimensions when purchasing wood. While it is referred to as 2×4, its actual measurements are 1 1/2 x 3 1/2 inches in thickness and width.
The metric equivalent for a 2×4 is 50mm x 100mm, with real dimensions of 1 1/2 x 3 1/2 inches (38mm x 89mm) after being dressed.
In short, the actual size of the wood (thickness and width) used in this project is 1 1/2 x 3 1/2 inches (38mm x 88mm).
If you wish to use a different thickness of wood or alter the length of the table, refer to ‘Changing stock size and/or table length’ in the appendix at the end.
Shopping list
Here is the complete list of materials you will need for this project:
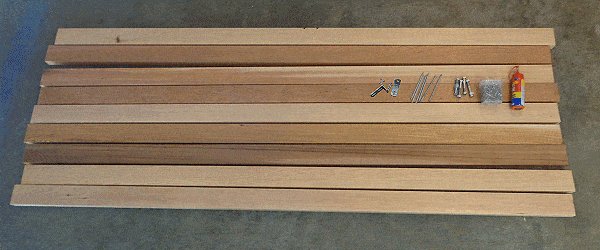
- 9 only 8ft (2.44m) lengths of 2×4 (50mm x 100mm) dressed (dimensional) lumber.
- 4 only 3/8″ (10mm) bolts 3″ (75mm) long with washers and self locking nuts.
- 80 only 3″ (75mm) exterior type wood screws.
- 2 only angle brackets (sliding door stopper type brackets).
- 6 only galvanized 6″ (150mm) nails.
- Exterior wood glue.
Note: Material for the optional ‘clip-on’ arm pieces is not included as it is optional and can be customized to your preference. Refer to the building plans for how to attach these components for additional support.
Optionally, utilizing cedar wood can add a luxurious touch and enhance durability, providing superior support for outdoor use, especially when finished with a weather-resistant sealant. Cedar also lends itself well to an aesthetically pleasing, natural look, making your outdoor project stand out.
Tools required
- Circular power saw
- Drop saw (chop saw) – able to cut accurate angles
- Jigsaw
- Electric drill
- Hammer
- Hand saw
- Measuring tape
- Pencil,
- Square screw driver
- Level
- Clamps
- Adjustable angle bevel
- 3/8″ (10mm) drill bit for the bolt holes
- 1/8″ (3mm”) drill bit for the screw holes
- 1″ (25mm) drill bit to countersink (embed) the bolt head
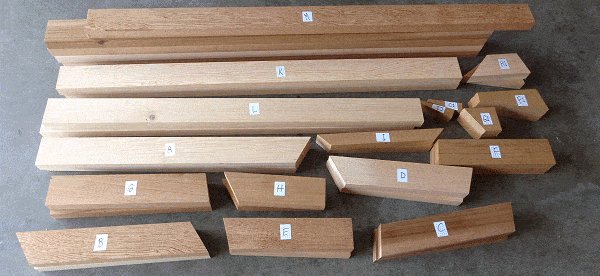
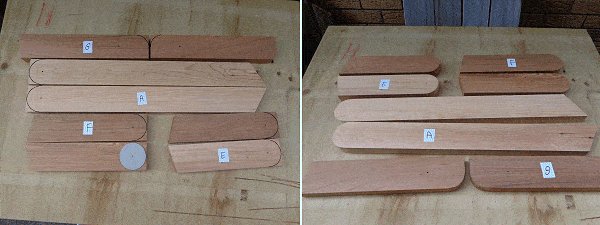
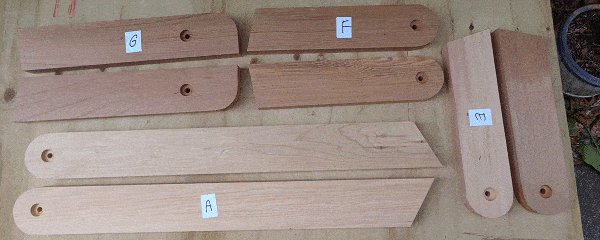
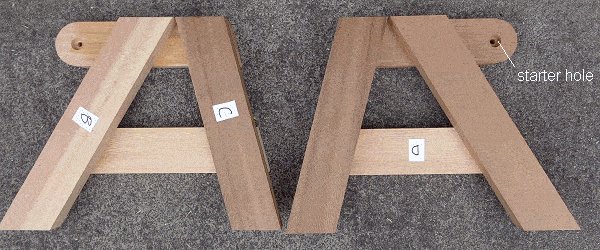
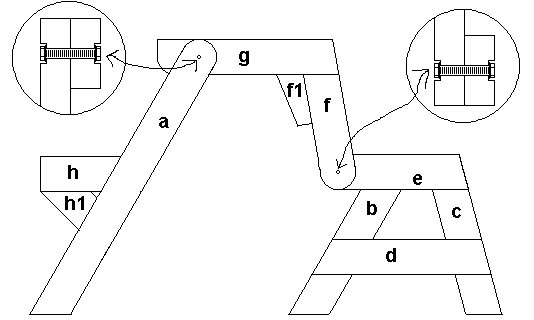
Part identification – Schematics
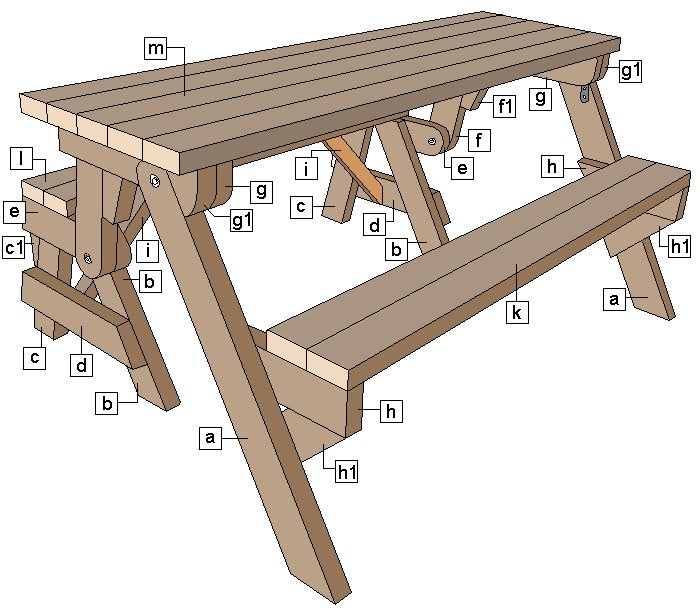
| [a] front leg [b] rear leg (inner) [c] rear leg (outer) [c1] back stop [d] lower seat rail (rear) [e] seat rail (rear) [f] leg extension part 1 (rear) [f1] leg extension part 2 (rear) | [g] table rail [g1] spread stop [h] seat rail (front) [h1] seat rail brace (front) [i] seat brace (rear) [k] seat board (front) [l] seat board (rear) [m] tabletop board |
The plans
Side elevation plans – picnic table mode
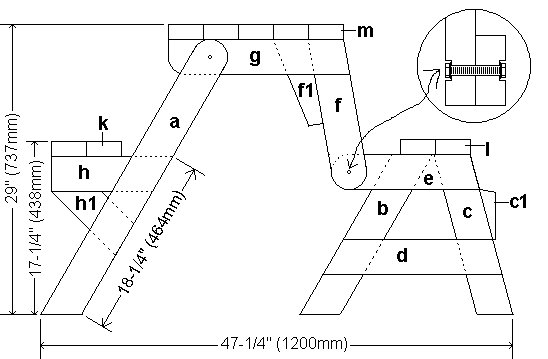
Side elevation plans – bench seat mode

Footprint plan
The individual pieces
Step 1. Mark and cut the pieces
General
Skim through all pages before starting the DIY project to grasp the overall building content. Read each step to the end before beginning any tasks and compare the images with the plans.
You can navigate to any page via the ‘Table of Contents’ located in the right sidebar or beneath the content if viewed on a mobile device. You can also download the complete building plans for easy reference.
Pre-drill all screw holes to prevent splitting.
When you arrive at the assembly stage, use clamps to hold pieces in place, ensuring everything aligns correctly, especially during complex assemblies that include angle cuts measured to the correct degree for optimal support.
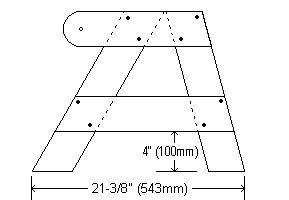
Step 1. Mark and cut the pieces
Mark all the pieces onto 9 pieces of 8ft (2240mm) lengths of 2×4 (100mm x 50mm) as depicted in the drawing below. Refer to the individual pieces plan in the free downloadable plans on the preceding page for the dimensions of each piece.
Place a sticker on each marked piece and write the piece identification number on each sticker for easy future reference.

Cut out the pieces, focusing only on square and angled cuts at the correct degree for accurate alignment. Save the round cuts for later stages as specified in subsequent instructions to keep the DIY building process easy and organized.
Move on to the next section for patterns for the angle cuts.
Note: All the wood in this project is of dressed (dimensional) 2×4 (50mm x 100mm) stock.
However, bear in mind the actual size of the wood is 1 1/2 x 3 1/2 inches (38mm x 89mm).
In summary, the real size of the wood in use (thickness and width) measures 1 1/2 x 3 1/2 inches (38mm x 88mm).
The angles pattern
There are three different angle cuts required for this project – 10 degrees, 15 degrees, and 30 degrees. If you want a pattern for the three angles, click the image below to open it in a new window at a larger size. You can then print it out.
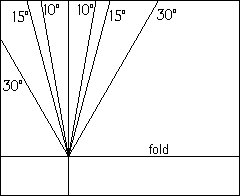
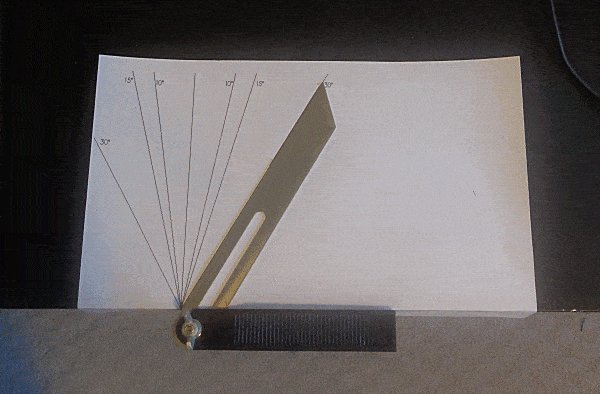
Once you have printed the angle patterns, fold them over a table and use them to set your bevel to the desired degree, as in the picture below.
Step 2. The round cuts
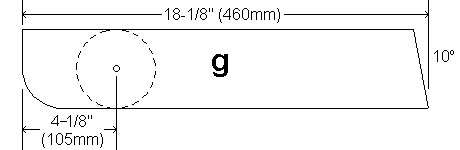
Craft a cardboard template for the round cuts and bolt holes. Draw a 3-1/2″ (88mm) diameter circle using a compass, which matches the width of the wood. Cut out the circle to create your template.
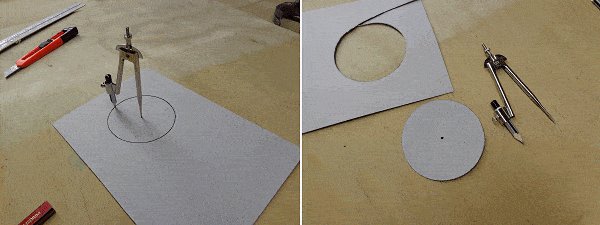
Mark and cut the round shapes on pieces [a], [e], [f], and [g] using the template, ensuring each pair is a mirror image of one another.
Use the middle of the template to mark the center of the bolt holes.
Step 3. The bolt holes
Begin each bolt hole with a wider starter hole to embed (countersink) the bolt head or nut.
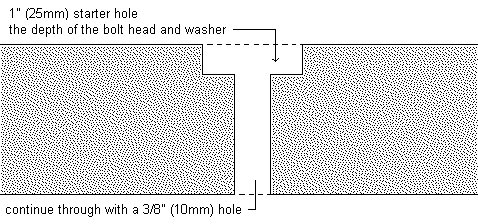
Drill a 1″ (25mm) starter hole to the depth of the bolt head and washer ON ONE SIDE ONLY of each relevant piece. Then continue drilling through the wood with a 3/8″ (10mm) hole.
Pay close attention to the hole placement in piece [g], as specified in the plan diagram below.
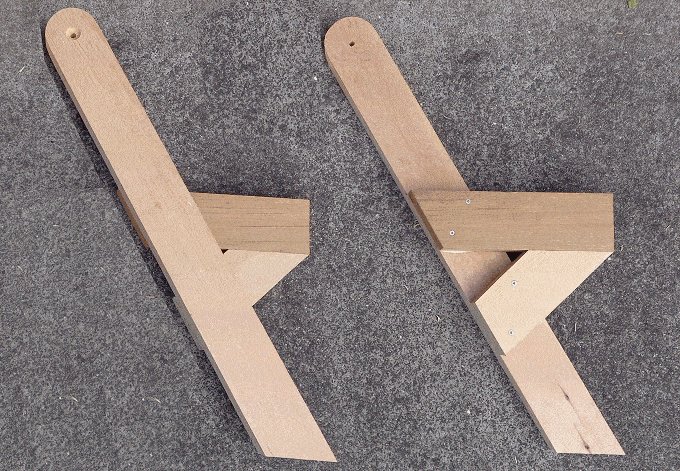
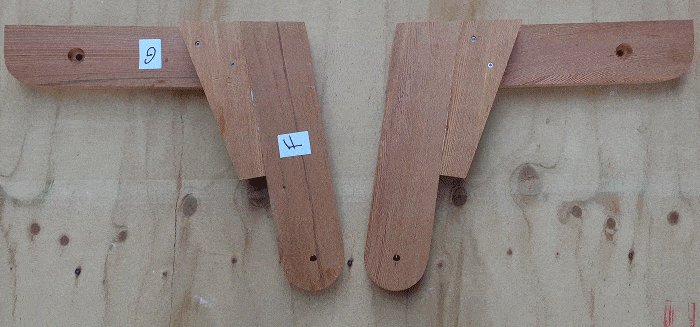
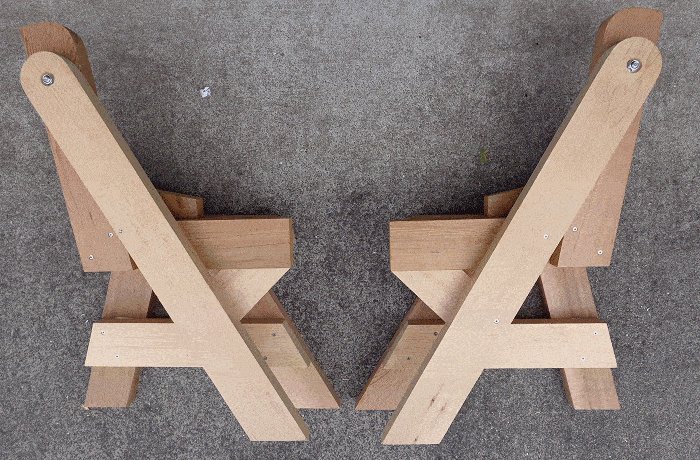
Step 4. Assembling the back seat side-frames
Create the two back seat side frames by assembling pieces as shown in both the photo and the plan diagram below using the provided DIY plans.
Assemble both back seat side-frames as shown in the photo and as per plan below.
Attach horizontal pieces [d] and [e] to pieces [b] and [c] using screws and exterior wood glue. Use two screws per joint and pre-drill the screw holes through the horizontal pieces.
The frames must mirror one another as illustrated in the picture. Note the placement of the starter hole in piece [e] as shown.
Ensure that the bottoms of pieces [b] and [c] and the horizontal pieces [d] and [e] are parallel.
Step 5. Assembling the front legs
Construct the two front legs using pieces [a], [h], and [h1] to be mirror images of each other. Refer to the plan diagram and accompanying photos for guidance.

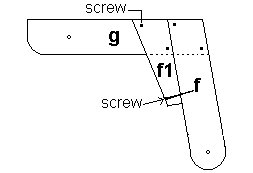
Step 6. Attaching the table rails to the leg extensions
Join the table rails to the leg extensions to complete the third and final component of the frame, following the easy-to-follow DIY plans.
This section comprises pieces [g], [f], and [f1]. Follow the plan diagram and photos, ensuring the two components mirror each other during assembly.
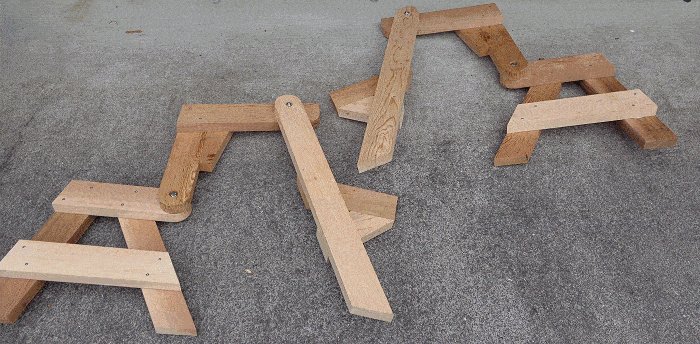
Step 7. Completing the side-frames
Assemble the two side frames to create the working mechanism. Ensure the assembled side frames mirror one another, aligning bolt holes and threading bolts with washers through the holes. Secure with washers and self-locking nuts on the other end. Tighten nuts enough to allow folding while preventing sideways wobble.
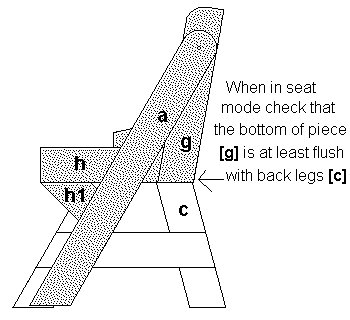
Step 8. Testing the functionality
With the frame on the ground, test its folding motion to ensure the mechanism operates as intended. When folded to bench mode, the top of the horizontal seat members [e], [f], and [h] should align and be flush. Verify that the bottom of tabletop rail [g] is at least flush (vertically) with the top of the back leg [c]. It’s acceptable if it protrudes slightly.
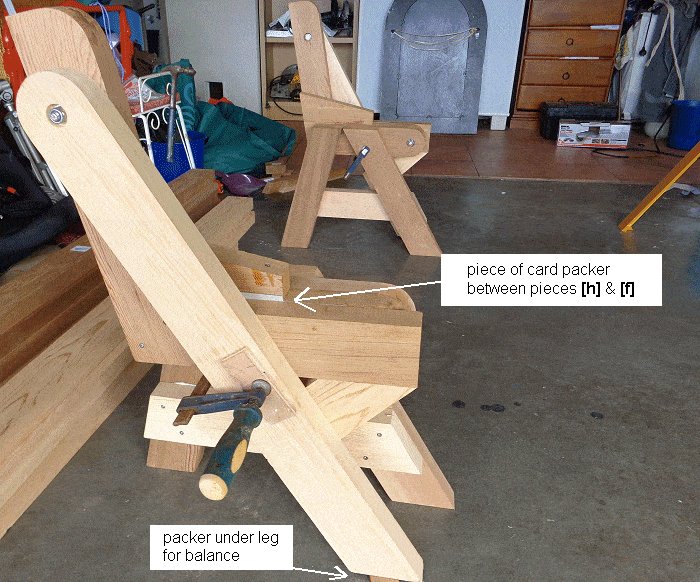
Step 9. Prepare for the seat boards
Fold the side frames into bench mode with the horizontal seat members [e], [f], and [h] flush with each other. Insert a cardboard spacer between pieces [f] and [h], then clamp each side frame in this position. Place the side frames parallel and apart, ready for the seat boards. You might need to place a small spacer under the front legs [a] for balance.
The cardboard spacer separates pieces [f] and [h] slightly to ensure the frame doesn’t bind during folding.
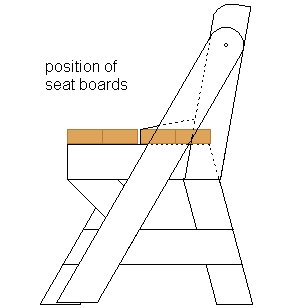
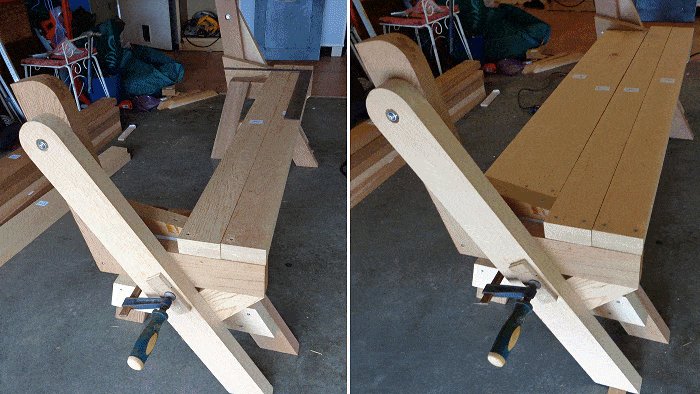
Step 10. Installing the seat boards
Position the seat boards onto the side frames. The shorter seat boards [l] fit between pieces [f1] with their back edges flush with the back of piece [g], while the longer seat boards sit flush with the front and sides of the frame.
First, secure the front boards, followed by the back boards, ensuring everything remains square and plumb. Use screws for attachment. Avoid using glue at this stage in case adjustments are needed later. Once sure of the mechanism’s proper function, you can unscrew, apply glue, and re-screw.
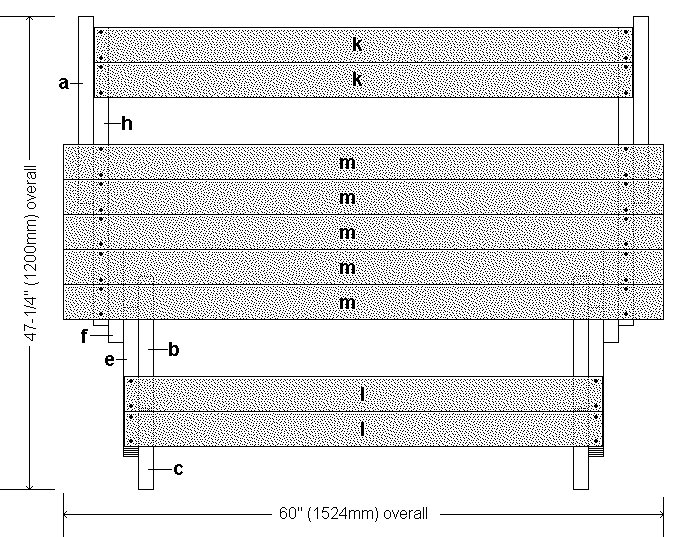
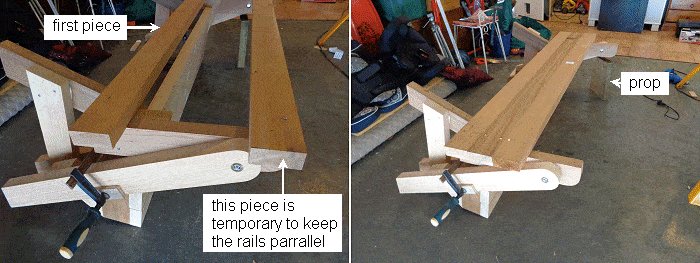
Step 11. Add the tabletop boards
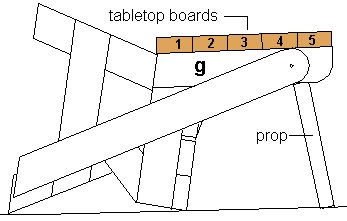
Refer to the drawing above and add the tabletop boards as follows:
1. Fix board no.1 and board no.5. Make the overhang at each end equal.
Board no.1 starts flush with the end of piece (g). It can be glued and screwed in place.
Board no.5 is temporary, just to keep the tabletop rails (g) parallel. Screw but do not glue.
2. Fix (with glue and screws) boards no. 2 and 3. Then take off board no. 5.
3. Whoa, hold it there. Time to fasten the tabletop boards in the middle to stop possible wrapping which could make for an uneven tabletop. Read the next step ‘Step 12. Keeping the tabletop boards even’. Apply that method to the three tabletop boards already fixed in place, and then add boards no. 4 and 5 securing in the same manner, as you go.
Leave the unit in that position, with the clamps still on, until the backrest stops have been fixed in place as explained in step 13.
Later, once the unit is in picnic table mode (towards the finish), you can fasten the middle of the seat boards in the same manner as you fastened the tabletop boards.
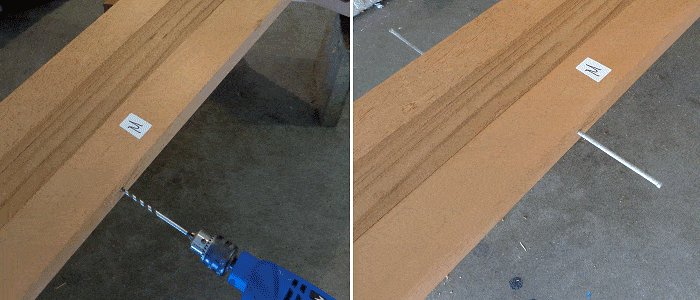
Step 12. Keeping the tabletop boards even
This is a method I have found very effective (in this scenario) for keeping the tabletop boards and the seat boards even in the middle. Simply nail 6″(150mm) galvanized nails through the edge of one board into another.
Pre drill the hole first the full length of the nail and the same diameter as the nail.
Make sure the nails in the tabletop are staggered, to ensure one nail does not run into another. See the pictures below.

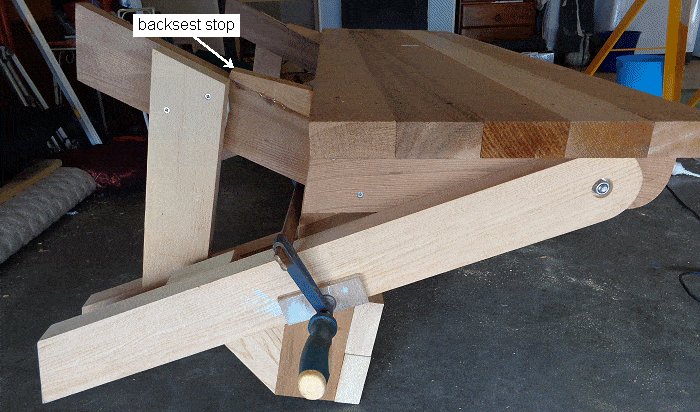
Step 13. Add the backrest stop
With the unit still on it’s knees (so as to speak), and the clamps still holding everything in place, now is the time to fix the backrest stops.
Fix one to each rear leg (c) up against the side of the tabletop (currently clamped in seat mode).
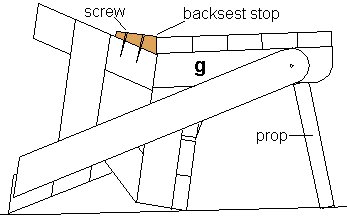
Now you can stand it up, take the clamps off, take out the cardboard packer, and open it out to picnic table mode…
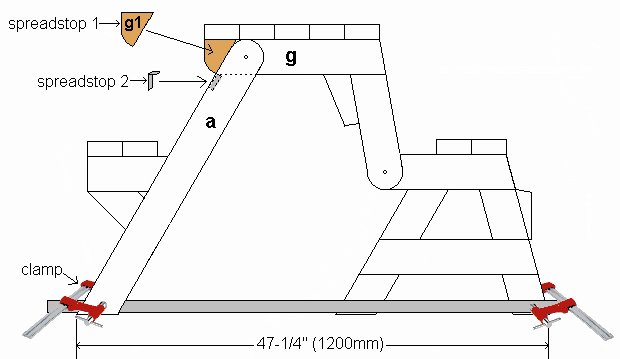
But wait!!! There is nothing to stop it from spreading out too far. We need a spread stopper.
Step 14. Stop the table from spreading
We need a spread-stop (for lack of another term). Otherwise the table will just keep spreading out until it is on the floor.
O.K. Open up the picnic table until the from leg and back leg are 47-1/4″ (1200mm) apart overall.
Find two pieces of wood (or something) slightly longer than 47-1/4″ (1200mm) and clamp them to the bottom of the front and back legs, one each side of the picnic table. That will hold the table in position and stop it spreading while you fix the spread-stops.
Apply two spread-stops each end. Spread-stop 1 and Spread-stop 2.
Spread-stop 1 is piece (g1). There are two, one each end. Fix them (g1) to the ends of the tabletop rails (g)so they are positioned flush with the ends of the tabletop rails (g) and against the front legs (a). Fix with glue and screws.
Spread-stop 2 are angle brackets (sliding door stopper type brackets). Fit them to the front legs (a) as close to the outside of the leg as possible and hard up against the end underside of the tabletop rail (g). Ensure it is as close to the outside of the leg as possible otherwise it could be in the way when folding the table back to bench mode.

Step 15. Add the seat braces
Hey, almost there. Just the rear seat to brace.
Turn the table upside down and prop or sit the rear seat on something solid. Ensure that the seat side-frame and the seat are at right angles to each other and fix the braces (i) in place. Just like in the picture.
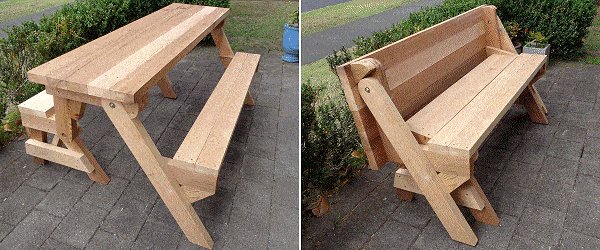
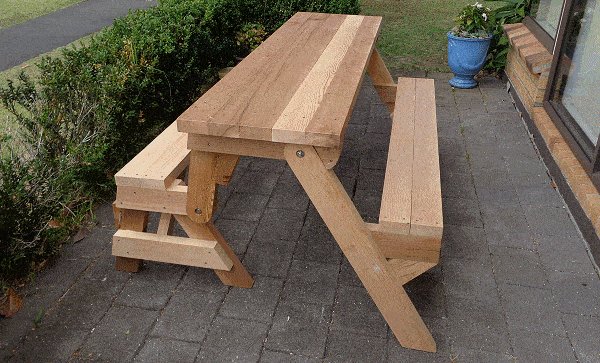
Flip the folding table up the right way and see how it works.

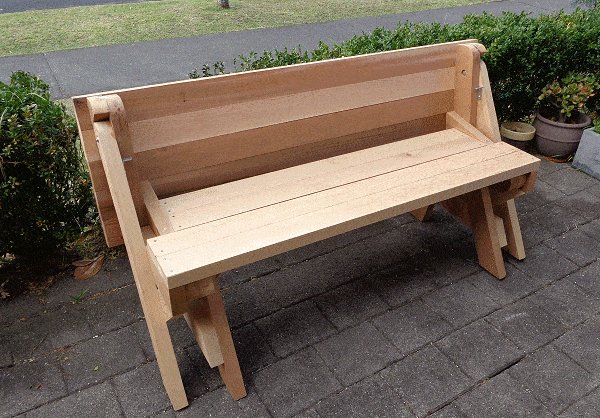
Step 16. Well done
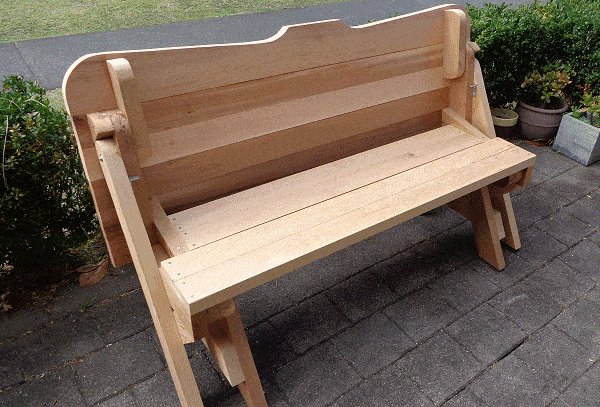
Yes, well done. If you have made this folding picnic table to the dimensions given in this content, and you have followed all the instructions thus far, you should have a unit that looks like this
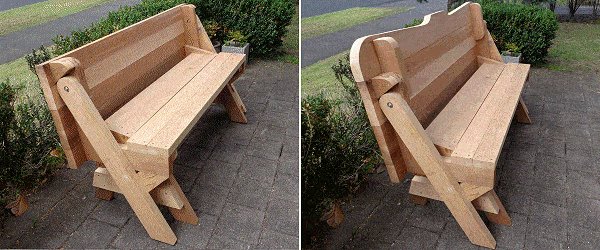
And if you want to add a back-rest clip-on (as shown below) for a bit of extra back comfort and also to give a more appealing look (depending on taste, of course) to the unit when in seat mode, then go to ‘Appendix 2: The back-rest clip-on’.
Appendix 1: Changing stock size and/or table length
It is possible to use a different stock size (thickness) and/or change the length of the folding picnic table.
Using a different stock size (thickness only)
If you want to use a wood that is slightly thicker or thinner that the wood size used in this article, you must adjust the length of the four bolts to suit as well as apply the formula (see below) to the seat boards and the tabletop boards (in relation to one another).
Changing the table length
You can change the length of the table simply by changing the length of the seat boards and tabletop boards.
The same amount must be added (or subtracted) to the back seat boards, the front seat boards, and the tabletop boards.
If you use a thicker or thinner wood as well, then you must apply the formula.
The formula
The difference in length between the shorter and longer seat boards is the sum of the thickness of four side framing members plus 1/4″ (6mm). The later measurement is to allow for a little bit of play.
For example, if the side frame members are 1-1/2″ (38mm) thick, four times that plus 1/4″ (6mm) equals 6-1/4″ (158mm).
Therefore 6-1/4″ (158mm) will be the difference between the length of the front and rear seats boards.
The difference in length between the tabletop boards and the longer seat boards is the sum of the thickness of two side frame members plus 3″ (76mm) for the overhang (shared equal each end).
For example, if the side framing members are 1-1/2″ (38mm) thick, two times that is 3″ (76mm), and plus the 3″ (76mm) overhang = 6″ (152mm).
Therefore, In that case the table boards will be 6″ (152mm) longer than the longer seat boards.
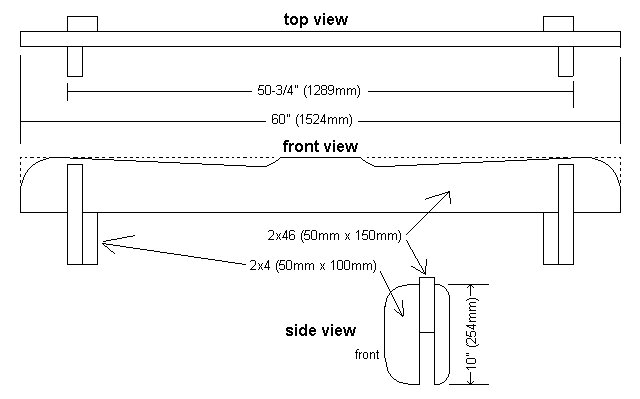
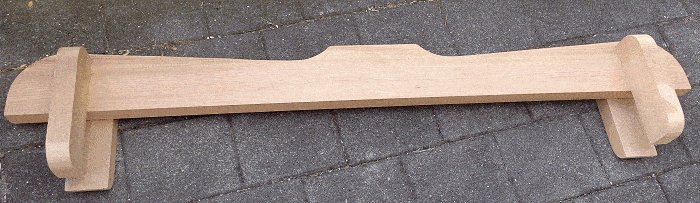
Appendix 2: The backrest clip-on
A backrest clip-on if you want to make the backrest a bit higher for comfort or looks.

You will need:
• 1 piece of 2×6 (50mm x 150mm) that is 60″ (1524mm) long.
• 4 pieces of 2×4 (50mm x 100mm) that are 10″ (254mm) long.
• A dozen 3″ (75mm) screws and a bit of glue.
Make the clip-on up according to the following plans and pop it on top of the backrest when the picnic table is in bench seat mode.


Had a blast with this project. Very simple with your instructions! Thank you.
veo que tiene 6 tablas arriba en la mesa?? si son de 4plg??? o ambiaste alguna medida para que sea mas ancha??
1 piece folding picnic table of 2×4 lumber made off a BuildEazy plan by G.A. Miedema
Les, A couple pictures of my almost finished table/bench from the plans you sent me. Really cool project, I just need to finish with some sort of design/etching.
Mike Hayes
Hi there, I bought the plan for the folding picnic table from you last week and today I’ve finished the project. Please have a look at the pictures attached.
The plan is precise and the work went smoothly. The only thing I added to your plan – I rounded edges for a better look and pleasant touch.
Definitely I’ll use your service in the future, there is a lot of interesting stuff on your website (K2 project is in queue 🙂
Thanks a lot!
Slava Kulchytski
We made the folding picnic table after your plans. It suits perfectly in our small garden here in Copenhagen, Denmark, Europe.
It was a really good guide that guided us through the process. Thanks for that 🙂
Torben Aggerbeck
Folding picnic table out of 2×4 lumber – Came out awesome, I have already had lots of complements on this project.
Aaron Thomas
Thank you for your plan
One piece folding bench picnic tables. Painted. Thanks Build Eazy
Randall Jabeth
Here are some pictures of the Bench and folding picnic table I build with your plan. Great details in your plans. Thanks
Jose C.Ponce de Leon
I used all 2×4 boards. And sanded and stained the cut boards before assembly.
Steve Oliver
‘Hello Les, I just thought I would tell you that I have just finished the buildeazy table bench. I built it with USA pressure treated “2×4″s. They measure 1 1/2 x 3 1/2 inches. I had built this table bench with one simple correction, shorten l seat (rear) pieces by 1 1/2 inches. Then assemble as the rest of the plan shows.
Thanks for your help.’
Don Szymanski
Attached is my little project from a plan I purchase from you. Thanks
T. Mhlope:
‘I attached the 4 pictures I took of the finished product. I placed it online and it was sold and gone in less than 3 hours today. I am going to start the next one tomorrow, as this seems to be a hit around here =]’
Richard Lewis
‘Lots of fun doing this, thank you’
Andre Fauteux
In the attachment I’ve added the photo’s of our homemade folding bench.
It was easy thanks to your plans!! Thank you very much.
We’ve already received a lot of great reactions from neighbors and cyclists.
We placed the bench on the side of our house which is directly situated at the road.
Cyclists actually already used it as a resting point when we weren’t at home.
All the best to you en your company!
Yvonne Dortant
My name is João Carlos I am Brazilian and I live in Brazil.
I made the picnic bench used the site design.
I’ll run another site project.
I’ll sell and earn some money.
Thanks, buildeazy team!
I prefer one with arms and perhaps a wider table implying higher bench back. Any suggestions re best way to do it?
Loved the project. I was curious if there was a way to make it wider by maybe two more boards. What would need to change other than the spread of the table. Any insight would help. Thanks for the great instructions !
Hi
I’m from South Africa. Here we work in metric sizes.
Do your plans come in metric sizes.
THANK YOU!! Your plans were great and instructions easy to follow!! I did it! I’m so happy!!
Old picnic table was rotting away so I took it apart, cleaned it, and cut boards out of it from your pin measurements. Granted these were 2”x 6” boards so there was a little tweaking involved but it turned out well and didn’t cost me a dime using the old picnic table. Thanks for sharing.
Dear Les,
It was a pleasure working with the instruction set you provided.
The logic was clrar, ant the explanation of how to set the seat and table boards length was remarkable.
Thank you so much!
Hi, I have built your folding bench table 4-5 times for various friends and neighbors and it seems I have more problems as I go, particularly with the seat board lengths as it is hard for me to get it square and true early in the project. It will either be hard to fold into bench mode or the two sets of seat boards don’t come together evenly and straight. What am I doing wrong? The timber I am using here in New Zealand is treated pine in a smooth decking 1-1/4’x 3-5/8 and the seat boards are thicker to carry the extra weight of bodies especially at the picnic table. What am I doing wrong? Please help.
What would I have to do to make this table more of an adult size table? I love the plans but when I made the table it is more of a kids size table. What dimensions for the cutting list would I have to increase and by how much to make this more of an adult size table? This table finished up as a more compact table than I wanted. Other than that I love the plans and the table. Please help.
Hello! I made the cuts and everything, but now this website is blank on the drawings for the instructions to assemble. Anyway to fix the website? Thanks.
Hi Michael, yes we were working on the website yesterday and we had a few problems with the images.
This should be fixed now.
Sorry for the inconvenience.
Very nice project and plan, thank a lot
Pay attention to h and h1 piece the current plan above here specified 30 and 15 angle which match with small mod I had to make to get leveled seat (in my case 29 and 16 instead of initial 27 and 18 found in the plan here : https://diywoodworkingmastery.com/free-folding-picnic-table-bench-plans-pdf/)
Gracias por las medidas. No las había encontrado. Pero ahora ya las tengo y voy a construir una. Espero en Dios terminarla y les enviaré fotos.
I made this one and it looks great. Table is a little narrow, but that can be changed. 4 People can eat without any problem on this table.
Greetings Les, thank you for posting these plans. I made this table in the spring of 2020 (sorry no photos). I made mine about 2 feet longer because I have a large family. I am interested in making another but I would like to make it about 2 boards wider across the top. Am I correct in thinking that I will need to apply some math to the legs to make the lengths work in both positions? If so do you happen to have that math already?
In Step 9, there is something referred to as a CARD PACKER. What exactly is this? I understand its use but not what it is.
Carey, it doesn’t look like folks reply here. I just made this table. It was just a piece of cardboard but I used a large galvanized washer between the wood (on the bold) for the packer. Works great and will always be there.
Thanks for posting this. As a possible help to others, I had difficulty working out c1. (How to cut and how to fit). I ended up with a very simple fix and it’s much stronger!! I measured the length of the seat where c1 needed to go, cut a board the length and just put it in place. Much stronger and doesn’t take away from the looks. (Photo attached) And for any wondering why you need to cut piece (i) to half its thickness, it works fine at the full thickness, it doesn’t interfere with other parts and is merely aesthetics.
One more possible help, I used threaded rod through the center top of the table (instead of nails) and it is good also. Because I was using this I also thought to add galvanized washers between the pieces at step 9 instead of cardboard. I am happy with my changes.
However, I love the pattern. Excellent!
As an enthusiastic DIYer this was going to be a challenge for me, however, your plans and instructions are excellent. Many thanks for sharing.