Contents
Preface
History unknown. I first made a couple of these chairs some six or seven years ago after obtaining a rough DIY plan from a friend who used to make them in his spare time – not only for around his own house but as gifts for his friends and relatives. He got the woodworking plans by measuring off a chair that his father had made but has no idea where his father got the original designs. Regardless, this woodworking project has been a great addition to our DIY furniture products.
The chair doesn’t appear to have a common name. I have heard it called by various names including “stick” chair, “Kentucky” chair, “garden” chair, “folding” chair, but to name a few. By my way of thinking, none of those names seem to be a perfect fit for this woodworking project. So I’m going to call this chair “the Kentucky Stick Chair”. One thing’s for sure, the design isn’t confined to Kentucky. Maybe it originated there – who knows? Some feedback might enlighten us as to its origin. This chair is a great addition to any furniture art collection and showcases the strength of simple stick-based designs.
Anyway, let’s re-visit this DIY project, dust off the old sketch plans, gather our woodworking tools, and build another Kentucky Stick Chair.
Kentucky Stick Chair
$5.00- Pay online by credit card, debit card, or Paypal using Secure Server Paypal. You do not need a Paypal account if paying by credit or …
|
Introduction
This is a fun project.
This DIY project simply involves cutting all the stick pieces to length using appropriate tools, drilling holes through all the pieces at the given points, and then threading wire through the holes to tie all the sticks together.
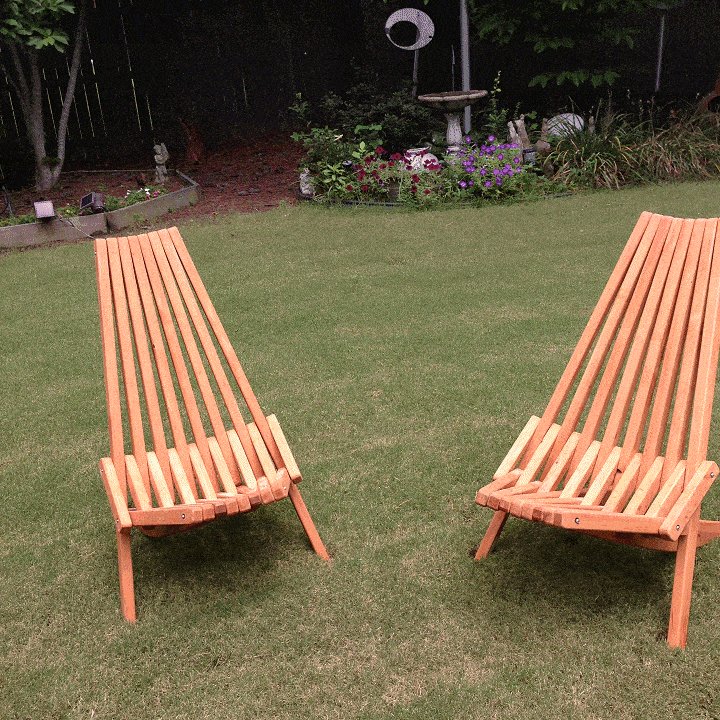
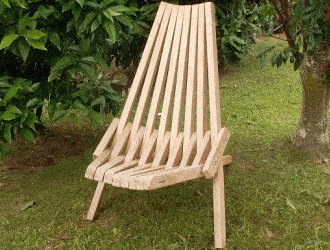
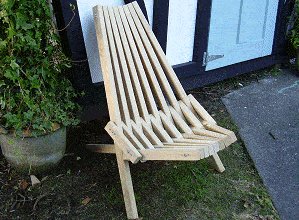
Voila. A comfortable chair that can easily be folded up and stored, or carried.
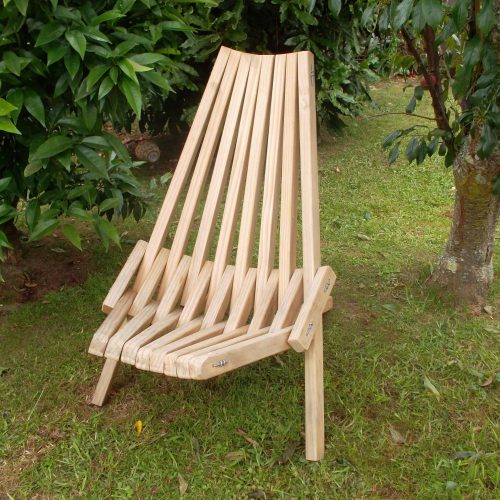
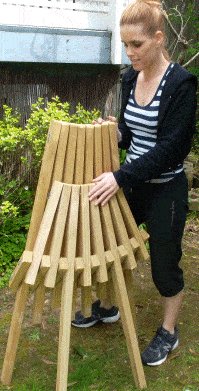
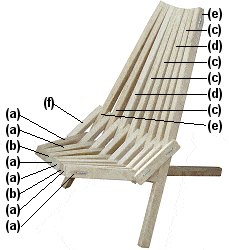
The chair is a low, laid-back, comfortable bucket-type furniture piece. Sit in it, and you won’t want to get out. It is made out of a number of narrow pieces of wood (sticks) that are interwoven and held together with wire thread through holes drilled in all the individual pieces, reflecting the art of woodworking in DIY projects.
When finished, the chair can be easily folded up and stored, or carried like any other great furniture product. Adding your own personal touch by painting each piece individually with milk paint can enhance the chair’s aesthetic appeal and its integration into your outdoor art space. The use of strong sticks and quality paint bonds well with wood fibers and provides excellent protection.
Materials and cutting list
Stick chair project
Dimensions given throughout this project are in both imperial (inches) and metric (mm). The imperial measurements are given first, followed by the metric measurements in brackets ( ).
Wood size (width and thickness) and alternative sizes
The stock size used in this woodworking project is 1½” x 1¼” (45mm x 33mm). This size is not a common one in many places. If you cannot obtain this size or anything close, you can rip (cut lengthwise) an acceptable size from a wider stock using appropriate woodworking tools. For example, you could rip three equal size pieces out of 2″ x 4″ (100mm x 50mm) stock. The size (width and thickness) of the stock that you use does not have to be exactly the same as the stock size used in this project, as long as it is within a bull’s roar and all the pieces are uniform.
What you will need
You will need 4 pieces of approximately 5/32″ (4mm) diameter galvanized mild steel wire – 32″ (800mm) long.
The wire size mentioned above is the approximate size (for rounding off purposes) of 6 gauge AWG (American Wire Gauge), which is the same as 8 gauge British SWG (Standard Wire Gauge), also referred to as number 8 wire (NZ).
The cutting list
Note: If you cannot obtain the exact stock size as listed in the cutting list below, refer to the paragraph ‘Wood size (width and thickness) and alternative sizes’ on the previous page.
| ITEM ID | DESCRIPTION | STOCK SIZE | LENGTH | HOW MANY PIECES |
| [a] | seat | 1½” x 1¼” (45mm x 33mm) | 15″ (375mm) | 6 |
| [b] | seat/back legs | 1½” x 1¼” (45mm x 33mm) | 35″ (875mm) | 2 |
| [c] | back longer | 1½” x 1¼” (45mm x 33mm) | 31½” (787mm) | 4 |
| [d] | back shorter | 1½” x 1¼” (45mm x 33mm) | 29¾” (745mm) | 2 |
| [e] | back/front legs | 1½” x 1¼” (45mm x 33mm) | 42″ (1050mm) | 2 |
| [f] | couplers | 1½” x 1¼” (45mm x 33mm) | 9⅛” (228mm) | 9 |
Plan drawing – Where to drill the holes
Below is a drawing of all the pieces giving the dimensions for the hole positions.
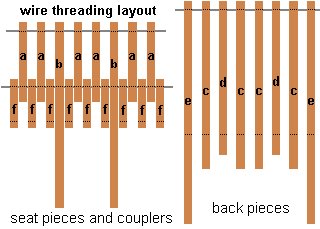
Also are drawings showing the wire threading layout.
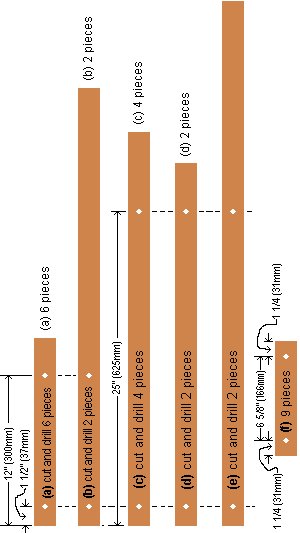
Refer to the cutting list on the previous page for the lengths of the individual pieces.
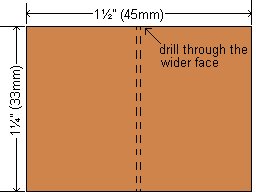
Make all the holes ¼” (6mm) diameter and drill through the wider face of the wood.In other words, the wood size is 1½” x 1¼” (45mm x 33mm), therefore drill through the 1½” (45mm) wide face.
Cutting, drilling, and aligning the pieces
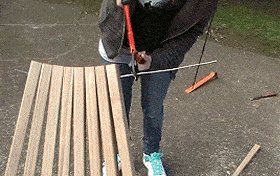
Step 1. Cut and drill the pieces
- Cut all the pieces according to the cutting list above. There will be 25 pieces altogether and each piece will need to have 2 holes drilled through it.
- Make the holes ¼” (6mm) thick and ensure that they are all in the center of the wider side of the wood.
- Position two holes along each piece as follows:
- Pieces (a) and (b). Measure from one end 1½” (37mm) and 12″ (300mm).
- Pieces (c), (d), and (e). Measure from one end 1½” (37mm) and 25″ (625mm).
- Pieces (f). Measure in from both ends 1¼” (31mm).
- Refer to the “where to drill the holes” drawing on the previous page for a bit of a visual guidance.
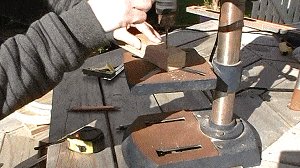
- Preferably use a drill press to ensure the holes are straight and at right angles to the face of the wood.
- This will make it easier to align the pieces and thread the wire.
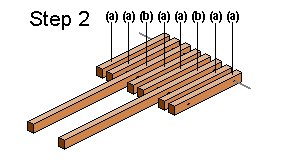
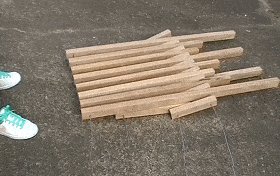
Step 2. Align the seat pieces
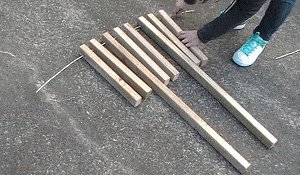
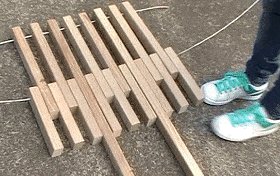
- Lay the seat pieces in a row, spaced apart about a thickness of a piece, in this order (a) (a) (b) (a) (a) (b) (a) (a) with the holes lined up.
- Thread a piece of approximately 5/32″ (4mm) thick mild steel galvanized wire through the top holes. See the photo.
Note: The holes are ¼” (6mm) diameter. That is about 3/32″ (2mm) more than the thickness of the wire. A bit of play is necessary in order to easily thread the wire.
The assembly order by drawings.
A visual guidance showing the assembly process.
`
Threading the wire
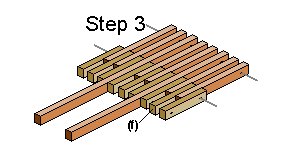
Step 3. Add the couplers
- Position the couplers (f) in a row, one each side of the two end seat pieces and one in between each seat piece.
- Align the holes in the couplers with the lower holes in the seat pieces, and thread another length of wire through the holes.
Note: The wire is longer than need be at this stage. It can be cut to suit later on.
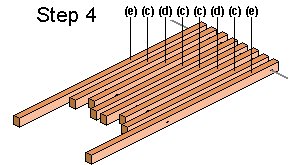
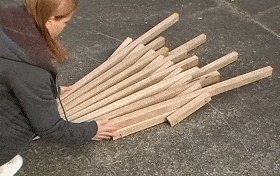
Step 4. Thread more wire
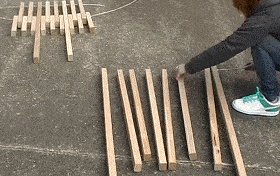
- Lay the back pieces in a row, spaced apart a thickness of a piece, in this order (e) (c) (d) (c) (c) (d) (c) (e) with the top holes in line.
- Thread wire through the top hole.
Note: The holes should be bigger than the wire to allow ease of threading. Refer to Step 1.
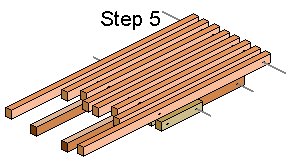
Step 5. Sit the back pieces on top of the seat pieces
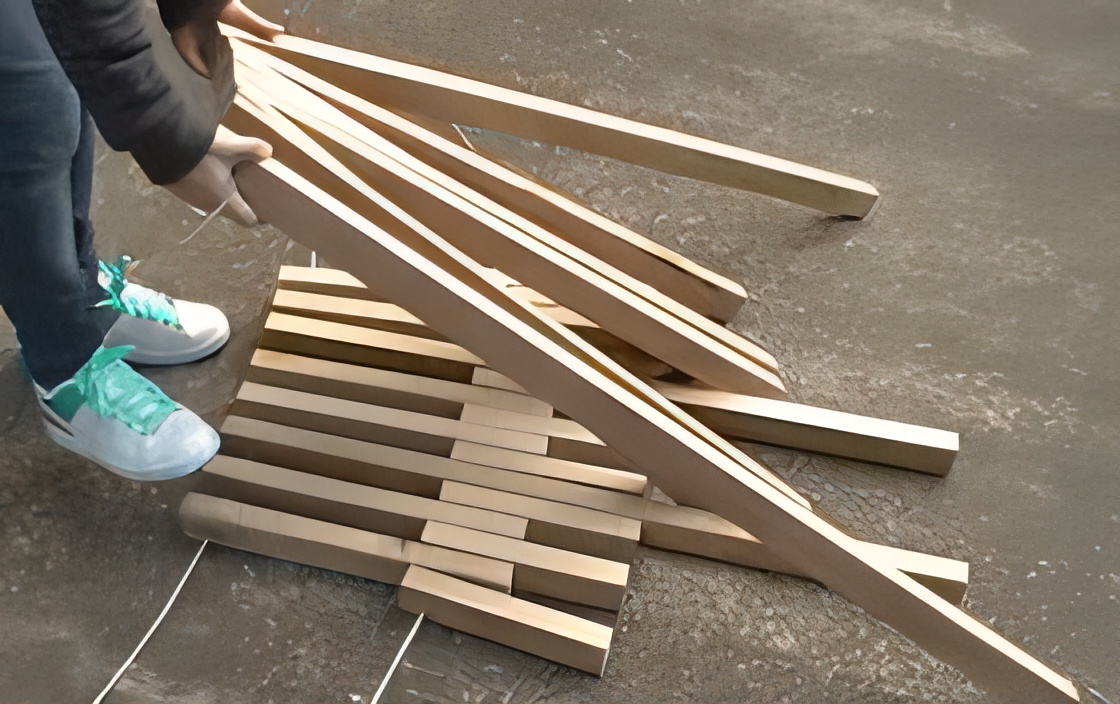
- Move the back pieces over the seat pieces.
- Sit each back piece (e), (c), (d), (c), (c), (d), (c), (e), on top of each seat piece (a), (a), (b), (a), (a), (b), (a), (a), respectively.
For further visual reference see the ‘step 5 drawing’ at the bottom of the previous page.
More wire threading
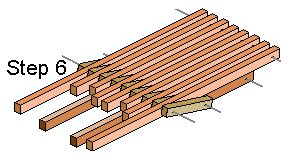
Step 6. The last wire
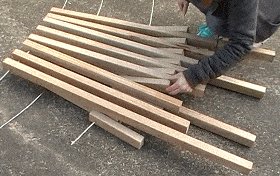
- Slide the back pieces forward along the seat pieces so that the ends of the back pieces overhang the seat pieces by approximately 6½” (163mm).
For further visual reference see the ‘Step 6 drawing’ at the bottom of the previous page.
- Align the coupler holes with the back piece lower holes, and thread wire through them.
Step 7. All the wire in
And that’s all the wire in place.
Four lengths in all.
At this stage everything is fairly loose.
All the wire is longer than required and will be cut off in due course.
Coming along marvelously.
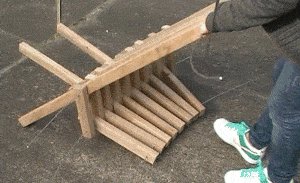
Step 8. Push the top in
- Give the top a bit of a squeeze in.
This is really the interesting part because you will now get to see how the chair unfolds.
Simply grab the wire at each end of the chair top and lift the unit up so it’s upright and on its legs.
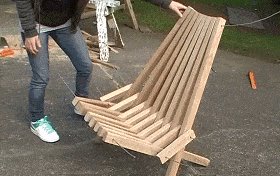
Unfolding the chair
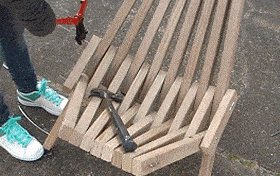
Step 9. The chair unfolding
- Simply grab the wire at each end of the chair top and lift the unit up so it’s upright and on its legs.
- This is one of the most rewarding stages of the project – seeing it fold into a chair.
Step 10. Squeeze the pieces in
- Squeeze the top of the back pieces together: i.e. just with your hands, push the pieces together until they touch.
- The wire is longer than necessary at this stage and will need trimming.
Step 11. Snip the wire
- When the top of chair is pushed together, cut the wire at each side leaving a “2” (50mm) overhang.
- (Note alternative fastening option before Step 14 which requires a shorter overhang.)
- This can be done with a tool such as a bolt cutter, a wire cutter, heavy pliers, or a hacksaw
Step 12. Fold and staple
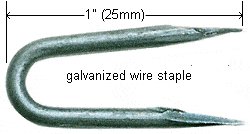
- Fold the wire over and fasten with two galvanized wire staples, at each fold.
Final touches and a bit of sanding
Step 13. Snip more wire
- Ensure the sides (where the couplers are) and the seat ends are all pushed together, and cut the rest of the wire leaving a 2″ (50mm) overhang at every point.
- Then, with a hammer, bend the overhangs over against the wood and fasten each bend with two galvanized staples.
Alternative fastening
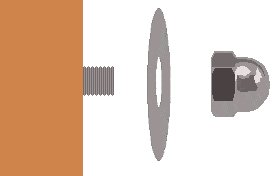
If you prefer a more polished look (fastening-wise), another option is to make a thread on the ends of the wire, and then secure each end with a washer and dome nut.
This would mean leaving approximately a ⅜” (10mm) overhang on the wire at each point rather than the 2″ (50mm) overhang and making a thread on the ends of the wire.
A thread can be easily made with a tool called a ‘die’.
Step 14. A bit of sanding
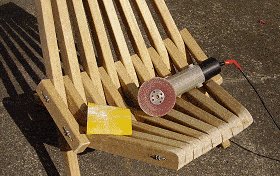
Finally, a bit of sanding.
Get rid of all the sharp edges with woodworking tools, and that’s about it.


We built 3 Kentucky Stick Chairs for our grandchildren (11, 9, 4), using your paid pattern. There are several big Jake’s Chairs on our dock, so we wanted lower profile chairs that could be used for dock-fishing, but otherwise would be inside for TV/games, etc.
Safety Design Change for Young Child
The Stick Chairs were quick and easy to make but we did have one design issue. Caroline is 4, and while tall and thin her legs do not touch the floor when sitting in this chair. The seat/back right angles and couplers make the Stick Chairs sturdy and comfortable, but they are VERY forward TIPPY when enter/exiting the chair. An adult, or even our older grandchildren, automatically compensate with no problem. We showed her how to enter/exit to the side which worked fine until she forgot :(. Not only did the chair tip forward, it folded up and the entire chair weight slammed into the back of her head. A few minutes of tears and a popsicle brought back her smile, but we knew we had to have a safety modification.
We tried adding 9″ forward-facing feet to the inside of the two front legs, but that was not enough to prevent tipping. Ultimately, we added 17.5″ legs to the outside front seat string, cutting the top flush/angles with the outside seat pieces. The front seat rod was tighten enough that the support legs follow gravity down when unfolded, but are still loose enough to fold up. After many enter/exit test, they have prevented tip-overs without further attachment. When she gets older, the two legs can easily be removed.
Finishing
We wanted bright, fun, colors but stains tend to be more house/deck conservative. We found our solution with Behr’s new water-based, tint-to-paint-colors stain. We loved Behr’s new Seasons, Home Decorators Collection of bright, beach-resort colors. Home Depot personnel had to custom match to the paint sample color due to the differences in stain/paint base, but they were happy to do so for ANY of their paint colors (thank you Margaret)! One 8-oz sample size was enough for two coats on a single chair. One coat gave good coverage, but we want a more painted look that would wear like a stain considering all the moving parts.
Pattern Layout
Am also passing on our cutting layout for using ONE 2x8x10 board, in case you think would be helpful (see the cutting layout above). We will make others, so did not want to forget and have to rethink it when we do more. Cutting smaller lengths first made ripping quick and easy for those of us who hobby-build.
We all LOVE our new chairs and thank you for the pattern & instructions!
Jerry Doty
I have grandkids and was wondering if you created a new cut list, to avoid any injuries getting in and out of the chair?
Great project. Had a good time making these chairs.
James Piper
Built my first chair from your plans. I think it came out pretty awesome. Thank you
Julian Cofer
Thank you all for this wonderful team that gave me my first lessons to build chair. God bless you.
Cestari Carlos – Brazil
From Ahmet Ionel Dascalu
My first ever experience in woodworking was really fun and super easy. A huge picnic table no less! ‘Measure well and take it slow’ is my advice to woodwork newbies!
Whilst working on my first project, I spied an intriguing looking folding chair. I really liked its modern look and Les suggested that I should have a go at making one.
The chair I made was constructed from narrow stick ripped from wider board, and if I followed the original pattern, the results would have been a chair too narrow to sit on comfortably. We ended up modifying the pattern by adding an extra centre piece to the back, front, and seat, to make it wider. Once the pieces were cut to size and holes drilled, assembly was very quick and straightforward.
The second chair was cut and assembled to the original pattern. As this was my second try, it was straightforward and quick to assemble and secure. Cut the pieces to required lengths, mark and drill holes for threading then wire it all up. The fun part is unfolding the chair after assembly. It looks complicated but is a very easy make.
Now I have two (sort of) matching folding chairs. Slim and wide version, both very comfortable. My fellow flat dwellers Iove sitting in them on summer evenings in our shares backyard.
Overall, a very practical and satisfying project that anyone could tackle with the right tools.
Video: https://www.youtube.com/watch?v=EtVBW2p_5SY&feature=youtu.be
isnt it possible to use 31 mm for all the holes? or is it neccesary to use 37 mm for the top and seat…?
Done! Our only problem is they seem to be too forward facing. Wondering if anyone has trimmed the back legs to have them lean back a bit more? Or leveled off the back legs to a flatter/grounded leg? And clues?
What is the seat height where the seat joins the back?