Contents
Introduction and material list
Introduction
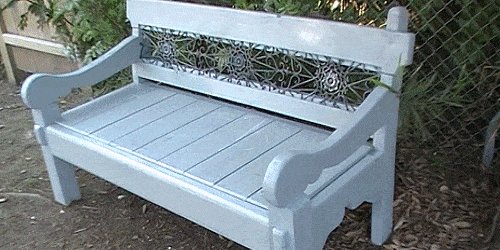
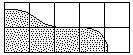
The idea for this project came from a bench that I spotted in the zoo whilst on a trip to Melbourne, Australia (see picture to the right).
Although my version didn’t look nearly as old or as rustic as the original, it still turned out to be a mighty bench!
Dimensions
Ft and inch version
Overall the bench is nearly 60″ long, 35″ high and a little over 30″ deep.
Metric version
Overall this bench is nearly 1500mm long, 875mm high, and a little over 750mm deep.
The wood sizes
The dimensions given throughout this project are the finished (actual) sizes.
There are three stock sizes used in this project. They are 1 1/2″ x 3 1/2″, 1 1/2″ x 5 1/2″, and 3 1/2″ x 3 1/2″.
You will need
Ft and inch version
| Wood | |||
| Nominal size | Actual size | Used for | Total amount |
| 2″ x 4″ | 1 1/2″x 3 1/2″ | lower backrest rail, seat support, side rails | 13ft |
| 2″ x 6″ | 1 1/2″x 5 1/2″ | rear rail, front rail, rear legs, arms, seat boards | 37ft |
| 4″ x 4″ | 3 1/2″ x 3 1/2″ | front legs | 40″ |
Metric version
| Wood | |||
| Nominal size | Actual size | Used for | Total amount |
| 100mm x 50mm | 90mm x 45mm | lower backrest rail, seat support, side rails | 4m |
| 150mm x 50mm | 145mm x 45mm | rear rail, front rail, rear legs, arms, seat boards | 11m |
| 100mm x 100mm | 90mm x 90mm | front legs | 1m |
You will also need
Ft and inch version
- two of 8″ long galvanized lag screws (coach screws),
- fifty of 2″ wood screws,
- a handful of 4″ galvanized nails,
- a handful of 3″ galvanized nails,
- some exterior wood glue,
- and some type of decorative wrought iron or metal pattern for the infill at the back of the bench.
Old Style Park Bench
$5.00- Pay online by credit card, debit card, or Paypal using Secure Server Paypal. You do not need a Paypal account if paying by credit or …
Metric version
- two of 200mm long galvanized coach screws,
- fifty of 50mm wood screws,
- a handful of 100mm galvanized nails,
- a handful of 75mm galvanized nails,
- some exterior wood glue,
- and some type of decorative wrought iron or metal pattern for the infill at the back of the bench.
Plans – The individual pieces
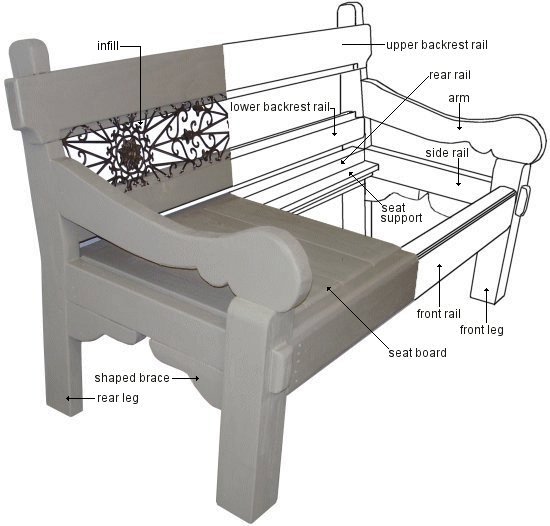
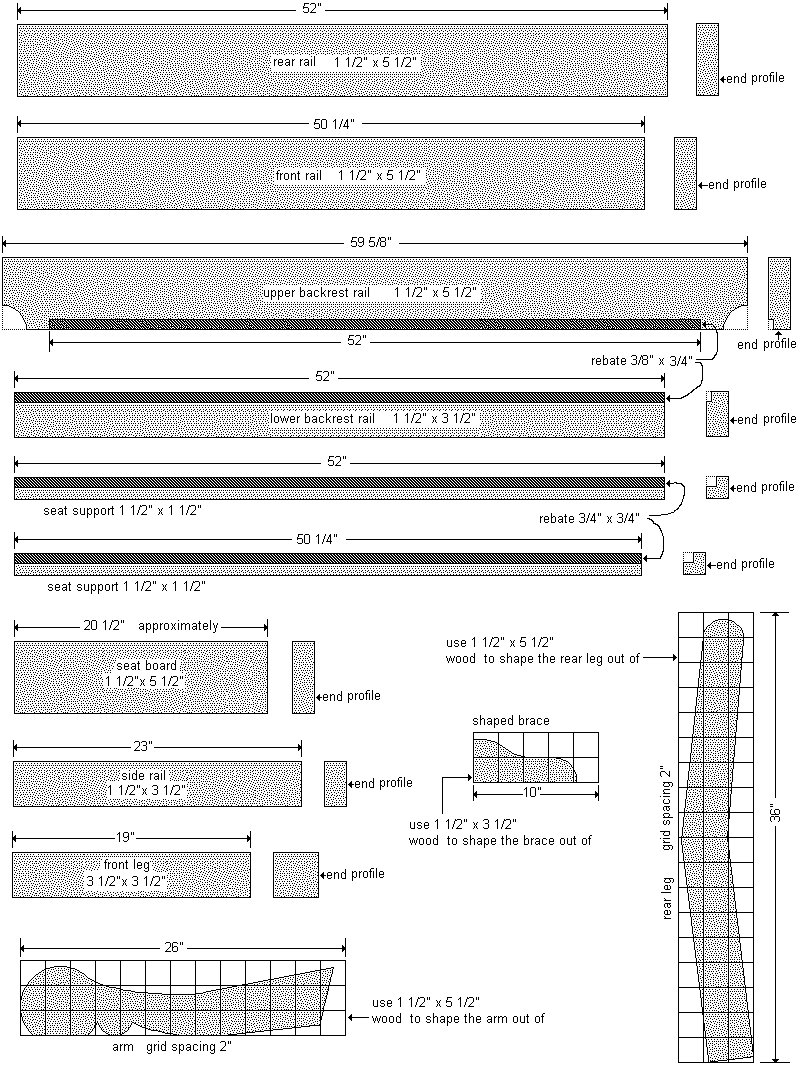
The pieces
Below are the drawings and dimensions for every piece required to make the park bench.
Ft and inch version
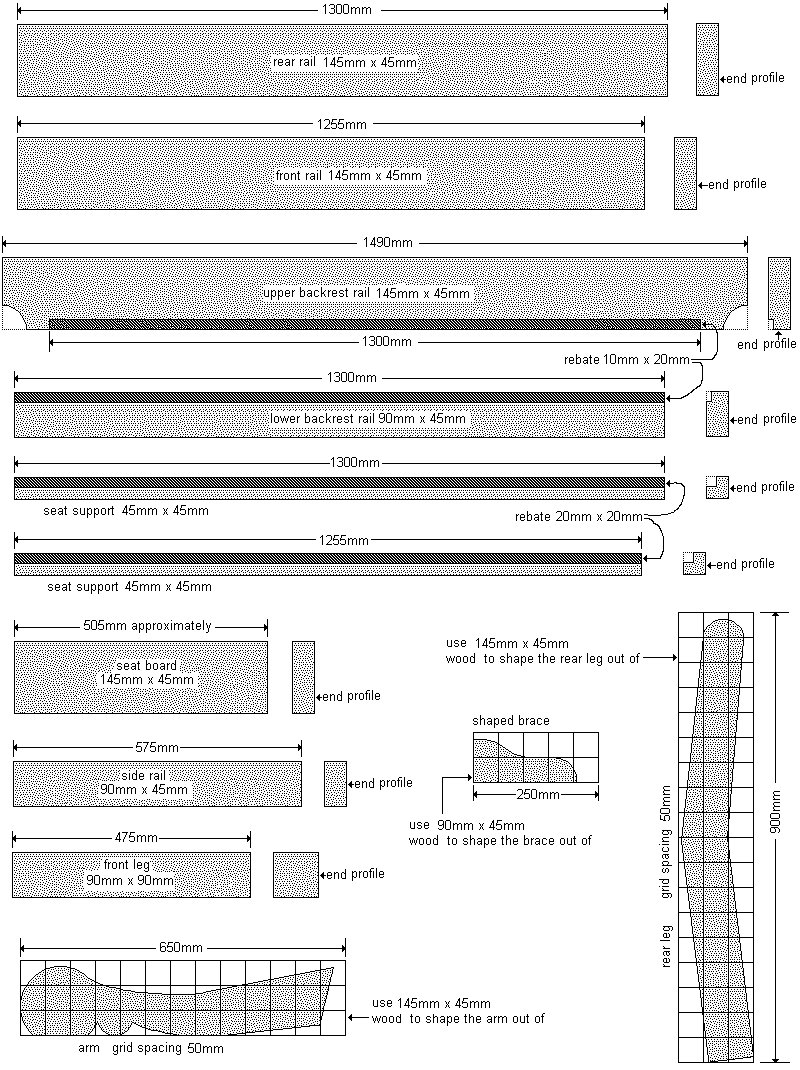
Metric version
Plans – Elevations and details
The Plans and cut-out detail
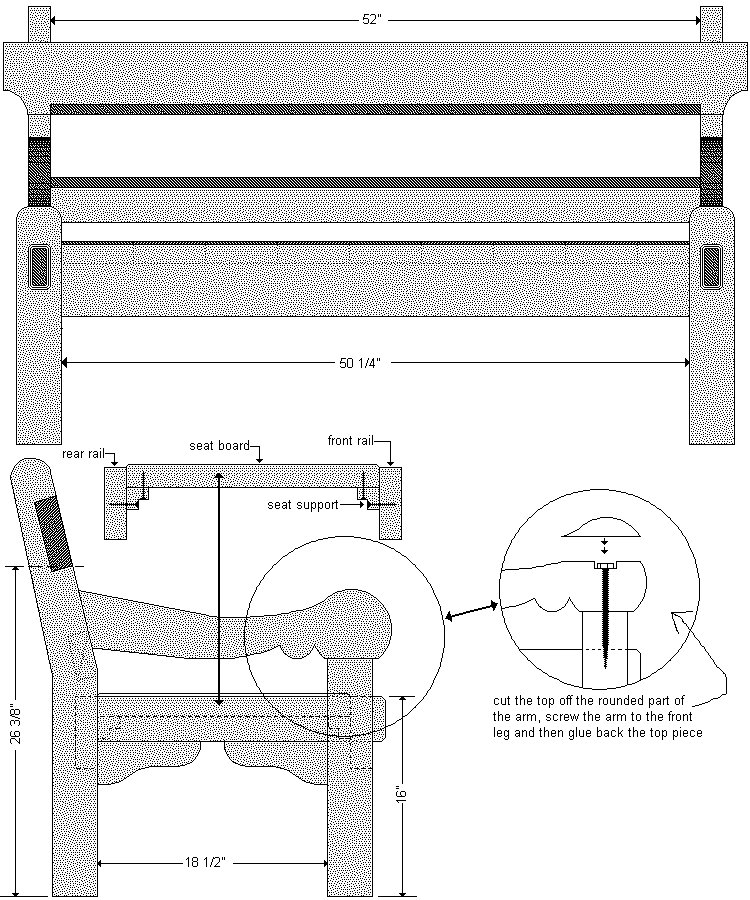
Ft and inch version
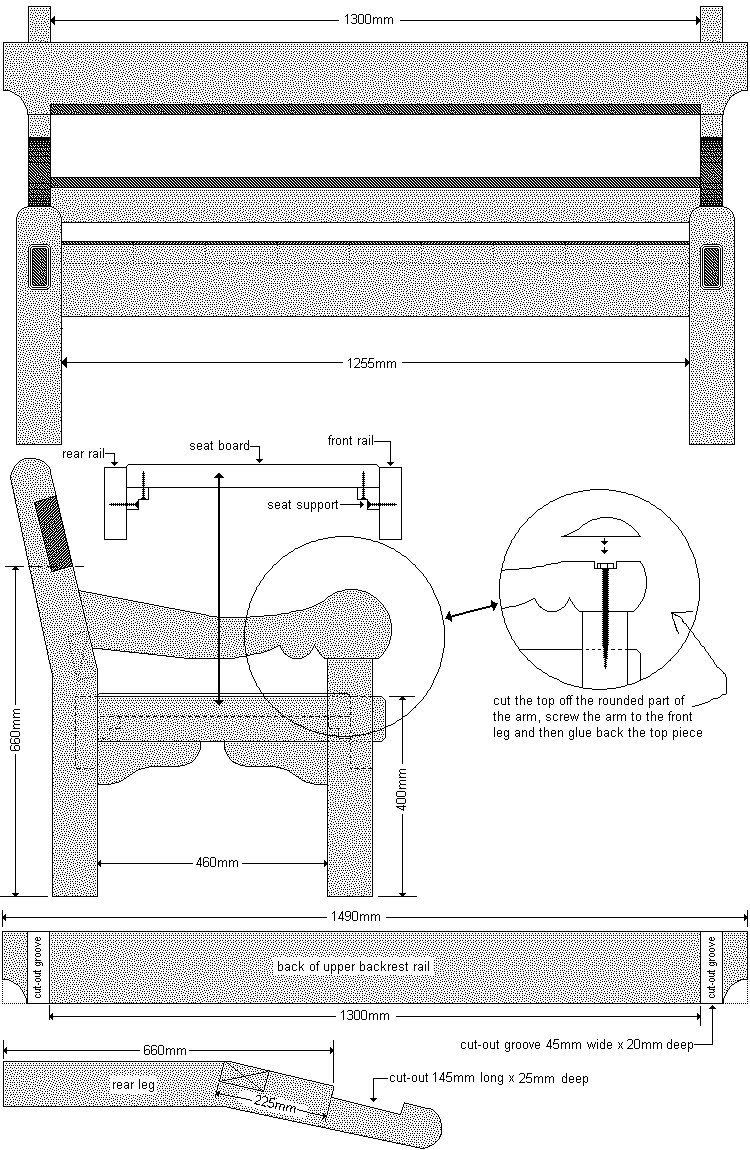
Metric version
Cut-out detail
Ft and inch version
Instructions – Making the legs
Step 1: Make the front legs
Ft and inch version
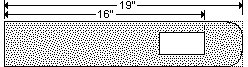
- Out of 3 1/2″ x 3 1/2″ wood, cut two pieces (the legs) at 19″ long.
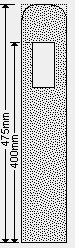
Metric version
- Out of 90mm x 90mm wood, cut two pieces (the legs) at 475mm long.
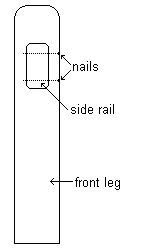
- They will each need a hole (mortise) cut through them to house the side rails.
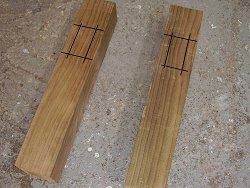
- To do this, first mark the mortise hole positions on the legs.
- The holes will need to be marked on both sides of each leg, so they can be worked on (drilled and chiseled) from both sides.
- The top mark of each hole will be 16″ (400mm) up from the bottom of each leg.
- The hole size will be the same as the side rail width and thickness, which is 1 1/2″ x 3 1/2″ (90mm x 45mm)
- Mark the holes accordingly on both sides of each leg.
Ft and inch version
Metric version
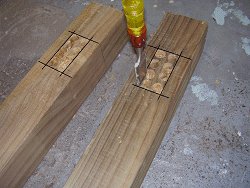
Cut out the holes (mortises)
- Drill out the waste, drilling from both sides of the legs.
- Drill inside the marked areas, as close to the marks as possible.
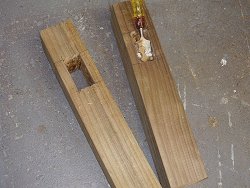
- Clean up the holes in both legs with a chisel, coming through from both sides, bit by bit, until the mortises are formed and the side rails can fit snugly into the holes. Then slightly round the tops of the legs with sandpaper (see drawing above).
Step 2: Make the back legs
Ft and inch version
- Shape the back legs out of 1 1/2″ x 5 1/2″ wood.
- Cut two pieces 36″ long.
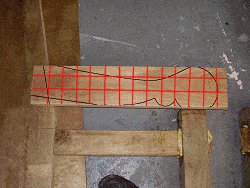
Draw a grid on one of the pieces with the grid spacings 2″ apart.
Metric version
- Out of 90mm x 45mm wood, cut two side rails at 575mm long.
- The front legs are already made (step 1).
- Add some glue to the insides of the mortise holes in the front legs.
- Then tap the side rails in through the mortises, until they protrude 25mm out the other side.
- Using the picture below as reference (or using a clearer picture here), approximate the points between the grid lines on the leg piece. Then draw lines from point to point so that you have a pattern on the leg piece similar to the pattern drawing below.
Ft and inch version
Metric version
- Then cut the wood along the lines using a power saw, jig-saw and handsaw where needed.
- Once you have cut out the first rear leg, use it as a pattern to mark and cut the second leg.
Making the arms
Step 3: Join the front legs and side rails
Ft and inch version
- Out of 1 1/2″ x 3 1/2″ wood, cut two side rails at 23″ long.
Metric version
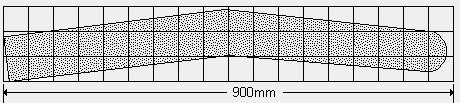
- Shape the back legs out of 145mm x 45mm wood.
- Cut two pieces 900mm long.
- Draw a grid on one of the pieces, with the grid spacings 50mm apart.
- The front legs are already made (step 1).
- Add some glue to the insides of the mortise holes in the front legs.
- Then tap the side rails in through the mortises, until they protrude 1″ out the other side.
- Ensure that the side rails are at right angles (90°) to the front legs.
- You can then hammer a couple of nails into each leg to secure the joints.
Step 4: Make the arms
Ft and inch version
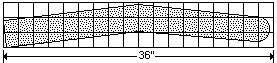
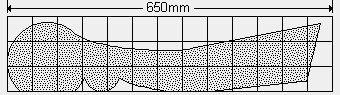
- Cut two pieces of 1 1/2″ x 5 1/2″ wood, 26″ long for the two arms.
- Draw a grid on one of the pieces with the grid spacings 2″ apart.
Metric version
- Cut two pieces of 145mm x 45mm wood, 650mm long for the two arms.
- Draw a grid on one of the pieces with the grid spacings 50mm apart.
- Using the picture below as reference (or using a clearer picture here) approximate the points between the grid lines on the arm piece. Then draw lines from point to point so that you have a pattern on the arm piece similar to the pattern drawing below.
Ft and inch version

Metric version
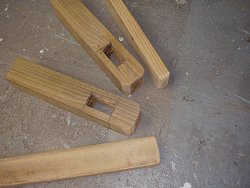
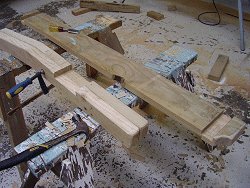
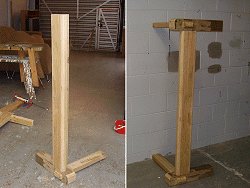
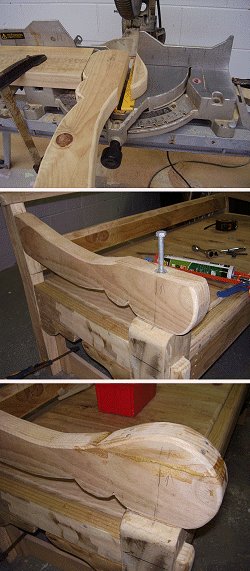
- Prior to cutting, hold the marked piece of wood in position in relation to the front and rear legs (which are temporarily placed together), to ensure the back angle of the arm is correct (see photo top-right).
- Then cut the arm shape out using a power saw, jig-saw and handsaw where needed.
- Once you have cut out the first arm, use it as a pattern to mark and cut the second.
The cut-outs
Step 5: Cut the rest of the frame pieces
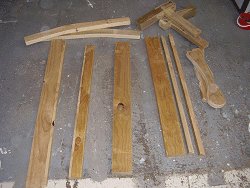
- Cut the rest of the frame pieces which are…
The rear rail, the front rail, the upper backrest rail, the lower backrest rail, and two seat support pieces. - Refer to the piece plan for all the necessary dimensions.
Ft and inch version
- The seat supports are 1 1/2″ x 1 1/2″ wood, 50 1/4″ long.
- Rip (cut lengthwise) a length of 1 1/2″ x 3 1/2″ wood in half to get the two seat support pieces.
Metric version
- The seat supports are 45mm x 45mm wood, 1255mm long.
- Rip (cut lengthwise) a length of 90mm x 45mm wood in half to get the two seat support pieces.
- The upper backrest rail, the lower backrest rail, and two seat support pieces all need rebates cut in them.
- The piece plan also gives the rebate dimensions.
- The rebates can be easily cut out with a circular saw.

Step 6: Make the shaped braces
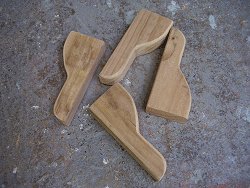
- Cut four shaped braces to go in the corners where the legs and side rails meet, to give added bracing strength.
Ft and inch version
- Use 1 1/2″ x 3 1/2″ wood to cut the braces out of.
- Draw a grid on one of the pieces with the grid spacings 2″ apart.
Metric version
- Use 90mm x 45mm wood to cut the braces out of.
- Draw a grid on one of the pieces with the grid spacings 50mm apart.
- Using the picture below as reference, approximate the points between the grid lines on the brace piece then draw lines from point to point so that you have a pattern on the brace piece similar to the pattern drawing below.
- Then cut the brace shape out using a power saw, jig-saw and handsaw where needed.
- Once you have cut out the first brace, use it as a pattern to mark and cut the other three.
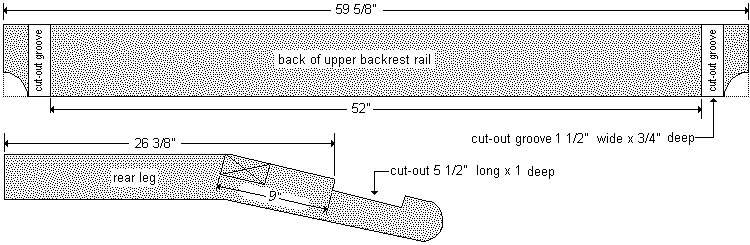
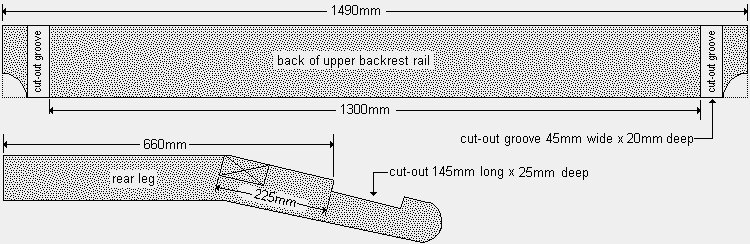
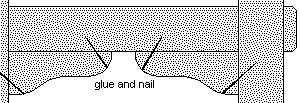
Step 7: Make the cut-outs and grooves
- The two rear legs require a cut-out (to house the upper backrest rail) and the upper backrest rail requires a grove at each end (to house the rear legs).
- The grooves in the backrest fit into the cut-outs in the rear legs in an interlocking fashion.
- Both the cut-outs and the grooves can be made by setting the blade in a circular saw to the required depth and making multiple cuts across the cut-out and groove area. They can then be cleaned out with a chisel.
- Refer to the plan below for the cut-out and groove dimensions.
Ft and inch version

Metric version
Back and front assembly
Step 8: Assemble the back
- Make up the back comprising of the two rear legs, the upper backrest rail, the lower backrest rail and the rear rail.
- The grooves in the upper backrest rail fit into the cut-outs in the top of the rear legs. Once fitted, they can be nailed.
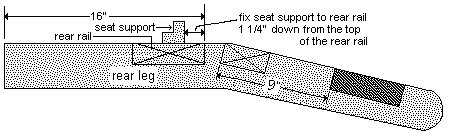
- Refer to the drawing below for detail on where to fix the lower backrest rail, the rear rail and a seat support.
Ft and inch version
Metric version
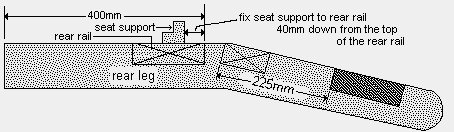
- Nail the lower backrest rail in place and then screw one of the seat supports to it, 1 1/4″ down from the top.
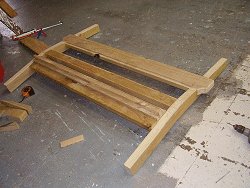
Step 9: Assemble the front
- Fix the front rail to the two front legs.
- Use the pictures as a guide.
Step 10: Join the front to the back
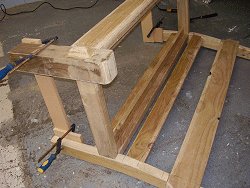
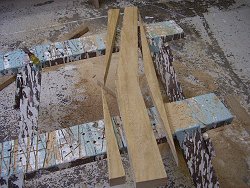
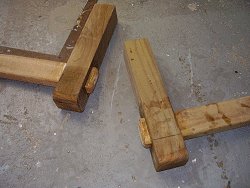
- Align the front portion of the bench frame above the back portion, and hold it in position with props and clamps (see photo).
- Ensure the alignment is correct and that the lower part of the rear legs are parallel with the front legs, and then nail the side rails to the rear legs.
- Leave the clamps on until the shaped braces have been fixed in place.
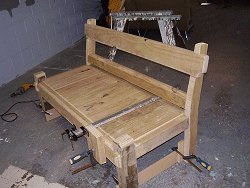
Seat boards and braces
Step 11: Fit the seat boards
Ft and inch version
- Screw a seat support along the front rail 1 1/4″ down from the top.
- Measure between the front and rear rails, to determine the length of the seat boards. They should be approximately 20 1/2″ long.
Cut the seat boards out of 1 1/2″ x 5 1/2″ wood.
Metric version
- Screw a seat support along the front rail 40mm down from the top.
- Measure between the front and rear rails, to determine the length of the seat boards. They should be approximately 505mm long.
Cut the seat boards out of 145mm x 45mm wood. - You will need 9 boards. One may need to be ripped down in order to fit.
- Cut the seat boards and fit them, but first apply a run of glue along the seat supports.
Fix by way of screwing from underneath – through the seat supports into the seat boards.
Step 12: Fit the shaped braces
- Fix the shaped braces under the side rails against the front and rear legs.
- Glue and nail them.
- Once the shaped braces have been fixed in place, you can take off the holding clamps.
Arms and back infill
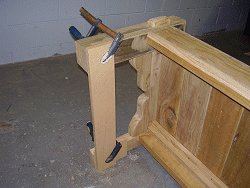
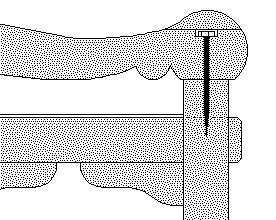
Step 13: Fit the arm
- Cut the tops off the knobs on both arms.
- This can be done with a miter saw, band saw, bench saw or even a hand saw.
- Add glue to the ends of the arms and the top of the front legs.
- Position the arms and fix (nail) the back of them to the rear legs. The front of the arms will be sitting loosely on top of the front legs.
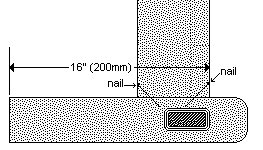
- Drill down through the top of the arms into the top of the front legs.
Make the drill hole (through the arm) the same size as the shank of the screw.
Make the drill hole into the top of the leg, a smaller size than the shank of the screw. - Insert the screws (8″ (200mm) long galvanized lag screws) and tighten them.
- Then glue and nail the top pieces back on the arm to cover the bolt heads.
Step 14: Paint it and fit the back infill
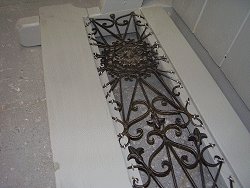
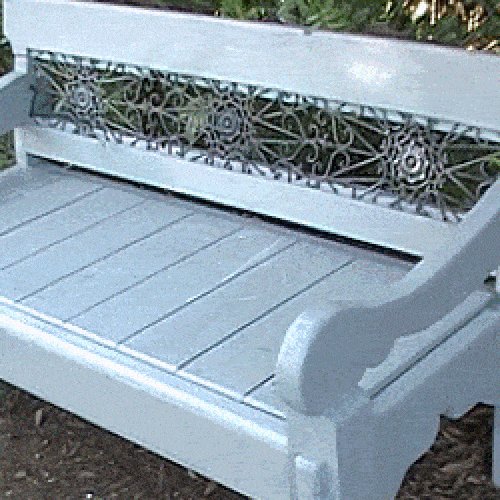
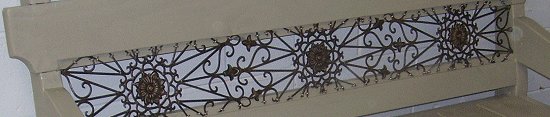
- Finally, Paint the bench and then fit some sort of metalwork to the back of the seat.
- This can be wrought iron, a decorative metal wall hanging which can be found at some garden centers, or anything similar – even wood art or trellis.
A seat to be proud of. Enjoy!


Good day
My wife wanted me to build her a chair so she could sit outside and watch our daughter while playing on the jungle gym.
So she search the internet for picture of chairs and found your plans. And handed me the plans.
This is the product of the plan.
Thanks, she is so impressed with the results that it has ended in the entrance hall of the house.
Kind Regards Ian Stanley