Contents

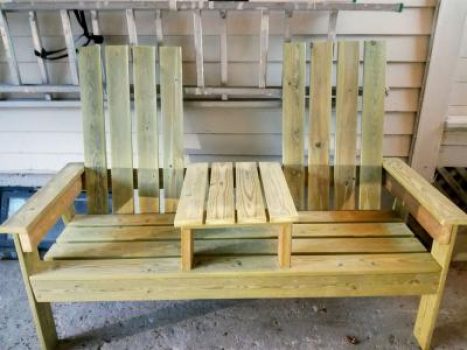
This style of bench is very common and there are many varied versions posted around the place. This is my version.
What differentiates this fellow is that it is built mostly out of rough 1×6 (150mm x 25mm) actual (true) size lumber.
But there is more about that further down the page.
I have also authored another version of this bench which can be seen here.
So let’s cut to the chase and get cracking. First up the plans, parts identification, and then all the other razzmatazz with plenty of pictures, step-by-step how-to, yadda yadda yadda.
This project is written in both standard (inches) and metric (mm).
The standard measurements are given first followed by the metric measurements in brackets ( ) – for example: 1×6 (150mm x 25mm).
The standard is more suitable for North America and the metric more suited for Australasia.
I hope you find these plans useful and easy to understand, if so – please share. I also appreciate feedback – there is a comments form at the end of the page.
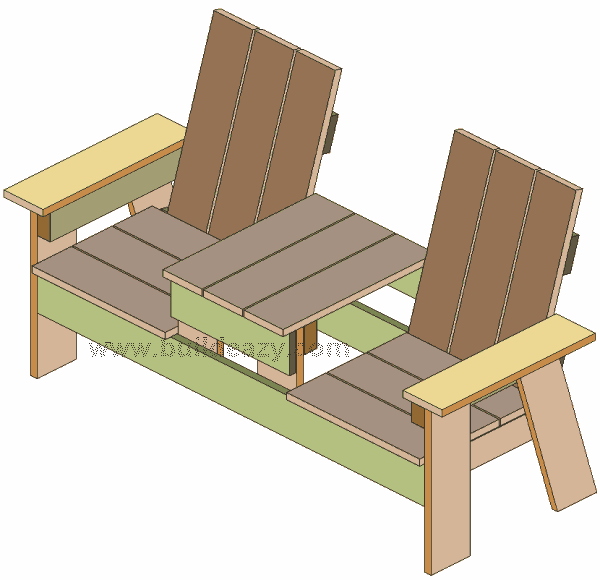
The plans
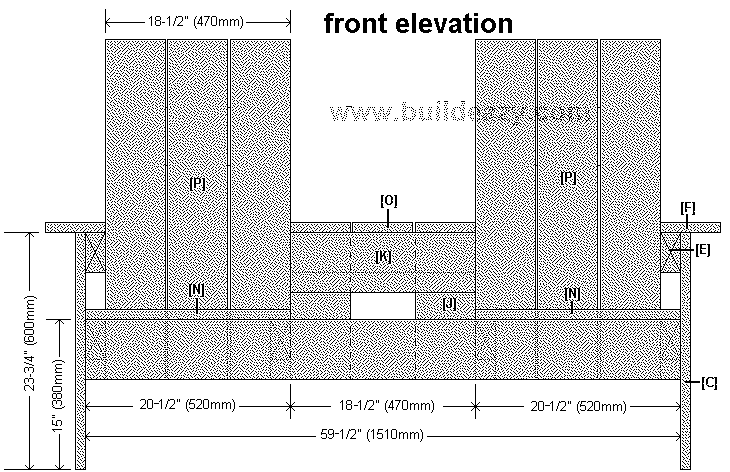
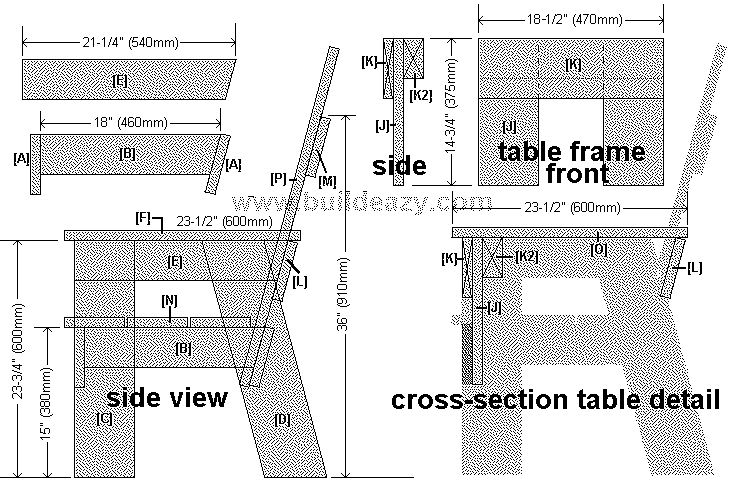
Identifying the parts
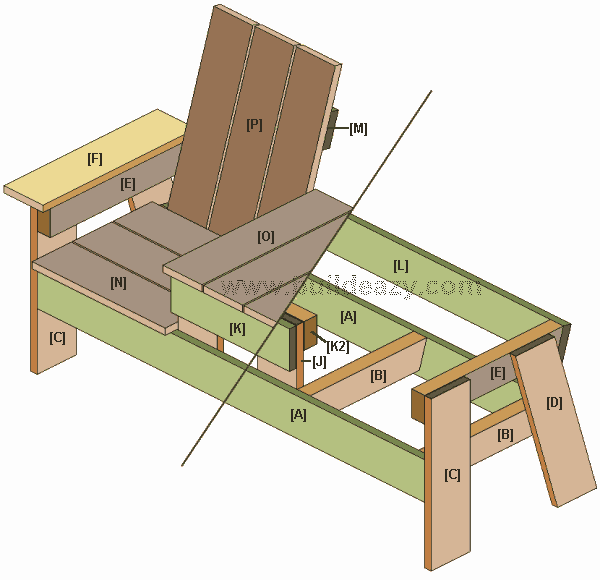
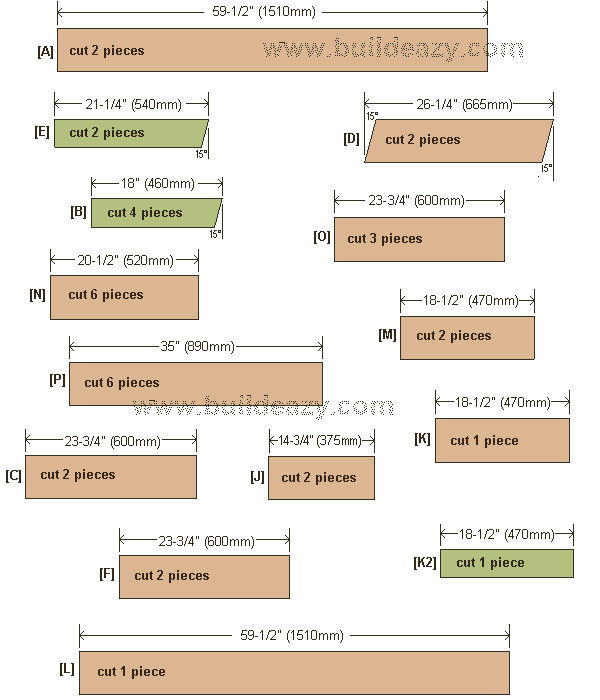
All pieces are 1×6 (25x150mm) lumber except for pieces [B], [E], [K2].
Pieces [B], [E], [K2] are 2×4 (100mm x 50mm) lumber
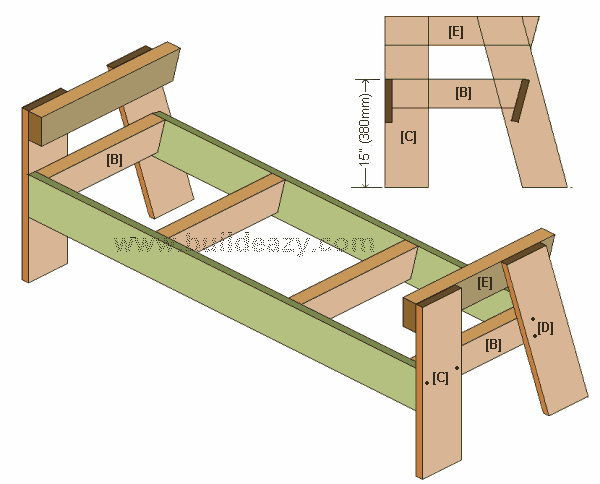
[A] seat-frame front and rear members: 2 pieces @ 59-1/2″ (1510mm).
[B] seat-frame cross members: 4 pieces @ 18″ (460mm) angled back 15deg one end.
[C] front leg: 2 pieces @ 23-3/4″ (600mm).
[D] rear leg: 2 pieces @ 26-1/4″ (665mm) overall, angled back 15deg both ends, parallel.
[E] armrest support: 2 pieces @ 21-1/4″ (540mm) angled back 15deg one end.
[F] armrest: 2 pieces @ 23-3/4″ (600mm).
[J] table frame upright: 2 pieces @ 14-3/4″ (375mm).
[K] table frame front-rail outer: 1 piece @ 18-1/2″ (470mm).
[K2] table frame front-rail inner: 1 piece @ 18-1/2″ (470mm).
[L] table frame rear support: 1 piece @ 59-1/2″ (1510mm).
[M] backrest top rail: 2 piece @ 18-1/2″ (470mm).
[N] seat slats: 6 pieces @ 20-1/2″ (520mm).
[O] table slats: 3 pieces @ 23-3/4″ (600mm).
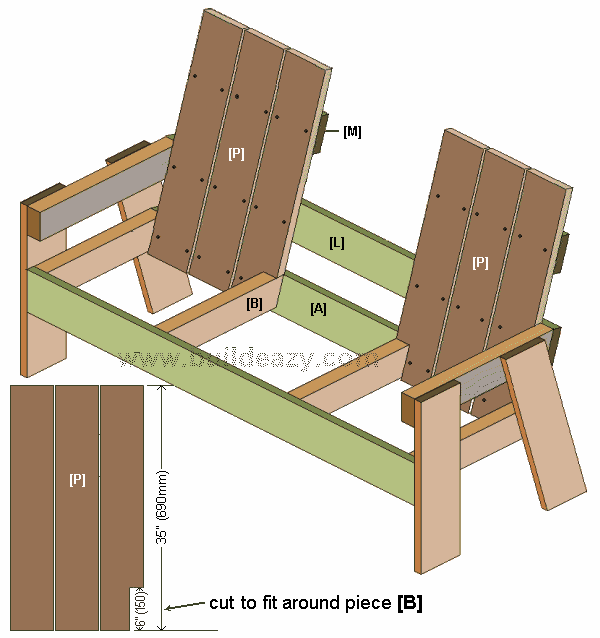
[P] backrest slats: 6 pieces @ 35″ (890mm).
The wood and wood size
For cost reasons, this project is designed for using 1×6 (150mm x 25mm) and 2×4 (100mm x 50mm) wood – actual (true) size which is usually a rough wood before it has been surfaced or planed smooth.
Read more about that at the end of the instructions.
‘Lumber sources’ and ‘Materials you need’ are at the end of the instructions (scroll down).
The individual pieces
All pieces are 1×6 (25x150mm) lumber except for pieces [B], [E], [K2].
Pieces [B], [E], [K2] are 2×4 (100mm x 50mm) lumber. All dimensions are actual (true).
Steps 1 to 3:
Step 1. Cut the pieces
- Cut all the pieces to the lengths given in the drawing above. Cut the longer pieces first to minimize waste.
- Note that pieces [E] and [B] have one end angled back 15° off square, and piece [D] has both ends angled back 15° off square as shown in the drawing above.
All other pieces are square cut.
Step 2. Make the seat frame
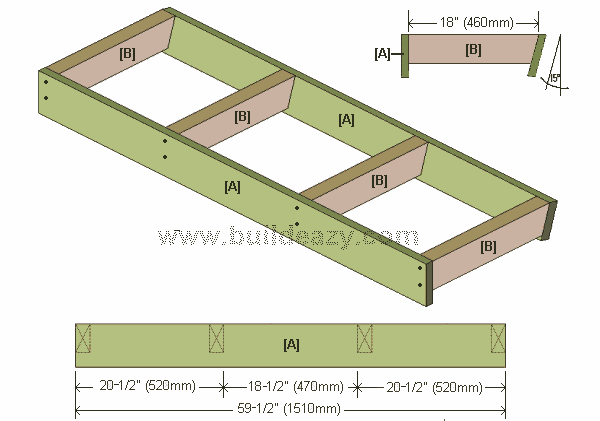
- Make up the seat frame as shown in the drawing above.
- Note that one end of pieces [B] (the cross members) are angled back 15° off square.
- Note that the distance between the two intermediate cross members [B]
is 18-1/2″ (470mm). This is an important measurement.
- Fixing detail: This applies to every step.
- Apply glue to every joint before fixing with screws. Each step shows the screw holes marked with a black dot.
- Pre-drill all the screw holes in the face piece of wood at each joint. The face piece is the piece where you will see the screw head (the screw hole dots shown in the drawings).
Refer to the drawing in each step for screw placement. - Use 3″ (75mm) screws in steps 2,3,4,and 8.
- Use 2″ (50mm) screws in steps 5and 7.
- Use 2″ (50mm) screws in step 6 except for the top of the table frame where you will use 3″ (75mm) screws.
Step 3. Make up the side frames
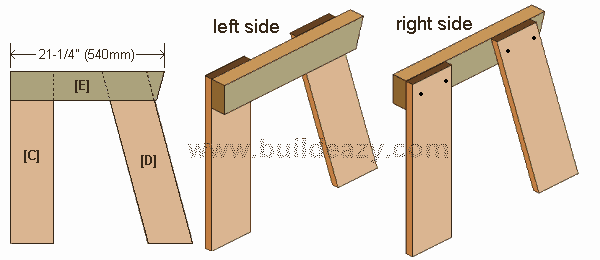
- Make up the side frames as shown in the drawing above. The left side is a mirror image of the right side.
Steps 4 to 6
Step 4. Add the side frames to the seat frame
- Fix the side frames to the seat frame as shown in the drawing.
- Position the top of the seat frame 15″ (380mm) up the legs.
Step 5. Add the backrest slats
- Fix piece [L] (the table frame rear support) to the ends of the armrest supports [E].
Then fix the backrest slats to pieces [A] and [L]. - Two of the backrest slats [P] will need a bottom corner cut out in order to fit around the intermediate cross members [B].
- Fix pieces [M] to the back of the backrest slats to prevent the slats from warping.
Make the cut-out with a jigsaw or a handsaw.
Step 6. Add the table frame
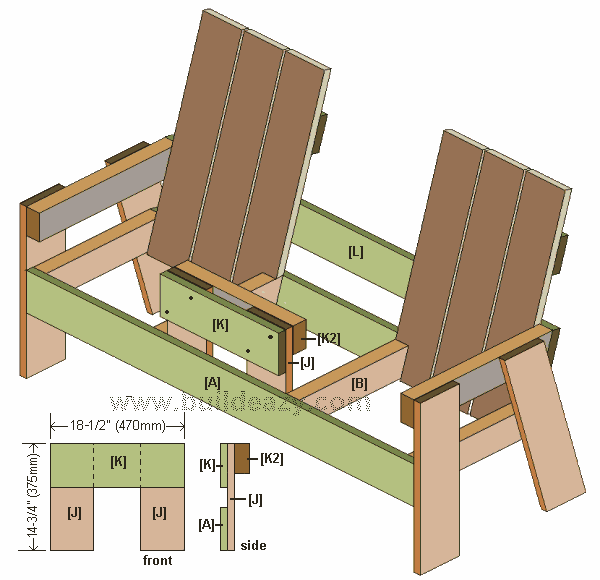
- Make the front table frame up as shown in the drawing above, then fix it to the inside of the seat-frame front member [A] between the two intermediate cross members [B]. Make the bottom of the table frame flush with the bottom of the seat-frame front member [A], and the top of the table frame should be the same height as the top of back piece [L].
Steps 7 to 8
Step 7. Add the table slats & seat slats
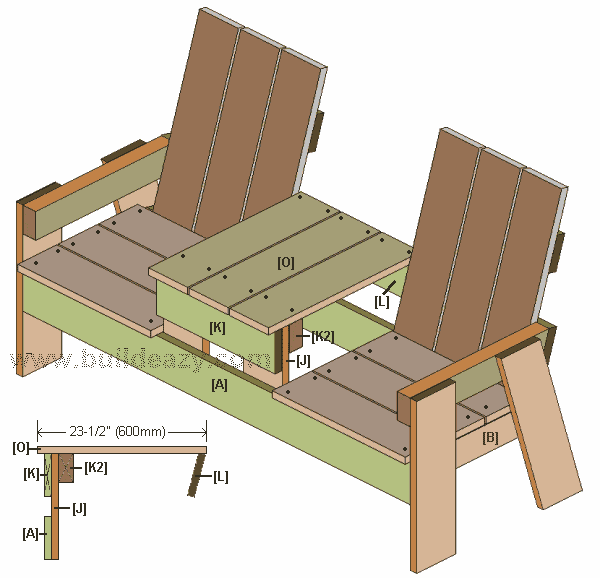
- Fix the table slats to piece [K2] and piece [L].
- Fix the seat slats to the seat-frame pieces [B]
Step 8. Add the armrest

- Finally, fix the armrest [F] to the armrest support [E] and the top of the front and rear legs,
- as shown in the drawing.
Done!
About the wood and wood size
This project call for 1×6 (150mm x 25mm) actual size and 2×4 (100mm x 50mm) actual size wood – which is usually a rough wood
(not dressed, planed, or dimensioned). It will give a bit of a rustic look and be inexpensive. Treated pine would do.
Would the rough wood pose problems splinter wise?
Not really. The fur (for lack of a better term) on the treated pine is soft and if need be, it wouldn’t take much to sand the parts that matter.
Wood source
In USA you can get 1 in. x 6 in. boards easy enough (smooth or rough).
In Australia you can get 150mm x 25mm treated (rough sawn) pine commonly used as plinth board.
In NZ you can get 150mm x 25mm treated fence paling (rough sawn).
In most other countries you should be able to source 1×6 (150mm x 25mm) wood without too much bother
in some form or other.
Altogether you will need
Allowing for a little bit of wastage…
- 12 ft (3.6m) of treated 2×4 (100mm x 50mm) actual size lumber.
- 72ft (22m) of treated 1×6 (150mm x 25mm) actual size lumber.
Note: treated 1×6 (150mm x 25mm) and 2×4 (100mm x 50mm) actual size lumber usually means (rough) lumber before it has been dressed (surfaces, planed smooth).
When purchasing lumber try to get as long a lengths as possible to minimize waste.
You will also need…
- 80 of 2″ (50mm) wood screws,
- 48 of 3″ (75mm) wood screws,
- and some glue.


After a few initial explanations and a couple throughout the project, Les left me alone to read from the plans and get on with it.
I felt I handled the electric saw and drill with confidence and ease. I wasn’t at all intimated by the drop-saw as I read some of the
first-time girls were and I soon learnt to hold the drill-driver in proper alignment with the screws. There were only a couple of instances (maybe more) where I had to call on Les for some assistants.
It was such a lot of fun and I thouroughly enjoyed it. I think I could just about do another one by myself although Les said for safety reasons I would probably need supervision for the next one or two. It took about six hours to make over a couple of days.
I would recommend anyone to give such a project a try.
I am very proud of my bench seat with it’s little table.
Video: https://www.youtube.com/watch?v=MS20IoA46II&feature=youtu.be
Hei.
Har laget noen av disse benkene, men har gjort noen endringer.
Del “D” er 5 gr. i forkant og ca. 10 gr. i bakkant.
Dette gjør at setet heller ca. 5 gr. mot ryggen. Mye bedre sete.
Legger ved et bildet av den jeg har laget.
Arild
It says use actual 1×6 and 2×4 instead of dimensional lumber. Can dimensional lumber be used even though it’s not as thick or wide and the plans still come out ?