Contents
Introduction
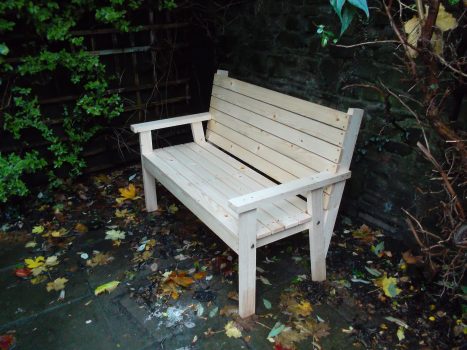
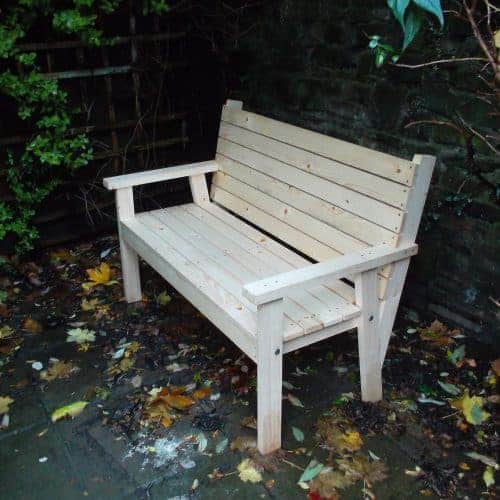
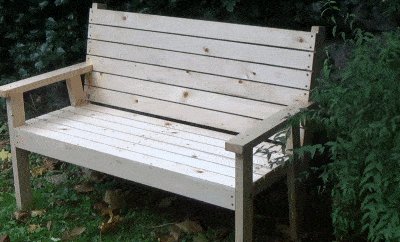
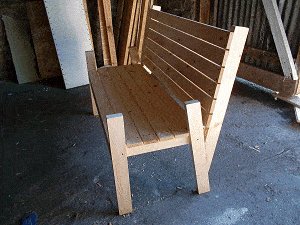
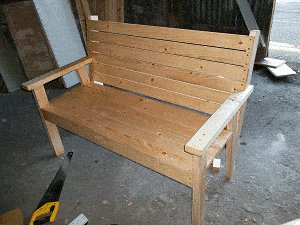
My Ireland bench seat
I call this ‘My Ireland Bench Seat Project’. Not because it has traits similar to any type of traditional Irish furniture or structure – but simply because I made it in Ireland.
Easy As
This is a great project for the novice woodworker or do-it-yourselfer.
Minimal tools are required. The whole thing could be cut out with just a handsaw.
There are only two different stock sizes used.
Most of the pieces are square-cut – easy, easy, easy, – although there are a couple of different angle-cuts required.
To make it easy to mark the lines for the angle-cuts, printable angle patterns are included in this instructive.
Just print them out, fold (or cut) along the lines and use them to mark the angles.
And… there are easy step-by-step instructions with plenty of helpful drawings and photos.
The source
I made this seat in the back shed of a quest house in Dublin, one of my places of stay whilst traveling around Ireland.
I managed to get my hands on a handsaw, electric drill and a few drill bits, a hammer, screw driver, measuring tape, pencil, square, and that was my total arsenal.
The only suitable wood I could get within a bull’s roar of my place-of-stay was a softwood, not really suitable for outside use. As the seat was more than likely to spend most of its life outside – that meant preserving the wood.
Easy Bench Seat
$5.00Moving on
On the next page is a pictorial overview – a quick visual guide to the contents within this documentation. That’s followed on subsequent pages by the plans and cutting detail, printable angle patterns for the two different angle-cuts required, a bit of information on the wood sizes and the measurements given, the materials and the tool list, and step-by-step instructions with accompanying photos and drawings.
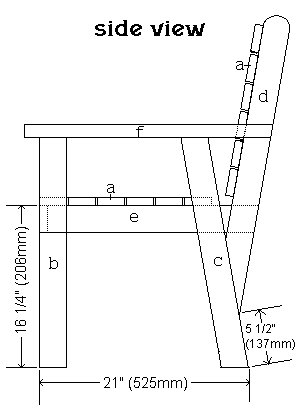
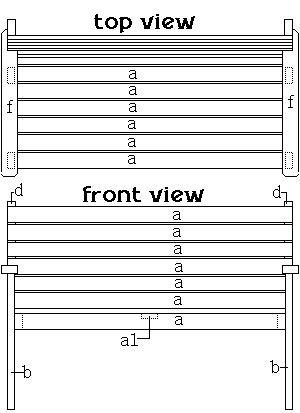
The plans, part identification, & cutting detail
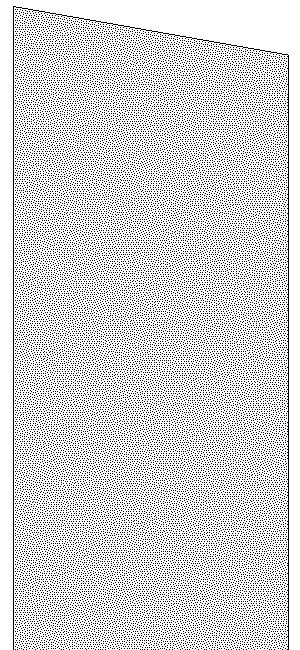
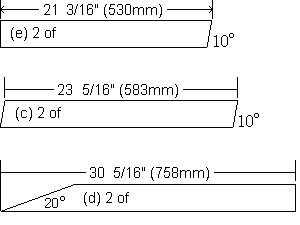
10 degree angle pattern
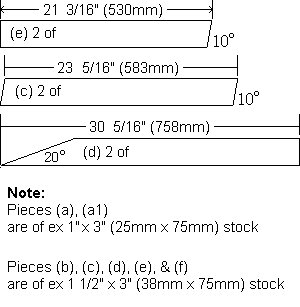
This is the angle required to cut the top and bottom of both back legs (c), and one end of both cross-rails (e).
Just print the pattern out, fold (or cut) along the lines and use it to mark the required angle.
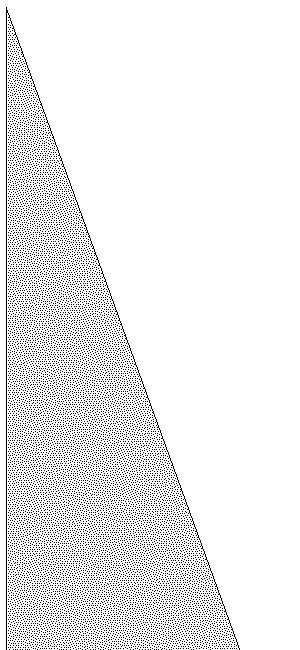
70 degree angle pattern
This is the angle required to cut one end of both back-rest supports (d).
Just print the pattern out, fold (or cut) along the lines and use it to mark the required angle.
Wood sizes and measurements
The wood sizes – bit of an explanation
Note: The wood sizes mentioned below are the stock sizes I was able to source locally. Sizes could vary from place to place. A slightly bigger or smaller stock size (within reason) will fare just as well.
There are only two different wood sizes used for this project. They are ex 1 1/2″ x 3″ (38mm x 75mm) for the two side frames and ex 1″ x 3″ (25mm x 75mm) for the seat slats and backrest slats.
Note: The term ‘wood size’ refers to the width and thickness of the wood, not the length. There are a number of different lengths.
The term ‘ex’ (as mentioned just before the wood sizes in the first paragraph) means ‘out of’.
When the wood is planed or dressed ‘out of’ the sizes mentioned following the ‘ex’ (the nominal size), the finished wood size will then be somewhat less (the actual size).
The nominal vs actual size of the wood:
Nominal size (unplaned/undressed) – 1 1/2″ x 3″ (38mm x 75mm),
Actual size (when planed/dressed) 1 1/4″ x 2 3/4″ (32mm x 69mm).
Nominal size (unplaned/undressed) – 1″ x 3″ (25mm x 75mm).
Actual size (when planed/dressed) 3/4″ x 2 3/4″ (20mm x 69mm).
Note: It is the ‘actual size’ or ‘true size’ that will be referred to throughout this project.
‘Actual sizes’ can vary from place to place and country to country. If you cannot source the exact stock sizes as mentioned in this project, near enough is good enough. A slightly bigger or smaller stock size (within reason) will fare just as well.
About the measurements given
All measurements throughout this documentation are given in both standard (inches) and metric (millimetres).
The inches are given first followed by the millimetres in brackets.
For example: 3/4″ x 2 3/4″ (20mm x 69mm).
As far as the lengths go, the metric sizes are not an exact match to the equivalent standard sizes.
A bench built using the given metric measurements will be approximately 1.6% smaller than a bench built using the standard (ft and in) measurements. Hardly worth worrying about.
The measurements are rounded for practical purposes.
Basically what that means is, use one system or the other (not both together) and you shouldn’t have a problem.
Materials and tools you will need
Wood you will need
Note: If you cannot source the stock sizes given below, slightly bigger or smaller will do. I used a softwood which required coating with a preservative for outside use. If you are able to get a treated wood or a wood naturally resistant to decay, all the better.
- 3/4″ x 2 3/4″ (20mm x 69mm) for the seat slats and back-rest slats.
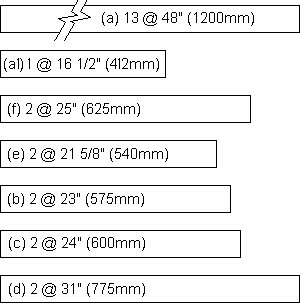
- (a) 13 pieces @ 48″ (1200mm)
- (a1) 1 piece @ 16 1/2″ (412mm)
- 1 1/4″ x 2 3/4″ (32mm x 69mm) for the side frames.
- (b) 2 pieces @ 23″ (575mm)
- (c) 2 pieces @ 24″ (600mm)
- (d) 2 pieces @ 31″ (775mm)
- (e) 2 pieces @ 21 5/8″ (540mm)
- (f) 2 pieces @ 25″ (625mm)
You will also need:
- Around one hundred 2″ (50mm) exterior type wood screws, four 3/8″ (10mm) galvanized carriage/coach bolts 3″ (75mm) long, exterior type wood glue, wood preservative (if required).
And tools…
You can get way with just a handsaw, electric drill and drill bits for the bolts and screws, a hammer, square, screw driver, measuring tape, pencil, a bit of sand paper, and that’s about it.
Cut all the pieces
Step 1. Cut all the pieces
- To begin with, cut all the pieces to length – cut all the pieces square to begin with. Do not do any angle cuts just yet.
- There are only two different stock sizes.
- From 3/4″ x 2 3/4″ (20mm x 69mm) stock, cut 14 pieces as follows:
(a) 13 pieces @ 48″ (1200mm), (a1) 1 piece @ 16 1/2″ (412mm). - From 1 1/4″ x 2 3/4″ (32mm x 69mm) stock, cut 10 pieces as follows:
(b) 2 pieces @ 23″ (575mm), (c) 2 pieces @ 24″ (600mm), (d) 2 pieces @ 31″ (775mm), (e) 2 pieces @ 21 5/8″ (540mm), (f) 2 pieces @ 25″ (625mm).
Now the angle cuts.
- Pieces (c), (d), and (e) need to be re-cut with angle-cuts. Six pieces in all need angle cuts.
- Cut them according to the dimensions given in the drawing.
- To help, there are angle patterns that can be printed out on the pages following the plans.
- Just print them out, fold (or cut) along the lines and use them to mark the angles.
- Of course you might not need the patterns. You might be quite capable of getting the angles by other means.
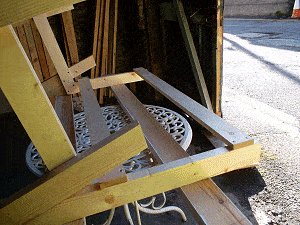
Assemble the side frames
Step 2. Preserve the wood

- This step only applies if you are using a wood that is not treated or not suitable for outside use.
- When the wood has all been cut and all the sharp edges sanded, coat with a suitable wood preservative.
- Get advice from you local builders supply store as to the best wood preservative for the job and then follow the instructions regarding applications and safety measures. Normally liquid preservative can be applied with a paint brush or rag and usually requires two or three coats.
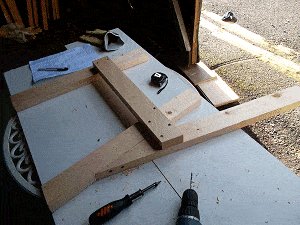
Step 3. Fix ‘side one’ vertical members

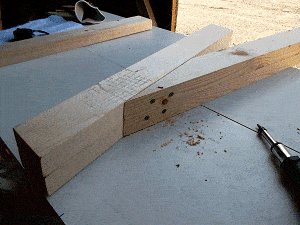
- On a flat surface lay out the three vertical pieces ((b), (c), and (d)) for one side in approximate position.
- Drill, glue and screw (with 2 screws) the bottom of piece (d) to piece (c).
- Refer to the plans for positioning.
- The bottom of piece (d) should be up 5 1/2″ (137mm) from the bottom of piece (c).
Step 4. Fix ‘side two’ vertical members
- Lay the vertical side-frame members ((b), (c), and (d)) for the second side, on top of the corresponding members of the first side.
- As with step 3, fix piece (d) to piece (c).
- Placing one side on top of the other ensures that both sides will be the same.
Side frames and back slats
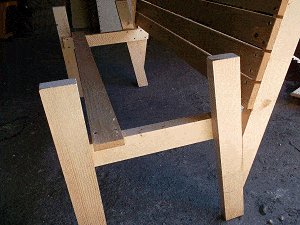
Step 5. Fix ‘side one’ cross rail
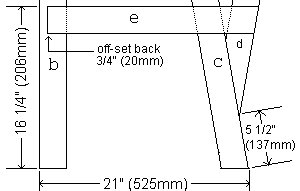
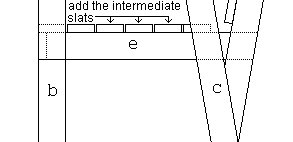
- Fix a cross-rail (e) to side one’s vertical members. Refer to the drawing below.
Step 6. Fix ‘side two’ cross rail
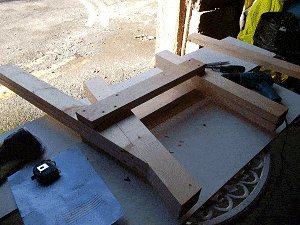
- Fix ‘side two’ cross rail (e) to side two’s vertical members.
- Note: Side one must be a mirror image of side two.
- Refer to the plans for positioning.
- To reiterate – The top of the cross-rail (e) should be up from the bottom 16 1/4″ (206mm) and offset back from the front of vertical piece (b) by 3/4″ (20mm).
Step 7. Fix two back-rest slats
- On a flat surface Lay the two side frames on their backs, spaced apart 48″ (1200mm) overall.
- Work out (and mark) where the back-rest slats (a) are to be placed along the back-rest vertical supports (d).
- Fix (with glue and two screws at each meeting) the first and last (lower and uppermost) back-rest slats in place.
Back slats and seat slats
Step 8. Fix the intermediate back-rest slats
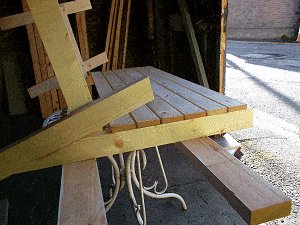
- Fix the intermediate back-rest slats (a) in place.
- Secure with glue and two screws at each meeting.
- The ends of the back-rest slats (a) should be flush with the outer side of each vertical back-rest support (d)
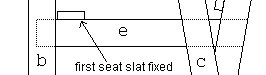
Step 9. Fix the first seat slat
- Turn the unit upright.
- Mark where the seat slats (a) are to go along the cross rails (e).
- Fix the second from front seat slat (a) in place. The ends of the seat slat should be flush with the outside edge of the front legs (b)
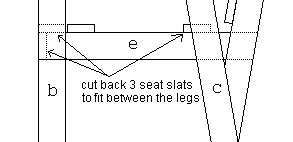
Step 10. Cut 3 seat slat
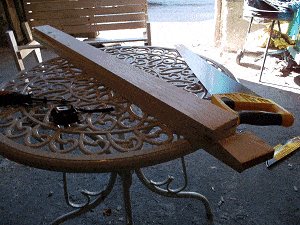
- Measure the distance between the legs. Then cut the ends off three seat slats (a) to fit between the legs as shown in the drawing below.
Seat slats and arm-rests
Step 11. Add the intermediate slats
- Once the ‘cut-back’ slats have been fixed between the legs. Then add the rest of the intermediate seat-slats.
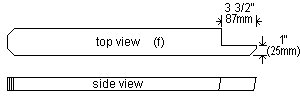
Step 12. Prepare the armrests
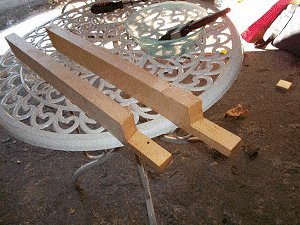
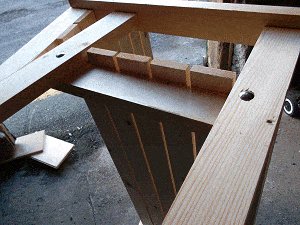
- The ends of the armrests (f) need to be cut to fit around the back-rest support (d).
- This can be done with a handsaw. Cut out the rebate using the drawing below as a guide. Then coat the cut-out area with preservative (if applicable).
Step 13. Fit the armrests
- Fix the two armrests (f) in place.
- Glue and screw them to the top of the back and front legs and also into the side of the vertical backrest support (d).
- Almost finished. Just a bit of strengthening and bolting to go.
Bolts and strengthener
Step 14. Bolt the frame together
- Turn the unit on its side.
- Drill 3/8″ (10mm) holes for the bolts where the front/rear legs (b)/(c) and the cross rail (e) intersect.
- In all there will be four bolt holes. Two each end.
- Ensure that the holes do not cut through any of the screws.
- Feed the bolts through the holes and tighten them.
- Do two at one end and then flip the unit and do the other end.
Step 15. Fix the under seat strengthener

- Lay the unit on its back.
- Fix the strengthener (a1) to the underside of the seat.
- The strengthener (a1) should be centered and run across all the seat slats (on the underside).
- Fasten with glue and nails.
Step 16. All finished
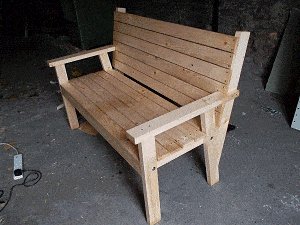
Done!
If you have used a preservative, it would be a good idea to also give the seat a coat of paint.


