
Contents
Introduction

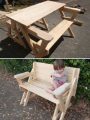
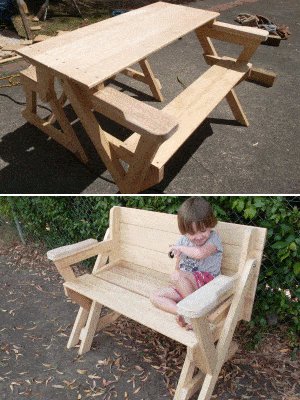
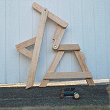
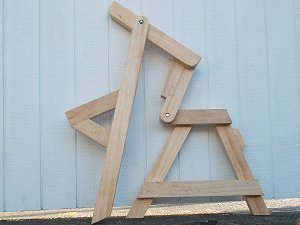
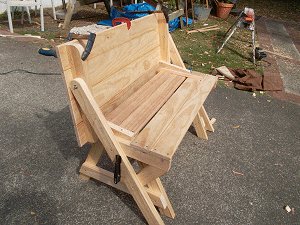
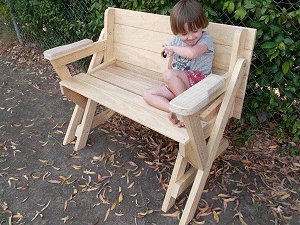
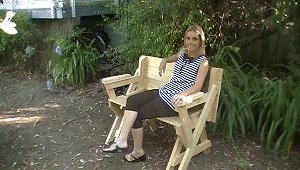
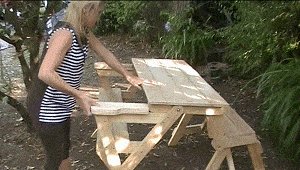
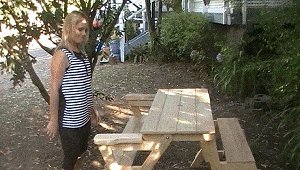
From picnic table to bench seat in one easy move.
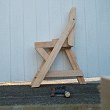
This compact one-piece folding picnic table can be neatly folded back into a single bench seat and tucked away in a corner of the deck, patio, or garden area.
This design is a remake of a very old table given to me many years ago. The old table was due for the scrap heap, so before it disintegrated and was lost forever, I decided to make another.
I had made a similar-style bigger table once before (it can be seen here), but this one is more compact and is ideal for a deck or area with limited space.
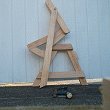
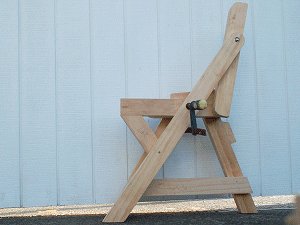
In seat-mode it can be neatly placed to one side and seat two people. When food or drinks are served it can easily be folded out to make a picnic table with a seat each side that will comfortably accommodate two adults and two kids, one adult and four kids, or five kids (subject to the kids’ sizes of course).
- Pay online by credit card, debit card, or Paypal using Secure Server Paypal. You do not need a Paypal account if paying by credit or …
|
The structure of the thing
The mechanism of this masterpiece is all in the side frames, where the various members are cunningly assembled to allow the necessary motions that transform the unit from a single seat to a two-seater picnic table, and vice versa.
And once the two side frames have been made, it is simply a matter of fixing the seat panels and tabletop panel to the side frames, and adding the armrests.
The armrests, incidentally, also act as a brake to contain the unit from spreading out too far.
About the measurements, wood sizes
Let’s talk about the measurements used
The measurements throughout this project are given in both metric (mm) and standard imperial (inches).
The metric measurements are given first, followed by the standard measurements in brackets ().
Please note that, for rounding off purposes, the metric (mm) measurements given do not convert exactly to their corresponding standard (inch) equivalents, so just choose one or the other and you won’t have any problems as far as the measurements go.
The standard measurements are best suited to North America and the metric measurements are best suited to Australasia and some other countries.
Let’s talk about the wood and sizes
The frame: I used treated pine (suitable for exterior use) for the frame with a stock size of 32 mm x 64 mm (1 1/4″ x 2 1/2″).
That means that the wood is 32 mm (1 1/4″) thick, and 64 mm ( 2 1/2″) wide.
If you are unable to source that stock size, or unable to obtain it by other means (e.g. by ripping it down from a bigger stock size), then use a thicker wood. However, if you do this you will also have to change the length of the bolts to suit, as well as the length of the longer seat panel and the tabletop panel in relation to the shorter seat panel. See Step 8 for more information about that.
The seat and tabletop panels: I used 140 mm (5 1/2) wide x 19 mm (3/4″) thick, tongue and groove boards for the seats and tabletop. Tongue and groove boards have a groove along one edge and a tongue along the other edge.
The tongue on one board fits snugly into a groove in another board.
Tongue and groove joints allow two or more boards to be strongly joined together to make a single flat surface.

Alternative stock: There are other alternatives, such as standard boards or decking boards. They will be dealt with in the appropriate step. Standard 90 mm (3 1/2″) wide x 19 mm (3/4″) thick boards (as another option) will be allowed for in the materials (shopping) list as well as in the plans in Step 8.
The materials (shopping) list
For the side frames you will need:
- 12 metres (40 ft) of 32 mm x 64 mm (1 1/4″ x 2 1/2″) stock, treated pine or other wood suitable for exterior use.
- 1.5 metres (5 ft) of 140 mm x 19 mm (5 1/2″ x 3/4″) stock, treated pine or other wood suitable for exterior use.
Note: The above allows for a bit of wastage.
Tip: Purchase the wood in the longest possible lengths to minimize wastage.
Alternative stock: If you are unable to source the above stock size, or are unable to obtain it by other means (e.g. by ripping it down from a bigger stock size), then use a thicker wood. Remember if you do this you will also have to change the length of the bolts to suit, as well as the length of the longer seat panel and the tabletop panel in relation to the shortest seat panel. See Step 8 for further explanatory details.
For the seats and tabletop you will need:
- 9 metres (30 ft) of 140 mm (5 1/2) wide x 19 mm (3/4″) thick, tongue and groove boards.
Or alternatively: you can replace the tongue and groove boards with –
- 10½ metres (35 ft) of 90 mm (3½”) wide x 19 mm (3/4″) thick wood.
For the armrest pad you will need:
- 1.5 metres (5 ft) of 140 mm x 19 mm (5 1/2″ x 3/4″) stock.
Note: The above allows for a bit of wastage.
Note: Use treated pine or other wood suitable for exterior use.
The materials (shopping) list is continued next page
The materials (shopping) list continued
You will also need:
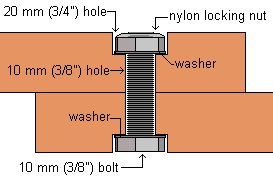
- Four 10 mm (3/8″) diameter bolts 64 mm (2 1/2″) long overall (the length of the thickness of two pieces of framing wood)..
Note: Usually the length of a bolt refers to the shank length only, that is, the head of the bolt is not included in the length. However, in this case the reference to the length of the bolt is ‘overall’, meaning it does include the head. This is because the head of the bolt is countersunk into the wood.
- Four nylon locking nuts.
Note: Each bolt is used as a pivot point for two pieces of wood, therefore the nuts cannot be tightened completely otherwise the wood would not be able to ‘pivot’ freely.
Because the nuts can only be loosely tightened (just enough to allow the wood to pivot), nylon locking nuts (or similar) are required.
A nylon locking nut is a nut that resists further loosening or tightening under vibration and torque. It has a nylon collar insert.
- Around 200 exterior type wood screws 50 mm (2″) long.
- Some exterior wood glue.
Shopping list summary: To recap, in all you will need:
- 12 metres (40 ft) of 32 mm x 64 mm (1 1/4″ x 2 1/2″) stock, treated pine or other wood suitable for exterior use.
- 1.5 metres (5 ft) of 140 mm x 19 mm (5 1/2″ x 3/4″) stock, treated pine or other wood suitable for exterior use.
- 9 metres (30 ft) of 140 mm (5 1/2) wide x 19 mm (3/4″) thick, tongue and groove boards.
- 1.5 metres (5 ft) of 140 mm x 19 mm (5 1/2″ x 3/4″) stock.
- Four 10 mm (3/8″) diameter bolts 64 mm (2 1/2″) long overall (the length of the thickness of two pieces of framing wood).
- Four nylon locking nuts.
- Around 200 exterior type wood screws 50 mm (2″) long.
- Some exterior wood glue.
The cutting list
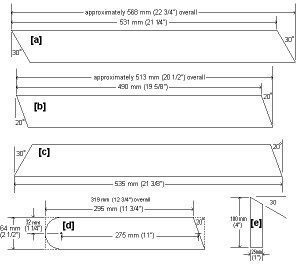
Out of 32 mm x 64 mm (1 1/4″ x 2 1/2″) stock, cut the following lengths:
[a] 2 @ 568 mm (22 3/4″)
[b] 2 @ 513 mm (20 1/2″)
[c] 2 @ 535 mm (21 3/8″)
[d] 2 @ 319 mm (12 3/4″)
[e] 2 @ 100 mm (4″)
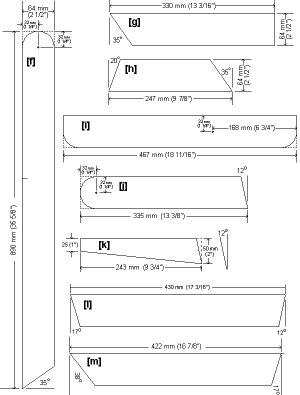
[f] 2 @ 890 mm (35 5/8″)
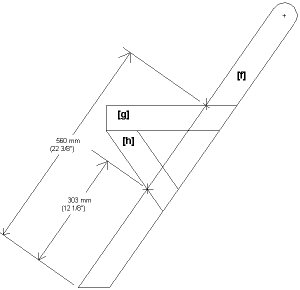
[g] 2 @ 330 mm (13 3/16″)
[h] 2 @ 247 mm (9 7/8″)
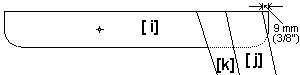
[i] 2 @ 467 mm (18 11/16″)
[j] 2 @ 335 mm (13 3/8″)
[k] 2 @ 243 mm (9 3/4″)
[l] 2 @ 430 mm (17 3/16″)
[m] 2 @ 422 mm (16 7/8″)
Out of 32 mm x 32 mm (1 1/4″ x 1 1/4″) stock, cut the following lengths:
[n] 2 @ 530 mm (21 3/16″)
Note: The above stock size for pieces [n] can be ripped (cut lengthwise) out of 64 mm (2 1/2″) wide stock.
Out of 140 mm x 19 mm (5 1/2″ x 3/4″) stock , cut the following lengths:
[o] 4 @ 325 mm (13″)
Out of 140 mm x 19 mm (5 1/2″ x 3/4″) tongue and groove stock , cut the following lengths:
[p] 2 @ 1010 (40 3/8″)
[q] 2 @ 880 (35 3/8″)
[r] 4 @ 1090 (43 5/8″)
Note: Some of the above tongue and groove boards (the pieces each side) will need to be ripped (cut lengthwise) to achieve the required widths.
Cut, shape, and drill the pieces
Step 2. Shape and drill the frame members
- Shape the frame members [a] to [m], as per plan drawings below and on the following page.
- Drill 10 mm (3/8″) diameter holes in pieces [d], [f], [i], and [j] with 20 mm (3/4″) starter holes to house the bolt heads and the nuts. Refer to the plan drawings below and on the following page for placement.
- The drilling procedure: First drill a 3 mm (1/8″) pilot hole all the way through the wood, then a 20 mm (3/4″) starter hole where required, and then a 10 mm (3/8″) diameter hole all the way through.
- Make the starter holes deep enough to house the bolt heads and the nuts.
- Use a drill-press to ensure best accuracy with the depth of the starter holes.
- Pay special attention to the drawings, plans, and photos, to see what side of the wood the starter holes go on.
Plans, the individual frame pieces
The individual frame pieces continued
Make up the smaller side frames
Step 3. Make up the smaller side frames
- Make up the smaller side frames according to the dimensions in the plan drawing below.
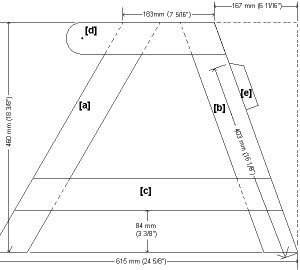
- The smaller side frames comprise of pieces [a], [b], [c], [d], and [e].
- Important! Make up each pair of frames so that they are a mirror image of each other. The same rule will apply for all the frame pairs throughout the project.
- Use two 50 mm (2″) wood screws at each join and pre-drill the screw holes through the top member.
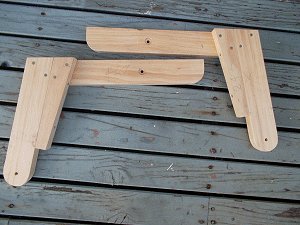
Fix the seat support pieces to the long legs
Step 4. Fix the seat support pieces to the long legs
- Fix the seat support pieces [g] and [h] to the long legs [f]. Two units in all, one for each side of the folding picnic table.
- Use glue and two 50 mm (2″) wood screws at each join and pre-drill the screw holes through the top member.
- Refer to the plan below for positioning.
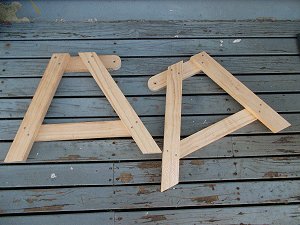
- Make up each pair of frames so that they are mirror images of each other. Refer to the photos below the plan.
Assemble the side frames
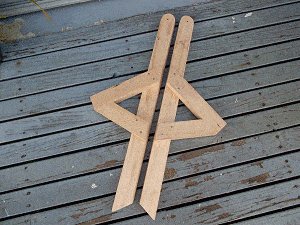
Step 5. Make up the two tabletop support units
- Glue and screw pieces [k] to pieces [j], and then glue and screw them to pieces [i] to make two tabletop support units.
- Use the plan below and photos for reference, and don’t forget to make up each opposing unit so that they are mirror images of each other.
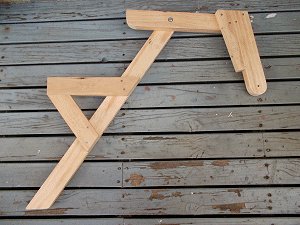
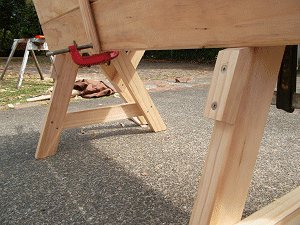
Step 6. Connect the side frames
- It’s now time to join the side frames together, which is really just a matter of aligning the bolt holes in pieces [i] with the bolt holes in pieces [f], threading bolts (with washers) through the holes, and applying washers to the other ends followed by nylon locking nuts. Then do the same to pieces [j] and [d].
- Refer to the photos for a bit of visual guidance, and ensure that one complete side frame is a mirror image of the opposite side frame.
Note: Each bolt is used as a pivot point for two pieces of wood, therefore the nuts cannot be tightened completely otherwise the wood would not be able to ‘pivot’ freely.
Because the nuts can only be loosely tightened (just enough to allow the wood to pivot), nylon locking nuts (or similar) are required.
A nylon locking nut is a nut that resists further loosening or tightening under vibration and torque. It has a nylon collar insert.
Prepare the frames for seat and tabletop
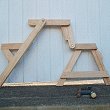
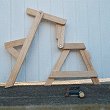
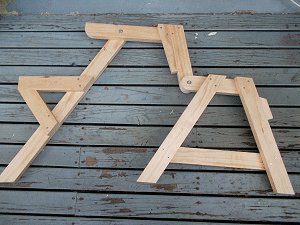
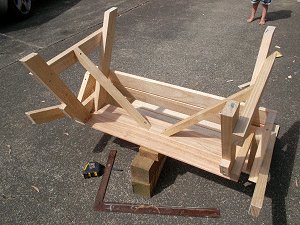
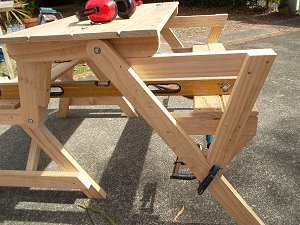
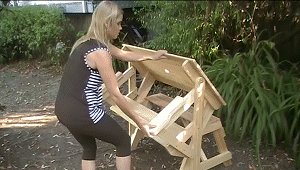
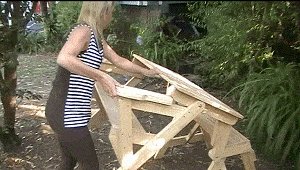
Step 7. Fold the side frames over to seat position.
- Fold the side frames over until the tops of the horizontal seat members [d], [g], and [j] are flush (even), and then apply a clamp to each side frame to hold it in that position.
Then place the side frames apart and parallel in readiness for the seats and tabletop. - Follow the sequence of pictures below.
Make the seat and tabletop panels
Step 8. Make the seats and tabletop panels.
- The size of the seats and table panels is crucial.
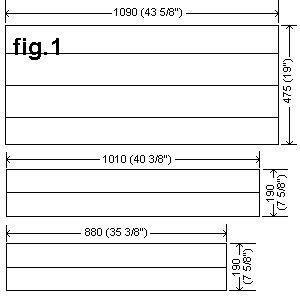
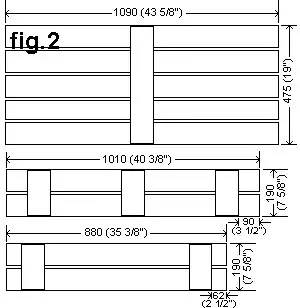
- The panel sizes are as follows:
- Shorter seat area, 190 (7 5/8″) x 880 (35 3/8″)
- Longer seat area, 190 (7 5/8″) x 1010 (40 3/8″)
- Tabletop area, 475 (19″) x 1090 (43 5/8″)
- The formula – The most crucial measurement is the difference in length between the shorter and longer seat, which should be the sum of the thickness of four side framing members. For example, the side framing members are 32.5 mm (1 1/4″) thick. Four times that is 130 mm (5″), which is the difference between the length of the two seats.
- This formula is worth considering if you want to make the seats longer, or use a thicker wood for the side frames.
- Below are the plans for the seats and tabletop. There are two options. The option used in fig.1, which is 140 mm (5 1/2) wide x 19 mm (3/4″) thick, tongue and groove boards, and another option used in fig.2 i.e. using 90 mm (3 1/2″) wide x 19 mm (3/4″) thick boards.
Note: The sides of the tongue and groove boards fig.1 will need to be trimmed (ripped down) to achieve the correct width of the seats and tabletop.
Fix and seats and tabletop
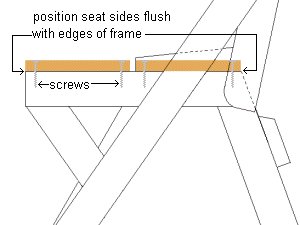
Step 9. Fix the seats to the side frames.
- It becomes obvious which seat goes where: the shorter seat fits in between pieces [k] with the back edge flush with the back of piece [d] and the longer seat sits flush with the front and ends of the frame.
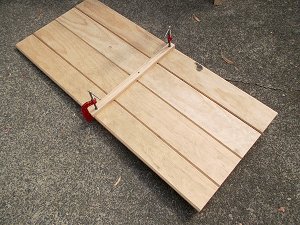
Step 10. Prepare and fit the tabletop.
- When the tongue and groove boards have been cut to length and the two sides trimmed to make a panel 475 (19″) x 1090 (43 5/8″), then join the boards together by fitting the respective tongues into the grooves. It’s best to hold them in place by clamping a batten across the middle of the panel until such time as it is firmly fixed in place.
- Then clamp the tabletop to pieces [i] (the tabletop supports) so the overhang is equal all the way around, and screw it in place.
Adjust the backstops and fix the bracing
Step 11. Adjust the back stop and add the braces.
- If need be, adjust the back stop [e] so it sits hard up under the edge of the tabletop.
You can then take any clamps off and turn the unit upside down, packed on blocks of wood (to steady it) in readiness for the bracing. - Out of 32 mm x 32 mm (1 1/4″ x 1 1/4″) stock, cut the following lengths: [n] – 2 @ 530 mm (21 3/16″). Cut a 45 degree angle at each end as shown in the drawing below.

- With the unit upside down, ensure that the two side frames are at right angles to the seats and commence fixing the two brace pieces [n] in place.
- Screw one end of each piece to horizontal piece [c] and the other end to the underside of the seat.
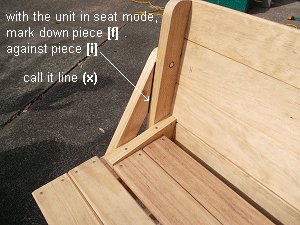
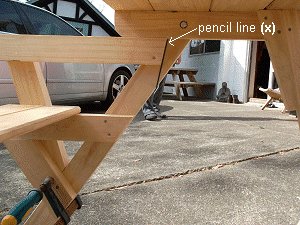
Step 12. Mark position for the armrest horizontal frame pieces.
- First, with the unit in seat mode, pencil a line (x) down piece [f] against piece [i] as shown in the photo.
- The unit must be in table mode for the armrest to be fitted, so…
when the unit is folded open to table mode, and the armrest frame is being fitted, that line (x) is the mark where the inside end of piece [l] will be positioned up to, and fixed. All will become clear as we progress.
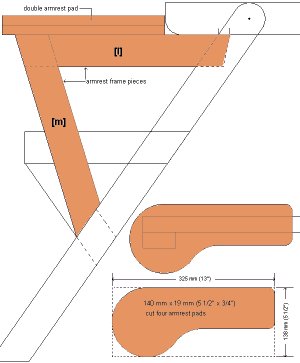
Plans – the armrest
Step 13. Fix the armrest frames.
The plans for the armrest.
Note: The dimensions for the individual pieces [l] and [m] are given in Step 2.
Make and fit the armrest frames
Make up the two armrest frames.

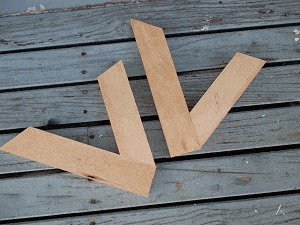
- Join pieces [l] and [m] together with glue and screws, forming two ‘V’ shaped frames.
- Ensure one is a mirror image of the other.
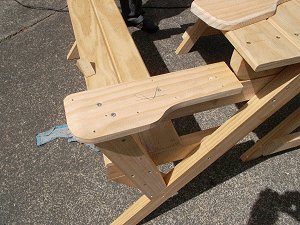
Refer to the picture. - Next fix the armrest frames to the longer legs [f].
Refer to the plans on the previous page for positioning, and the pictures below for visual guidance.
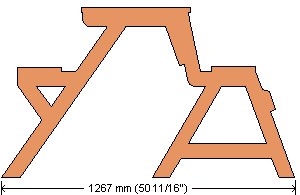
Important!
- Before fixing the armrests, ensure that the spread of the table is correct. The overall spread (longest point at the bottom, front legs to back legs) should be 1267 mm (50 11/16″).
- Also, the seats and table top should be on the same plane (level).
- See picture.
Notice (in the photo below) that the horizontal frame piece [l] is positioned directly under the tabletop support member [i] and the end is positioned up to pencil line (x). That is the pencil line we made in Step 12., when the unit was in ‘seat’ mode.
Make and fit the armrest pads
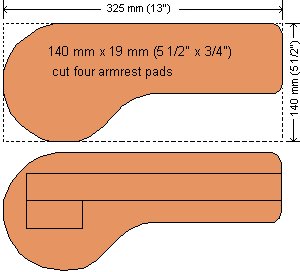
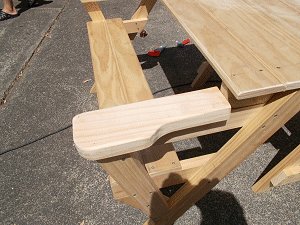
Step 14. The armrest pads.
- Out of 140 mm x 19 mm (5 1/2″ x 3/4″) stock, cut four pieces 325 mm (13″) long, and then with a band-saw or jig-saw cut them to shape as shown in the plan drawing.
- There will be four altogether, two each side. Each side has a double layer. This is so the first layer can be glued and screwed to the horizontal frame piece [l], and the second layer can be glued on top of that, and screwed from underneath – thus resulting in an armrest pad without visible screw holes or screw heads.
- Position the pads over piece [l] as shown in the plan drawing. Ensure that the narrow end butts up against the tabletop support [i].
Note: The armrest, as well as being for the obvious (to rest your arms), also serves another purpose. It acts as a brake to stop the table from spreading out too far.
Make the umbrella hole and more photos
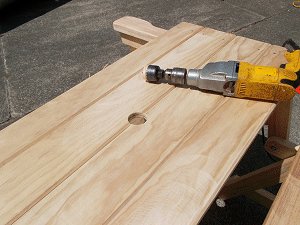
Step 14. The umbrella hole.
- Make an umbrella hole in the middle of the tabletop. Done!
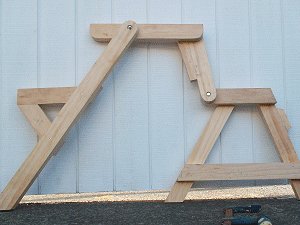
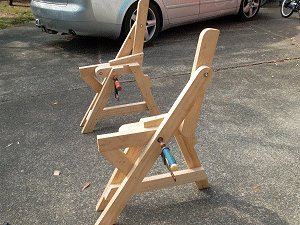
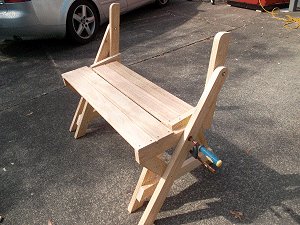
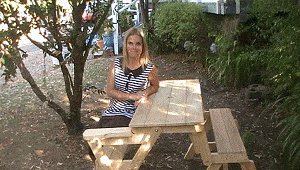
And some photos of it working


For the frame I used 5/4 x 6 pressure treated wood (actual 1.25 x 5.5). I don’t have a power miter saw so I cut each length with a circular saw then ripped into two identical pieces with a table saw. Cut the angles for each piece with a table saw. The top and seats are T&G pine. This may not hold up outside so I didn’t glue them. I can always replace them with the same pressure treated wood. If I do this I will edge dowel them together rather than use a rod or a batten as shown in the plans.
Thanks for the plans.
Reed
Beware – the cut list is converted to English units by dividing by 25, resulting in rounding errors. More accurate English units can be obtained by dividing by 25.4.